Description
About This Video
Transcript
Read Full Transcript
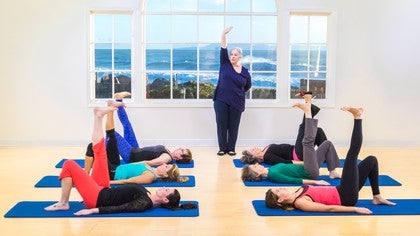
My name is Debra lessen and today we are going to be working on strengthening the intrinsic muscles of the feet. The feet are immensely important in providing the basis of support for our bodies when we are weight-bearing. Um, my mentor Karola treer did a tremendous amount of work on the feet and I'm going to share that with you today. So first I would like to explain proper weight bearing on the foot and if I could ask Candice to come up as our model, the weight of the foot has to be evenly distributed between the first metatarsal, the fifth metatarsal and the heel. Now if too much weight is on the first metatarsal, the foot and ankle pronate. If too much weight is on the fifth metatarsal, it causes us to Evart.
If too much weight is back on the heel, the toes either grip the floor or they come off the floor. And if the weight is too far forward so that there's not enough weight on the heel, then this transversal arch is not doing its job in supporting. So I want you to think when you're standing that the first line of defense for supporting your weight is this transfer muscle arch. The toes are like long tree roots, but we want to think of these mid foot bones as being the support. Now if this transversal arts is healthy, then we have a good support for the longitudinal arch.
And actually there are two of them. There is the lateral and the medial and both are very important. So the first thing that I would like us to do is a test to see how supple and strong the muscles that support this transversal arch are. And I'm going to ask you to get a piece of paper and a pencil and we will resume. I would like you to use your right foot and you are going to pick up your pen with the point of the pen toward your pinky toe and you're going to write your name on the piece of paper and then we can sit.
Yep. And this is something that Corolla had each new client do at the beginning of their first session script. And, uh, whatever, whatever you can do. And Ruth, you're cheating a little bit. You need to get it under all five too.
And if you find this cheating to help you to use the other no, that's, that's fine. If you find that it's easy to do with your right foot, then try with your left foot. Yeah, just remember to turn the pen around.
And I think that we are ready to go onto our next exercise failed at this and we will be using a squishy small ball. The squishier, the easier. What you're going to do with your ball is first massage under the Longitudinal arch, forward and back, and really give it your body weight so that you let your foot spread around that ball. Then you're going to roll back. So the ball is under the transversal arch and let your foot dome around the ball. Slide back just a little bit under the toes and you're going to grab the ball and try to pick it up. Now it doesn't matter whether you can pick it up or not, it's the activity of doming grabbing with the toes and lifting that strengthens the muscles underneath.
And if you can see all of these metatarsal heads sticking out, that's what we're working toward.
She does have a squishier ball. The harder the ball is, the more difficult it is to pick it up. Yeah. Okay. Now let's bring the ball back to your right foot and I want you to give some weight onto the ball under the metatarsal arch. Stabilize your heel and reach your big toe around the ball and down to the floor and then your pinky toe around the ball and down to the floor. So keep weight on the heel and big toe. Yes, the foot is going to twist and a little toe and big toe and little toe and really reach through your toe. Separate it from the pack and little toe and big toe and little toe once more big toe and little toe.
And let's change feet. So Candace, that ball is a little too squishy for you for this activity. So just don't give it too much weight. Okay. Under the metatarsal, feel that transversal arch dome around the ball and first come into the big toe and then out to the little toe and big toe and little toe. Stabilize the heel.
So you want to keep weight consistent on your heel and little toe and big toe and little toe. Get the tip of the big toe down into the mat and little toe or, or the corners of your mouth and big you have a right foot in the wrong foot, big toe and little toe and just roll your foot out.
Keep the toes moving and let the toes release. Now you can either do this just plain or if you want to ramp it up, we're going to put a theraband, a light theraband lengthwise. So we create a little hood and you're going to hold the top end with your outside hand and the other with your inside hand. Don't apply too much pressure because you may immediately cramp in the foot and then start the same way. Send the metatarsal forward, point through the toes, metatarsal his comeback, and release the toe. So let's repeat this three more times. Metatarsal is forward. Point the toes.
Keep the toes pointing while you bring the metatarsal back and release the toes and metatarsus forward. Stretch through the whole foot. Bring the metatarsal, his back. Release the toes. Last time metatarsal is forward. Point through the toes. Metta tarsals back. Release the toes and now everyone can keep moving with.
We'll drop her theraband so you can see. Now we're going to reverse. So point the toes, stretch the foot, bring the toes back and flex toes forward. Point through the foot. Bring the toes back and flex. So as your toes go forward, you're doming send the tips of your toenails out.
Bring the toes back and flex last time. Toes forward. Send the toes out and stretch through the foot. Bring the toes back and flex good and just shake that foot out. And let's go to the other side. So we're doing four of each, which is really plenty because you're working very deeply on these intrinsic muscles. Christy feels that it's more difficult without the band.
And this is a very interesting comment because when you use an implement to provide resistance, which we know very well about because we use springs there, the focus of the work becomes much more clear. So in other words, when you're using springs on PyLadies apparatus, they are literally telling which muscles should be firing. And then it's more obvious which muscles don't to be working. And we want to work as efficiently as possible all the time. So the theraband can provide the same thing for your foot, but make sure that you don't pull too hard on it or you're going to cramp immediately and not feel like you're getting articulated movement through your foot. It is giving it some support and targeting the work.
Okay, so let's start now on your left foot with or without your theraband, you're going to start with the foot flexed. Good. So you want that hood of the theraband to be over all five toes and metatarsal. It's all right. We're going to start flexed and send the metatarsus forward point through the toes. Bring the metatarsal back and you want to look for all those metatarsal, his head, metatarsal heads and release the toes.
Metatarsal is forward. Stretch through the toes. Bring the metatarsal back and release the toes. Metatarsus forward point. Keep lengthening the toes as you bring the metatarsal back and release the toes last time. Metatarsal tarsals forward stretch.
Bring the metatarsal back and release the toes. Now let's go directly into the reverse toes forward. Stretch through the foot. Bring the toes back and flex. Send the heel forward, toes forward dome and stretch through the foot. Bring the toes back and flex sliding the heel forward.
Dome and point. Bring the toes back and flex and dome toes forward and point. Bring the toes back and flex. Good. Shake out your foot. And now we're going to go back to the first side and we're going to use more of the foot. So now you're going to start with the foot flexed.
And think of bringing your pinky toe across. You're going to go to full point. Bring the big toe to the outside, diagonal and flex. Now establish center with your heel. Keep your knee facing directly up to the ceiling so that you know that you are just circumducting through the foot, but you're not rotating from the hip and you're not moving your ankle.
Okay, so little toe across. Point the foot, big toe across to the outside and flex the foot through center. Little Toe across and point big toe across and full x. Keep the knee vertical, little toe across and point big toe across and flex. Now let's reverse it. Take the big toe to the outside. Point through center, little toe across to the inside and flex big toe to the outside and point through center. Little Toe across.
Keep the ankle centered and flex and big toe to the outside and point little toe to the inside and flex big toe to the outside and breathe a little toe to the inside and [inaudible]. Excellent. Shake that foot out. Okay, now let's do the other foot. And if you would like to, you can do this with your theraband, but I suggest when you start these exercises don't work too hard because you may get really sore. Okay, so I leave it up to you. Okay. Start with the foot flexed. Stabilize your knee facing directly up to the ceiling and lets start little toe crossings inside.
Go through center full point, big toe to the outside and you're going to flex through center toe. Straight up to the ceiling, little toe across and full point. Big Toe to the outside and flex the foot. Little Toe across and point big toe to the outside. Good. One more repetition.
And now you can feel that you're using all of the muscles of your Shin. Good. You're using your calf muscles, you're using the muscles front side, back. Good. Okay, come back to your flex position and let's reverse it. Big Toe to the outside and point little toe to the inside and flex big toe to the outside and point to the inside and flex. Keep that knee facing up to the ceiling. Yes, you can hold it still if you need to do the inside and flex.
So if these muscles aren't used to working, it's might be tough to wake them up. Point to the inside and full x. Did we go both ways? Okay. And shake that foot out. Okay, excellent. Now I don't know whether you're aware of it, but when you really warm up and work your feet, you're getting much more feedback up through your leg and your legs are going to work much, much better. So what I'd like you to do now is lie down right where you are, Ruth.
You can just slide forward a little bit.
And again, don't give yourself too much resistance. So hold on. Anchoring your elbows down into the mat. Okay? Just the way we did that circumduction with the foot. I want you to cross your big toe to the inside and you're going to circle in center as you get to the bottom. Turn out. Oh, you can point or flex and center as you come to the top. So when your leg is vertical, your knee is facing you.
When your leg is straight down, your knees facing directly up to the ceiling. Okay, so let's start with the leg up and you're going to turn in to go down, come through center and turn out and come back to center. Turn in, turn the actual angle. Uh, no from the hip. So now we're turning in and out from the hip, good and down through center and turn out and center. Once more, turn in, center the leg, turn out, come to the top and let's reverse. Turn out to open down through center.
Turn in and up through center. Turn out and center. Turn in and up. Once more, turn out. Good. Turn in and up. Good. And you can switch legs if the foot may do the same action that you did when you were just circling through the foot. So sickle sounds like a bad thing, but in this case you're bringing that little toe across as you turn in and when you're turning out that little toe was going toward the floor. So yes.
So it's okay. Yes, no, it's fine if you take that movement the way through the foot. Okay. Think of your foot like a fan or like you're using a Japanese fan or I like to think of Flamenco hands. Yes. Okay, so let's start with the leg directly up to the ceiling. We're going to go inside first. Yeah, turn in down through center. Turn out and turn in down through center. Turn out and up.
Turn in, down through center. Turn out and up and you should be feeling nice and toasty around your hip joint and center. Now reverse turn out center. Turn in and up. Good down through center. Turn in and up. Last time.
Turn out down through center. Turn in and up. Good. And you can take off your theraband. Slide your legs down and just shake out your legs. Okay, now we are going to regroup if you have a small towel, a pair of socks.
Now is the time to get it and we'll resume with our next exercise. So the next exercise we're going to do is particularly good for those of you who proni and those of you who have enlarged first metatarsal joints, um, in which case you are bearing too much weight on that first metatarsal metatarsal. And we're going to try to condition the muscles to get you back to centered weight bearing. So just the front of the foot is on your towel. You're going to lift the forefoot, spread your toes, grab the towel dome, and now just slide your forefoot to the left as if you're wrapping it right around your own heel. Good.
Release the towel if the forefoot up again. Spread, grab dome and slide back in. Excellent. Again, lift, spread, dome and slide back in. Good. Readjust your towels. Let's do this one more time. So you should be also working very hard up through the inside tendons of the ankle. So lift, spread, Dome, keep the whole outer of the foot in contact with the floor. Good. Okay. Shake out that foot and let's go to the other foot.
So now you want your towel off to the left. Good. Okay. Only the four foot goes on the towel. So lift, spread, grab the towel dome and slide the forefoot in. Keep that outer edge of the foot in contact with the floor. Release it. Yes. And you may feel a difference from one foot to the other. That one, one foot is stronger or more facile.
Good and slide into the front of the foot. Good. Twice more. Center the foot. Release the toes spread. Grab look for your metatarsal heads sticking out on the top of your transversal arch last time. Release it. Spread. Ladies, this is wonderful to do. After an evening in high heels. Good. Okay. Shake out that foot.
And now let's go back to the first foot and we're going to do the opposite. So start with your towel toward the inside. Okay. Your forefoot will be on the right corner closest to you. All right. Now this is a little more difficult, but we're strengthening the same muscles. You're going to spread dome, slide the outer edge of the foot out, but that's it.
And now you'll really feel use the use of your peroneal muscles. Your knee can move a little bit. If you want to hold onto your thigh with your hand and stabilize it, that's fine. The outer edge stays on the floor. We were sliding in and now we're sliding out. Okay, so let's all start together. Start with the forefoot lifted. Spread Dome, anchor the heel and slide to the outside.
Good. And lift up center. Spread Dome, slide to the outside. Good lift, spread dome, slide to the outside. Last time, lift, spread, dome and slide to the outside. Good. Give that foot a good shake. And let's go to the other side. What is more important?
Keeping the outer edge of the foot and contact with the floor or getting more range of motion. And the answer is keeping the outside edge of the foot in contact with the floor. So over time, if you do these exercises, you will increase your range of motion. Okay? And I want you to think about, um, walking on uneven surfaces, even out on this beautiful beach and how your foot and ankle have to be able to adjust. And you know your brain does this automatically as you step on your foot, but the better condition those muscles are the least likely you are to injure. Okay, so we're onto the left foot now and you want to start with your towel in so you're on the lower left corner of your tail, right foot back.
Good. Lift the forefoot.
Good. Yes, you can stabilize your thigh with your hands. Okay. Lift, spread, dome. Good. This is a much smaller movement than the first exercise we did last time. Lift, spread, dome and slide to the outside. Good. And shake that foot out. Excellent.
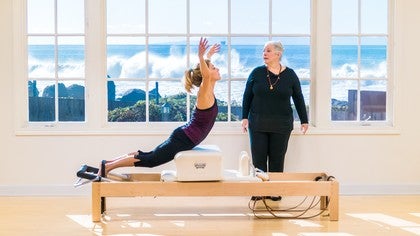
Okay. And now we are going to do our first weight bearing exercise and we're going to use a foot bar that Corolla had in her studio, which is designed for this kind of work. It has ample padding so that the metal tarsals are protected. It has a no slip surface so that it won't slide away from you on the floor. But at home, if you have a carpeted step, you can use that a phone book if you still have one or something similar that's safe. Okay, and let's move into position for our standing exercise.
We are starting with the whole forefoot on top of the foot bar. That means that you are weightbearing on both the first and fifth metatarsal on top of the foot bar. The big toe joints are together and the heels are together and you want to keep constant pressure between the heels so that the muscles of the back of the leg are actually wrapping around as if your back seams are coming toward each other. So the first thing I'd like you to do is just rise up. Good. Stay at the top, heels together, feel first and fifth metatarsal and slowly lower down only as far as you can without releasing the support of the muscles of the foot.
Good. Again, rise up, pressing the heels together and I want you to feel like the inner thigh is also pulling up and lengthened down, wrapping around and closing in the back. Good. Let's repeat this twice. More rise up. Feel the hamstring support and as you lower down, make sure that your pelvis doesn't hang forward so that you keep your vertical alignment. Now you're going to slightly bend the knees and let them turn out the heels. For most people will have to come off the the floor.
Roll up through the foot so the heels come high up. Stretch straight up and stay high in the upper body. As you lengthen down through the heels, bend the knees, keep lifting the weight out of the legs. Rise up right through the top of the head and lower down. Good. Twice more. Bend first.
Roll through the feet. Press high up and lower down. Last time. Bend knees open slightly so that you are wrapping and closing in the back. Roll up through the heels. Rise up and stay good.
And now we're going to reverse. Bend the knees. Stay lower the heels down. Lengthen in opposition so that you lengthen the whole body and press back up to Relevate and knees open slightly. As you bend
Okay. And now we are going to get a magic circle and repeat with the magic circle, which is going to change the focus of how you're using muscles of the leg. We are now going to repeat this exercise with a magic circle. Um, and when you work on your own, you can do it either with or without the magic circle or both. So let's get the four foot on the foot bar. Again, the magic circle will be just above the ankles.
All right? And don't start with so much resistance from your magic circle that you're unable to move. So now you're really going to work the adductors and also the outward rotators. So let's start the same way. Just rising up good.
And as you lower down, send the heel straight back and you want your ankles pulled up evenly inside and out and rise up. Good. Feel first and fifth metatarsal and send the heel straight back. As a matter of fact, outer edges of the feet parallel to each other. Good and rise up and lower down. One more time. Rise up and lower down and we'll go right into the rolling through the foot.
So bend the knees, the knees open slightly towards your pinky toes. Roll up through the heels. Stretch straight up. Stay high in the upper body and lower the heels straight back down and bend the knees slightly. Turning out. Roll up through the heels. Stretch high up and lower back down. Feel the hamstring support constantly. One more time.
Bend the knees, roll up through the heels. Stretch high up and stay. And now we're going to reverse bend the knees dome to bring the heels down, stretch through the legs, keep supporting from the bottom of the foot and rise up and bend the knees dome to bring the heels down and feel like they're coming into your foot bar. Stretch up through the inner thighs up into the abdominals and rise up. One more time.
Bend the knees dome to bring the heels down. Support from the sole of the foot. Pull the ankles up as you straighten and rise up. Good, and you may come down. Remove the magic circle and shake out your lower legs and feet.
Good. Okay. Now if you are very strong, you want to try to increase your strength. Ruth, could you demonstrate so we don't need the magic circle for this and you're going to face the window. Okay? Now you're going to be just on the right foot. Keep this foot parallel actually perpendicular to your foot bar.
You're going to use the other foot pressing against the heel so that this heel that you standing on doesn't come in towards center. Good. Now bring the pelvis right over the ankle and you're going to rise up to Relevate and lower back down and rise up. And by pressing this foot against her standing leg, she's also really challenging her inner thigh. Now you're going to bend the knee, roll up through the foot, stretch high up and lower back down. And we'll just do it one more time because this is new for Ruth. Bend the knee.
Open that knee slightly. So you're wrapping around, closing in the back and rise up and lower down. And now we'll reverse rise up. Bend the knee just slightly toward the pinky toe. Reach the heel straight back and stretch the standing leg and rise up. Bend the knee lower dome to bring that heel in and stretch the leg.
And thank you, Ruth. That was beautiful. And everybody come and try on the other side. So we're going to stand on the left foot. Oops, sorry. Okay, you're going to use your right foot against the inside of your left ankle for resistance. That's it. Really. Press your right foot against your left ankle. So you're going to bring this split all the way into the inside to the inside.
That's it. Okay. All right, so we're starting with the heel down and rise up. We're just going to do twice rising up and lower the heel down and feel your hamstrings helping to support your body weight and lower down. Now we're going to bend the knees slightly out toward the Pinky toe. Roll up through the heel. Press that right foot against your left ankle bone. Stretch straight up and lower straight back down and bend the knee.
Roll up through the heel. Excellent. Ladies, rise up. Let's reverse. Before you lose steam, bend the knee, send the outer edge of the foot straight back straight in the standing leg and rise up through your inner thigh and bend the knee. Heel under dome. Good stretch and rise up. Good. And come down and shake out that leg.
Excellent. Okay, and we are going to grab our magic circles one more time. Okay, so let's now do the same exercise we did parallel with the magic circle turned out and you'll need to go toward the ends of your foot bar. Mild turnout is fine, don't force it. And you'll feel that this is even more work for your abductors and now a lot of medial hamstrings. So start straight, legs, heels low. And let's just go straight up. And as you lower wrap the backs of the legs toward each other and press higher and lower back down. Now, small ple, a knees open toward the pinkies. Roll the heels up.
Stretch high up, and reach the heels down. Good bend turning out. Roll up through the heels. Rise up, and you want to feel that you finish high up under the buttock and lengthen the heels down. Good. One more. Repetition. Bend the knees, roll the heels high up, stretch, stay high. And now we'll reverse bend the knees, heels, lower, stretching, opposition, heels down, head rising up and rise up. And bend the knees, lower the heels, stretch and rise up.
And bend the knees, lower the heels, stretch
Pilates Legacy Project: Carola Trier Practices

Mention
 |
Deborah Lessen (Teacher) |
 |
Peggy P |
 |
Cher |
 |
Justy S |
 |
Vanisha T |
|
|
Lori |
 |
Niedra Gabriel |
 |
Amba Loudon |
 |
Bonnie H |
|
|
Violet M |
|
|
Janie J |
 |
Kristi Cooper |
|
|
Leslie S |
|
|
Laurie H |
 |
Karen A |
 |
Myriam Kane |
|
|
Celia C |
|
|
Dolly K |
 |
Idrienne S |
 |
Laura G |
|
|
Sharayah C |
 |
Inma F |
 |
Piera B |
|
|
Cindy W |
 |
Arielle B |
 |
Hannah M |
|
|
Louis R |
Comments


Louis~ I am sorry that you experienced problems with this video. It played through fine to the end in Auto-Detect for me. I would recommend restarting your computer and watching it in Auto-Detect or Low video quality. If you choose Auto-Detect, you can fast-forward to the spot where it stopped for you without waiting for it to load. If you continue to have problems, please email support@pilatesanytime.com and we will be happy to help.


Deborah Lessen Pilates


Idrienne
You need to be a subscriber to post a comment.
Please Log In or Create an Account to start your free trial.
