Description
About This Video
Transcript
Read Full Transcript
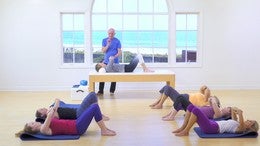
Uh, this is the second in the series. We're going to just move it up a notch or two, but I always start in the same position. I always start with a mat, work in this semi supine position to remind ourselves where it's all going to come from and always think of this, not tightening but narrowing of the waist. It's just tightening about which works the abdominals much more successfully than pulling the navel to the spine. I used to tell people to pull the navel to the spine, but what I found is that we're trying so hard in the beginning that they were doing a slight tightening of everything. Whereas this, it's like squeezing a tube of toothpaste. If you narrow the waist, the spine elongates rather than thinking of pulling it. So if you'd like to lie down in your semi supine position.
Does it? Just that feel better when we do the higher pelvic tilts, if you take that away from your head, okay. Take it from behind your head. Okay. Think of where your feet are. Parallel feet in line with your hip joints. A 90 degree bend. Think of that triangle on the feet. The apex is the front of the heel, the bases across the metatarsus.
Think of your pelvis again, this triangle from the coccsyx up across the top of the hips from your tailbone. Let's have the legs a little further away. Okay. And think of Bay wide ribs at a match. Just relaxed ribs down onto the floor so the ribs are touching. Just imagine this. Someone has gently pulled your head away from the torso. Just feel that someone's taken their head bay gently and elongated and Elvis slightly bent.
Just think you're lying on a nice, comfortable mattress. Everything's gently into the floor. Close your eyes. Take a deep breath in through your nose. And now as you breathe out through your mouth, just gently feel your narrowing the waist. Imagine that belt tightening. So everything is pulling into the center and then relaxed.
Breathing in and breathe out and narrow. Now as you're narrowing your waist, still feel that sensation of the head being gently pulled away from this torso. Breathe into your nerves and then breathe out through the mouth knowing the waist. There you go. Good. That's nice. Breathe in and breathe out. One more time. Breathe in and breathe out and pull. Pull down, pull, pull, pull, pull. Pull. One more notch on your belt. No, don't tense. Just gently pull. There you go. That's it. Good. Okay. Let's just do what we call a pelvic rock.
So it's just a very small pelvic tilt and then an arch. So your pelvis is rocking back and forth. Just in your own time. Just a nice loose, easy position. Don't think of any. Just breathe, but don't think for breath with the movement and then arch the other way back the other way. And so the back touches and the back comes off just almost as if there's a wind moving your pelvis back and forward. So curl and arch, that's it.
So it's just mobilizing the lower back a little more. Try not to think about it quite so much. There you go. And Zach and up and that at. That's it. Okay. Undressed. Okay. Take your head, your head. Rest away from that. Just move it out of the way. Arms by your sides.
Now we're going to do a pelvic tilt up onto your shoulder blades. Just just not above the shoulder, but so the blades are still on the bed, but almost off. So take your breath in as you breathe that stabilize and curl the spine up. Think of it rolling into a ball. As you go up, think of the tailbone coming through towards your neighbor, keeping your knees in parallel. Breathe in the air and now slowly go down from the front of the torso hollow.
Just soften the chest, soften through the abdominals, pull the navel down full, right down to the bottom of the torso, right down to the pubic bird. Breathe in and breathe out and curl. Remember to initiate with the narrowing of the waist, keeping your legs in parallel. Hold their breathing in and slowly breathe out here first. Pull in slowly, slowly so you feel the muscles working right to the bottom.
Paul Paul, Paul, Paul, Paul, Paul, Paul, and curl up. Breathing out. Now this time as you breathe in, bring your arms up to 90 degrees, palms facing each other. Now as you breathe out, rich your fingers to the ceiling, pulling your shoulder blades away from the floor as you rolled on. Hollow out the front of the torso. Keep pulling up with your palms facing each other and then put the shoulder blades back into place and bring your arms by your sides and breathe out and curl. Curl up.
Bring your arms up, breathing in, palms facing. Now reach your fingertips to the ceiling. Pull the shoulder blades away as you rolled on, curling through the front of the torso as you go down. When your pelvis is done, put the shoulder blades back into place and bring your arms back down and breathe out and curl. Think of rolling the spine into a ball as you go up, rather than just lifting your pelvis and stretch your fingertips to the ceiling and soften through here and now.
So it really gets the muscles between the shoulder blades working a little more, but you have to make sure that although you're stretching up like that, you need to pull your arms back into place before they go onto the floor again. Okay. The same position we're going to do a chest lift. Can you interlace your fingers and place them at the base of the skull with your thumbs going down towards your shoulders and have your Elbers up so you can see your elders in the periphery vision. So in this position, you're not flat like that. You're here. So I can just see my elders. So I take it, just watch for a second. I take a breath in. As I breathe out, I pull everything together here first and then keeping my skull pressed into my hands. I lift from my breastbone so I'm not pulling my head forward and keeping the neck very long all the way. Okay, so bring your elbows up so you can see your elbows. Just see them.
I feel the weight of your scar into your hands. Take a deep breath in, stabilize through your center and slowly breathe out as you lift your breastbone forward. Chin away from the chest, Chin away. And then slowly go back down. Breathing in. Just imagine a string on the middle of your breastbone, pulling you forward and breathe out and curl. Watch the Chin and then slowly go back down and breathe out. Stabilize and curl. And then Dan, okay, a long, slow outward breath and the game.
Breathe in and breathe out. There were only one loud, one chin in this exercise. So none of this shit. Keep it open. One more time and stretch. And then uh, one last one.
We're going to make it a little harder. Okay? Come forward just the same way. Breathe out as you come forward now as you breathe in, slide your hands off your head and reach your fingertips towards your knees. Come up a little higher. Hold it. Place your hands back behind your head. Smile in this position and then go back down and again and breathe out and curl forward. Slide your hands off. Show the bait out.
Now reach. Come on, reach, reach, reach, reach, reach, reach, reach, reach, reach, hold it. Place your hands back and then down. Very nice, very good. Shake your arms out for a second. This position you're going to place. I'll do it this one hand behind the head, the same as you did, but instead of having your arm stretched out to do this position, you're going to bend your elbow and make a fist with the fist turned away from you is this. If you're looking at your watch in this position and it stays there in the center of your of your torso, you take a breath in. Then as you breathe out, you draw the stomach muscles towards each other and turn towards your left elbow with this position, the towards the bent elbow.
Hang on for a second. Wait. [inaudible] you're here so you go that way, but hold the fist in the sense of your stem all the way. Let's start again. Now the fist is there so it stays roughly the center of your sternum where w we are all in the position. There you go. Take a breath in. Now this stay still it. The arm stays there. Take a deep breath in. Stabilize.
Now lift your sternum and turn, turn, turn, turn, turn and turn center. And then go down and breathe out. And lift, lift, lift, lift. Drop the shirt off the shoulders. Come up, up, up, up, up, up. There you go. And slowly go back down. Good. Hmm. Try and get the shoulder off. If it doesn't come off, it doesn't matter.
To begin with this up, up just a little and turn 10, 10, 10, not too much, not too much, just to left there. So you're feeling the work into here. Okay. And then slowly go down. One more time. Add to 10 and dad and other side. Now this is a, I hate to tell you, but I t this is a slight cheat forward. Turn in this position. It's turned straight away.
So you're coming up rote with the rotation to the other side. Breathe in and add and relax back down, breathing in and better. And breathe out. Keep that shoulder blade down as you turn and reach. Lift, lift, lift, lift. And uh, and that's true. You're a match. Good. One more time and breathe out. And straight curve and a nice, okay. So remember the whole idea is what happens.
What we used to do, we used to do it like this and all I got was people just sliding the shoulder blade forward. So they got away with it. Sort of quite a nice looking cheat. But here it stabilized the s the scapular and it moves you in the torso. So it keeps the shoulder in place come up onto the table. Or do you just watch this? Can you lie on your stomach? Let's just rest your arms. Bio s bend your elbows and place the hands, the forehead down onto the hands. Okay. Work into this prone position.
If, if you're going to lie in this position for too long and someone has a bit of a curvature in the lower back, I tend to put a pillow under the abdominals to support it. So it is held so they didn't have to worry about keeping the lower back in place. Okay. And then again, if they're very tight in the shoulders, I'll put a pad under here. So it's a reasonably comfortable position. So what we're going to do, you remember when you were standing up squeezing here when you were doing the balancing thing. We're gonna do it lying down, but I want you to just watch what's happening here. Just look at the the body as we do it. So take a breath in and then as you breathe out, think of squeezing from the top of the leg.
Hold it, and then relax and squeeze. Do you see as she squeezes a slight length thing of the lower back, which means the stomach muscles are lifting a little and that work is into the top of the hamstrings as in the glutes. Okay? So what not tucking under that. We're just getting a gentle elongation of the lumbar spine. Yeah, it's that feeling happening and that which means the stomach muscles will lift.
Okay? So we're gonna do that. But just imagine that you've got a Kebab stick sticking through your, the from the, from the top of the leg, which will bring it together. Okay. Or whatever imagery you want to use. All right. After that, these muscles are very important for stabilizing your pelvis. So we're going to do it quite slowly at one at a time. So it's not a kick, it's a bend. So as you breathe out, you're going to slowly back keeping the knee down.
You're going to bend your knee to 90 degrees and then straighten it. So you're working this muscle group, the hamstring group. So we'll do it on one side and then the other one. Okay. You then bring your arms by your sides. Let's just your nose hovering to the mat.
We'll do what what we call the Arrow. It's sometimes called the dot, or it's this slight thoracic lift. So what we do is from here, you take a breath in first. Then as you breathe out, you slowly float your arms up to about the, then as you breathe in, you draw the shoulder blades down and lift your breastbone off the ground. Little more, a little more. That's it. So just get the work here. Then you stretch your hands and rotate the palms out of towards pulling down on the side there.
So you get much more work on the sides here and then relax back down. Let's do that again. So you breathe out, float your arms up, gently draw the show, debates done, and then lift your breastbone breathing in. Let the head come up in Lyon. Stretch your arms and rotate. Breathing out, feeling the pull down, and then relaxed. Breathing in. Okay, should we try that?
So lying on your front, let's have the heads facing into the middle. That's good. Rest your forehead down onto your hands. Parallel legs, soft, easy feet, a net position. Just gently feel the shoulder blades drawing down. Don't overwork them. Just feel the, is it gentle? Drawing down the shoulder blades.
Okay, take a breath in. As you breathe out, just feel that squeeze the top of the leg so it's gain your feeling of knowing the hips, but you're working more from the back of the thighs. This time, just relax to here just a little bit more. Let it go down. That's it. Hold it for about four cans and then relax back down. So breathe out and squeeze. Sit, hold. And then breathe in and relax and breathe out. And squeeze that as you're squeezing.
Just gently draw the shoulder blades down and relax because the feeling of land thing that our back is connected to your shoulder blades as you do it and squeeze. Think of the elongation of the lumbar spine, but remember it's not a tuck under, it's just an opening of the lower back and relax. Okay. This time squeeze and that go 50% so you're not completely let go about 50% take a breath in as you breathe out slowly bend your right knee, soft, easy foot. Don't flex or polling just easy foot and then breathe in and straighten it. That's do four on the right and four on the left, so all on one side. Then on the other, keeping the pelvis absolutely still as you do it and making sure the leg is completely parallel
Keep your foot face soft. When you come up, just let the foot go. Just easy foot.
Not touching the floor. Palms facing upwards. Take a breath in. Now as you breathe that, gently lift your arms up. So this slightly higher than the hip bones. As you breathe in, draw the shoulder blades down and lift your breastbone off the ground.
And then relax back down, breathing in and breathe out and float your arms up. Uh, feel the top of the head is just gently stretching away from this torso. Breathe in and lift your breastbone and draw the shoulder blades down. Stretch your arms and rotate. Still feeling the top of the head going away. And then dad and relax back down and uh, float your arms up, breathing out, pull the shoulder blades down and lift your breastbone up just to there.
That's fine. Yeah. Now stretch your arms and rotate and pull the shoulder blades down just a little more. And then relax back that last one and float your arms up. Draw the Scapula, Don. Just lift your breastbone a little. That's it. Breathing and not rotate your arms and reach away. Rotate the other way. That's it. And pull down through there, but keep it look quite low.
That's nice. Okay, so you feel more into this part of your back and relax back that good. Sit up onto your hands and knees. Just come up on all fours and sit down towards your heels. [inaudible] and then stretch out again. What we're going to do is like a very slow swim.
All right? So just watch for a second. You're stretched out in this position as you breathe in. So y'all, you start very long, so you start straight out. You don't have to stretch while you're doing the exercise, so you're not reaching with your arms. You're long. The shoulder blades are done. As you breathe in, you just float your right arm and left leg and then, uh, to go down, breathe in other side and then done. So it's not a high lift. It's elongation with the spine stretch. So right arm, left leg, left arm, right leg. Breathe out. Sorry. Breathe in and lift.
Breathe out to go down. Now feel where your shoulder blades are like you did in the last exercise. I want four on each side and the nose is just [inaudible] off the floor. That's it. That's nice. I wanted to see your ears on this. Come on down, Brittany. That's it. Yeah.
Now do it. There you go. That's it. Okay, so we have this openness there. You can lift your head slightly.
What I want you to think about is just floating so I'm already stretched. So you're just let you don't reach away. So that's better. Yeah, keep this lens through the, the back of the neck and then when you've done that, sit up and stretch your back out. So that's how you're pulling your shoulder blades down and you're not really reaching. Exactly. So you're just lifting with the blades in place. Cause if you're just, if you do that, you're just getting this feeling of this happening and it's nothing. It's a bit like what we're doing with the arm that you have the arm in place as you do it. Okay? Okay.
On your back.
Pressing your hands onto the floor so you breathe out and go over, breathe in and come through the center and then breathe out to go the other side, keeping the shoulder blade down. You can turn your head in the opposite direction. As you go over to one side, just gently turn your head to the other.
And back. The shoulder blade. Stay old habits die hard, don't they? [inaudible] if you let in your waistline as you're doing that, if you that working through here. Good. Just one more to each side and then take hold of your knees and just gently pull them towards you.
Do you understand what I'm saying about the the tabletop? It's not my idea. I was working with good friend of mine, Madeline Black, who I'm sure you've seen. She said, she kept saying that she found that the tabletop caused a lot of tightness in the hip flexors and the soon, and I agree with Anne, as soon as I've started doing this with my people that we've stopped the tightness through here. I mean obviously this still use but it's not so gripped. Okay, this is the traditional tabletop and that's the one we're going to use. Kay, right, sitting up, very straight. Stretch your arms out with your knees bent. So take a breath in.
Now as you breathe out, really feel this wrapping around here and slowly, slowly, slowly, slowly, slowly. And I'm going to fall over. Go into the floor all the way down and then just pick yourself up any which way you use your hands to pick yourself up, stretch your arms out, feel as if someone's holding your arms, holding your hands, keep the scapular don redone and now slowly, slowly, slowly, slowly roll done. Keep the head forward, head's too heavy to go back. Use the stomach muscles all the way down and then up this time. So don't go down. Now when you get onto your lumbar spine there, bend one knee up.
Take her to your ankle if you can. If not the knee, we'll do take the other leg up and then do the single leg stretch freed into change and then breathe out to stretch and reach. But making sure that the knee does not come above the law rib cage, so it's not, yeah, I don't want this that easy. We could do this forever. I want the energy to go that way. So it's as if someone is pulling you forward so you have to hold that as you straighten and change. Okay? So stretch your arms art now, Slowly Roll Dad until you feel the lower back into comfortable position on the floor.
Now Bend one knee up and take hold of your knee or your ankle and the other leg up and take hold of the knee or the ankle. Depends where you can reach. And now breathe out and stretch. Breathe into change and stretch slowly, slowly, slowly, and reach and stretch and stretch. You're going to hold onto the ankle, outside, hand to the ankle, inside, hand to the knee, and change and change and change. There you go. And Change. Ah, there you go.
But what I want you to think of doing is just be in that position and change and change and change. And there you go. Okay, good. Addressed. Did he see, just watch what I did here. Can you, do you get, can you mind do it again? Doing it again. A good way to come up onto the top here so we can see. We'll just, we'll start in this position. Hold onto your ankles, ankle, both ankles.
Now the idea is to hold this position and you stretch this leg. Leave this one, this leg out and take hold of this knee. But what people want to do is to pull into this position. So if you think of your elbows being gently lifted out to the side, which will bring us as, soften the chest and bring your head forward. That, there you go. So you hold that position, change legs and arms, breathing in and out and change. That's it. Good. One more time. It's a, there's a reason for doing this because if you've got your head, even though you can lie, place your hand here and your hand here.
Now if you put pressure onto your hands like that, you keep the leg parallel. If you have this, this and you pull on that hand, you get a twist in your knee. So it's really to keep the legs absolutely straight. But if you can't reach your ankle, it doesn't matter. You can hold onto the knees like that. So there's not a problem. Okay?
Okay, thank you.
Now I want you to sit on the end of your mat with your legs
So you right on the edge, that's it. No, you don't have to open the legs quite so wide. You can, that's fine. It's fine. So what you're going to do here, you're going to focus on the inside of your thigh and as you breathe out, you're just going to slide the leg across, keeping the hips square all the way, and then back right across and then back. Quite slow, slow to come across the center line a little quicker as you go back to four on that side, and then have the leg very, very slightly outwardly rotated and draw up the strong muscles as you do it. Now bend the leg closest to the camera, place the hand behind and hold on and a slight curve. Now just imagine there's a slight resistance as you go across, so you're concentrating on keeping the hip completely straight. Sorry, I'm in your way. And then back. Draw up the style muscles as you do it and feel you're lifting out of your hips and the hip. This pelvis should stay square all the way.
What else do you feel when you do this or you're obviously feeling the inner thigh working. What else do you feel? Feel in the tummy. That's good, but another thing, what else do you feel it stretch out in the outer so you feel a stretch on the outside of the leg. And why I like doing it this way is you get a much bigger movement. There's a bigger range movement to get the leg working and one more too. It's on this side and then we're relaxed.
Shake your legs out, stretch your mats out. Again, just unfold them so as not to confuse me on this. We'll all lie that facing that way on our left side, facing that way in a completely straight line, lying on your side, not a stretch your arms out so you make yourself as long as possible. The bottom arm, you can turn the palm over and stretch it away from you. Turn the pump over onto the floor so you can use the palm as a sort of support. Place your right hand in front of your breastbone with the fingertips on the floor, not the whole hand.
And I want the shoulders stacked and the hip and the hips stacked on top of each other and the feeling of drawing the stomach muscles in rich of toes away from you. And I want you to think of your top leg resting on the bottom leg. So the top leg is not going to do any work. So take a breath
As you did on that earlier exercise, lying on your stomach. And as you do this, just think of the head coming away from your arm, from your arm, just a little as if you are listening to your arms. So the head comes up just a little. So the top of the head is stretching away from your feet and lift and you should feel that through here and dad, but it's the same feeling of what you're doing earlier when you were pulling your tightening your belt around your waist. And one more time.
I think this is about six and low down. And let's swing around to the other side with your head. Yeah,
Draw everything together, the latch wrapping around, long [inaudible] legs and I breathe in and lift the legs and draw the scapula down and bring the head up just a little and then breathe out to go down. Draw the tummy in as you do it. And lift
Now as you breathe in, you're going to reverse. It's your work from your pelvis and then middle and then upper back. And think of lifting your sternum away from your hands, pulling the shoulder blades down gently and curl up pelvis first. Stay this, that, and the pelvis. No round the back and lift and drop. Have you hands underneath your shoulders.
Now keep this curve now from the pelvis only. So start pelvis, middle back, upper back, but not too deep into the back and curves. So the spine is moving, it's undulating, it's sequential. Rather than going into the positions, drop the blades down and uh, from there, just tip the pelvis. That's it. Yeah. Tip the pelvis a little more and lift your sternum up, but not the head's much. There we go. Now pelvis first colored under and then roll up and drop the head one more time and cut up and a little more work in the pelvis. Tip the pelvis, tip the pelvis. That's it. Yeah. And now go into here and lift.
Good, good, good. And sit back towards your heels and stretch your back out. Just hold that position. And s. Let the feel that there's a weight on your tailbone. Do you're stretching your lower back.
Take a deep breath in and breathe out and stretch. Okay. From that position, come up onto your knees and up straight. Take one foot in front please. Your hands onto your knee and just stand up. End Up straight. Good, right standing by straight feet. They slightly actually rotated. Bring your arms up and stretch really rich your show. Let your shoulders go into your ears.
Go on and showed us into your ears, into your ears, into your ears. Slide them back down where they belong and lift up again, rich, rich, rich, rich. And then bring your arms all the way down and again, lift up, reach up, reach, slide them down,
And then stretch, lift and stretch. Look down in the opposite, in the direction you're going. And then come up, place your arms by your side, class your hands behind your back, and they're just reached back with your hands and pull the shoulder blades together and then stretch and come back to the center. Just slowly go down. Bend your knees if you need to. Take a breath in here and now just slowly think of what's happening to the back of your legs as you come up. Draw the stomach muscles up so you're stacking your vertebrae, one on top of the other.
Draw the shoulder blades down and just feel the top of the head going up to the ceiling as the shoulder blades slide down. Thank you very much. That's very good.
Comments


I like in shoulder bridge thinking about abdominals moving more than vertebras


You need to be a subscriber to post a comment.
Please Log In or Create an Account to start your free trial.
