Description
About This Video
Transcript
Read Full Transcript
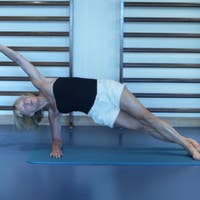
Welcome to our fundamental polarities class. So my name is Malcolm and we are to be focusing on the fundamentals. For me, what this means is if you have experience, you bring it back a little bit from the push and you focus on technique subtlety. So the label may not be the most dynamic. It may not be the most superficially aggressive that gives you the chance to get into your body and recognize where I'm at today. But we also have our good days and bad days on the bad days.
We need something we can achieve. Yes. Um, that means ultimately that takes awareness and skill. So for me, this, sometimes these movements, you may not get them the first time, but the repetition means you should get what's happening anatomically deep within the body. That doesn't sell very easily, short term. So when you're doing these movements, ultimately you're gonna think about method, the principles, and we're trying to lay those principles don't in the preparation phase, when the preparation phase takes place, it's about the main connection to the body and laying down the foundations of the method. So for that, we're going to be standing now the fetal alignment beneath the hip joint. Yeah. All of this is about rebalancing the body, so we want the muscles in the front and back to be working together. The muscles and the inside and outside to be working together in harmony creates a healthy body so the bones can line up properly, so that's what we're looking for to relax those legs. If your kneecaps are up, you're working with the wrong tension. The uterus relax. The quarters that let those kneecaps drop, it doesn't mean a squat. Okay?
From there, we need to just lengthen up through the body, krone the head, long to the ceiling. A lot of people will push the Chin up and create tension in the back of the neck, crown of the head, and that feeling of length is going to be your friend through the whole class. Whenever you think about anything, start as my spine feeling long and open. We're going to move into the shoulders. Just give them a little bit of a rule for me and we always, I always roll forward, up and open.
Most of us spend our life crunched forward texting. I'm trying to get a lot of my clients to text this way so they can drop the shoulders down. So roll up and over. I mean, you can imagine walking down the street this way instead of this kid that roll going, you're going to clunk and click a little bit. That's good. That means something's happening in there. But now up to the ears. Let them drop one more time. If that drop hurts, you can ease them down. And I try and visualize the Scapula, like two little lumps of butter, gently melting. Well, if it's in a warm space, it might melt a bit too quickly, but they're just gliding down in the back. Good stabilization is a marathon runner, not a sprinter.
So I want to think the amount of connection to the muscles that draw the scapular down are going to be keeping you going for a marathon, not for the sprint. That connection we call the soft v. So whenever I say set up, your shoulders are soft V, it's that gentleness. You're going to challenge that, but that's going to be superficial muscles. This is deep. That should also allow you to open the chest up a little bit without pinching their knee. Chest needs to be often cause we're going to work on our breath.
So remember Belarus breath. The number of times people don't know why they're breathing, the way they are is the training breath. If you breathe into the front, you change your spine alignment. If you breathe into the belly, you change your center. One of the main principles. So we do natural thoracic. So take one finger and find your bottom rib on the other side. Take the other finger, find the other bottom rib. Now, if this isn't comfortable for you, then you can always put your hands here. But this position here, this last four thoracic breath is key to the method.
It's sometimes the most challenging, so just lengthen up from the crown of the head. Where do you choose to make sure your weight's not going into the front? Try and think of the not going into heels, right? She needs again, lengthen that spine and then breathe into your fingertips. Now the inbreath don't want to make it labored, is their breathing out. Feel your ribcage. Just relax. Don't, don't try and push it down, but I want you to imagine that I'm here holding onto the side of your rib cage.
Now most of us don't breathe deep. We breathe very shallowly into the rib case, so the intercostal muscles between the ribs don't stretch out. What that means is we go a little too much, barely. So kick this breath going and I want you to try now just breathing into your left side, just breathing into your left side. It's possible, okay, and inside, just breathing into your right sight. My Fun enough by isolating left and right separately.
When I noticed the I breathe into both equally, you might find this a little deeper than it was before. That depth is going to give you more strength when we work with the out-breath, but it's going to eventually open up the revocation, like the whole body work with more efficiency. So that showed us stability. With that good breath, you're going to let us work with that center. The powerhouse efficiency. So whenever a teacher's telling you center, plot his breath, plot his breath, there's a reason. Take a breath. Make sure you breathe. The worst presses, no breath, but that's the reason.
Relax your arms. Neutral spine. Again, a big debate in some worlds about neutral spine that this is the way your spine is designed to be. Even balanced. The muscles front and back, even weight on the desks. No collapsing and relaxing, not flat. So to find this length, move your pelvis. I talk about the tray of marbles. Roll the marvels to the front of the tray. Roll the marbles to the back of the tray. Now you're doing this. Don't let your body shorten. Keep the length. For some of you, this in itself could give you a strange feeling in your back. It's movement, it's controlled movement, and it will connect to the center.
It should never feel that you're over compressing or tensing. Finding this range could be for some of you and actual mobility exercise. You could even do this sitting on a seat if you know you've been sitting too long. Just articulate forward and back with the pelvis and it keeping the length, however, keeps the spine open. Everything we're trying to do is talk the body getting to the end of the day shorter than it started as well. It will get shorter.
We just don't want to be too much. Now the middle point where the effort feels equal, find that, and that's the neutral spine. So whenever I reference neutral, the natural curve in your lower back, different for all of us, it's where I want you to be. Not relaxed, not arched neutral center. We're going to work with pelvic floor, so to get to the center powerhouse, we as a school m capabilities, we work with a mild contraction. Again, the marathon runner, so for that sensation it has to be all internalized. You can think about your glutes here, but now visualize that there's four, two strings, one from sit bone to sit bone and one from pubic, one to tailbone. Together they're creating the tension like a drum. See that drum that's on the tone of is not tight enough is not going to be, I'm making a nice sound. So I want you to think about that tension though, that drawing those areas, try and think of drawing us.
It wants together and drawing the Pew one until one together. The boons then don't come together, but it's a sensation and that's the connection into your pelvic floor. If you over contract that area, now you start feeling all the superficial muscles coming in. Yes, you've got that, that subtleties. What I want, not that over dominant feeling. So again, when accused center, I'd rather you worked with that. It will bring along the abdominal wall naturally. The deeper abdominal wall.
Okay. If it's new to you, just make sure you don't relax. That's the key. Relaxing is very easy to do, right? So set up the body. We basically set up the center, the breathing and the control. So what we're gonna work on now is layer a bit of balance and that's going to come through. Assemble here, rates breathing out. You're going to go up now, how far do you go? If you get to the top and wobble, you've lost precision, so don't go so high. Come down. Don't take the weight onto the heels. Let them kiss the floor, taking it back up.
Now I'm going to ask you to think about behind the big tool in a second tool, no, the toes themselves, but behind the big tool and second tool. Again, don't worry about anyone else. So if you're looking at these two, don't be in synchronized movement with them. You're in your own breath. You're rolling between them. Yes, so guys, if they are working, synchronize, it's a coincidence. It's not a goal. You're working with your breath and all of us have different breath lanes. If you've got a tight chest, your breasts going to be shorter, that you're going to go do more in one minute than I am going to do so find your rhythm. No, this is very simple balance to start with.
It allows you to recognize that balance as a challenge for you. We're going to take that a little step further. Go up the next time. Now imagine your backs up against the wall. You're going to slide your back down the wall, keeping the heels lifted. Now that blows not too low. You're going to drop the heels to the floor.
Try and feel the work into the ankle joint, heels into the floor lane. Lengthen up, backup into your balance, and then take it down so there's no leaning forward and I'll feel bad technique here. No leaning forward. You're sliding down hills. Drop an angle up so you're building a pattern. Where are you reading now? I don't really care. As long as you breathe. What you're trying to do is if you notice you're losing control, then you just soft and don't, don't push. Don't make your range of movement quite so big.
I always talk about it not being a competition. There is no one else in the room. We were doing group class, but you're actually alone and you're here with me. Pestle training. That just happens to be some other person sharing the space. Everything I see you take on board for yourself, finding your range. Last one, when you come down this time and the hills types, the floor, straighten the legs. Stop there. We're going to reverse it.
You're going to work with tier one, dropping down to the hills. If you really blocked. This doesn't move very far. Yes. Some people go a lot lower. We are all showing for eyeglasses. Normal heels. Lift up without moving. Anything else in your body and then go up. Yes. And then relax it though. So squat, heels, lift, oops, I'm losing my control there. Up you go.
So we're working feet, muscles. We're working on the art. She is, we're working the ankle joints, we're working the knees, but we're also working the center. We're working the principles of control and flow. Hopefully also breath. Otherwise you will be getting a little bit late headed by no. So breathe out where you feel the most challenged. That's the key out-breath where you feel most challenged.
I may not be exactly what I see. The worst breath is no breath and bring it back down. Okay, so that's working. The idea of the balance is always a tool that we use to connect to the center. Always has been. We're going to try and get the spine movement happening now.
One of the most popular things that people need to do, well, at least popular is what we call extension like people can do normally in the lower back really nicely. But where do we want to focus on as the mid back? So to do this we're going to take one hand and put a little finger on the sacrum, thumb up to the base of the ribs, which is just about hand width up from the sacrum area. Sequins the hard bony bit in the pelvis there. Yup. You'd be using that as a brace to set up the shipping your lower back. Now the other hand depends on your flexibility, your shoulder, you can either have here, sorry, like that one or you can take it to the back of the neck.
The key thing is I'm isolating where the extension is going to come from. I don't want it to be neck and head. I don't want it to be lower back. But instead of thinking of the back during the movement, we're going to focus on the sternum. So as you do the breath out, bottom rib drops. But the sternums going to push forward and up there for you whom you might not actually see anything much happening here, but if I think of this idea, reaching out, pause to you. This the iron man movement is good. He's got the power here. The power's coming out through the center of the chest.
You should feel work there. That's the out breath in breath. Relax that tension in the mid back, so breathing out, feel the sternum. Reach forward. If my hands there, you're trying to get to the heat of my hand or reach your heart out and reading en. Release that to control. Change your arm position, switch it to the other side, especially if you've got that tension in your shoulder joint. If you are feeling the stress in your shoulder joint in this position, then that just tells you you need to be doing something like arm circles or the shoulder rolls. You need to be working on that shoulder joint a little bit more as an extra exercise on your own.
There's feeling here is at the bottom of the ribs and the hip distance doesn't change. The movements coming by working these mid back muscles. Guess what it's for? It's for all of us who spend too much time in this position. We're trying to lengthen up. I'll show it CTT or you can even do it sitting at home, breath out, opening up. Very simple, not big movement at all and release that. Okay, so we're gonna do some flexing as well. So no squat.
Take the hands onto the knees, stabilize the shoulders into that soft v position, but then press through the hands. Open out the fingers a little bit if you need to for extra support. Now in this position, what we're going to do is tuck the tailbone under but not change the upper back, so tailbone under and until when to the ceiling. I call this happy dog. Sad Dog. You've got the image. So sad dog. His nose done something bad. The tails tucked between his legs, that's the tuck under to open it.
The lower back. Now, sometimes during a class, if you feel you've overworked your lower back, do this kind of movement often at those lower back muscles. Again, think of the spine, the shape of this man. If you can see the skeleton inside your body and visualize what's happening there, rather than worrying about the muscles, the muscles will do the job automatically. As you take it back through to neutral, you could then do a gentle extension. Press this hands, fill that sternum, reaching forward towards the Mat and you feel the extension in the mid back as well and enter condor and release. So you can add the two things together. So tuck under overnight, the lower back and until one happy dog, press the shoulders, press through the hands and feel the extension roll through.
Now these actions all relate to Matt root movements and equipment movements. So don't think about being an exercise, thinking about direction of movement of the spine, the muscles working correctly, and bring it back. Release. We may be not. We're spending too many repetitions with some of these. If you like them, if they feel good and rewarding, you can do as many as you want because nothing we're doing here is aggressive. So now we're going to a little bit of lateral, a little bit of side opening.
Know a lot of people crunch a new lateral flection. What I want you think about is not the band. I want you to think about the distance opening. So this hand arm goes up, shorter stays down, and in think of ticking the ribs up, up, up to the ceiling. So it's not even thinking about bending and keep this foot down down, down. Lovely teacher that I worked with before, I'm often talking about opposite directions, always thing of opposing forces.
So as you're going up landing, linkedin, Linkedin, Linkedin, I think the other direction is going down into the ground. You should feel this site stretching out yet without a crunch happening. Release that other side lifting up. So it is getting a curvature coming into the spine, but the focus isn't how much can I Bain? The focus is how much can I open my waist.
So as I'm lifting and pushing up from this side of the rib cage, I'm trying not to crunch this site and then make it fluid. So try and make the opening happening with your out-breath, why it's going to help you avoid the lower back collapsing. It's going to help you anchor the pelvis and keep it in place and when you're doing that as well, try to think about the feet not ruling in or out. Try and keep them even so you're pushing down equally the pelvis, those marbles resting on the pelvis are not ruling. So remember here, always think, if I'm looking at your tee shirts, guys, I don't want to see too much crunch happening on this side. I don't want to see too many lines.
I want to see a feeling of lifting up one side without crunching the other side. So it's not visually big and dynamic, but individually you should definitely feel there's something happening there. Okay? We're opening a deep back muscles and superficial ones as well. We're going to do a little bit of a dynamic rotation. You guys should be okay without hitting each other.
Just take yourself a little bit wider. They generally what your secrets to doing, she's trying to avoid. I don't stand on mats. It's an unstable surface that may be a little bit weighed for your feet. So you can stand on the mat. For this one, we're going to stand here.
We're going to think about connecting to the rib, to the hip and try and control that. You're going to turn around and the hill is going to come off the floor. Now I'm going to show you this here. Arms, take them in front, one behind you. See that feeling? Connect your ribcage down. That's going to happen dynamically. Go to the other side.
Now keep going and just let there be a little bit of momentum in those arms. You're not hitting yourself, you're not beating yourself up with your arms, but you're allowing the main Manson with a center to try and get a gentle rotation into the spine. So in case you've worked it out, we've done extension flection, we've done rotation and lateral flection. All of the movements the spine can achieve in our preparation phase. So this is saying I'm getting the body connected and working well. Before we go on to the movements, bring it back to center for me and t itself back again from your we, we're going to go, we're going to go down onto the side kick.
Now they say kick movement. I will lay myself down. You're going to roll down that roll down. Again, it depends on your body. Take it down into a point of tension and income on hands and knees. And basically guys, if you can face away from me as the face towards me. So roll down onto hands and knees. Drop onto your hip.
So you're facing me and come to the front edge of the mat for me. So bring your hips to the front edge of the mat and then Lenten down on your side. Now in this lying position here, legs straight. I want you to think about the front of the Mat, being the guide to help you set up the mutual that you had in your top hand, his fingertips. Now the way we do our sidekick is a very much the balance focus. Just to help yourself understand how this movement was been done.
Bring yourself now up onto your elbow for the underside. Yep. Stabilize your shoulder and lift that low wreckage away from the floor. I want to show you something with a hundred front leg, slightly forward like forward, forward, forward, forward, forward and then take it behind and through and you see how there's a lot of movement going on. That's can be so easily not using your strength. Yes and also in a compact class of people you might hurt someone.
So we're going to take it down and think of control which we're supposed to apply. So line dime. I want to think about that. Lower Rib cage lifting up so that comes from the top hip reaching away from you opening at the top, waist, hand in front fingertips from their center connected. Remember that mild contraction that allows you to feel so the feeling is here but that pushing away the connection to the center, opening out those mid and lower back muscles. You're already working a little bit of balance, but we need to add more challenge that think of the top hip socket which are long and wide, so the long and wide, long and away and that floats leg up. Now you see here, I brought it to right in line. If the thi the thighbone is parallel to the floor so it's not high to the ceiling, holding that position, reaching that out, and then you're gonna breathe out and bring the bottom like to join it.
Now for me, now we're in the correct position to start working with it. Challenge the balance. If this weight with the legs is too much challenge for your lower back, you can take the balls on like any anytime, but how much are you using your fingertips? I want you to think about going to one finger tip. So what they're doing now guys, is let's go one finger on the mat.
Where are the logical way of progressing that then is to take that hand to the ceiling or restaurant. Use the high. I always talk about peripheral vision, so if your fingers were wiggling, you would see them in your side vision. You don't have to look up to see them. You don't need to work on them all the time, but you know that it's there. Now we've got the balance challenge in place. These guys maybe showing a lovely stillness to you, but what they should be feeling is challenged the stability. Yes, we got that.
So we're going to use movement in the top leg. It's only a few inches. No, maybe an inch, two inches tall, like goes forward. Bottom leg doesn't move as the breath, bring it back to the start position as it goes forward and redone is it comes back. If I was to put a glass of, let's see what time of day we here, let's make it about spheres. Some champagne and orange juice just in case, whatever time of day that should be. Okay? That champagne box fares is behind your bottom leg. You can't knock the glass over. If you've got a form roller at home. What you could do is put the foam roller behind you.
So I'm going to be acting as the former ruler here. So the idea here is you can feel that the roll is behind you, but you can't push it over. Yes. And you're trying to come back and touch it so you're not letting the bottom leg move away and the top leg comes back. Now if that's showing one, two, three, I've got an issue with their shirt showing wonderful control, go forward, then go up over, over, over. Can you take it a little bit behind and interact to the start and then breathe out and up and and back.
So trying to get the same InCircle happening, flat site of the D and then the same circle. If that suddenly cause your back to tense up and the warble the loss of quality, you lost the principle of control, then you need to take it down a notch. If your shoulders fatiguing, just as we've done here, take charge of yourself. For me, I this, I love this when I see someone taking charge of themselves cause I don't want anyone to keep me happy hurting themselves or putting themselves into a stressful position. Last time and gently lower one leg down, lower the other leg down, bend the knees in anti-Israel onto your back. Now ideally when we're on our back, we need to make sure that the head and the spine are on the same level of surface, which we are here. We've got the nice long mats.
If you've got a shorter mat, make sure you've got loads of room for your feet, faint position. What we're going to work on here is a hundred and a double leg stretch. The a hundred movement we know it's called the hundreds. Many people haven't remembered why it was just a count, but the purpose was strength. We're not going to worry about the count. We're going to worry about quality, so in this position, these guys have done pretty good job for the setup.
This shows a lot of experience. The legs are not too far away, too close in. They can find neutral here. Remember that lower back curve, there's like a silk ribbon underneath your lower back. You're not trapping it all the way through this movement. I want you to think that you can control that. The reality is here now is this is all about you and your own body.
So what we're going to make sure is that with that natural curve in place with your center connected, remember the shoulders and that Salt v and then the length from the crown of the head. So you're feeling the length in the back of the neck, but not pushing and straight into achieve that. Some people may need a towel under their head, but ultimately for me, the goal is if you can bring your posture turn and a better position in Tang you, that lesson they should teach, you should be able to help you with that. And then from this position, we're going to challenge it. We're going to give the option of working with two legs today. Anytime you go back down to one. So with the I breath, you're gonna float first, one leg up. Now put that down for me. I didn't see which one guy.
So what you'll have picked was your favorite leg. So challenge yourself by picking the other leg. You be the hang out. Stabilize the pelvis, float the other leg up into the tabletop. Start with your weaker side because that will truly tell you how well you're working today. Now, ideally, if I placed a glass of water now on your tummy, you're going to be there. Been the second leg up. Now, if you're in control of that curve, if the silk, I'm going to move over here because what I've seen here is the knees are over the tummy. I need to be above the hip socket, so if I'm going to get my glass of water, still the ribbons, stone moving, I'm working the purpose of the a hundred which was a strength exercise. I'm strengthening the inner unit, the center, the powerhouse.
That's my supporting structure. Remember, it's a marathon runner, but I'm also working the superficial. Now we can add lots of variations to this. For today, we're going to keep simple and we're going to float the arms off the floor. Thumbs to the ceiling. Now in this position, remember if your lower back starts to be the victim just slightly off the floor, just yeah, there you go. Just hold it so you can reach that Sophie. If that quality in the abdominal wall starts to be lost, then you put one leg down. If I see that happening, I'll just remind you halfway through we need to go to change the site because one leg will train one side or the Lego train. The other side. This is our hundred how you doing?
Good deep supporting structure, so we don't need to rush away to get to the big muscles in the outside. They are working already here, but they need that support coming from the center. We're going to move this movement on into another movement called the double leg stretch. We're going to add challenge, but to do that today we're going to take it down a level so to get ourselves ready, float the arms down, float one leg down, float the second leg down and we're going to do the double leg stretch. Now what the a hundred and double leg stretch have a version which is flexed when they've, when I've got these guys working, I'm going to show them up here for you, but ultimately we're going to go back to just simply one leg this time. So bring one leg up, knee above the hip socket.
Take both hands off the floor and touch the knee or just to the thigh. Just above the knee. Yep. So there's your measure so you don't bring it in. So the thigh above the knee rather than the shin. There you go. Yep. Now what you're going to do here, that's it. You're holding onto your leg and just want you to touch there.
You're going to take the leg away as you read that. Do that for me. Reach out long not to the ceiling. Say Down with the head. Shoulders. Just reached the leg out. Breathe in. Bring it back far as you can. Take it and keep neutral with end. Bring it back. Keep the hand in exactly the same place. Breathing out. Land in a way.
Breathing in, coming back now. Now I've said double leg stretch, but you don't go to the top of a ladder straight away. You begin levels. So we're working with single leg first to understand the control. The challenge here is to keep with the neutral spine in place, keep those rib cages from not popping up to the ceiling. So the bottom of the ribcage is still touching the floor. Now what you going to do is you reach out, the arms are going to go out behind you, breathing out there and go behind, not all the way to the floor and breathing and they come back and touch.
They come together at the same time, breathing out the length and breathing and coming back. So we're working on developing towards two legs, last one with this leg and inflict the leg back down to the floor. Other side. Now the advantage of working single leg isn't simply that you get the coordination sorted out in your head. With single leg, we can focus on the inner muscles not worrying about big superficial muscles. So the sense of gentle sensation, the glass of water and the ribbon under the back. Try again. Now. First, just the leg again here.
This is your chance to compare. If you add on too many levels too quickly, you rush and think I'm getting to the top a level that it really quickly. You don't know how high the ladder is yet. This movement has lots of levels to develop into. I'm not going for the flex version. You guys do a few more. If I did the flex version, it presumes that my body, my Porsche is already fairly well set are the arms.
Then we can roll over onto your side with bent legs and then straighten out your legs again. If you're transitioning around, do it with bent legs. If it's less pressure and your lower back. Remember the front edge of the match your friend as a guide, a hands in front. So I always say the second side. Theoretically I should be talking less and I helping you with your alignment.
But let's make sure we get this idea. If there was a mirror on the ceiling and you were to look up at it, what you would see is your feet in line with the knee and line with the hip socket. Excuse me, for walking on the cross, you and language the shoulder joint, which has dropped away from the ear and aligned with the ear. Okay, so we're setting up that neutral spine alignment that also includes the rib cage. So the mid-back is not pushing forward and towards your direction. Low back, nice and open centers in place, and then reach that hip away feeling the low red keys light right now, again, coming out of the hip, reach out through the hip socket, leg floats up, it's out of the hip. Don't think about the foot. If you've got a habit of pointing or flexing your foot, try and relax. It tries to try and make it not be the ankle.
That's your focus to the hip joint that's going to help you open that waste as well. And work from the center bottom there comes up. Now we're into the balance. How much are you needing those fingers? They're there to help you. If this is a challenge, if this is not challenging you, you feel that you want to take it to the next level. You know you can go to a finger on the floor. Again, the that I should see that there's blood in the end of that finger. And in an ideal here, if your shoulder is okay to do it, bring the arm up to the ceiling. And for me, every teacher is different.
But for me, I don't add movement until I can get you here cause although this doesn't look exciting, do you feel some work happening guys? So it's not a big sale. I'm not trying to sell it for the people walking past. It's all about your sensation. That lower rib cage is there. The breath is nice, deep and wide. Our principles in place, that center connection, think of that deep pelvic floor, that drum being nice and taut. The sit bones coming together without squeezing the glutes and then adding movement. Start Simple, small movement forward. Think of that bottom leg. Think of the weight on the bottom. Fine, not changing and if it's you can feel that bottom citation on the floor.
You're trying to make sure you don't feel it moving. It's staying in exactly the same place. No, I'm not a great tea drinker, but the cup of tea is balanced on hip joint. Yes. That's for the feet. Yes. There's the teetotalers among us that don't drink. We'll have our, we'll have our alcoholic drink by the feet and you only get to the end if you earn it. Okay. We'll have the nice and simple refreshing one. He helps you when you're stress.
You know the old British thing of stressful moments have a cup of tea. I'm living in Greece at the moment and they always seem to give you food. The British give you tea. Finding your range of movement. Now again, developing it, the movement become the same. You circle forward up in a curve over to the back and forward. Think about being precise so it's not a circle.
It's forward to your point of challenge where you could lose control. Then control it with a lovely circle. Try and make it a beautiful curve. It's like a beautiful rainbow curve. You're creating, not a wiggly line. Yes, that bottom leg, if I'm going to come along and touch it to try and help you sense if you cheating with the bottom leg. There we go. I have been known to put the foam roller behind the glutes a little bit to control the pelvis and remember that top arm, if your shoulder starts to tire, you saw happening before. You can always put Aaron down by your side. If you're losing the control of the movement, completely. Make it static.
Holding the static with the lower leg lifted off the floor is totally acceptable because it means you're finding your level where you're just being challenged, but still working with the method which is control with precision. And the last one she's going, that's always a good sign. It means I've been there long enough. You guys don't have to remember if you'd fatiguing. Stop but bottom like down first talk like dinette next the knees. Now from here what we do is normally to transition up to setting from that position. Put the hundred front, push yourself up and don't worry about facing away from me for the moment.
Where you're going to do is we'll spend for this class arrangement we're going to spend in space the center. Yeah, but in reality I'd normally have your face in the same direction and I made transitions. Think about moving between one movement in the next as smoothly with control. So if I'm doing this in a class, I'll pick the other side cause little pack there. If I'm in the class, I come through an app and turn around. Simplest option. This is now my roll up position. Okay, we're going to do roll up. Now the roll up.
What I see a lot is people think about flat feet. I don't care about the feet. I care about this. Don't push this back. Yes, open out the legs a little bit away from you. Now if you play with that distance, bring them closer and put them further away. For those guys that are flexible in the back of the legs, this isn't a problem, but for those of us that are tight, the leg position is going to make a big difference to how easily we feel we're setting up. So for instance, here, she's sitting up, but she's using her mid back muscles to do that. So I want you to think of that. Your rib cage is floating on top of the sit bones. Now if you bring them closer, then go for flat feet and she's got a lovely open foods.
So if I just relax that, just so make the point, if you do that further away, you should feel that you can sit up with less effort. That's what I want. I want that tall sitting position. But without the back working too hard, you're gonna do a lot of work here already and without these muscles doing all the work for you. Now in that position, you're going to think about connecting to your center. Obviously because you've got the glutes on the floor, you can recognize if you're cheating with the glutes. So if you squeeze the glutes and relax, that's not the center. It's what's between them. Lift that up from the floor.
Now we're going to start with the arms forward. This feeling here is the shoulders are soft, so don't reach forward. Don't shorten those chest muscles. No one's going to help you. Yes, it's just useful help. Yes, this is relaxed and I want you to really think, know that the movement is initiated by a t under member, the sad dog, so don't think about leaning back at all. Think about tucking under and then opening out the mid back, the lower back stop and that position. Do an extra little talk of the pelvis without moving the body back there.
Go a little bit further. Stop how you feeling. Tuck under a little bit more. If you got more tuck without going further, you aren't opening up enough. The first time you were doing what I call a hinge, a flat back holding that position. They're breathing out. Come back up. Keep the curve until the weights on top of the sit bones and then lengthen up there guys, just relax for a second. I want to show you something. The original movement, you kept the flection all the way through for most of us because we flex so much in our daily lives, we're not going there straight away.
It's only appropriate for certain levels of classes. But what happens then is from people who here try and pull themselves out to sitting position, that's just going to do all that compression. So I want you to really think that as you're coming out, you keep the curve until you feel yourself and talk with the sit bones and only then lengthen up. Yes, so she'd feel nicer. You ready in your own time. Now you're going to start with a tuck under and then the body has to follow that rolling up note center muscles. You let the hips do the work. Let the front of the time do the work.
Don't go too far. Come back up. Keep the curve. Keep the curve. Keep the curve until you're on top of the sit bones nan length. That nice and tall. Those heels come off the floor. You've gone too far. Keep that going with this movement. Ideally, once we've got a reasonable range happening, I know you can point, so don't worry about it, but try not to make it 10 so this focus here is your legs that are relaxed down here and the work is all in the trunk and the thigh. Yeah. So I don't want you have tens feet, four point or flakes each time. If you go a little bit further where quality control people, if you lose the quality, if you started to do speed bumps, shaking, struggling, don't go so far the next time.
That means you've lost the precision of the method. You need to reduce the range of the movement. It's not a competition to see can I go to the floor? In fact, I limit people. If you can take it down to the point where you can touch the scapular. Don't wait it further. We're going to progress it as an option today, but that'd be the furthest road back up. So make this your last one.
And I want to just teach you a little bit of the progression if you're going onto the floor. So here today we can take it down. When you get down to the base of this, to this base of the scapular, if you go down to the floor, I want to emphasize the in-breath takes you to here and I this point you start the breath.
Remember there's nothing wrong with not going that far with the movement. So if I'm walking around you guys and I see lots of quality, I'm going to pull you back. If you do go down to that point, make sure that if their arms go all the way to the floor behind you, the base of the thoracic spine and mid back doesn't come off the mat. So that outlet at that point should really feel that you can work through that stress point. The key thing is, am I getting the curvature? Am I getting the center and the superficial muscles again? The neck, try not to crunch it in. It's like you're holding on overrate peach under the chin.
You don't want to squash it. Yep. And so I'm going to emphasize the breath for you here. So breathing n stop there. We then, and they read out. Reach the ridge, the hip flex. Flex Lex, Lex, Lex, Lex, Lex, Lex. Lex. Lex likes that. Feel better. Yes. Sing all the right words from me. Thank you.
Don't know if she meant it. The idea here is if I use the body correctly, I should feel less tension in the hips and I should feel less change than the lower back landing up at the top of the movement. Nice and tall. You're just imagining you've got that proud sitting position happening last time and staying at the top from you. So as soon as tier there, great. Now what we're going to do is we're going to move on to our side beds. We're gonna do a little bit of preparation. The muscles are going to work on the side bend are gonna involve the shoulder girdle. But to help them not do all the work, we need to use our trunk.
So what you're going to do for me is with the legs straight. Now we're going to do a bent leg option after we've done this. But what I want to do, a little bit of preparation. Let's cross your father's way, like over the top to me. Now that's it for this week. I would have started here in a second. Don't worry.
Teachers kind help helping teachers. There we go. And it helps. Welcome. So this point here, I want you to think that your Luna lift the cheek. That's away from me. Up off the mat. Yes. But now you're going to do a spine twist. You're going to turn around to face me and show off your jewelry. Yes.
Open the chest. Looking forward. Arms Out, staying up nice and tall. Do you feel the work in the trunk to hold that position right? Take it back down with control through the center. Cross the leg. You're gonna turn away from me, left in the cheek, up off the mat, turning around at the same time. Now that starts to happen. Well with good height then are what we can aim for. Bringing it back through, so that's going to happen fluidly. Breathing out as you turn and lift.
Good movement, so very good. It's closet as, although it's, I'm going to modify the movement a lot more than this. It's a preparation. It's like, see you working well here. I know you're going to use the right muscles in the modified version. It's very easy to cheat. When you see a modified version, it's very easy to use the lower level, trying to lift that higher, higher, higher. Never be happy. Always. I see millimeters. You're going to talk about 16th of an inch further. Yes.
Never be happy with where you are, but don't hold it there. Enjoy it for a split second. Boom. Back out of it. One more each side. So this is just me testing that. You're using your waist muscles. You're using your center. Yes.
So I'm going to go to the site. What I want you to think about here is we've got what I call the room and banquet position. You know when you can eat the grapes, very well demonstrated there. Yeah, that's the wrong position. That's going to stretch your shoulder out. It's not going to work. The center muscles are told it's going to make it harder to do the movement. So what you're going to think about here is push that hip away, lift that rib cage up off the floor, and you should already feel that you're working a bit more in the center.
Make sure your ribcage is pushing forward. Shoulder drops down in the back and then using your front hand help your elbow come directly underneath the shoulder joint. So this bone here, the humerus, the upper arm is completely vertical. Yep, that stays vertical. So if you really want it, we'll do the box fills. Again, it's back up against your arm. Now here with a nice open hips, you're not crunched up. What you're going to do is take your head up one direction and you rev. The other direction is to talk with, we're trying to open, breathing out, lift the hips up, stabilize the shoulder. Remember that glass of wine or box was open, open, open, open, open.
Now as you come down, try to just kiss the mat with the hip and back out. Up. I'm trying to open the top side now until we get this control in the shoulder, we're not going to go into the movement the way it will sometimes originally done from a side plank. Take the top arm up and over and help. That's going to help you open out the talk waste and taking it down. The feeling is each time not holding it at the top, not going at the top. Again going anti wonderful, but certainly at the top feeling am I getting a little bit farther when you come down, I want you to think of that as we're seeing here.
You're not seeing an extra crunch and not dropping, but you are seeing open up more at the top, good and coming down. Now as the shoulder starts to complain, you can hold the lower position or you can even sit up and release that shoulder. It needs to be developed. This is our to be taken to another level, softly for the positioning, all of these muscles working. But when you come down and making sure that lower rib cage doesn't come down first, you come down from the hip, him the top waist open
Then when you've got yourself set up, you know that your chest isn't pushing forward, your mid back and lower back and in the neutral. Then you can take yourself up. I keep the a hundred front initially just in case you're a little bit wobbly and once you know that you've got the control coming from the center, breathing out as you go up, they aren't following to help the fluidity. But remember the focus isn't the arm. The focus is the top rib cage as good alignment here. You're keeping it well, you should feel the work in the lower side and the stretch in the top side. Yes, no, I breath as you go up.
Breathing in as you come down.
Certainly don't want do any more. Remember you can always rest if your shoulders complaining, it will complain if it's a weak area for you. Last one and what it didn't want you guys was you may need a box or a chair at home. We could do this with a chair, but these guys are going to grab a box now and guys if you can put the box on your mat so you're sitting on the box is facing in towards each other. Um, just along way it's that way. Yeah,
So to help with that, you see what they've done, the legs are closed. Then you're going to take your legs further away. And just like we did the ruler, that should mean that you can sit up nice and tall with our illustration. You could use a chair at home. But the idea here is we want to be sitting nice and tall.
And when you work on rotation of the spine but without there being any movement on the sit bones. So that means the center is supporting it. So the lower back's protected, the lower back supported the movement all is from the mid upwards. This also means is not the head but take downs in front. So when you do the turn this time, if you guys want to turn and look at me for a second with your heads, you're gonna pull the thing with the fingers. You're going to think of pulling the rib cage back and opening out and let the head follow so the head doesn't lead. The head follows.
Bring it back through to the front and then rotate. So it's not the arm that's leading the movement. It's the rib. The hand is pulling the rib cage. Now don't pull in straight in and fight. So for some of you, if you block maybe a small movement, yes, this idea here, so breathing IOTG turn, doesn't matter which side you pick first. Don't worry about the camera angles or me or anything else opening out only if it doesn't add more strain.
If you feel any tension developing into the mid back or the shoulder area, then make the movement smaller than the arm breathing out. As you turn, your weight should be pivoting on the center of the pelvis, not ling onto one hip more than the other. So if I am looking at your hips and looking at your knees, they're staying in alignment. I could put a block up to your sacrum on the block, wouldn't be moved. You know, shifting the weight onto one side more than the other. The outrage should help facilitate a little bit with the ribcage relaxing and allowing more range of movement. Again, it's the thing we don't do a lot.
We don't move the spine in this direction. So spine twist is a fantastic thing for the body. At home chairs, you can sit in a very stable chair. You can do that. So this is one other piece from that movement. Some people develop breath and everything for us. We'll leave that for today.
That should be more than enough to with the facilitators. I just wanted to use the book. Did it feel better sitting and sitting on the floor? Why not? If you're at home, especially sit on something solid. Get yourself up off the floor so your lower back's not fatigued when you're finished. That was it. We're finished with the boxes. So after putting your boxes away or your chairs away, we're going to take ourselves back down to the mat. Now again, transitions guys, sit yourself down on the mat, but I don't want you just to roll down to the mat.
What I'd like you to do is take yourself down to the side left and onto your side and they rule onto your backs. If you just flop down, it's going to be harder to set yourself up. What we're doing here is we're going to play with a shorter bridge preparation movement. The shorter bridge on the Fillo levels. The final places are about strain. This version we're working on is about mobility of the spine, but we're going to add a little taster of the strength side to it. Where we're working from is we're going to work with our spine articulation.
We don't want to be feeling a lot of work in the back of the thighs or the glute muscles. Again, I've got a perfect class here. They've all put the feet correctly. The further away your legs are, the more you're going to feel the back of the legs. Working in this position here, we don't want to be pushing the pelvis and taking it out of neutral. We want to be starting in neutral, so you've all done great for me, but here we think small. If you didn't, you show two rocks. The neutral spine to the mat involves a little bit of a pelvic tilt.
Don't make it about the Tommy grabbing. Make it about the lower back, relax into the mat and then ticket to neutral. Each time you focus on this, take it a little bit into the Ma node, you're touching and more pressure into the mat and feel the hip opening. So it's that sad dog sensation. Again, the tailbone is coming up between the legs and in roll it back through neutral. Each time you go a little bit further, but don't think ever of lifting up. Think about articulating the spine up towards your navel, towards your sternum, towards your upper body. Each time a little bit further. We're going to start by breathing into ruler. I to articulate back down, building that up each time. So if this was a, your spine was a bicycle chain, what you're trying to do is roll it up in itself and then as you roll back down you see the bicycle chain coming down, link by link by link by link, lower back touches before the sacred. And here the more we can focus on the, on the feeling of the action rather than using the legs, the more will come from the center rather than the legs. You know the work.
So the Niche we rolling out. If you're very dominant on the outside size, you're going to find these one a rollout. You could always put a block between the knees, softball, but don't squeeze it. If you are a little bit over dominant inside thigh, your knees are going to roll together. Same thing. You want to put something there so you can tell if that's happening. The weight on the feet is going to be, even now these guys are progressing nicely for me, so we're going to take it all the way up to what we call the ski slope.
It's just the neutral knee, hip, shoulder, straight line, lower back in neutral and hold it there. That is now a strength position holding it there. Now in that position, how you feel about bringing your heels off the floor, kicks it into the leg muscles, kicks it into the strength more. Can You keep them up there and then roll the spine down. So we've jumped a few levels here. I wants to play with the fact that there's always somewhere to go with every movement if that cause you start cramping up.
Of course you let the heels drop down. Okay, roll back up and play with the heel raise. So you could do a couple of few raises. You do just one heel, then other heel, and then come down with the heels back down in the floor. Such flexibility, rolling it down through where you got the next time. Can you float your arms up to the ceiling? Why? Because it's a habit for people to use the back of their arms to stabilize with instead of the center. So now with the arms up to the ceiling, remember the shoulders melting down the back. Your neck is free of tension. Articulate up.
Now if you add in the heel raise here, you really might notice if you are using your arms, you might not be ready to. Well No. Okay, Punchy right? Take it, roll it down. If you can roll it down without the legs, cramping, fantastic. All about slowly challenging yourself timewise. Pick a level, give yourself quite a few weeks with a level before you, whatever progressing it. You guys can relax their arms and their to come to sitting again because I'm going to demonstrate the last movements which is going to be a strong movement drop to your side. You see that? Say you've got to demand it yet. Don't worry.
I don't do that with actual demand at points. I just give you the raised eyebrow, right? The next moment we're going to the last one. We're going to use a very strong movement and it's a leg tool prawn and it's really for me a real test of your knowledge, of your body's ability in stamina. I want to emphasize to you that we're going to come down onto the elbows.
Now in this position, the elbow is going to be a little bit forward to the shoulder and here open at the lower back. Now for some of us, that's going to be our, our position that we stay with, and then from there the hips come up, but when they come up, you can see my shoulders are not on top of my elbows. They're behind in this position. We're going to work on stamina, holding it there, open chest, and we're going to get gain four doesn't sound much. 90 seconds. Yep. It's a 20 actions that were originally in this movement. We're not doing the actions, we're doing the control not too far, because you are going to go a little bit further up. So again, that's a little bit too far to start with. So when you go up, don't think about pushing into your elbows. What you're going to think about here is landing at the lower back first.
You should already feel in, you're working into that front of the abdominal wall, but make sure the center is involved in that as well. Yep. That's a strength movement already. Shoulders down the back, chest open, right? The gaze between the hands to the back of the neck is long. And then from there, breathing out. Push the hips up and a little bit hard. Familiar. Yep. Staying there, staying there. Now I've move the shoulders a little bit back. There we go. That's harder isn't it? You're just cheating a little bit with your shoulders.
Sorry, I, I'll start the club. When I see good alignment, I hear it a little bit low. If you're little too low, you'll feel a lot of work in the lower back. You're aiming for a little bit below the shoulders. Over time we will be working towards a straight leg, but for the moment we're working on the stamina. If you start to feel that you're shaking and struggling, remember what I've said before about fighting the work. If you shaking in struggling, you may think, oh, this is good, this is good. No, you're going to use all the cheap muscles and costs. Straight intention.
You take it down, you take it down a notch. So here if I see someone's beginning to shake a struggle, I take them down, encourage them to go down to the base position that we started with and stay there. Once you can bring back the control, then you can come back into the level. Remember, 90 seconds is a long time, but this movement originally has 10 actions, alternating legs done with the breath. That's 20 breaths. We do about 12 breaths in a minute, so 20 breaths would be at least a minute and a half. So it's a stamina test. I think that's enough. Push back up onto hands and knees and if you complain about the rest, you can always build the rest recipe a little bit. But here in this hands need position to take one hand the one away from me, reach it through and rotate around to me, but try not to collapse down.
Yeah, try not to collapse down and it should be a better rotation. Bring it back through transition. Turn away from me. Ideally you should be in a neutral spine. I was not there. I learned my back arch and bring it back through. Take the bottom half way towards the hills. Press through the hand, stabilize the shoulders and sad dog. Open up the lower back, curl the toes under and from there work the hands back. Drop to the hills.
Roll back up to standing. Okay, so just to finish, you're doing a little bit of a balance, a little bit more challenging balance. You're going to take your weight onto one food, but to do that you're going to go off the Max again from you guys taking the way over onto one foot. So let's take the food away from me. Take the weight onto the fruit. That's away from me. Take the other one out to the side. Drop down, down or their arm again, up here.
Now your focus here is this arm is completely soft. This leg can lift and if it doesn't work, you can put the tool down. But in this position, just let the shoulder relax and let the wind blow or the shorter stabilizing changed the ratio. Tow goes. Dang. Bring it back through. Just to remind you, the whole point of anything we do on the mat is to look better standing. Yes. So when we finished this last, sometimes I finish class by getting people to walk around.
The whole point is we walk out of a class better than we walked in. Get the food day, likes the arm or that arm to the ceiling, long neck centered, and please what's happening in the back. Don't let that go into your habits. Find your balance and focus on the shorter being. Very free for the chance to let the shortages relax. The breeze is moving the hand. What's happening with your foot, that stabilizing change direction back through.
Roll down. Hands on this, the knees till we'll tuck under till one happy dog shoulders draw downs down until reaches forward. Tuck under one more time. Extension. Tuck under. Roll back up on. Thank you very much for joining us today.
Comments


You need to be a subscriber to post a comment.
Please Log In or Create an Account to start your free trial.
