Description
About This Video
Transcript
Read Full Transcript
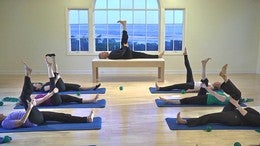
Hi, I'm Tom McCook. I'm here at Pilates Anytime with a fabulous group of people. We're going to do a mat class, incorporating some of the Franklin Method and some of the lessons that I taught in tutorials. If you're interested in the tutorials, they'll be available also where they'll go into a little more detail about some of the things you'll find in the class. Pleasure to be here with everybody.
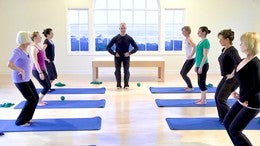
So we're gonna start by standing with your feet about four to six inches apart and I want you to look down at your feet for a moment and just lift and spread your toes nice and wide. And starting from your baby toe, lay them down, reaching into all four corners of your feet. And now, bring your head right up over your spine. And again, go ahead and lift your toes without looking and then lay them back down. One more time.
Lift, spread, and lay them down. Now, leaving them down, lean a little forward on your feet. Come back to the center. Lean back slightly. Back to the center.
Lean to one side. Back to the center. Lean to your second side. Back to the center. Now, sense where the middle is, where the weight's dropping down, just in front of your ankle bones.
With your head right up over your spine, just close your eyes for a moment. So let's just begin by dropping more into a feeling state. As you exhale, soften behind the eyes and let your breathing start to drop a little lower in your body and just take an inventory of your feeling body. Notice tension levels, posture, breathing as a starting point. And as you're noticing, just start to formulate your own intention for your practice today.
If there's any particular areas of your body you'd like to heal or become more skillful at using or qualities you want to develop, a little more graceful, a little stronger. Whatever it is for you, just set that intention before we begin. And go to the end of your next exhale and just softly open your eyes and I want you to take your left hand and put it on your right trapezius, the muscle between your outer arm bone and your neck, and bend your knees a little bit and just imagine you're holding a big sponge. So as you inhale, lift the shoulder up and squeeze the sponge, squeezing the water out of it. Now, exhale, let it lower and just feel the weight of your arm as that muscle lengthens.
And again, inhale, lift and squeeze. Exhale, lower, release the squeeze. One more. And then lower. Now this time, lift, squeeze, and hold.
Now rotate your head left to right. Notice how the muscles are affected that you're touching when you do that. And then release. And this time, lift and squeeze and hold again and nod your head front to back. And release.
Now this time, as you squeeze, reach the arm to the front. Release the squeeze. As you reach to the back, look back and squeeze. This time, as you reach forward, take the same side leg back. As you reach to the back, take the same side leg forward.
And just do three more, nice and slow. It's your little moment of Tai Chi for yourself, for your shoulders and neck. Nice and fluid. And one more. And release.
That's it and then come back to the center and just brush down the arm. And take a moment to compare your two sides. You might notice that arm feels a little lower. You could test its length. And notice its range and ease.
So releasing tension makes your muscles more available and actually stronger. So it's a great place to start. Let's take side two. We'll put the right hand on the left trapezius. Bend the knees slightly.
As you lift the shoulder up, squeeze the sponge. Then release the sponge as the shoulder lowers. And again, lift. Breathing in. Exhale to lower.
This time, lift and hold as you squeeze and rotate your head left to right. Fluid motion of your neck and head. And then release. Lift and squeeze and hold and nod your head front to back. And back to center and release.
Now as you squeeze, reach the arm forward. Release the squeeze and as you squeeze, reach and look back. And do that. On this next time, as you reach forward, take the same side leg to the back. So we're adding a little body dynamic now, a little coordination.
Same side arm and leg, there you go. And again, breathing is still fluid. One more front to back. And release. Moving down the chain.
So now before we do, we're gonna do another thing for the neck. So I'm gonna show you. So I'm gonna pick up the skull, while you guys put your fingers on where your head sits on your spine. That's it. Very educated group.
So where you want to put your fingers is just below your ears, you'll find a bone called your mastoid process. It's a little hard, rounded point. Everybody feel that? So if you turn your head and you see that muscle that sticks out, it's right where that muscle attaches. That's the mastoid process.
Now, straight in from your fingers is where the head rests on the spine. So imagine you're drawing a straight line, like a pencil, between those two points. Now, let me show you that before we do this next exercise and this is really, really, really useful information. Here's from the side view. And that's how the head sits on the spine.
And where you're touching is right here. So the head's designed to float on the end of the spine there. So we want to have the back and under the jaw really relaxed. So we're gonna do a little massage for the back of the neck to free that up a little bit more. So what I'd like you to do is take your Franklin balls and put them on each side of your neck just behind where you were just touching a little bit.
Now, imagine you're gonna still bring your awareness to where the head sits on the spine and as you roll the balls towards the spine, just slowly oscillate your neck or your head front to back. Just take it nice and slow. You can press in a little bit to get a little deeper feeling of massage. Then you go a little lower on the neck. Ah, that feels kind of nice, doesn't it?
Who says you can't massage yourself? That's it. And back to the center. Now, let that go and put the balls under your armpits. There we go.
Now, still staying aware of how the head sits on the spine, as you bend the knees a little bit, slide both shoulders straight up. Now on the exhale, let the shoulders lower as you lengthen the legs. Let's do that a few times before we change it. And just get a feeling that the balls are floating the shoulder up, then the shoulders relax down as the spine elongates. One more.
Now we're gonna do the movement a little more rapidly, but we're gonna lower the shoulders when we bend the knees. So we're gonna keep the legs straight and as you inhale, lift the shoulders up. Now, on the exhale, drop the shoulders rapidly as you bend your knees. Inhale, lift and lengthen. Exhale, drop.
And imagine that your shoulder girdle is being supported from the top of your legs. Two more. One more. Now, for single leg. Now, if single leg feels too daunting, you can keep your foot on the floor, just for balance, but you're still gonna take the weight on one, otherwise have the foot in the air.
But you can keep the toes down if you need to. Now lift the shoulder up as you breathe in. Exhale, drop onto that one leg. Inhale, lift. Exhale.
Two more. And one. And we'll take side two. Nice work, everybody. We'll lift.
Breathe in as you lift. Exhale. And again. Relax the arms as best you can. Two more.
And one. Very nice. Now, let's, keeping the feet down, let's move the spine with the balls there to give yourself feedback. So now, just imagine you're gonna roll the upper torso forward into flexion. Then roll back up and go into extension as you pull the shoulders back slightly.
Just go very slow. You're feeling the weight of the shoulder girdle and you're articulating the upper part of the spine. And lengthen up. And one more. And lengthen up and extend.
And now bend the knees and now laterally flex and see one ball rolls up as one rolls down, just like your shoulder girdle, and go side to side. And feel there's a fluid motion of the spine, the ribcage, and the shoulder girdle. One more. And now when you rotate, one shoulder will go forward, one shoulder will go back. And notice can you relax the arms and feel like the balls are generating the twist.
And back to the center. Now put the balls under your heels and stand on them. Now as you stand on them, there you go. That will happen. Now, just get a sense that when you're standing on them that your balls of the feet on the floor and I want you to just become aware of where your legs meets your body.
So for that, touch your pubic bone in the middle and go straight out to the side and you're gonna touch what's called your greater trochanter, the outer border of your thigh. Put your thumb there and bend your knees a little bit. Now, let your fingers come across the crease and halfway between where your thumbs are in the middle of the pubic bone, put your fingers in the crease and imagine directly behind your fingers is where the head of your leg bone meets your pelvis. So as you bounce, imagine that's where the weight is landing. There, not wider.
That's where the weight of the upper body lands on the legs. Now let the arms hang. And as you bounce, imagine your tailbone is relaxed 'cause your tail's not supporting any weight. Let it be easeful. So you can feel the spine is more springy.
That's it. I'm just coming more to join you guys a little bit here. There we go. And then I have no idea what comes next. No, I think I do.
Now from here, we're gonna swing your arms to go like this. And then as you come up, feel like you're right on top of your legs, but you're letting the shoulders relax down into your body. And again. That's it. And breathe.
Two more. One more. Now let the arms come down. Bend your knees slightly. Now starting from the top of the spine, articulate down.
Very slow. Let your pelvis roll over the top of your legs. Go to wherever you feel comfortable. You don't have to go all the way down. Now at the bottom, feel the weight of your head and relax the shoulder girdle.
Take a breath. Now, start to roll the pelvis back over the top of your legs to roll up and let your head be the very last thing up. Arrive in a line posture. Take a breath at the top. And again, bend slightly, curl down through the spine.
Fluid, let the pelvis roll over the top of the legs a little bit. Take a breath at the bottom. Exhale, roll the pelvis back over the top of your legs and stack the spine. Beautiful. And then gently step off.
Now, let's do a roll-down without the balls and notice the difference. Bend the knees slightly. Curl down through the spine. Take a breath. Now, nod your head yes a few times, recognizing where your head rests on the spine, and rotate a couple.
Take a breath. Now, feel the sit bones get heavy and then stack the spine, letting the head be the last thing up. Ah. That feels a little nicer, huh? So when you make it a little more challenging, then it makes the ground a lot more easy to deal with.
So I'd like you to take your theraband. We're just gonna do a couple standing theraband exercises for your spine, then we'll come down onto the mat. So I want you to take the theraband and wrap it around the middle of your breastbone in the back. There we go. And just hold it with your first finger and thumb.
Now, we're gonna add in a little bit of strength to your spinal movements. So bend the knees slightly. That's it. Now as you exhale, as you press the bands forward, take your spine back into the band. Your tail will go forward, but your waistline goes back.
Now as you inhale, bend the elbows, lift the top of your chest and look up. Exhale to curl. Inhale to lift and open. Three more. Inhale to lift and open.
Exhale to curl. And notice, all the way through, can I leave the head nice and easeful on the end of the spine. So the spine moves nice and easy. Inhale up. One more.
Inhale up. Very nice. Now, we're gonna add a lunge. When you do the lunge, you'll lunge to the front, to the side, to the back, and to the side. And we'll all just do it with one foot at a time.
We're gonna add that to the movement you just did. So step your right foot forward. Now on the exhale, round. Inhale, center, extend. Step out to your right and round.
Inhale, center, extend. Step slightly back with your right and round. Inhale, center, extend. Step right again. Center, extend.
Now, left forward. Center, extend. Step left. Center, extend. Step back left.
Center, extend. Step left one more time. Center, extend. And just shake it out. Let's drop the bands and now find your balls and I'd like you to help yourself down onto your back.
Come onto your back and you're gonna put the balls underneath your pelvis. On each side of your sacrum about four to six inches apart, basically behind your pubic bone. Make sure the balls are not on your lower back. They're on the back of your butt. And your heels are in line with your sit bones.
That's it. Now just take a couple breaths and let the front of the body fall into the back of the body. Let yourself organize in this relationship with gravity. Relax the fronts of your shoulders. Relax your jaw.
And let the breathing travel down so you actually feel your belly move when you breathe in. Now on the next exhale, initiating from your tail, the very bottom of your spine, curl your tail towards the knees to lengthen your lower back towards the floor. And now, inhale and reach the tail towards the heels to deepen your hip crease and subtly arch your lower back. And go back and forth like that. Nice and slow and smooth.
And notice when you're curling that you can keep the front of your shoulders and your neck soft. And as you arch, see if you can sense that the bones at the bottom of your pelvis are widening slightly. And as you curl, they're subtly narrowing. That's it and just go for a nice even quality of movement through both sides of the lower back. Let's do two more.
And we're gonna flow into some other movements. That's it, one more, everybody. So begin just by organizing and lengthening out those muscles in the lower back and the pelvis. That's it. Now float your right knee up in the air and then your left leg.
Now, relax from the knee down. So from your knee to your foot, let go of tabletop completely. So think of tabletop as actually a little overrated. So in this position, fully let it go and try to avoid using your leg from the knee down. Now, let your thigh bones fall into the hip socket.
Just imagine they're falling deep into the socket, like they're sinking into warm clay. Now, slowly, keeping your knees tracking right over your hip joint, let one knee go towards the floor in front of you and one knee come towards your chest. And keeping your knees tracking over the hip joint, just move evenly through both sides. Where the primary place where the movement's happening is where your leg meets your pelvis and the hip joint. And let the knee go as far away from you as it's coming towards you.
If you feel your back is arching, make the movement smaller. That's it. Now bring these a little higher and just go like this. Really small so you don't go so close to the floor. That's it, there you go.
That's it, you guys, nice and fluid. And now start to go just a little quicker, but keep the knees tracking right over your hip joints. Keep softening the fronts of your shoulders. Imagine this is your new job and you want to be really good at it 'cause you're gonna be doing it an amazingly long time. Just kidding.
That's it. Now from there, as you slowly come to a halt, I want you to put your fingers in your lower part of your abdomen just above your pubic bone. Relax your lower legs. Bring the knees a little higher than directly over your hip joints so your belly can relax a little more. Now, imagine the muscles that go over your pubic bone and attatch to your inner thigh.
It's like a pulley. They connect to your spine. Over your pubic bone to your inner thigh, your deep hip flexors are gonna generate this movement. So on the exhale, slowly lower the knees towards the floor, but only go to the degree that you don't feel the shape of your spine change. Then float them back up.
And notice can you not overly brace in the muscles you're touching. 'Cause the muscles that are moving your legs are under your stomach wall. And do both legs at the same time. Both legs together. Double leg lower.
Make it as small as you need to. So you start to get those deep hip flexor muscles to have a little more restoration and function. Let's do three more. That's it. Two more.
Like a pulley, pulling over the pubic bone to float the legs up. One more. And as you come back to center, take your left knee and draw it in towards your chest. Hold it with your left hand and reach your right leg straight up as you breathe in. Now at a long exhale, lower that long leg towards the floor.
Then inhale, bend it in towards your chest. Reach it up. Long exhale to lower. Do four more on that side. Moving with your breath.
And visualize, now you're using your leg as a weight to stretch your deep hip flexor muscles, the muscles that go from your inner thigh, over your pubic bone to the front of your spine. Front and side of your spine. One more. That's it. As the knee comes in this next time, take hold of it and switch sides.
Now take that left leg straight up as you breathe in. Long exhale, lower towards the floor. Nice and smooth, that's it. There you go. So you're working on good alignment, nice fluid development of the leg.
Good. Two more, everybody. And one more. Very nice. As you come back to the center, with both legs bent, put your hands on the outside of your knees.
Imagine the focus now is gonna be your pelvic floor, the muscles from your tailbone to your pubic bone. And as you inhale, let your knees open away from each other. On the exhale, activate the tailbone closer to the pubic bone to close your legs. Inhale to open evenly. Exhale to close.
And notice can you do that without adding any shoulder or neck tension. That's it. Three more. That's it. Good, you guys.
One more. Now as you close, straighten your legs straight up to the ceiling. They can be slightly bent if there's any strain in the hamstrings. And put your hands inside your thighs just below the knee joint with your palms facing out. Now, imagine you're going to resist your hands out into your legs and you're going to resist your legs in towards your hands.
But on the exhale, with about 30% of your strength, let the arms win over the resistance. So take a breath. Exhale, resist the legs in, but let the arms win so the legs will open. And as you inhale, just release the resistance and close the legs. Now, exhale, resist as you open.
Inhale to close. And again. That's it. So you're resisting all the way through the opening without any strain. Good, two more.
One more, everybody. That's it. Awesome. As you complete the one you're on, bend your legs and place your feet on the floor. Lift your hips and take the balls away and just take a moment to notice how the lower back feels after that.
Should feel kind of nice and long and supported. Now, put the balls next to you. We're gonna take that right into a bridge. So have your feet in line with your sit bones, neutral pelvis, neutral spine. Take a breath.
Now as you sink on the exhale, right above the pubic bone, imagine you're gonna traction your tail towards your knees and peel the spine off the floor till you have a straight line from your knees to your shoulders. Now, just put your hands on your front ribs for a moment. Now, melt your front ribs down a little bit and lift your sit bones a little more towards the back of your knees. That it, now bring the arms long again and take the top of your arms closer to the floor and breathe in. Now, exhale, use your abdominal muscles right below your breastbone to articulate down, getting each part of the spine to sink into the mat.
Inhale at the bottom. And again, exhale, curl up, like you're tractioning your spine towards your knees. Take a breath at the top. Exhale, use your abdomen to articulate down. We're going to do two more before we change it a little bit.
Again, on the exhale, curl. Nice fluid breath at the top. And then articulate down, nice and smooth. Now on the next one, you're gonna come up about 2/3 of the way and stay. We're gonna add a march in the bridge.
So take a breath and curl up. Now, imagine your pelvis stays completely level and you're strong in your standing leg and the hinge is gonna be your hip joint. So on the exhale, stand into one foot as you float the other knee like you're marching. Inhale to lower. Exhale the second side.
Just feel a nice fluid hinge, strong standing leg. Back of the arms are strong. Jaw and your neck are soft. That's it. Two more each side.
One more each side. Last one. Take a breath as you lower. Then articulate down through the spine. Now, touch the front of your hip bones, just the front edge.
It's called your ASIS. Now, imagine if your pelvis was a clock looking up, those would be, those two points would be three and nine. Your tailbone and your belly button would be 12 and six. So you're gonna move between three and nine. So what I want you to do is keep your knees straight up and down and lift your left-handed hip towards the ceiling by reaching through the knee.
The knee will go forward of the other knee. Notice how the pelvis now rotates to the right. And now lower it back to the floor. Now reach the second side and feel how it rotates and this is what your pelvis does on a smaller scale when you walk. Feel that rotation, the knees tracking straight ahead.
That's it. Do one more on the second side. Now we're going to add that to your bridging. So come back to center. Now on the right side, reach the knee forward.
Now, exhale, roll up on the left side of your spine. Reach through the left knee at the top to square your pelvis. Keep reaching through it to lower the second side and roll down on the right side of your spine. And come back to center. And now reverse.
Reach through the left knee and then roll up on the right side. Reach through the right as you come to the middle. Keep reaching through it to rotate to the second side and roll back down. And do one more each side at your own pace. Feel how there's that rotation of the pelvis, then you're articulating up.
You're reaching through the knee to level the pelvis. Keep reaching through it to rotate down to the second side and roll down. One more time. Nice and fluid. That's it.
Back to center. And roll back down through the side. Beautiful work, everybody. Very nice. Now, interlace your fingers behind your head.
Now, holding that position, just take a breath. And on the exhale, I just want you to float your head a few inches off the floor by lifting your head and sliding your breastbone towards your pelvis. So curl up just a little bit. Now, holding it there, notice, again, I widen and lower my shoulder blades a little bit more and bring the back of my waistline into the floor. That's it.
Now hold it there, take a breath. And as you sink in your belly, float one knee like you did on the balls. Inhale to lower. Exhale the second side. And notice can you lift the leg without letting the back of the waist come off the mat.
That's it. Sink in your belly. One more. Now on the next one, float it up and keep it up. Now bring up your second side.
That's it. Now on the same exhale, lower and lift both knees. That's it. Make it as small as you need to to keep the shape of the spine the same. There we go, two more.
Now we're talking. It just got warm in here. That's it, one more. And then place one foot down. The second side.
Let your head come down. Now rock up to a seated position. And I want you to hold the back of your thighs. We're going to do our supported roll-down. And get right up as tall as you can with your feet flat.
Now, imagine a roll-down is the same as a bridge. The initiation is from your tail. So take a breath. On the exhale, think of sending your tail towards the back of your knees as you draw the belly away from your legs. And just roll down to where your arms straighten.
Take a short breath. Now, fold at the belly button level to come back up. And then grow tall. And again, initiate like your pelvis is two wheels that are rolling back. Take a short breath.
And roll back up. Now reach your arms like this, like you're scooping and picking up a bucket of water. Your shoulder blades are low. Now from the pelvis again, roll down, but keep scooping from the underside of your shoulders. Take a short breath.
Curl back up. Two more times. On the exhale. Scoop so the shoulders stay low. Roll the pelvis under.
Short breath. Curl back up. One more time. On the exhale. Short breath.
Curl back up. Very nice. Now find your theraband. And wrap it around your feet. Very nice.
Now as you wrap it around your feet... Your legs will be a little bit bent. So it's easy to sit up on your sit bones. And now hold the band where your arms can be straight, so your elbow can be straight. That's it.
Now, first thing, just get up on your sit bones and take your head of your arm bones and draw them back. That's it. So imagine you're right up on the center of your sit bones as best you can. Now on the exhale, as you curl back about 1/4 of the way, let the legs lengthen. Now, take a short breath.
Now, fold at the belly button level and curl up without bending at the elbows. Then grow tall. Let the knees soften. This time you're gonna curl back and we're gonna add a rotation. So curl back.
Now, start to draw your right shoulder blade straight back and pull the elbow in to turn. Inhale, center. There you go, no worries. And again. We're gonna go both ways.
It's all good. Inhale, center. Exhale, pull and turn. Now, imagine the rotation is from the belly button up. Inhale, center.
Exhale to turn. Inhale, center, exhale, turn. Let the elbow bend as you pull. One more. Last side.
Inhale, center. And now, fold at the belly button level and come up. Now we're going to add one more component to it, the same thing, but when you're back there we're gonna add something. So take a breath again. Roll back again.
Now, you guys are gonna turn towards me. So I want you to pull your left shoulder blade back and pull. Now this time, when you're pulling, press your right arm across your body. Inhale, center. Exhale, turn and pull.
Press the left arm across the body. Center. Pull and press. Center. Exhale, pull and press.
One more each side. Pull and press. Last time. Pull and press. Back to center and roll up through the spine.
Now take your band away and help yourself onto your side, facing my direction. And I want you to cradle your head with the bottom arm and bend your bottom leg like you're sitting in a chair. That's it. Now with your top leg, reach it straight off, like it's a straight line off your head, and reach that top leg away so you feel the bottom waistline come off the floor a little bit. So your spine isn't conforming so much to the mat.
There's a little space there. Now float your top leg up about six inches and now reach the top arm up and absorb the arm into your shoulder joint. Now with a flexed foot, imagine the hinge is the hip joint, which is at the pubic bone level. Now pulse the leg up. And notice as you're pulsing up, you're doing your best to not let the waistline change.
So you feel both sides of your hips working, the down side and the up side. Two more. Now, hold just at hip height. We're gonna go into side kicks. As you inhale, kick to the front.
When you exhale, point to the back. Now, hold it to the back for a moment. Imagine you're activating your down knee towards your chest. So you feel both legs working together. Inhale to the front.
Exhale, point and reach to the back. That's it, there you go. And all the way through. So even keep the head in line with the spine. Nice and fluid.
That's it. Two more, everybody. One more. That's it. Now as the leg goes to the back this time, hold it to the back and put your top fingers on the floor now 'cause we're going to take it into bicycle.
So keep this, keep that line. Now, that leg back as far as you can. Activate that down knee. And bend the back knee. Then draw the knee to your chest and reach long.
Go right into your bicycle. And all the way through, try to keep the head and the pelvis in the same spot. That's it, nice and smooth. One more in that direction. As the knee comes forward, stop and hold, then bend and reach it to the back.
Sweep it to the back, long leg to the front. That's it, nice and fluid. There we go. As you're reaching back, feel how you're using your glutes and hamstrings with a little support of your lower belly. Two more.
And one more. This next time, as the leg bends, reach back and take hold of your ankle. Now, create a line from your knee to your head, as best you can, by drawing the tail down and the belly up. Now, contract your butt on that side. Like, press it forward.
And as you resist the foot into your hand, if you can take it deeper, let the heel come closer to your butt. That's it. Take a few breaths there. I'll show you how you can use your band for this. Hold both of those.
There you go, that's it. Just take two more breaths, everybody. That's it. And then gently release. And we'll roll to side two.
Nice work. So from here, you guys, just bend your bottom leg like you're sitting in a chair. Cradle your head with your bottom arm. Now bring your head back away from your chin off your chest. Now reach through that top leg so your bottom waist comes off the floor slightly.
That's it. Now lift the top leg up a few inches and flex your foot. Now as you press it up, feel like the hinge is gonna be at the hip joint. So it's just a straight, up and down motion now. Really small.
And feel the hinge. I'm gonna roll this a little forward. Gonna feel like the hinge is right there. There you go, that's it. Stay aware of that head-tail relationship and see if you can feel, when you're pulsing the leg, you're feeling both sides of your waist, both sides of your hips.
That's it, two more. One more. Now hold it at hip height with a flexed foot and strong leg. Inhale, kick. Actually, before you go into the kick, take that top arm straight up to the ceiling and absorb it into your shoulder joint.
Now inhale, kick to the front. Exhale, point and reach to the back. And in the back motion, activate the down knee towards your chest. So legs are working together like you're striding up a hill. That's it.
Breathe all the way through. Stay aware of that head-tail line through your body. Good. Three more, everybody, nice and smooth. And two more.
One more. As the leg goes to the back, hold it to the back. Now put your top hand on the floor again, fingertips in front of your chest for support. Now as you're reaching into that back leg, let the knee bend, heel to your butt, knee to your chest, leg long to the front for bicycle. And just get a nice sense of all the way through you're keeping the alignment of your head to tail and your breath is nice and smooth.
One more in the direction you're going. As the knee comes forward this next time, pause, and then reverse. Now sweep it back. Long leg to the back. Nice and smooth.
That's it, you guys. Let's do two more. And one more. Bend the lower leg, take hold of the ankle. Do your best to create a straight line from the knee to the shoulder.
There you go. You got it. Now, draw up in the lower belly, down through the tail, and if possible, contract your glute on that side. If you can take it deeper, draw the heel a little closer to your butt, but resist the foot into your hand for activation and a deeper stretch. Two more breaths.
One more, everybody. And gently release. Nice work. Now, help yourself forward onto all fours, facing the middle. And we're going to do a little series for your hips and then for your spine.
So first thing, what I'd like you to do is just float your right knee straight up off the floor. Just a few inches off the floor. Now, bring your head in line with the spine. And on the weight-bearing leg, imagine you're letting the femur head be absorbed into the socket, like it's sinking into warm clay. Now, take that free leg straight back behind you onto the ball of your foot.
Now, you're gonna go forward and back. You're gonna rock the body back and forward, getting a deeper crease and roll of the weight-bearing leg in the joint. That's it. Just one more, front to back. Now, take that weight-bearing leg and swing the foot out to the side, so the leg's going to go into internal rotation.
So the foot will go away from the body. That's it. Now go back and forth. That might be a new feeling, going into external rotation, especially if you're a dancer. Really good for your hip sockets and your hip muscles.
And as you come back, now you're going to go into external rotation where you'll take the foot towards the other hip, then take your free knee and push the foot forward. That's it. Then after you've pushed it forward, slide that other leg back. Create a line through the body. Now rock forward and back.
Keep that line head to tail. Now, go to the back end. Stay in the back end and just weight shift a little bit toward the hip that's being stretched to feel a deeper stretch in those muscles in the back of the hip. And just hold that for several breaths. Breathe into it.
One more breath. Come back to the center and we'll switch sides. So first, just float the knee off the floor a few inches. Let the other leg be absorbed into the hip. And then take that free leg back.
And now, rock forward and back. Visualize your femur head on your weight-bearing leg is rolling back in the socket as the body transfers back, rolling forward as you go forward. And as you come back to the starting point, take the foot out to the side so your leg's going into internal rotation, and now go forward and back. And then back to center. Now, go take it towards the other leg.
And then with the free knee, push the foot forward, assisting a little greater external rotation, then slide the free leg back and now rock forward and back. That's it. Now go back to your back-end position and weight shift a little bit towards the stretched side hip so you start to feel the back of the hip a little more and just breathe into that. That's it. Two more breaths.
And then slowly back to center. Now, tuck your toes under and I want you to just do some deep rocking. So when you rock, see if you can avoid rounding the lower back. So as you press back, feel your sit bones widen and then come forward and feel there's a deep hip crease happening and you're keeping the top of your chest open and just getting the femur heads to go deep into the socket. That's it.
And now I want you to transfer back. And as you transfer back from your sit bone level, come up to tall kneeling. And then from your hip joints, hinge, float back down and go forward again. Do that three more times. Hinge, squeeze up.
Hinge and float down. And again. And float up. And one more. And float down.
Very nice. Now come to tall kneeling and take your therabands and wrap it around the back of your waist. So from here, we're gonna, if you can, tuck your toes under. If that's uncomfortable, you don't need to. But sit back on your heels for a moment.
Now, we're going to use the band to keep tone in your abdomen and lengthen out your hip flexors. So come up to tall kneeling and step your right leg through. That's it. Now, just holding position, on the exhale, press your waistline back into the band as you contract your back glute. Inhale to release it.
Do that three times. Feel like your lower back gets longer and you feel a stretch in your hip flexors on that back leg. Now release and step back. Sit back for a moment. And again, from the sit bone level, squeeze up.
Step your second leg through. Now on the exhale, waistline back. Inhale, release. And again. One more.
Now this time, hold that tone and squeeze up to standing. Step back down. Lower. Step back and lower. Little tough on my knees.
I'm gonna watch you guys this next time. Squeeze up, step through. Squeeze up. Step down with control. Step back and lower and do two more each side at your own pace, each time coming right back to that start.
Press the waistline back. That's it. Take it nice and slow. That's it. And again.
There you go. Good, you guys. Step down. One more. Squeeze it up.
That's it. And last side. I believe. Was that even number? I think so.
Good, okay, cool. Keep me honest that way. Now, take this away. Nice work, you guys. And come onto your forearms.
Now as you come onto your forearms, let your chest come down and rest your forehead on the back of your hands. Now, we're just going to practice what's called crocodile breathing. So when you breathe in, I want you to breathe your belly into the floor. And as you breathe your belly into the floor, you want to feel your lower back moves away from the floor. Now as you start, if you feel your chest is the first thing that's moving, it's just a sign that you're breathing a little shallow and high and that's the tendency for a lot of us.
So let the breath start very low. This is a great way to teach yourself how to use your diaphragm better. Just take two more breaths like that. Now, in the next exhale, follow the exhale in and just draw the lowest part of the belly away from the floor. That's it.
Now as you inhale, sliding your upper chest forward, rotate your elbows out so they're in line with your wrist. That's it. Now as you exhale, still keeping that lower belly lifted, pull the chest forward and float the elbows a little bit off the floor. Lower the elbows. Rotate the hands down and lower yourself.
And again, start to slide the upper chest forward. Externally rotate the upper arms. Lift the belly. Lift the elbows slightly. Lower and rotate back in.
Do one more before we add something to it. Feel how you're using your upper back muscles, you're using your hips, you're using your mid-back. That's it. And lengthen down. Now, we're going to add to that.
So same setup. So slide the upper chest forward. Externally rotate the upper arms. Now as you lift the elbow, keep the lower belly lifted and I want you to reach one arm all the way up to ear height. Lower and release back down.
And again, rotate, come up. Float the elbows and reach. Do two more each side at your own pace. Feel the support of the abdomen, mid-back, and your legs. That's it.
Very nice. And again, rotate, extend, float the elbows, and reach. One more each side, everybody. And again. Rotate, extend, and reach.
One more, last time. And reach. Beautiful, very nice. Placing your hands under your shoulders, help yourself up onto all fours with your elbows on the floor. Now, I want you to press into your elbows and press into your feet and round your lower back to release any back tension.
And take three breaths, holding it where you're toning your abdomen, toning the bottom of your glutes, but you're relaxing the neck. That's it. One more breath. And then slowly help yourself up onto all fours. Now on all fours, walk your knees back behind your knees, or behind your hips, so you're in like a kneeling plank, and let your hips come a little forward and create a straight line from your head to your tail and then tuck your toes under.
Now, just get a feeling here that you're resisting your hands and your knees towards one another, and make sure that your waistline is pulled away from the floor. That's it. Now just take three breaths here. Try to open the top of your chest. You're taking the roundness out of your back.
That's it. One more breath. Now, slowly, without really moving the spine very much, one the exhale, contracting your low glutes, reach through your heels and come to a plank. Now, hold the plank for three more breaths. Two more breaths.
One more breath. Float the knees back down. Have your hands right under your shoulders. This time, knees under your hips. So you're more in a tabletop position.
Now, slowly, as you exhale and draw the belly away from the floor, I want you to slowly reach one leg low along the floor and the other arm forward. Inhale to lower. Exhale to switch. And see if you can keep an awareness of the same amount of tone in the lower belly and the back of the legs as the limbs move. That's it.
Nice and long through your neck. One more each side. That's it. Now as you come back to center, tuck the toes under and shift your hips back a little bit. Now lift your hips a few inches off the floor.
Now, keeping your chest open, lift back to a downward dog. Now, in the downward dog, looks towards your feet and see if you can pull your front ribs in, but melt your chest a little more through your arms. Now take a breath. And on the exhale, initiating from your tailbone, round the spine and arrive in a plank. Take a breath in the plank.
Exhale, round back to downward dog. Now, hold the downward dog and reach one leg up behind you. Now, on the exhale, as you round the spine like the earlier one, I want you to pull that free knee to your chest. Now reach it up and back. Do three times on that side.
Nice and smooth. Draw it in, keep the chin tucked in, and then reach it up and back. That's it, one more. As you get back to the downward dog, lower the leg. Take a breath.
Now reach your second leg up. Nice work. On the exhale, round and pull the knee to the chest, coming to plank. Back up to downward dog, long leg. Two more.
That's it. Reach it up and back. One more, nice and smooth. Reach it up and back. Now hold the downward dog, lower the leg.
Now just slowly just walk in place, where you run in place a little bit really slow, where you're bending one as you stretch the other, pressing the thigh bone back into the hamstring, relaxing the back of the neck. Very fluid. And then gently walk your hands to your feet. Soft knees. Roll up through the spine to standing.
Now, I recommend you stand next to your mat on the wood for this next piece because we're going to do a balance exercise and the wood will feel a little better. Now put your left foot on your right instep. Now drop your left hip, or your... Whatever is your weight-bearing leg, drop that out to the side. Now press to the middle to get up on top of that guy and drop it out one more time.
Now press to the middle and take your free leg and just feel where the floor is and just imagine your head's floating up. Remember where your head rests on the spine. Relax the shoulders. We're gonna do six head positions. So slowly turn your head to your right.
Center. Left. Center. Look down. Center, look up.
Center, laterally flex. Center, laterally flex. Center and down. Side two. Drop the hip out to the side.
Press it to the midline. Do that one more time so you get a real clear sense of being on top of the leg. Then take the free leg and just feel the floor. Use it any time you need to. Imagine your head just floating up, your shoulders relaxed.
Slowly turn your head to the left. Center. Right. Center, look down. Center, look up.
Center, laterally flex. Center, laterally flex. Center and down. Now bring your heels together in a small V. Bend your knees about 1/4 of the way and imagine from your mid-thigh to your belly button, zip up your legs and float your heels.
Now float the arms. Stay tall as you open. And lower and one more time. Bend. Zip up the midline, float.
Reach. Open. Lower, turn back to parallel. Close your eyes for a moment. Come back to balanced standing.
Equal weight on the front and the back of your feet. Let the breathing drop a little lower in the body. Relax behind your eyes. And just softly open your eyes and acknowledge yourself your hard work, you guys. Good to see you all.
Thank you, everybody. Hope you enjoyed. Thank you so much. Thank you. Thank you.
Mindful Movement: Creating Awareness


Comments


Thank you for your comments, I'm happy to hear you're enjoying the class. The Franklin Balls are 4" balls and the bands are 11 ft. And can be purchased at OPTP.com
All the best!
You need to be a subscriber to post a comment.
Please Log In or Create an Account to start your free trial.
