Description
About This Video
Transcript
Read Full Transcript
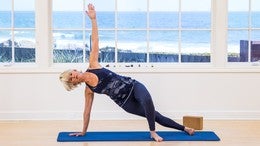
Hello, I'm Madeline Black and we are going to do Madeline's Movements and it's in two parts. This first part is for you to work on your agility and to release the joints and to fine-tune your local muscles, turn them on before we do a more vigorous workout. More vigorous workout is part two. So you can choose to do only part one because you feel like you need to get a little more agile. Or I suggest you do part one and then follow right after part two.
However, if it feeling warmed up and you don't have that much time, you could do just part two when you're ready for a vigorous workout. What you will need is just a mat and a yoga block. And if you don't have a yoga block, you can just sit on a box or a very large book or find something in your house that works that's not too soft. So we're going to start by standing on the end of the mat. And at first you just want to feel your feet, make sure you feel your weight equal in both feet and just feel your spine relax but upright.
And we're going to take your hands and you're going to press on the top of your thighs right where the crease is. So as you push in the palm of your hand back you're gonna feel it lengthening in the front of the body. So you're gonna lengthen and then send the sit bones back behind you so you're feeling a nice stretch through here and your sit bones are actually going wide and you want to try to widen your sit bones as much as you can. And then we're just going to hang here. So what I want you to do is feel relaxed in this position.
So it shouldn't be a lot of effort in your arms to hold yourself up. And then I want you just to breathe slowly about three times. So we're gonna inhale. Feel the back of the spine and then exhale. And try to let go, it's about letting go.
And inhale again. And exhale. Check in with your spine where are you holding, where do you feel tight and breathe in last time. And lengthen your spine, exhale. We're gonna do a couple more breaths.
I want you to emphasize, drawing the abdominals in when you exhale without changing your spine or creating tension in your spine. So inhale and exhale. And inhale and exhale. Notice the exhale is twice as long as the inhale. Good.
You can see I'm bouncing a little bit, I'm just trying to really let my hip joints relax and release. And now we can do a little bit of a curl. So now we're gonna start at the sit bones, you're gonna pull the front of the pelvis up, curling the tail. And you can pull a little bit of weight in your arms and just kind of curl in the back, you can just change your arms if it's more comfortable and then you're going to lead with the top of the head, sit bones wide. And lengthen through the spine, relax the shoulders, just let your spine hang.
There's no particular shape, you just want to feel the length of the whole spine. Again exhale curling, feeling the sit bones under. Feel your knees reach forward. Let your shoulders just hang, watch the neck a little bit and then reach the top of the head out and reach. And we'll do one more, you can sink deeper, kind of feels good to get lower.
And then curl again, press into your feet. Feel your feet, nice curling. And lengthening out, rest. Now we're going to come down onto the floor and you're going to grab the block and we're just going to sit on it in between the feet. If this is too stressful on your knees you can actually turn the block to a higher position or you can get a higher prop for your back.
And there should be no stress in the knees, you should feel relaxed in the hips and the back. And we're just going to sit and feel the sit bones now, grounded into the block. And then I'm going to take your hand. So what I like to do here is to kind of stretch out my feet a little bit. So I like taking my thumb and pressing along the edge of the little toe side of the foot, trying to get that little toe which does not like to stay on the floor to stretch that transverse arch.
And I like to take my knuckles and kind of just press right into it. You can actually do both at the same time, but I was just showing you. So you're gonna press the fifth toe down and then take your knuckles and press into the bottom of the foot. It's kind of opening up the fascia on the bottom of the foot to prevent any kind of cramping that may happen. And then take your fingers under your toes, maybe the little toe plus the third and fourth toe and just push your metatarsal down into the mat to lengthen the front of the toes this way and then move to the other two toes.
I'm giving it a good stretch here, good, and then both feet, so you want to do the other side. Kind of pressing into the metatarsal arch, lifting the toes off the mat to stretch the front of the foot also helps to prevent any kind of foot cramping that tends to happen. Now if this feels good you can drop the block lower, get a little bit more of a quad stretch. And then again just sitting and feeling this position. Taking a breath, feel your weight into the sit bones.
And now we're gonna take the block away. And what you're gonna do is we're going to come onto our hands and knees, you're gonna tuck your toes under. Now this should not be easy to do but it should also not be like a toe crunch and like be extremely painful, we don't want to jam the joints. So whatever you can do, this might be your stretch for the foot. Some of you might be able to sit back a little more and some of you might be able to come all the way up.
And we want to feel that the metatarsals are all on the mat here for a stretch. And make sure that your heels are straight up and not out to the side, that they're straight up this way and we're sitting up to stretch the foot out again. Now your hands are going to go to the mat. You're going to cross your feet so the right foot is sitting into the left arch. And we're going to sit back and just stretch the arch and then shift your weight, tuck your toes under again and sitting upright and then coming back down.
Now switch feet so the top of your left foot is in the arch of your right foot. And just sitting on the arch just pressing into the foot. If it's too painful come off or you can sit longer. We're gonna do one more set. So now the right foot is on top of the left foot.
And you can place your hands down and try to lift your right knee to get a little bit more pressure into the arch of the left foot. And then sit and we're gonna switch. Sit back on the toes. As this starts to feel easier you can do it a little bit quicker. So now the left foot is in the right arch and lifting this knee, nice stretch here, good, and then tuck your toes under.
And now we're going to come to a quadruped position. See if you can find a nice neutral spine, nice and long best you can. And what I want to see you do is just send the sit bones wide again and see if you can just go into a deep hip flexion without changing the pelvis or the sacrum. So there's no curl in the spine, your spine staying long, your sit bones are wide. The minute you start to feel a curl, you've gone too far.
So see if you can find where is your hip flexion. Some people can go further than others but we're just trying to open that up and find that hip flexion. Now we'll come back to neutral and we're going to take the right hand and you're gonna slide it under the left hand. Now this is not your typical twist here. What I'd like you to do is keep your spine upright not drop to the floor, press firmly into your left hand, press firmly into your right hand and you're going to inhale.
And as you do that, you're gonna lift the chest up, you can bend your elbows a little bit and then you're going to arc your tail to the right to create length on that left side. And you can look up a little bit and use the bottom hand to twist and then come back. Place the hand just past the other hand and find your length, keep your weight in the middle. We're going to pull with the hand, the left hand is pulling. I'm gonna arc the tail to the left to create length on that right side and come back.
We'll do that one more time. This time I'm going to arc the tail to look to the right. You're gonna bend that right elbow towards the floor but go up with your chest, up with your chest. So we're getting a little extension and rotation. And switch sides and pull the elbow towards the floor without dropping your chest.
So I'm lengthening, twisting in my spine, arching my tail to the left and then come back. And now you're gonna bring your feet together, knees apart, and we're just going to go into a child's pose and we're gonna stretch down. What I'd like you to do with your hands is to push back with your hands so that you can deepen the crease and your hips and sit back more onto your heels and let your head drop. Take a breath in, breathe into your back and then exhale. Now we're gonna push with the right hand and send the left hip off the leg.
So you're gonna kind of go over at the same time, push with the right hand and then rock the pelvis back. And then push with the left hand and let the right side of your pelvis just fall off your leg. And then bring the pelvis back and again we're going to reach and let the pelvis fall off the foot. And last time, finding that diagonal stretch and release and then come back to the center. So now we're going to lie on our stomachs and stack your hand so you can support your head.
So first I want your legs turned in and at the edge of the mat. You can wiggle around because what I want you to feel is how your body can let go and release into the floor, so there's no or minimal holding. So you're going to breathe in and as you exhale you're gonna flatten yourself out. So what I'm feeling is the front of my pelvis is releasing into the floor as I exhale I feel my ribs flattening into the mat. And I have to move my arms up periodically because my spine actually starts to get longer.
So breathing in, start at the pelvis and exhale and sink into the mat. Sink the chest into the mat and the neck lengthens. You have to move out a little bit, we'll do it one more time. Breathing in. It's a flow from the tail, releasing the spine through the ribs and through the head.
Nice, now we're gonna bring the legs back so your heels are in line with your sit bones, the top of your foot big toe to little toe on the mat heels towards the ceiling. And I want you to feel the whole front of the pelvis, not just the pubic bone and not just the top of your pelvis into the mat but the whole front of your pelvis melting into the mat. Then we're going to stretch the arms out. I'm going to take a what I call a long Sphinx position, so the arms are bent a little bit. And then I want your palms facing up, get that rotation.
Now here's where you can work your neck. So we're gonna inhale here. And as you exhale, you want to try to draw the top of the thoracic spine, that's the upper ribs, down as you bring the neck back. So that's the activity we're going to be doing, so it's really not a lot of movement. I'm feeling my pelvis into the mat and I'm imagining my upper vertebrae of my ribcage going down my back as the base of my neck is moving back.
And again I'm just on the exhale feeling that upper thoracic lower neck, bringing it back. And then I'm gonna bring the hands up and walk your elbows out a little bit more, palms facing each other. So the lower ribcage is on the mat, the front of the pelvis is melted into the mat. My belly tissue is lifted off the mat, so there's no pressure on my stomach. And I'm trying to keep my neck alignment and I'm just reaching and walk the elbows out a little bit more.
And as you exhale, I'm still working the same part of the upper back and the neck. And then I stretch the hands out and lower down. Let's fold the arms again and place the forehead on the hands. Now we're gonna start working, freeing up our hips a little bit. So we're going to bend the knee and tuck your toes under.
So your knee is on the floor and you're trying to reach your Achilles back. So you're flexing in your ankle and you're trying to get on the metatarsals again with the thigh into the floor. Now feel the front of your pelvis, it's gonna stay anchored into the mat, especially the right side, I'm showing you my left leg. So my right side staying into the mat and I'm just gonna reach my heel backward. So as I lengthen in my Achilles, my knee straightens.
I'm gonna keep reaching the heel back. I really feel a strong quadricep contraction. And then I'm gonna hold my thigh bone right where it is, it's not going to move and I'm just gonna slide my foot and feel the front of both sides of my pelvis into the mat. Then I'm gonna flex the foot again, reach the Achilles back, I'll feel my toe on the mat and then soften my knee onto the mat, we do that few times. So reach that heel back.
That's what straightens your knees. Feel the quadricep very strong in front of the pelvis into the mat. Now the thigh bone stays where it is and all you're doing is sliding the foot and pointing. It's a very strong quad hamstring contraction here. Flex the heel back and soften the knee.
I'll do it two more times. This is a prep for what's coming up next. So reach the heel back, slide the foot, keep the femur, that's your thigh bone right where it is, front of the pelvis into the mat, flex the foot and bend the knee down. Last one and reach, slide, flex and bend. Let's switch sides.
Flex the other foot, right foot tucked under. Adjust your knee if it's kind of snuck out a little bit and reach the heel back. Feel that strong quadricep contraction, slide the toes back, flex the foot and soften the knee and check in with your shoulders too. How much pressure are you putting in your upper back to hold the leg up there. See if you can keep it into the leg and into the pelvis and flex and bend.
And reach back long Achilles tendon, strong quadriceps, slide the foot, feel the front of the pelvis and flex and bend. One more, and reach back, strong legs, slide. See if you can hold it there, don't go higher, don't go lower, and flex and bend. Now we're going to take the hands and we're gonna make a diamond shape with your, actually triangle shape with your hands. And your thumbs are gonna be at the top of the pelvis, so that pelvic bones are actually sitting in the palm of your hands here.
And the little fingers, the second finger and your little fingers are at the pubic bone. And I want you to feel the pelvis on your hands. So what I'd like you to do, everybody's a little bit different, some people are heavy on the pubic bone and some people are heavy on the top of the pelvis. So I'd like you to find where's the weight of both those bones on that triangle. I feel the top of my pelvis and I feel my pubic bone and it's going to stay that way.
The first thing you're gonna do now is lengthen through the spine and I'm pulling as you can see with my arms to kind of draw my spine forward, keeping my scapula just sitting on my ribcage and then I can float my legs up. And keep pulling with the arms, keep lengthening through the body. No teetering. This is teetering. No teetering.
You've got to anchor your pelvis into your hands, feel the length of the whole spine and then come back down. And breathing it at that point is it really a good idea and again, so now pull with the arms, lengthen the upper spine, lift the legs, gonna hold it. Now we're gonna do a little circle, circle. You can turn out but keep the pelvis. Can you lower your legs in that circle without teetering with the pelvis?
Can you keep the neck long? And actively keeping the upper back extended. And then we'll come back to parallel. Shaking, yes. And back down.
Now then take the hands, push back. I don't want you to flex, I just want you to sit back, feel your spine long. Don't go into flexion yet. So that was heavy on the back and heavy on the posterior hip, that means the back of the leg. So we're going to contract the front a little bit but keeping the spine long.
So we're gonna come into a quadruped again. And this time I'm gonna keep the arms nice and long, spine long, sit bones wide, alright. And here's the hard part, let's try to unweight the right hand and the left knee without changing anything. So there's a lot of weight in the left arm and the other knee, no wavering and come back down. If you notice I bring the knee slightly forward so that I don't tip my pelvis and I keep this level here.
It's a lot of actually core to actually do it in this kind of small way. It's local, working locally here. Not relying on our extremities to help support the spine. So it looks simple but it's actually quite challenging, especially on one particular side, you'll notice one side is more challenging than the other. So we're firing up that whole core ring.
Now we're gonna keep that same feeling. All I want you to do is slide your right hand out and your toe down, keep it on the floor. We're all used to lifting all the time but I want you to hold it on the floor and barely hover and lift. Can you hold that position? And hold and keep breathing and then come back and other side.
So we're touching the floor with both the hand and the toe and then you just barely left and we're holding it there. Totally different muscle group here than doing a big lift. One more time each. So I'm just turning on the core. See my stabilizers turning them on, preparing myself for my more vigorous workout.
But this is actually very challenging to try to be precise and then come back. I'm gonna grab the block again because I want to do a shoulder stretch. Because in the vigorous workout we're going to be doing a lot of work on the arms. I'm gonna hold on to the block in this position like this with the palms flat, which is actually good for a stretch for your wrists and your hands and tuck your toes under. And all you're gonna do is put your elbows down on the mat and watch your neck, try to keep the alignment and start walking back.
Now for some people this could be, and keep your elbows in, no elbows out, they have to stay in line with the block. So it's a lot of external rotation, we're trying to open up the armpit. Now this might be an up stretch for some of you. Maybe you want a little more, we can come up with the knees bent and then kind of reach back. Reach away from the block.
You can add a little straightening of the legs, get a little bit of hamstring stretch but it's really more about the spine in the shoulder stretch. Keep breathing. And then bend and come back. We'll remove the block again and we're going to work our way up to standing. So we'll come back into that position here and then I want you to look between your hands.
Now you can either step through or do a little jump. Squat down and I want your heels to go out, toes to go out, long back. Now we're going to turn the hands out and we're going to come up. And I feel like a skydiver going through the air here in this position, and then I'm going to stand up. Now I'm ready to go.
Comments


You need to be a subscriber to post a comment.
Please Log In or Create an Account to start your free trial.
