Description
Sherri recommends taking her Strengthening Reformer workout before taking this class so that you build a strong foundation for your practice.
About This Video
Transcript
Read Full Transcript
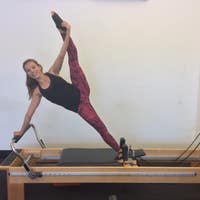
Hi, I'm Sherri Betz and I am here to teach you an advanced reformer class for osteoporosis for premenopausal women or anyone who is fit who wants a challenging workout to build their bone density. For class number 3129, that is on "PilatesAnytime," already as the level one version of this class. So I suggest you start with that class, working in some of the more basic exercises, building strength, and higher intensity within those basic exercises before you begin this class. We have Jenny here. Come on, Jenny. She is 39 years old and holding. Gorgeous specimen here.
And she does not have any major health issues. She has some wrist pain and weakness in her wrist that we'll be dealing with as she goes through the workout. We'll give her some breaks in between some of the weightbearing exercises. And then, we are going to give her a good workout that's gonna help her with her premenopausal bone health and building her bone for the future so that she has strong bones for the rest of her life. So, Jenny, let's get started. Let's go.
You're ready. All right? So we're gonna go around the corner here and I want you to stand at the end of the reformer, facing the reformer. All right. And then, I'm gonna place the foot bar on a little bit lower level here, just so she doesn't run into it when she puts her foot on the reformer. And then, we're gonna start with one red spring on the hook.
And then, what I'd like you to do, Jenny, is take your leg and abduct it and place it around the world to get onto the surface of the carriage there. Beautiful, that was great. So I'm looking to see that she has good balance, she has good pelvic alignment, and that she is aligning that standing leg as well. So she has the ball of her foot against the platform here and now what I want you to do is lift your leg off the platform, hold there, and then do 10 heel raises for me. Okay, ready and two, pressure's on, three, four, five, six, seven, eight, nine, and 10, excellent.
Go ahead and put that foot down and press the carriage out to a straight leg and bring it back in. And you'll do that five times. Two and three and four and five. Now, left the leg back up. I want her to make sure that she's standing on top of that leg because you tend to lean forward when you do that.
So now place the foot back on the carriage, push it out, flex the heel underneath, press it forward, bend it back in. Press out, flex, bend, and back in. There you go. Press it out, flex, keeping the leg straight, point, then bend to bring it back in. Last one, press out, flex, bend, and back in. All right, now take the leg up and switch sides.
Circling around, abducting, there you go. Placing the foot on the carriage. Excellent, now lift that foot up and 10 heel raises here. So I'm gonna check to see that her alignment is good from the back here. Three, four, five, six, seven, eight, nine, and 10.
Also watching to see that the first one is as high as the last one. Place the foot on the carriage, press it out and in five times. And I'm gonna have you send your weight back over your foot, so you don't lean in, right? There you go. Three, four, and five. Keep those legs straight.
Flex the foot underneath. Press it out. Bring it back in and press out. Flex, point, bend to come in. And press out, flex, point, and back in. And pelvis is kind of coming forward here, so bring it back. That's it.
It may be too heavy, so I might have to make it lighter. That looks good. She's got it. Very nice. Take the leg off. And coming down now, step aside. And we have two different devices here.
One is a balance pad that we can put down and challenge the balance. And the other is a rotating disk. So we're gonna skip the balance pad for now, but you can choose that for sure. I think the rotating disk is the most unique to use with this exercise. So we're gonna put it toward the back of the reformer so that when she starts she's gonna stand to the right of reformer on her left foot and then cross over with the right foot.
So go ahead and step on with your left foot and then cross over, placing your foot across the carriage. Now, I'm gonna switch the spring to a little bit lighter spring. This is a challenging exercise for balance. And now, you're gonna push the carriage out and then turn as you press it out. We like to call this one the music box ballerina.
And then come back in. Great. Turn it all the way around and press it out. And back in. And then, one more. Press it out. And back in.
Trying to maintain your pelvis over that leg. Okay, stepping down and let's see the other side. Excellent. All right. Right foot on the platform and then left foot on the carriage. Okay, yes, there you go.
Okay, now I'm gonna give you some spot, right? So let's turn straight ahead to start. Yup, that's okay. If I need to give you a dowel, I can do that too, but I'm gonna hold onto you here. Press away and turn. Mm-hmm.
And then back in. Yeah, you can definitely feel the compensations on this side. This one's a little harder for her. The pelvis hikes up a little bit more on this side. See if you can keep that pelvis level like you have headlights and they're gonna shine.
Straight ahead. Mm-hmm. That's okay, you got it, you got it. And then, press. Yeah, this is definitely the challenging side for you. Excellent. Let's do one more on this side.
Press it out. You got this. And in, beautiful. All right, well done. Stepping down. And then, I'll remove the rotating disk. Okay, next exercise you're gonna mount the carriage from the back and one red spring on the hook.
We're gonna do sidearm series, so facing forward. And placing your knees against this front pad and then hand in this loop. Okay, first thing we're gonna do is just do a little rotator cuff exercise setting up everything for success. So lengthening the spine, breathe in, and breathe out to pull to the side. And then come back in.
And then, I'm gonna change her to a blue spring with this and let you see her range of motion's probably gonna increase a little bit. So press out. This is also really good for wrist stability. So, yeah, the blue spring is better, huh? I bet she's glad I changed it, huh?
And out. There you go, that's great. And back in. And so, the shoulder blade should remain fairly stable on the back. And she does this. And I always like to do a little bit of prep with that rotator cuff before we do any overhead work.
All right, now you're gonna go up on the diagonal, reaching the arm out to the side. Lifting up and out. Mm-hmm. And then, pretend like you're gonna put the sword back in your pocket. Breathe in, breathe out to reach up and out. Wonderful. And then, back in.
And reach up and out. And, back in. And take it up and out. And, back in. Well done. All right, we're gonna turn around and face the other side. You'll be able to see the shoulder girdle on this side a little bit better.
Bring your knees even with the front pad. Perfect. Okay, now reach with your right arm. I'm gonna kneel down here, so you can see her scapula. And now, go ahead and do the external rotation and back in. Let's put that ponytail over there. Okay, yes, there we go.
So I'm looking to see that her wrist is remaining stable because she does have some wrist problems and that the scapula remains fairly stable on the back. Mm-hmm, that looks good. Really nice. Really wanting that external rotation through the humeral head there. Wonderful, one more. Great job. Just keep those shoulder blades level.
All right, now pull the sword out of your pocket. Go up on the diagonal and let's see how she does with that. Put it back in your pocket, up and out. Beautiful, that looks really good, Jenny. Drawing shoulder down as the arm comes up.
Great. Looks nice. Two more like that and breathe in as you go down, breathe out to come up. Use your breath to power the movement. Good job. All right, now putting the strap down we're gonna stand up. And then, I'm going to place the standing platform on for standing side splits.
I like to use the standing platform because it allows the person to have a more narrow stance that activates the gluteus medius a little bit sooner in the range of motion. So the wide side splits classically done is great, but for this particular exercise, I'm really trying to get the gluteus medius to be activated really soon. And she's gonna use the non-skid. Her feet tend to get sweaty, so we're gonna use the non-skid. We're gonna start with a red and a blue spring hooked up and then I'll probably take off that blue spring and let her do one red spring.
Standing on the platform first, then on the carriage. Whoopsie, there we go. This is why we spot carefully with this. Okay, great. So I want her to use the edge of that platform by bringing her foot really close to the edge.
This foot's good. Yes, that's it. You don't have to have it all the way at the edge, but pretty close. Okay, so now I'm gonna have her go ahead and use the one red and one blue spring to push apart. It's gonna be really hard so she'll probably compensate a little bit. That's pretty good. She won't be able to go very far.
She didn't compensate, but she just didn't go as far as I'd like her to go. So that looks pretty good. Is that painful at all? Okay, so I'm gonna give her a red and a yellow spring now. Let's try that. Gonna kinda work our way down. Yeah, that's good.
I wanna see her get a little wider with that. Exhale to press apart, reach your arms out. Mm-hmm, that's it. And then come back in. I'm gonna take that yellow spring off and then you're gonna see her increase her range of motion. I want it to be kinda fun and dynamic.
Excellent, there we go. And if I wanna increase the intensity, I'm gonna add the springs. Okay, exhale, reach out. Inhale, return. Nice posture. Exhale, reach out. And inhale, return.
And she's doing a great job keeping the arches lifted. Really nice form on the feet. 'Cause usually people wanna collapse their feet downward. Great. That looks great, Jenny. Okay, so now I want you to hinge at the hips, kind of like you're gonna jump into a pool or dive into a pool.
I'm gonna increase the spring tension to a red and a blue and be in that neutral spine position. Now press the right leg out maintaining the position of your pelvis and back in. Ooh, I might've been overzealous with that. Press out. Oh, that's that right leg that she was having trouble with.
Okay, so let's bring it down to a yellow. Red and yellow, press away. Yeah, there you go. She can get that leg all the way straight. And press out and in. And press out and in. And go a little faster three times.
One and two and three. Really nice. Go ahead and stand straight up. All right and carefully dismount. Perfect. Go around to the other side. And stand up on the platform first, then the carriage.
Perfect placement, that's great. So that way she minimizes the transition. Okay, sliding apart. Mm-hmm, there's the red and the yellow. So we'll let her do a couple like that. I'm gonna notice, yeah, she's arching her back a little bit, so I'm gonna take the yellow off.
Want you to maintain your pelvis position. Yes, now she can control that a little bit better. Keep lifting up through the pubic bone as you press apart, mm-hmm. I don't wanna tell her to talk and draw the tailbone down because I think that might make her squeeze the glutes. And then, that's gonna restrict her hip motion.
It's kind of like the dancer talk. We don't really want that. Want the lift from the front. Beautiful. One more time. Nice work. Okay, I'm gonna add that extra spring and now bend at the hips.
Right. Knees wide. Not too wide, but wide. Kind of over the fifth toe and then press away keeping the pelvis level. So no tucking of the pelvis. Lift the chest a little bit more, nice.
And tilt forward a little bit more. So buttocks pressing back. That's it. Lift the chest more. Now then now go. Press away. One and two and three and four. Little compensation happening there. And five.
Good. She's getting tired. All right, now I'm gonna add something here. I want you to step down. And then, I want you just to put your foot in the middle of this platform and face me, okay? And I want you to step up just like you're doing forward lunge on the chair and come up with your knee lifting kind of like a little bit of a hurdle.
Yeah. And then, step back down. Let's do that three times kind of incorporating some balance. Functional challenge. Perfect. One more. Good job. And now switch sides.
Five times on the other side. And one, and two, and try not to push off in the back leg as much as you can. Really make that left leg work. Four, one more. Nice job, five. Excellent, okay.
Now, we're gonna get ready for the star and Jenny is the star. She's gonna do great with that. This is a tough one for her wrist, so we're gonna really make sure she's okay with the wrist on this one. I'm gonna start with a red and a yellow spring. And let's get the non-skids for her feet so she doesn't slip, okay?
So I'll let you go ahead and put your hand in the middle of the foot bar. Step your left foot onto the edge of this foot rest. And if you need the non-skids, we're gonna put 'em in there. Looks like you're okay with that. Okay, really nice alignment to start with and you're just gonna press the carriage out and in three times.
Do you need non-skid under this hand? Okay, and then bring it back in. Just going right over the top. Not too far over the top. Just so that your shoulder is coming, approximating the foot bar, so no further than that.
'Cause if she goes further than that, it's gonna put a lot of stress on her wrist. That looks great. One more. Just gonna do three of each. All right, now can you lift that top leg? Extend out. And I gotcha if you lose your balance.
That's it. One and two and three. Now come into a comfortable position and then take this leg forward and then reach it back. Like the little sidekick. Excellent. Forward and back. Last one, forward and back. Good job, I know. Sprung that in on you there.
Okay, rotate to the other side. I'm gonna come around to the back to spot her. Wonderful. Okay, now taking it out and in with two feet down. Really nice form on the ankles there. I want the ankles mostly in a neutral position, especially that back foot.
I want this foot so that the malleolus is lifted and the ribs slightly pulling in. There you go. I don't want her to do it too much 'cause I think sometimes she responds so well to cues that she overdoes it. All right, that looks great. Now lift the top leg.
Mm-hmm, three presses out. Just make 'em small. That's it. And two and three. I'm not having to give her any support. I'm just here if she needs me.
All right, now forward and sweep it back. And forward. See if you can get back a little further. I love that hip extension. Yes, nice. Forward and back. Really good. All right. Taking it back down.
Stepping down. All right, we're putting the platform on again because I want to do that adduction side split. So I did it this way because she has pain in her wrist and we're gonna follow with a series that will be including weightbearing on the wrist, so I didn't want her to have too many weightbearing exercises on the wrist in a row, so I'm splitting this up for that reason. Okay, coming up to here and then we put the non-skids on. And you're gonna be in adduction, so to do the adduction.
Okay, so now we're gonna lighten the spring quite a bit. So I'll start you with a blue spring just to kind of test out the springs. And then, as you press apart, you're gonna reach your arms out to the sides and just glide apart. And now, pull back in. And usually that blue spring is really easy.
It's not really a challenge. Pull apart. That's right. And pull and lift back in. That's it. Sliding apart one more time. And then, grow taller to come back in, yes.
All right, now I'm changing it to the yellow spring. Just gonna have a little more work through those inner thighs. Take it apart, inhale. Exhale, drop up to come back in. Beautiful. I want you to think of drawing from the back of your legs, lifting up through the pubic bone.
So I'm really watching for arching of the back. I'm watching for collapsing of the feet and valgus at the knees. And she's not doing any of that. So the external rotation, if people have pain with knees, or in their knees with this exercise, then I encourage them external rotation and she's doing a great job. Can you lift your big toes?
That's also another one that helps with knees. So go ahead and glide apart and then, pull back in. That totally changes where she puts weight and what muscles are activated. (Jenny speaks indistinctly) That was a good one, yeah. Good job. All right, now step onto the platform and turn around.
And because this spring is so light, I'm gonna go ahead and put a heavy spring on there and then I'm gonna go around to the other side. All right, now turning your feet out just a little bit more. Okay, good with that. All right, so we're gonna go right into the yellow spring, since she's ready for it, I think. Go ahead and glide apart and pull up and in.
So really watching here at that lumbar to see if she has any compensations there. She's doing a great job with that. No arching of the back and no excessive tucking. No collapsing of the arches inward. Placing just a little bit more weight to the outside of your feet, Jenny.
Yeah, that's good. And exhale to pull together. Breathe in to go out and exhale as you pull the carriage in. Good, two more like that. Nice work. Yeah, so you're really getting a lot of challenge to those necks of the femur and, hopefully, getting some bone density increase on the necks of the femur. Okay, great job. All right.
Taking the platform off. And now, we're going into long stretches with some variations. Just gonna, okay, go ahead and grab those, yeah. Okay, foot bars back up. Non-skids, thank you. Oh, yes.
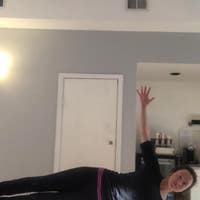
Need those for your hands? Okay. Yeah, so we're gonna put a red and a blue to start with. And if she needs to go a little bit lighter with that, we'll ask her as we go along. So placing your feet in a elevated position. So we're doing this one with the feet against the shoulder stops instead of on the head rest, okay?
All right, so a little bit different modification here. Now go into your plank position. Now press back just with, we're gonna do three long stretches. And how do you feel about the tension. You think that's hard to press back?
That's good. Feels good? You like it on a red and a blue? Mm-hmm. Okay, now press back. That's it.
And pressing back. Now you're gonna press back. Now go to the inverted V. Yeah, so this is our modified up stretch. And press into the long stretch again. And then, again. Press back.
So we're modifying the up stretch, the flowing version of it and keeping the spine in neutral. So try to keep the thoracic spine in extension, lifting your chest. Mm-hmm. Good, that's better. Okay, now come up over the bar. And then, I want you to lift your chest and do an upward-facing dog or what we call in Pilates down stretch, so there you go.
And then, pull up to go back to the V. Yes, that's it. So you're really working those abdominals. One more time. Take it forward, mm-hmm, and go into your long stretch plank. Come up into your upward-facing dog position, right?
And then, pull the carriage back home and lean back into your V. Mm-hmm, press back into your plank. And then, go up into the up stretch one more time. And then, pull up, inverted V, keep the carriage home. Nice work. That looks really good.
Okay, now you're gonna step down onto the right side of the reformer. Switch your foot over. Let's move this a little bit more. Mm-hmm, bring the carriage in and move your foot a little bit more. Take the hands off the foot bar and give me 10 scooters.
One, two, three, four, five, six, seven, eight, nine, and 10. All right, now take it up to the top again. One more long stretch pressing back. Come forward, cross this leg over. Put it on the floor, mm-hmm.
Place this one against the shoulder rest and then pump it out. Ready, one, two, three, four, five, six, seven, eight, nine, and 10, wonderful. All right, that looks great. Okay, come back up onto the long stretch position. I'm hoping that was a quick break for her wrists.
Okay, now take it back. And then, little jackrabbit, okay? Instead of knee stretch, knees off, we're doing jackrabbit and neutral spine. So the lower your knees go toward the carriage, the harder this is, right? Two and three and four, five.
Now, let's hold there and come up a little higher, so you can let go with one leg. So extend one leg back and then bring it in and out opposite to the other leg. That's it. One and two and three, other side. I'm being merciful. That's it. One, bring the carriage in as the leg goes back.
That's right. One and two and three. There's that right leg again. She's got some weakness in that right leg. Now shift back and stretch and just enjoy that stretch for a moment. Good job. Okay, let's go down.
And we're gonna get the box now. So I want you to get the box and I want you to lift the box properly as you bring it over here. So we're gonna be mindful about the way we put the box on the reformer. So she's gonna come this way. And then, I want you to do a hip hinge and I want you to do five hip hinges lifting the box properly.
I'm watching her from the side. I know that you can't see that at home, but I'm watching to make sure she stays in her neutral position, eyes forward, mm-hmm. Now what I want you to do is flip the box over and I'm going to grab some weights to put in there. So I've got all kinds of little weights that I can put in there. I'm gonna have you lift that.
That's about five pounds there. Adding a little bit of resistance and then we can build up with that as she gets stronger. So now lift and all the way up, mm-hmm. Standing all the way up. And the box is kind of awkward, so it's like life, right?
Okay, and then go ahead and put it down again. And stand up. And put it down. And stand up. Great. And let's put it down and I will take the weights and you'll flip it back over. And I want you to lie on your stomach.
I'm gonna put the foot bar down for a moment and have you lie on your stomach facing this way. And you're gonna have your face right over the bar and I kind of like that because it really makes you keep your head lifted. And then, if you can scoot back just a little bit on the box. Perfect, that's great. Okay. So we're gonna start with just one red spring because if you put too many springs on there the person will slide on there, especially if they're light like her.
All right, now push straight away. Yes, that's it. So I'm watching to see how she does in overhead press. Now bend your elbows and just do three presses out. So that's pretty easy, right? Mm-hmm.
Okay. Great. So now I'm gonna increase the spring tension. Let's see how much she can do. I could also put a non-skid under there to make sure she doesn't slide if I wanted to put more weight. And that would be a little more strength provoking with that heavier spring tension.
Okay, good job. All right, now I'm gonna take the spring off because I want to start to work on thoracic extension. So let's push away. And then, push the bar down to go up. Lovely. And then, I'm looking to see she gets a continuous curve through the spine and that she doesn't hyperextend in her lumbar.
So she's doing a great job with that. Press down to your neutral position and then lift up. And then, my cue is to really get that chest to come up. I'm pulling up on the sternum and down on the facets. Okay, take it back. Excellent.
One more. Great. Now, can you come down halfway? Move this hand over here. Reach this one back. And I'm gonna have her press into my hand to allow her to do a little more extension.
It's usually very satisfying. Good. All right, switch sides. And I know it's so much nicer to have her pull against me and watch how much more rotation she gets when I do that. Yes, very good. And then, come all the way down. All right, really nice.
All right, now what I want you to do is reach down for the back of your legs. Lift your chest without any assistance of the bar. And then, I want you to look down about right there. So I'm kind of looking where her collarbone, eyes, would be looking and then having her lift. Okay, and then do three lifts like that.
I'm gonna grab some dumbbells for you to add some resistance. So we can use light dumbbells here. Give you this one here and this one here. And then, she can bring the dumbbells up as high as possible and bring the elbows low as possible. So you're really going with external rotation of the shoulders and add a little dumbbell lift here.
There's not really any resistance in prone, in this particular workout. Pulling straps would definitely give her resistance. That was in the level one workout. Yes, that's great. Now, take the arms straight out in front of you and then I want you to do swimming with a little bit of weight here. So reach, slow swim, and try and keep your chest lifted.
That's it, mm-hmm. And that bar is really making her stay high. Excellent work. Two more and last one. So that little bit of extra dumbbell really definitely makes a difference. All right, now staying in that same position, a red and a blue.
We're gonna check to see what spring tension she needs for the breaststroke. So, for this one, I'm gonna take this down so it's out of your way. Yeah, just so in case she drops her head. All right, now I'm gonna bring the straps towards her so she can grab them, mm-hmm. Okay, so this is a little bit different variation.
But now bring your arms right to your shoulders, yes. And then, just do an overhead press. Yes, that's good. All right, so we're gonna see if that's enough for her to be able to lift up. So meet my hands and press up.
Beautiful and circle. That looks great. Sometimes, you need a red and a blue for this one. You take it and think of shaving the back of your head and circle one more time. Doing a great job. And press it up, lengthen, and up.
If doesn't build bone density in the thoracic spine, I don't know what will. That was excellent. Okay, now come down off the reformer. Okay, now what I'd like you to do is take the box and you're gonna place it right next to the reformer on the outside on the floor showing off your good alignment. And I don't have a gondola pull, so I'm gonna use the gondola pull this way so that she can climb up onto the box, mount for front splits, and red and a blue is usually what you use for front splits.
And would you like a non-skid for your feet? Nope, I'm good. Okay, you're okay with that? Now put your heel against the pad. And we're gonna use what I call the leap of faith mount, so I hold the hand.
She's got the gondola pull and then she is ready to go. So straighten this leg, okay? And then, find your vertical posture. Beautiful. And then, glide back into your split. So we're gonna do three variations here.
And you okay without me? Mm-hmm. Okay. Great. And then, gliding back. And we'll do five repetitions of each variation.
Doing great. Okay, now stay back there. And I want you to glide forward like you're on a conveyor belt. Gliding, mm-hmm. Back leg in and out. So she's just hovering in place. Great. Yup, that's the tough ones.
That back quad works a lot on this variation. One more. And then, keep this leg straight. Now glide this knee forward. This is the conveyor belt. That's okay, you can do 'em in any order you like, so it's fine. Yeah, knee glides forward and you notice that her pelvis stays completely level the whole time.
Excellent, that looks really good. All right, bring your legs to straight and then bring the carriage all the way in stepping down. And then, I'll hold her hand. And then, step the left foot forward. Great. You might wanna be a little wider with your stance because it's almost like you're on a balance beam, so you wanna have a little bit of separation, maybe three or four inches apart.
And then, glide back. Both legs straight. Mm-hmm. Great job. Keeping the pubic bone lifted. You're trying to really get a stretch through the front of this hip and the hamstring on the left side. Mm-hmm. Beautiful.
One more like that and then stay back there in our split. Now bend your knee. Glide forward keeping that level pelvis. So I like to establish the height of the pelvis with the front split with both legs straight, then do the gliding of the leg forward and backward. Yes, I love this one.
Really nice job, Jenny. One more time. Keeping that foot in the proper alignment with the heel lifted and now bend the back knee. Now, this one's the tough one. So this right leg gives her a little trouble. And then, see if you can bring your ribcage over the pelvis and stand a little taller.
There you go. Good job, good job. All right, last one. And then, bring the carriage all the way home. Stepping down, stepping onto the box. Mm-hmm, I'll take the dowel.
And then, placing the box on the reformer. Excellent. All right. And let's turn around, face the camera. Place one hand on your belly, one hand on your sacrum. Hinge at the hip joints. Thank you very much.
Excellent work, Jenny. That was such a great workout for you, I think. And we will look forward to seeing you in the next exercise class.
Bone Health: Osteoporosis and Exercise


Comments


You need to be a subscriber to post a comment.
Please Log In or Create an Account to start your free trial.
