Description
About This Video
Transcript
Read Full Transcript
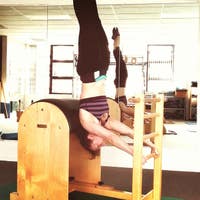
Hi there, everyone. Welcome to class today. We're gonna be taking it up a notch in our pre-Pilates for pelvic health. We don't need any props except maybe a little towel or a cushion. And let's begin.
Close your eyes, and bring your attention and your awareness to your breath. Taking the time now to notice just how you are today. Settle into your mind, body, and breath, and let go of the day. It's so important before we begin our class that we're really present, we're here. We're in our mind, body, and breath.
And invite your breath gently downwards towards your pelvis as you inhale. And like a fountain rising up out of your pelvis, when you breathe out out through the crown of your head, allowing yourself to become taller, breathing into your pelvis, and out like a fountain. Allow yourself to become taller and taller. Slowly, letting the light come in through your eyelids now and blinking your eyes open, ready to begin. Bring your legs into a diamond shape.
So the soles of your feet are together and they're meeting one another. They're not forced towards your pelvis. They're a little bit forward so that you can be there quite comfortably on your pelvis. Hold onto the front of your shins, the top just below your knees, and you're gonna start to gently rock on your pelvis back and forth. So you're moving on your sit bones onto the back of your pelvis, and then on your sit bones, and then onto the back of your pelvis.
And it's quite a free and liberated movement. We're not trying to do any perfect thing. We're just massaging the base of your pelvis across your sit bones and forward again. That movement's then gonna become more of a pelvic clock. So you're gonna go back around to the side forward, and then to the other side.
So you're rolling around your pelvis, letting your spine respond by moving with you. Your head staying quite centered, but the rest of your body is moving, change direction, in response. So you get that little side bending as you come round. Feel all of that tension melting away around your bottom and your hips and the base of your pelvis, around your pelvic diaphragm. You're just using the movement, and you're mat underneath you, that surface, to massage yourself.
Make this your last circle, and then rest there. Great job, everyone. Lay down onto your back. Your knees are bent, arms down by your side for a moment. Make sure your feet are comfortable distance away from your pelvis.
That just means that your lower back and your hips are relaxed, not feeling tense or squashed with them too close to you. And then take your arms and wrap them around yourself to give yourself a hug. So you've got one arm on top, one arm underneath, and you're reaching for your shoulder blades. And you are gonna there and breathe, giving yourself that hug. You've wrapped your arms around, your hands are wide and open, and you're breathing.
Feeling some movement underneath your hands as you breathe in. (Claire inhales) And then moving away from your hands as you breathe out. Then we're gonna do some rocking. So you're gonna rock gently across your head and shoulders, one side, then the other. Quiet through your pelvis in your knees.
I know it's tempting to let them rock and roll too. We're gonna forecast on your upper body. Use your actual hands and arms to rock you. So pull your shoulder blade one way, then pull the other one. Almost like you're just massaging your shoulder blades away from your ribs as you rock and roll.
These are our most mobile bones in our bodies, yet it's one of the areas we think of having the most tension, isn't it? So it's a great way to start to loosen that off so we can move really well in the exercises that we do. Come to the center, release your arms, switch the cross so the other arm's on top. Same thing, rocking and rolling. Using your hands, using your fingers on your shoulder blades or wherever they can reach to, to gently rock yourself from one side to the other.
Let your breath flow freely. And then gently come to the center. Release your arms, float them down. That feels amazing. Feels like I've had a massage.
I hope you feel the same way. Cross your left leg over into like a number four sign. So there's a little bit of space between both of your thighs and then slide your foot off the floor, the right foot. So you come up, ready to do. We rock from side to side.
So this is very small, very gentle. If you feel like when you take your right foot off the floor, your abdominal muscles are doming or bulging or you feel like your pelvic diaphragm is compromised. For example, if you have a pelvic organ prolapse, if you feel any of your prolapse symptoms, you can actually just keep your foot down and enjoy the movement down there and try again the next time because the most important thing is that you're listening to your own body and what it needs. Let's go ahead and switch. So you make that number four sign so there's a bit of a space, and you peel your left foot off the floor and bring it in.
So you've hugged in and you rock just gently across, your pelvis, your shoulder stay on the mat. You can even let your head rock in the opposite direction if that feels good. Let it be free. That's it. Go ahead and come to the center, float your left foot down, uncross your legs.
Now, you're gonna take your right leg into your tabletop position. So that just means a right angle here. Knee above your hip socket. We're gonna do our bent knee opening that we've done before, except we're gonna do it here with your leg in the air. So you take your whole leg out, and your whole leg in like the Hokey Pokey.
You're gonna take it out and bring it in. Bring your hands on your pelvis now. Your leg weighs a lot more when it's up there in the air. So you may find that your range of movement is a little different than when you did it on the mat. Inhale, open.
Exhale, close. Try that on for sides. Inhale, open. Exhale, close. Then try the exhale, open.
Exhale, open. (Claire inhales) Inhale, close. (Claire exhales) Exhale, open. (Claire inhales) Inhale, close. One more.
And float it down. Think about what breath made the most sense in your body today, and you're gonna apply that to the second side. So feel your right foot anchored to the floor, your sacrum is anchored. Remember that all important center of gravity. You only go as far as you can maintain your connection to the mat underneath you with your sacrum, with your ribs, with your shoulders, with your head.
And you know both sides are totally different. So it might be a little bit smaller on this side, especially if you've had an injury. If you've got a birth injury, you've had any pelvic surgery, there is going to be restricted flexibility and doing the movement is gonna help to increase that flexibility. This is your last one. And then rest there.
Take that down. Let's do some bridging. Bring your feet a little edge closer, arms down by your side. Let's just do a couple of plain ones. Stand into your feet.
Find your tail sacrum, yawn on your hips open You're still standing on your shoulders and your arms, let your tailbone go and melt back down. Tailbone, sacrum peeling up, yawning open, and then melting back down. Okay. Now you're gonna cross your left leg over into that number four sign, and we're going to bridge up like that. It's going to be the left leg that I want you to lead with.
So your left knee is gonna go up and forwards so that it helps to keep your pelvis level on the way up. And then slowly melting down, letting your right bottom fully relax and expand like a balloon, and then left knee reaches, and melting back down. Let your right bottom expand like a balloon, cause you know it wants to clench on in there. Last time this side. (Claire exhales) And then uncross your legs.
Notice the difference. And then we go to the other side. So number four sign just means there's a little gap between your thighs, and if you hitch up your hip when you cross your leg over, move your foot forwards a little more. So keep it to where it can cross easily. And then we bridge up, reach your right knee up and forwards.
You might feel like, oh yeah this is the side where it's a little bit more on the wonk and needs more attention. More attention to reach that right knee away. Relax your bottom all the way down on the left, cause that's the side that will keep holding on as you do the movement. Yeah. One more time.
Reach your right knee forward and away so your hips are yawning open, and then let your bottom inflate like a balloon, and uncross. Okay. Lay on your side, find your zigzag, support your head with your underneath arm, heck your heels are underneath your bottom. Flex your feet and stand into the bottom surfaces of your body. So you feel the underneath edges sinking down, creating that uplift in the other areas of your body.
Bring your top hand onto your hip and do your fire hydrant. Just one. So you do one fire hydrant and pause there. We're gonna do arm arc overhead and reach your leg away, and then bring them both in. Inhale as you reach away, exhale as you come back in.
We've done lots of things in previous classes, looking at your ribs and that two directional movement to guide your arm open. We've also done lots of leg movements, our femur arcs, and understanding the importance of your thigh coming into this socket, and the lengthening at the back that needs to happen so that it can do that. So as you bend your knee each time, think about inflating your bottom like a balloon. I know you'll be fed up hearing me saying that because it's one of my favorite cues. My favorite image to help us to find the length where we need it.
Okay, folks, twice more. Inhale over. (Claire inhales) And then exhale. Inhale over. And then exhale.
Well done. Have a rest. Spin round to the other side. Okay. Stacking everything up.
Getting yourself into position, check everything out, support your head, look forward. As I've said before, if there's a pair they should be stacked, so check them out. Hand on your thigh, flex your feet, stand to the bottom of your body, and float your leg. One fire hydrant. There we go.
Inhale. And exhale. Can you really let your ribs open to move your arm? Inhale. (Claire inhales) And exhale.
Inhale, reaching away. And exhale. When you reach your leg, being aware that we're still keeping hips one on top of each other, and then they stay one on top of each other when we bend cause we are inflating our bottoms. Inhale into the ribs. You can play around the more you practice this class with the breathing in the other direction, see how that feels for you.
There's not a right or wrong. Some days, one way is better for you than another. And it's for you. So the breathing needs to help you. Today, we're doing the inhale.
(Claire inhales) (Claire exhales) Smiling always helps too. All right, one more time on this side. In fact, let's just do one more for good measure. And bring it in. Great job, everyone.
Come on to all four. So we've got our hands underneath our armpits, knees underneath your hips. We're gonna be doing our leg to this side as we've done in previous classes, and you take your body weight back and forth. Body weight back and forth. Like the cross leg bridging that we did earlier, we do need to make sure that we're taking our pelvis as one.
Because we've got a different alignment with the side leg, we have to do something a little bit different with our inner thighs, which I know you'll be feeling. One more time. And then we switch. Take your leg to the other side, and then we are rocking back. So your foot is flexed if that's available to you.
And it just goes as far to the side as you can on any given day. Use your hands and your shin on the floor to do the press to rock. Okay. I'm getting excited now cause we're coming up to some of my absolute favorite exercises. Last one.
And then come back in. We did in our previous class our pelvic yawning, we're gonna do that with the arm arc at the same time, same arm as leg. So this means we are balancing, and then we come back in. And we're just gonna keep going on one side, take it and yawn. And then if you can open out and even come into more like a star, that will be great.
And then brewing it in. Yawning and opening. So you can feel all of the things we have done before. Bits of Cleopatra breathing. Nice. Let's do one more.
Big inhale. (Claire inhales) And exhale back in. Let's go ahead and do the other side. So we send our leg back, we yawn, and then when we've got our balance, we can open up and come in. And it doesn't matter what order you do in.
Maybe you get your leg out, then your arm, maybe all comes at once, maybe you return arm, then leg. Do what you can do. But remember, the yawning open is really important. You can come to your star, and maybe like me, your more wobbly on the second side. It's all just us being human.
And then back in. Hopefully, you enjoyed that. We're gonna come to sitting now. You're gonna cross your right leg underneath your left leg. So you're gonna kinda cross legs position, grab onto the back of your left thigh.
So right leg is crossed under the left, and you're holding your left thigh. We're gonna do a roll back. And instead of going through the middle, we're gonna go to your right bottom. So we roll across your pelvis to the right, and then around to the center again. Roll to the right.
Very much like what we were doing at the beginning in our diamond legs. And I want you to go with this like it's not an exercise at all. You're just going, oh, there's the side of my pelvis, what does that feel like? And explore it. Because we've got layer upon layer in there, and we sit on it often, and often for longer than we know we should, so it gets a bit stuck down and packed.
So when we get that stuck down and packed, it means that we don't have the same efficiency and function. So we're gonna go ahead and do the other side. Cross your leg under, grab the back of your thigh, and we're gonna go the other way. So this time you go into your left bottom. And you might feel like this is the side.
that's a bit more gnarly and something. Or maybe this is the side that's quite easy. Who knows? We're different, both sides of our body, and that's all good. So explore it rather than it being an exercise.
Enjoy it. Okay. So now that we've massaged out our bottom, we're gonna do a half roll back. Grab onto the back of your thighs, feet on the floor, and push through your feet and roll back. And then sit tall.
Now at the very beginning of all of our classes, I use the image of meeting the queen. So send the crown of your head up so you're really in your tallest best posture, roll back and sit. Roll back and sit. When you're rolling forward, delay delay, delay, and then you sit tall. Last one.
Rolling back, and rolling up. Great job. So we're gonna do something, another fun exploration. Now, we're gonna do leg cradles. So your legs are loosely crossed, and then you grab onto your right leg, and you're gonna cradle it like a baby.
And you're gonna rock your leg baby side to side. I know. But honestly, it's so good for you, you will thank me after. You're rocking your leg in the hip socket versus your whole body twisting. So can you move your leg with limited movement through the rest of your body?
Exactly. So we're cradling our leg, and then release. Wow, that feels so free. And then let's do the other side. So you grab your left leg, you cradle it, and you rock new rock it side to side.
And of course, you might have picked that leg up and gone, 'Whoa, it's a little tighter in there." That's normal. So I'm saying that cause that's what I feel. Its a bit more restricted in that hip. And then by doing the motion, we get more movement, more freedom, and more responsiveness from our pelvic diaphragm as well. Okay. This is gonna go somewhere.
So let's release that leg. Go back to the other leg. You're gonna grab it, cradle it, and start to look at your foot. Look at your foot and keep sending your foot upwards and backwards until you roll on your back and then come up. So this is a preamble to one of our Pilates exercises called rolling like a ball.
So you've grabbed your foot, you're looking at it. You're sending your foot up and back, and it just takes you back. Let's do one more. I know it's fun. This is where childlike movement is so important and so good for us.
So grabbing your other side. So on the left, you're looking at your foot, you're reaching up, and we rock back. And if you start to go wayward on your mat, it's helping you to understand the differences that you have from one side to the other. Let's just do one more on this side. Because we do have differences one side to the other.
It's why we're here working on balancing out our pelvis. Let's bring your feet apart. So they're wide. Your hands are behind you and slightly apart. Spread your hands, stand into your feet, stand into your hands until your pelvis levitates up like a bridge, and then come back down.
Stand into all 10 toes, your feet are wide, and all 10 fingers, well, eight fingers, two thumbs, and come up. This time, stay there. Bring your knees together, open them apart. Together, open. Like the bridging that we did earlier.
Think about that zip between your pubic bone and your belly button. Keep breathing. One more. And then come down. Wow, wasn't that fun?
We're coming up to standing now. Take your time to come up, and we're gonna have feet together, knees together. Bring your arms by your side and you're gonna press your arms back from the very top of your arm. So it's the top back of your arms that press back, press back, press back. You're gonna keep doing this and do a little bit more vigorously.
When you do it, your ribs at the front, they don't go forward. I want you to think about your ribs at the back going back, back, back, back, back. Last one. And rest there. We're gonna go into some ski squats now.
So we take ourselves into a squat like we're going down the mountain, and then come back up. We've done lots of squats in all of the classes that we've done because squatting is such a functional way to tap into your pelvic diaphragm. So this is why we do so many squats. It's important we do lunges and lots of other movements as well, that here we are with some squats. Go down and stay in this squats.
And if this feels good, you can do the chest expansion that we were doing when we were standing. Make sure that you're fanning out your tail feathers behind you. It's almost like the muscles and the connections at the base of your spine is like a horse's tail. So can you think about the swishing of your horse's tail? Let's go a little bit quicker if you can.
And then slowly come up. We're gonna stand with our feet ever so slightly apart. Close your eyes. Take a moment here. (Claire inhales) (Claire deeply exhales) Some deep breaths.
(Claire inhales) Thinking about the adventure that we just had in our class together. What are you looking forward to doing again? What did you learn about yourself? And how do you feel now at the end versus how you felt at the beginning? And then go ahead blink your eyes open.
Give yourself a pat on the bat. You did a great job in class today. Thank you for joining me, and I will see you again soon.
Pelvic Health: Pre-Pilates for Whole Body Pelvic Health


Comments


You need to be a subscriber to post a comment.
Please Log In or Create an Account to start your free trial.
