Description
About This Video
Transcript
Read Full Transcript
I'm Erin Wilson, and today's class, we'll be focusing on opening the chest area, and improving our upper back extension. You'll need two pillows for this class, possibly more. We'll begin by placing the pillows in a row, one above, and one below each other. Make your way down onto your mat however you need to. And this is where the size of your pillows might make all the difference in the world.
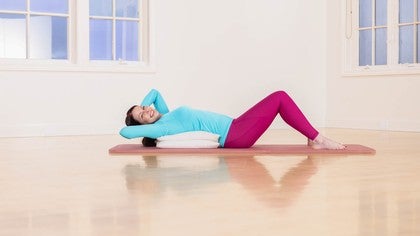
So I'm gonna be choosing to sit on the mat with the pillow starting at the top of my pelvis, you might find that it's more comfortable for your lower back to sit on the edge of the pillow, so your entire back and your pelvis are on top of them. Also, if you have forward head posture, you might find that a third pillow will be more comfortable behind your head back here. So let's lay back and just settle into your pillows. Everyone's pillows are gonna be a different size, so you'll know right away, hopefully, if you need to move one of them up or move one of them down. And then just take some inventory with how you feel.
If you notice that your head is, ugh, tilting back or you're really looking upside down, it might be a great indication that you need that third pillow, or at least a towel or a blanket behind your head, specifically. So we'll take a few deep breaths, knees can be bent, legs, wherever they feel most comfortable here. And just allow your body to settle into the pillows. Might be nice to close your eyes for a few minutes as well. So generally, things can feel achy when we first get down on the pillows, very similar to how you might feel on a foam roller.
So again, take some longer, deeper breaths when you're able, and just settle into those places that might feel slightly more achy. We'll begin by moving through some arm motions here. So taking our arms and reaching them up to the ceiling, the palms are gonna face in towards one another. And as we take our next inhale, we're gonna bend our elbows out to the sides. Depending on how tight the fronts of your shoulders are, or even the chest muscles, specifically, your elbows may or may not touch the ground, that's okay.
Just stop where it feels like you're getting a good stretch, hopefully in the front of your shoulders. Take another inhale here, and as we go to exhale, we're gonna reach both arms back up to the ceiling, but keeping our shoulder blades heavy on the pillows. We'll do this several times in a row, so as we, again, bend our elbows out to the sides, follow that with an inhalation, really allow your chest to expand, really allow it to lift up towards the ceiling. Find your next exhale and follow that breath. Reaching our arms straight up again.
Let's give ourselves three more here. So inhale, bending the elbows out, if they weren't touching the floor yet, they might be getting closer as time goes on, and gravity's our friend here. Another exhale sends them up to the ceiling. Last two like this. Breathing and bending them wide.
If you wanna put a little more activation into the upper back muscles, those muscles in between our shoulder blades, when the elbows are at their lowest point, picture squeezing your shoulder blades a bit together, or even squeezing them into the pillows here. Find our next exhale and reach our arms straight up. We'll do that one more time, so elbows bend, wherever they land is wherever they land, don't judge it. And then maybe put some extra focus in between the shoulder blades, a little light squeeze of them coming towards each other. From here, we're gonna reach our arms back up to the ceiling.
We'll keep the elbows straight this time. Same movement pattern though, so we'll take our arms out to the sides. And then same thing here, you might notice the backs of your hands can touch the floor right away, or they might not be ready to get that low just yet. Listen to your shoulder joints, there shouldn't be any pain here. Just the stretch sensation across your arms.
Next, exhale, closes our arms together, but keeping the backs of our shoulder blades sinking kind of heavy, nice, and settled into the pillows. And we'll keep this going, so a big inhale, arms are reaching out. Play around if the backs of your hands could touch the mat, maybe hover them off of the mat or off of the floor out there, and just get a different sensation. Next exhale brings them back together again. We'll do this a few more times, so opening our arms, you can play around with some nerve tension, so attempt to spread the fingers out more.
You'll feel a little bit of a nerve pull across your arms. You don't wanna do too much of that, but sometimes it's a nice thing to get the nerves to stretch out here as well. And give yourself two more, so whatever's feeling best, possibly bend your elbows a bit on these next two. Again, different sensation. There's no right or wrong, it's whatever feels more effective for your body.
And let's give ourselves one more big breath, as we open our arms. Don't be afraid to really lift your chest up here. And one more time, as we exhale, we'll close our arms together again. From here, we're gonna be placing one arm down next to our sides, the other arm's gonna go behind our head. And this is where we're gonna try to figure out what shoulder might feel more tension in an overhead position.
So our palms still face each other, we're gonna bring the right arm down next to our side, and we'll swing the left arm behind our head. Okay, more than likely, the right arm's gonna go down all the way, but the left arm might not make it back there where the thumb would touch the floor. And that's all right. So again, stop where it feels still okay for your shoulder joints. Our arms are gonna pass by each other as they come up, and then we'll bring the left arm down next to our side, we'll bring the right arm back, and then take some inventory here.
So my right arm might be the one that doesn't like to go that far back. Okay, as we breathe again, we'll bring our arms up, pass 'em by each other, and just keep this going. So don't worry about what I'm doing, right? Feel it out in your shoulders, I have hypermobile shoulder joints, I also have a hypermobile back. So those two things give me a lot of range of motion.
Keep passing your arms by each other. Okay, that's not necessarily a good thing, I've got a lot of old shoulder injuries in my history. Okay, so the point is, to try to get some better mobility, and overhead reaches of our arms, start with better upper back extension. Okay, finish when your left arm is down next to your side, and the right arm is traveled behind your head again, and then from there, we'll bring both arms up to the ceiling, and just take a minute here, bring your arms down into a comfortable resting position. Just to give them a break.
We'll continue on, let both arms reach back up to the ceiling again, this time we're gonna flip our palms to face the front of the mat. Listen to your shoulders, we're taking both arms behind our head this time, the wider they are, usually, the easier it is in our shoulder joints. So wherever they feel like they could be behind us, leave them there. And as we bend our elbows this time, we're gonna rotate a little bit more externally in the upper arm bone. Right? So the backs of your forearms and the backs of your hands might be parallel to the floor, more than likely, they're gonna be a little bit elevated.
Again, don't look at what I'm doing, feel it out in your shoulders, I've got the hypermobile shoulders here. So if that's not your body, don't worry about the forearms being leveled to the floor. Just feel the stretch, and feel the rotation in your shoulder joints. From here, we're just gonna reach our arms straight back behind our head again, and we'll continue to go there, so as we bend our elbows, we can think of pointing the inside of the elbow tips up to the ceiling, and encouraging the backs of our forearms and hands to get closer to the floor. But nothing should feel forced here.
Take another breath, reach your arms behind your head again, keep this going, we'll give ourselves a couple more. So opening 'em wide, and gravity's our friend here, hopefully, the pillows are our friends. And then we'll reach our arms straight back. And just one more time, we'll bend them wide, let 'em hang out there for a few moments. One more time, reaching our arms behind our head, from here, we're gonna pick them up to the ceiling, and we'll flip our palms towards each other.
Finishing with some circular motions, last thing we're gonna be doing in this position. So with our palms facing each other, we're gonna take both arms behind our head again. So hopefully by now, they kind of know more of where they should land back here, and what's feeling best for our own shoulders, as we open our arms out to the sides, you might find that the backs of your fingers can skim the floor, as our arms come down next to our hips. Once our arms are down all the way next to our hips, we'll pick them up towards the ceiling, we'll reach our arms behind our head again, and just continuing on. So here's where we can play around with bending the elbows a bit, as our arms open out to the sides.
A lot of times that will stretch the shoulder muscles, and the chest muscles a bit differently. Might be more effective if you're feeling pretty loose at this point, and aren't really getting as much of the stretch anymore. Give yourselves three more this way, taking our time, going where we feel comfortable, and coming back up, and just continuing to breathe as we move, could be a nice long inhale as our arms are going behind our head, and then a full exhalation brings our arms around, and down next to our sides, we've got one more here. Breathe. Don't be afraid to let your ribs lift up, right?
Don't be afraid to let the stomach muscles stretch out, it's a good thing. And we're coming all the way down. Now, from the bottom of the movement, we're just gonna simply reverse our direction. So begin by flipping your palms up to the ceiling, however much they're willing, and then we'll slide our hands out to the sides, we'll reach all the way back behind our head, and pick our arms straight up into the ceiling. Again, we'll lower them down next to our hips.
Rotate the palms up to your ceiling, reach our arms out, and just continuing the rotation in our shoulder joints. We might notice that one direction feels easier, one direction feels a little bit more sticky, or one arm might feel better going one direction, or one arm might feel more sticky. So a feeling, the safety that you have in your shoulders by not going too far, is what your main focus is going to be here. So give yourself one more, maybe two more, if you're enjoying this direction with your circle, feel free to do an extra one. We're gonna go for one more here either way.
And as our arms reach up over our chest one last time, again, just place them down where they feel comfortable. Take a few moments. We're gonna roll onto our sides now, to get off of both of our pillows, but we're gonna be removing one of them. So just put it off to the side, make sure that it's within reaching distance for later. And then we have to figure out where the single pillow should be.
So ideally, we want the connection of the pillow to be at the base of our ribcage and up. So depending on how large your pillow is, you might have to move it around a little differently than where mine is going to be on my body. So if we lean back, we're on our single pillow, it's supposed to elevate us just slightly off of the floor, so that we can focus on the muscles in between the shoulder blades. So we'll still have our knees bent, feet comfortable distance apart, we'll take our hands, interlace our fingers, and place them in the back of our head. So we wanna create a nice cradle sensation, don't just have 'em there for decoration, right?
So when we go to lean our head back, if you can feel the pillow right in the upper part of your spine, right in between the shoulder blades, it's probably in a good position, if your head is off the pillow, probably in a good position as well. Your head might have to be on the pillow a little bit, and that's gonna be okay. So we're gonna focus on the muscles in between our shoulder blades by opening our elbows just slightly wider than where they might naturally be, hold them there, and then think of squeezing your shoulder blades into the pillows and towards each other. So this is a movement you're probably not going to see, but you'll hopefully feel a lot of what's going on, activation-wise, in between those shoulder blades. From squeezing your muscles together, your shoulder blades together into the pillow, let them release, and then we're simply just gonna fold our elbows in a few inches towards our head.
So the shoulder blades feel like they're able to pull a bit apart. So we'll try that over and over again, so as we open our elbows, okay, just slightly wider where they feel natural, leave them there, and then try to squeeze your shoulder blades together, and also squeeze the pillow a little bit in between your shoulder blades, hold for a few seconds, keep breathing, that's always important, and then release the shoulder blades squeeze, and just simply fold your elbows in, and think of pulling the shoulder blades slightly apart. We'll do this a few more times, so we open our elbows first. Okay, we squeeze our shoulder blades together, the feeling might also be that they're connecting towards each other, but they're also sliding down our back. And then release that sensation, fold your elbows in, feel the shoulder blades sliding apart from each other.
Two more times, elbows open, shoulder blades squeeze, make sure you're not over trying where it just pulls on your neck too much. Release the squeeze, fold our elbows in. And just one more time, we'll go elbows out, we'll squeeze our shoulder blades together, release the squeeze, and fold your elbows in. Alright, we're gonna have an option to add that secondary pillow, so if you're finding that the single pillow is giving you plenty of extension in your upper back, and you're feeling just fine in the front of your shoulders, keep just the single pillow. Two pillows might be too much.
Let's roll onto our sides again, help ourselves up. Grab that second pillow, and place it on top of the bottom one. So again, we'll try to figure out where the pillows are at the base of our ribs and up. So as we lean back, we'll have our hands behind our head, and because there's an additional pillow now, we're higher up off the floor, so when you lean back over both pillows, it might be too extreme. Here's how we can tell, I'm gonna curl my head and chest up for a moment, do the same.
So when we're up here, notice the space that's underneath your chin to your chest. When we lean back, we're gonna attempt to keep that space about the same. Here's something we can be really good at. When I lean back, my upper back is gonna stop moving at some point, right? But here's what likes to happen, our neck and head like to continue to go on.
So at this point, nothing is actually moving anymore in the thoracic part of the spine, and all I've gone into is full cervical extension, neck extension. Not the same exercise, not exactly what we're trying to focus on in this class. So we'll sit ourselves up, feel the space underneath your chin here. And then as we lean back, try just to let yourself go to the place where your chin, the distance underneath your chin to your chest isn't gonna change, so for me, it's right about here. It might have been further for you, it might be narrower for you, you might have to come up a little bit out of there.
So we're gonna hold ourselves in this shape. And then from here, start opening our elbows out to the sides. Try to go a little further this time. So we've done this movement several times already, perhaps the shoulders are feeling loose enough to go a bit further. So the backs of our elbows are trying to get closer to the ground.
From here, we'll fold our elbows in a lot closer than we've been doing, so we're trying to wrap our elbows around our forehead, like they could almost touch each other here. Continue that, so we're gonna open our elbows out. Go a little further than they might be willing. Okay, check the space under your chin, and we're not looking totally upside down. That's how you can know.
The voice will change. And then again, we'll fold our elbows in, and then keep folding 'em in, so the idea is to really support the weight of your head here with your hands, right? With your arms. This is a full extension position, so your lower back might be in almost too much extension as well. Feel free to ditch one of these pillows anytime, right? If you're just straining to be here, it's not worth it.
Fold your elbows all the way in again, let's do two more like this. So full breaths when we can, right? The more we're in a bigger extended position, the harder it is to usually breathe. So make sure you haven't shallowed your breathing. Fold our elbows in again, and we've got one more like this, so they're gonna go really wide as best as they're willing.
One shoulder might be more willing than the other. It's alright, and then we'll fold them all the way in to our temples, now, they're gonna stay there. We're gonna lift our head up, use your arms and hands to help you do that. Once you're able to look straight ahead, grab onto the sides of your thighs, and we'll pull ourselves up the rest of the way, just to come out of that position for a moment. So it might feel nice just to round over your legs, be kind of lazy about that.
And if you notice that that was just too much with both pillows, now is gonna be a great time to get rid of one of 'em, and just work with the single pillow again. Or maybe move them up a little higher, that's always gonna be helpful to have you not in as much extension. If the two pillows are working well, let's stick with them. Find that same position where you were a moment ago, and we're gonna add some nice isometric contraction to our abdominals this time. So hands again, interlacing behind our head.
We'll just keep our elbows where we can see 'em. Shoulders in a comfortable position here. Check the space under your chin as we lean back, And then stop where it's like, okay, my upper back has stopped moving, and my head just wants to keep going, stop right there. Feel the tailbone heavy on the floor as we go to bring our head and chest forward, we wanna think of the pelvis staying the same and just lifting from our upper and mid back. So we're gonna pause when we're on a bit of a diagonal here.
Hopefully you're feeling your abs having to work to hold you like that. And then release your abdominals so you can stretch them, and go back into the upper back extension. Here we go again, exhale, try to feel the space, again, under the chin, not changing. So that when we're coming forward, we're finding all those deep muscles closest to the spine, all those deep core muscles having to engage to get us up there. It should feel more of like a hoisting sensation, like we're hoisting ourselves up.
Hold for a few seconds, and then release back with control. Take your next exhale, we'll curl up again, and if you find that you need to tuck your pelvis a bit, that might be better for you. If you find that that helps your back feel more safe, especially in the lumbar, go ahead and do a little pelvic tuck as your upper body is coming forward. If you don't need to do that, really try to encourage your pelvis and your lower back to not change. 'Cause we're essentially going from extension of the spine into just a flat spine.
So there's not necessarily a need to have our pelvic position change. But do what feels safest for you. We're gonna give ourselves about three more here. Right? And as we get more fatigued in our abdominals, it's easier to yank our head forward. So again, trying our best to keep our head heavy in our hands, or maybe find a little bit of a push-pull reaction, so your hands are gently pressing against the back of your head, but the back of your head is also pressing against your hands.
Let's go one more here. And as we make our way back, we'll just take a few moments, try to take some long, deep breaths, and maybe you're a bit lower, the backs of your hands might be touching the mat at this moment, and they might not have been when you first started. If they aren't, that's alright as well, but hopefully you feel like you've moved in different ways, and your back is feeling a little looser at this point to put you in this kind of position. To help ourselves up, we're gonna roll off to the side again, and we'll put a hand down, we'll help ourselves all the way up from there, we're gonna go into a few next stretches next. That will help open up the back of our neck, and also into the sides.
So you might find that you'll sit on a pillow or two just to have a more comfortable seated position. I'll just sit on the mat myself, but do what feels best for you so that you can sit upright, and not feel like you're straining to be there. So we'll take our hands, same interlaced position, and we're gonna place them more towards the top or the crown of our head, as we go to bring our chin slightly down, we'll make sure we can see our elbows in our periphery, And then very gently push the back of your head into your hands. And your hands are gonna gently push forward into your head. So we're giving ourselves a double chin here, essentially, but that's a good thing, 'cause we're opening up the back of our neck.
So if you are a person that has a lot of forward head posture going on, or you've done a lot of work at a computer, you might notice that the neck extensor muscles back here are more shortened and that's gonna throw the weight of our head forward. Very common thing. But that also means that the neck flexors are maybe underutilized, or they're a little too loose. So we're gonna attempt to put some tension on them, and when we connect to these muscles here in the front of the neck, we're lengthening the muscles in the back of the neck directly, 'cause they always have a relationship together. So just gently pushing again, the back of our head into our hands, bringing our chin down.
Make sure you can breathe, you just wanna hold for maybe five seconds or so, and then to release out of it, we'll think of pushing our chin slightly forward, open the elbows a bit, and we'll do it again, so we'll fold our elbows slightly in, we'll bring our chin down first, and then we're pushing the back of our head up into our hands, and our hands are just putting a stop. They're kind of gently pushing in, so we can't go too far, but we're creating a nice isometric contraction with the front of the neck muscles. And that's lengthening the back of our neck. Okay, to come out of it, we'll push our head forward a bit, let our elbows open, and just one more time, you can also do this with a pillow against a wall. Kind of nice, push the back of your head into the pillow, so you can feel your back against the wall.
Sometimes that's a better way to do these kinds of stretches. And then one more time, we'll release out of there. And now our hands are still more towards the crown of our head, we're gonna open our elbow slightly wider, and then the opposite thing, so we're gonna start tilting our chin up and just go slow and go small, and think of letting the back of your head push a little bit against your hands as well in this position. And then to come out of it, we'll just take our eyes and look straight ahead. So we'll take our eyes up, take our chin up, gently press the back of your head into your hands again, and then bring your chin down, bring your eyes forward.
One more time. So eyes go up, chin gently lifts, back of the head, a little bit of pressure in our hands, and then taking our eyes forward, and from here, we're gonna let go, and we'll focus on just one side of our neck at a time. So we'll be doing some motions with our arm, if that feels too nervy for you, meaning you feel a lot of tingles in your hands, or it's just not a good feeling that you're gonna create in your neck by moving your arm. Feel free to skip that part, and just focus on the gentle stretch of the side of your neck. So go ahead and take your right hand and we're gonna go onto the left side of our head with it, and then just start to pull your right ear to your shoulder, and it might not go that far, if there's a lot of tension, which for most of us, that's the case, in the sides of our neck, don't have to go that far, the thing we've always wanna try to avoid is the whole body going that way, right?
Yeah, that's easier to do. So notice again where your neck just stops, and where the rest of your body would want to continue, stop right there. So this might be good enough, we're not yanking on our head, lot of times just the weight of our arm is enough. If we wanna add on a different sensation, we're gonna be playing around with the nerve plexus in the side of our neck and in the upper part of the arm. So we've got cervical nerve plexus here, we've got the brachial ones here.
A lot of times there can be some entrapment, and that just creates more nerve discomfort, in throughout our neck throughout the day, So we're gonna take our opposite arm over here, the left arm, and just hover it off of your mat. It's not high, it's pretty low on purpose. It's usually a good angle to start getting into the nerves here. So our palm is facing forward, and then all we're gonna attempt to do is flip, rotate your form in your hand, so the thumb is pointing down, hold that for a few moments, and then go back to where your thumb is pointing up. And we're going slow on purpose, your head position's never changing, but you might notice as you move your arm around, that changes the sensation in the stretch.
That might not be a good thing, though. So listen to that, if it's like, "Ooh, this just got way too intense," don't do the arm thing, just focus on breathing and holding your head in the shape. Finish when the thumb is pointing down, and then we're just gonna bring our arm down really easily, you can let your hand rest on your leg if you're in a cross-leg position, using your right hand over here, guide your head back to the center, and then eventually let go of it, and just kind of feel what's going on on that side. Hopefully, the whole left side over here feels a little more dropped, or at least feels a little bit more open. We'll do the same thing to the other side, so left hand, this time's gonna go onto the right side of our head, and then same thing here, start bringing your left ear to your left shoulder, this might be a different side entirely, right?
One side of my neck is always way tighter, this is the tighter side, that's why I didn't start with it. Okay? So again, check your body out, if you're leaning, we're really smart. We think, "Oh, I'm going so much further," It's like, "Eh, actually this hasn't moved." It's at the end. And then just take some inventory, so this might be enough. If it is, hang out, breathe, make sure you're not tensing up your face, if we wanna add the arm motion, get into the nerves here a bit differently, we'll go ahead and add that on.
So we're opening the right arm out to the side this time, and yeah, just hovering off the mat. If it's up here, different pole, okay, but play around. Too low might be too much, so definitely allow your arm to lift up higher, it'll take some of the tension out of those nerves. So as we go to continue on, we're gonna rotate our thumb to the floor. Okay, so the whole arm is turning in, essentially, but the forearms moving the most, of course.
And then we're gonna rotate our palm forward again. So there's always this sensation of reaching our arm out. Okay? Not necessarily pushing the shoulder down. Don't have to be that aggressive with it. Yeah, be nice to your neck, it holds this bowling ball up all day.
Okay, so we'll flip it again, and then again, we go thumb to the floor. And maybe just one more in each direction, if you've had enough, you know, come on out of it. Finish when the thumb is pointing to the floor again. And then really easy, just lower your right arm, let it rest wherever it works. Use your left hand to help guide your head back to the center and then eventually, let it go.
So we'll just sit for a moment, maybe turn your head, look around, try to take some inventory in your facial muscles. Am I clenching my teeth? And you try to feel very relaxed around all of your facial muscles, your neck, okay, even around our eyes. And when we feel like we're ready to just settle our head, and settle our bodies into the middle ground, we'll take a nice big breath in, let our arms reach up, hopefully it feels easier to lift them up than it might have been in the beginning, we'll open 'em out to the sides, think of them going slightly behind you as they come down and around. And then let them settle in wherever they're comfortable.
Thank you so much for joining me for class today.
Begin Pilates: Functional Practices
Comments
You need to be a subscriber to post a comment.
Please Log In or Create an Account to start your free trial.
