Description
Looking to go more in depth with these concepts? Check out Danica's Training Movement Pathways tutorial here.
About This Video
Transcript
Read Full Transcript
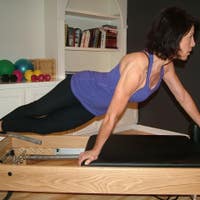
Hi. I'm Danica Kellum De Rolo, and this is training movement pathways where we're really looking at the muscularity of our posterior and anterior oblique slings. We're gonna start with a jump board attached at the end of your reformer with a heavy spring load and get into some footwork. I'm gonna use a magic circle so that we can close the chain across the shoulders and have more stability for the upper body. Come to the edge of your carriage, have a seat, bring your feet to the top of the jump board as you get settled into the reformer. Come into your pilates v with your heels lifted.
If you have a long Achilles, you may be able to get your feet all the way down, but you're probably gonna be hanging out in the back of your ankle and heel if you do so. So keep a little lift. I'm gonna give a light squeeze to the circle press it up out away, the farther out you go with those arms. Of course, the more work it's gonna be. Feel free to keep a little micro bend in the elbows that will still give you that closed chain across your chest and upper back. I'm gonna reach through the ankle in the heels and come to a flat foot and real dorsiflexion.
This is what I love about doing footwork with the jump board. It actually makes you work through the whole chain of your ankles, knees, and hips, fully unlike with the foot bar where we're really working specific parts of the foot. Once out here, keep the heels together, give a lift and press a lower, bend back in And again, be aware of where your Achilles needs to allow the calf to lift the heel while still keeping a solid press into the metatarsal. Press and reach the heel. Lift lower, back into a bend of the knee, lifting the heels to finish. And again, I'm on a heavy spring so I can really feel the spring wanting to pull me into the ground or the board as I have to work the opposition of my core up into the shoulder blocks.
A lift, a lower, a bend in. Now we're gonna go ahead and rotate into parallel But if we keep the metatarsal planted and just take a little twist on it, we'll be about hip width apart now. Pressing out, moving through the ankle, the knees, into the hips, a lift, a lower, a bend, and be clear and precise about when the heels should lift. Reach, press, heels, and doing about five to eight and each, depending on how many different footwork variations you choose to do. And we're just warming up the feet, ankles, and that whole chain all the way up through the knees and hips.
We're gonna take a straight leg flat foot and just give it a heel lift and a lower with straight legs lift. Reach two more up and lower and lift, keeping the heels lifted, a little bend in the knee, fire up those quads with a little bit of a pulse, which really concentrates the work around the kneecap and that lower quad. Which really needs a little bit of focus for all of us. And then we're gonna come into a flat foot and give another set of pulse as this really does change what it feels like at the top of the hip. One more set, and I'll finish with a straighten all the way up, one extra heel lift, lower, and bend the knees in. We could also do feet wider than hips, with a little external rotation if we like, which actually targets the inner thighs a little bit more than if we're in parallel. You have any option you want.
When you're on a heavy spring, you want to use two feet, two legs. However, now we're gonna go into some single leg variations. So we're gonna roll up, and we're gonna drop some spring so that on one leg, we're not having so much opposition with the spring. So come on down to a spring where you feel one leg is good for you. And we're gonna get back into those shoulder blocks, find that magic circle. And as I press out, I'm gonna draw a knee to chest send it back into the board and bring the other leg up.
An easy alternating march to find how you have to scoop and pull at the same time as you stand and reach. Then we're gonna go ahead and move the carriage in opposition to the working leg in the air. As the carriage comes in, leg stretches out. I'm gonna keep the foot on the board endorse the flexion rather than doing the tendon stretch heel lower and lift to mimic what I would do if I were standing up, giving a single leg pistol squat or a single leg bend. Then I'm gonna add a straight leg reach out.
Pull up, reach out. Then I'm gonna add a little bit of torso curving up, finding those upper abs, and then going back into that opposition of the legs as we move. I'm then gonna hold and take an easy single leg circle. And two, and three, and then an easy reverse. Now, I can look down my midline in this 100 curve and really see and assess the stability of the standing leg on the board. I'm going to come in roll down, take a breath, change legs, we'll press out, and we'll find that opposite knee up, reaching over the board as we close the carriage, pulling that leg back in as we take the carriage out.
And this is your single leg stretch from mat going into your single straight leg from your mat work and lower and lift just two more And then we'll hold with the spring engaged, deepen those upper abs, pivot the chin to the chest, and really think reach the crown of your head up through the circle and use your sight line to assess not only your center line, but where you are placed on that standing foot. We don't wanna be sickled. We don't wanna hang out in the knee where now I really don't have anything going on. We have to feel that lift up under in the back of the thigh and stand into the board. Here we'll take a single light circle, and over, and one more, and then we'll reverse three to five Since you're under spring load, it's a little bit more intense than if you were just swinging your leg around on the mat.
And again, we could take more of our single leg stretch from the mat while up in this curve as well. But what we also wanna add is a little rotation so that we're really working that anterior oblique sling. So as I press out, I'm gonna pull knee to chest curve up and twist towards that knee. Now I've really made a concentric contraction across that anterior sling and I'm gonna go back into that single leg stretch pull in. Reach it out and pull it in.
Breathing where it feels most supportive and where you're really able to pull in a full inhale and a full exhale. I'm gonna come center as I place that leg, go hand transition to the other side, rotate towards that leg, and reach. Pull it in. Reach it. Pull it in.
Two more. And last one, come center, bend the knees and roll down. How many reps you wanna do is really up to you and again really realize on how many footwork variations you're going to do. I did a few and I did about four or five in each position. You'll have to judge for yourself not only what your body can do, but what your clients can do.
We are now gonna transition and take the jump board away and bring the short box on to the reformer. So depending on what kind of reformer you have, you'll come around and take off your jump board and walk it wherever you store your jump boards. Always remember that your short box long box may have more weight to it depending on what style of reformer you have. I think it's always a great idea to instruct your classes to grab the jump board with two hands rather than one and definitely don't drag it across the floor. Placing it in front of the shoulder blocks.
But before I mount the reformer, I know that this distance is gonna be too short for as long as my legs are. I prefer that you have tension fully pulled in the foot strap without you having to rest onto the frame of the reformer. Of course, we have people who are so tall with such long limbs that that's unavoidable. But for me on this reformer, I'm gonna go ahead and gear it out one gear so that I have enough room for my legs. And loving contemporary reformers, gearing out is a lot easier.
I'm gonna load the spring so that the carriage stays quiet. It's not gonna move. Mounting the reformer, one foot under the strap. And like I said, I want you to have tension in the foot strap. You should be using it like it's an integral part of the equipment. Now we know short box usually starts moving through your sagittal plane with a round back, rounding back forward, and a flat back, reaching, opening the front of the hips, coming back forward.
But what I wanna focus on is your side bend and your twist, and we're gonna add a fun variation that gets everything involved in the back body and front body. So for your side reach, up and over to one side, find a contraction that draws your head around in an arc coming through your spine stretch forward and stack up. Keeping a press apart with the outer hips to keep tension in the strap. Over to the right. Draw the arc of your head around in space to the front of the reformer, find your spine stretch forward, and stack up. Now if we make it a little bit bigger, You'll really find this moment where we contract pulling towards that same side of the hip and leg contract into a deeper spine stretch, really find elbow towards up.
Really find elbow towards that same ankle and then stack up. Over contract and twist through center to the other side. And up, and one more because it feels so delicious. You're trying to keep that pelvis and thighs as stable as you can, really making the muscles of your whole torso, orbit around your spine from the rotation and the lateral flexion. If you need to scoot back, keeping tension, but do have a little distance between you and the back edge of the box.
This protects your sacrum if you go back too far. Now going into a twist, keeping hips still will mean that our twist really stays minimal and concentrated in the obliques to spiral the spine. Throwing your elbows to get more rotation is a different exercise. That would be more about saw. What we really want is just that plumb line to take a nice rotation in that central axis.
But then we're gonna go a little bit into some black back where we have to challenge the obliques a little bit more. Breathing. Reach back, come forward, and center. Many of us know magician, but let's take it into more of an around the world. So we're gonna twist, reach back, come through center to the other side, forward home. To the left, reach back, come across your midline to the other side, and home. One more time.
Twist, reach, pull that work across your obliques, bringing the muscles of your back with you forward, home, last one, to the left, reach it back, all the way over, forward, and home. And yes, I'm shaking because it's hard. Now, we're gonna turn side on the box, and go ahead and just take a stretch. Flex your foot, come into a parallel to latch the strap, and then take your hands out to the runners of the frame, reaching out, take a nice stretch. Here's where you can really see the posterior sling. As my lat stretches of this arm, I can really feel how my whole back is pulling apart, and it gives me a nice stretch of the glute on this side with a little bit of load into the inner thigh.
Therefore, my anterior sling is nice and contracted so that I can get that reciprocal inhibition of eccentric through the posterior. Now I'm gonna reach towards the floor. If you can put your hand on the floor, go ahead and press into it. I'm not quite long enough, so I've just got my fingertips there. Then I'm gonna rotate and open the chest.
Look up or look down, looking center is gonna be the hardest. I'm gonna choose up because I wanna find that top side, lift, and I'm really working all of the lateral sling from ankle all the way up. And just one more, and then I'm gonna come back into that rotation, easy stretch. Then I'm gonna come all the way up. Now I wanna get my hips involved with the spiral and rotation of the spine.
So I'm gonna anchor my sits bone and therefore I have to turn on this angle so that both sits bones are on the box. Rather than squared forward, now I have lift here. And I know my foot is touching the frame, but keep it flexed because it's gonna catch the strap as soon as I reach out. Ground both sits bones squaring shoulders on top, hands behind the head. If you wanted more challenge, use a stick or a magic circle.
The farther away you take your limbs, the harder it's gonna be. So I'm gonna initiate, not from my waist, not from an actual twist, but from the leg in the strap coming into internal rotation. As that happens, I have to push with the other hip as well to end in my twist. I'm gonna take a contraction, a reach up, a contraction, a reach up contract. And now as I reach up, I'm gonna pull that sits bone back down and come all the way back to home, again, on this angle to be square. Now I'm just gonna take it in one swift motion and inhale up, exhale push, inhale, and return.
Two more reach and all the way back up. It really gets the orbit of the hips into the spiral of your waifs. One more to grow on. Go back into the stretch. Last good time.
We're gonna lift and come to the other side where you're gonna be able to see more of that back line spiral as I face my back towards you. We'll bring that foot under the strap, bring it parallel with flexion to really catch the tension. Come into your twist, come to the frame, and stretch. Now I've got my right arm reaching a little bit farther than my other arm so that I can really get that full line of the posterior sling to open up. Breathe strong, exhale those abs deep. Reach with the floor, open the chest, and now we are square to that wall in front of you. I'm gonna look up, and then find where this lateral sling work all the way through my outer hip up into my shoulder. And, yes, even my neck gives a little lift and back down.
And up. You do not need to come all the way up because again, we really just wanna target coming up into gravity with that lateral work. One more and come back into that stretch. Now I'm going to reach down through this sits bone so that it can pull up the whole weight of the torso. I am now no longer square to the wall, but a little bit more in a diagonal so that I can anchor that sits bone.
The leg has also come out of the parallel. It's not quite externally rotated, It's just not parallel either. But as soon as I start to go, the spiral's gonna work its way up through the hip into my waist back and shoulders. Here we go. We take a reach and a twist exhale contract. Lift, give that two more really working into that front body in this spiral.
And up, last one, now reach through that sit bone and come up. I like to say push and flip, pull and twist. Push and flip, pull and twist. Last one. And while we're here, we'll take one final last stretch. Notice how I can go a little bit deeper over because I've gotten that activation.
If you work concentrically, the eccentric feels that much better. Coming back up, shaking it out. I like to come center and finish with an easy rollback in that sagittal plane so that both sides work evenly and uniformly. Because regardless of how strong you are, one side of you is always stronger than the other. Simmetry is a marketing myth. So you do the best you can with what you've got and just bring yourself back into that idea of working uniformly side to side, we'll take an easy extension, bring your forearms to the edge of the box, let that be a push so it opens up the front line a little bit more. And gives you some support in your upper back extension.
Coming chin to chest, reaching the arms, and taking a full dive out over, grab what you can, ankles, feet, foot bar, whatever, take an extra little stretch, and then roll up. Now we're gonna shift the box from short to long and look at some variations of pull straps and tee. To really load and target everything in the back body in our posterior slings. So step off, change your box long ways still in front of the shoulder box. And significantly lighten your spring. We had on all springs to stabilize the carriage in short box.
So I'm gonna come down to a very light spring because I'm going to be doing single arm pull n t. Coming down onto your stomach. Depending on the length of your long box to the length of you depends really where we're gonna set up the body. On this piece of equipment, I need to be a little bit farther back so that I don't feel so top heavy in the front. You wanna feel even.
I'm gonna grab the loops bring my head down. Just doing an easy double arm pull, add some extension at the end, because again, I'm on a very light spring. Return and arms come back forward. This is to just say, hey, triceps, upper back. We're about to do stuff.
We're doing stuff and come back forward. Now I'm gonna set one loop back And then to take this hand, I'm gonna press it into the box or into the shoulder blocks, whichever one makes you feel like it's connecting you and the equipment together. Then I'm gonna bend the opposite knee to the arm that's about to work. Therefore, when I pull this arm back, I am fully engaged in that posterior sling from my left latissimus Dorsey all the way down to my right glute and hamstring. Bring it back forward, and pull, and return. Keep a pull of the box and carriage to you with that opposite arm so that side stays engaged as well.
We're then gonna pull back open out through RT, return the carriage, and come back down. So it's a half of a circle, lift, reach, rotating in that shoulder girdle, and coming back down. One more, lift, reach to the t. Now hold the t and give a pull with a little rotation of the neck to look back at that hand and return. Because the muscles of your neck are part of your spinal system too. And return one more pull and return.
We're gonna reach that leg back out and change sides. So I put the loop down, change hands, grab the other. I'm gonna bend the opposite knee to the working arm, and a single pull straps and return home and pull and return one more pull and return. Adding the circle, pull lift up and around, come forward through t and back down, and lift and pull up around and return one more Three of each variation is really enough and return, but now hold the t. As I pull that single arm t, I'm gonna rotate head, look back at that hand as well. Return head and arm, and pull, and I've got a good pull with his left arm, keeping the feeling of me and the carriage being one unit together.
Pull and back forward. Return and reset the loop, and we're not quite done here yet. I'm gonna pull on both shoulder blocks. If you feel better, you can even pull around the frame. This actually feels better for me on this piece. I'm gonna bend both knees, have a little lift into those hamstrings, so I'm not heavy on my thighs. This is gonna cause my hip flexors to go more active than they need to be.
Lengthen through the front of the hip, work into the back of the hip. Give a pull, whether you're holding the post or you're holding the frame. And then you're gonna ask, for a twisting and a lifting of one side, exhale return. This really fires hammy glute up through that lumbar into the opposite shoulder and return. And lift, rotate, and return. If you wanna add rotation of the neck, I would look towards the knee that's lifting, and come back down, lift, and rotate.
And come back down, one last set, and back, and over, and return. Stretch out the legs. Let yourself round over the box. Press up, come up through an easy swan, and then you can crawl the knees forward to arrive in your quadruped position. Now I could load my leg and put my foot in the loop I could load my upper body and pull, but we're just gonna take easy bird dogs, no ropes, no spring, opposite arm to leg reaches out.
The challenge for your neuromuscular system to be on this box is enough for me. Yes. I can load it, like I said. But I've got more to do, and I'm gonna pace myself and pull back in, and reach out. Now as the arm lowers, the leg comes around to the side. I'm gonna lift that arm all the way up and contract, stretch back out reset.
Opposite arm and leg, contract as you sweep the leg forward, pulling that arm all the way up and back. Here's that back arm of your saw as you contract and scoop, bring it back. And down one more, and reach. Exhale, pull, and bring it back, and return. Last one. Reach. Contract, pull.
Reach back out. And reset. I like to come in and give a little bit of an adult pose where we keep our abs lifted and our spine rounded on purpose versus just sitting into our hip flexors and resting on our thighs. We'll come on up, dismount carefully, and we're gonna go ahead and say goodbye to the short box and long box. Use both hands because again, some of these boxes are very heavy.
Return it to where your boxes live, this one goes on the back of the reformer. We're now gonna come into mounting the reformer into our up stretch and transition that into kneeling knees off with some single leg and arm variations. Football is gonna come up. Important to know that on traditional equipment like a controllogy reformer, The footbars are not latched. They are not secured. If you pull up on the footbar of a controllogy reformer, the footbar will lift, you will fall, and your entire workout is over for a while.
So When you do have a secured foot bar, remember that your goal is to return the carriage with the use of your core strength, not just the pull of the arms. Okay? So we're gonna set it on a medium to heavy spring, and we're gonna come hand opposite foot where the heel is lifted and the ball of the foot has a press into the carriage. It's a down and back. Lift through your midline and bring the other leg up.
So up stretch really just looks like a press out. And come back in. If I wanna add an elephant curve to it, then it gets a little bit more towards the traditional way of doing the exercise, where I'm gonna curl through the tail extend through the spine, still keep a little bit of 100 curve into those upper abs, especially for taller people. Otherwise, they'll end up sinking in their shoulders, and we definitely don't want that. Lift back up into that elephant, reach out, come forward, and back up. If you want it again, make it a little bit easier, just stay in that plank line, come forward and press out. Come forward.
Now I'm gonna press out and hold, then I'm gonna contract my spine, bend the knees, and now I am in kneeling knees off. Pressing out, exhale come in. And in, and in, and in. It's hard to not bang the springs on this one, do your best. Then we're going to slide a foot forward. Now we are in really that position that runners would take to push off the starting block.
We're gonna add the challenge of a single arm, opposite arm to the leg that's in front. Reach. Reach. I'm gonna bring it back, and then add that single leg stretch again. Then we're gonna hold the carriage open with the knee in. Take a twist, come back center. The carriage is open. The spring is engaged, so I cannot lose that contact as I find that rotation.
Reach it back. Going back into my double legs, getting ready. For that single arm, right? Bring it back and single leg forward. It's up to you to decide how you wanna do that. I could also do the single arm here as well.
This is considerably harder as I showed it on the first side. Return. Then we add the leg. In that single leg stretch, and reach and reach hold the spring open. Twist. Come back center.
Twist. Come back center. If you need more twist and pull that knee in a little closer, center. Twist and pull in. Last one. Reach it back. Come forward.
And then come down. Now I'm gonna go into some side bend or prep for your star, and I just wanna show you the traditional way to mount the equipment for these exercises, which is very advanced, and then I'm gonna show you a modification that's more accessible for everybody. So if I step off, the traditional way to come on for any of your side planks, side bend star work, is to place one hand on the foot bar really over the center of the spring bar. If you've got five springs, that's very easy to judge because you've got a hook to line up with. When I bring that same leg to arm, onto the carriage, it's gonna come to the back shoulder block. So already when I come onto the mount, I will be slightly behind the hand, and that's what you want because you want to pull into the back of your shoulder.
If you put your hand in line with the shoulder block, when you come up, your weight is most likely gonna fall into the front of your shoulder, and your upper trap is gonna do way more work than the rest of that posterior shoulder girdle, and integration with your lat. So again, to the center, and this is very advanced. Remember what I did in the short box of that work of the hip bringing me forward around in that twist because that is exactly what brings that other leg up. And you can see why this, therefore, is the most advanced way to do this. Come on back down.
Try it for yourself, but now let's do something that's more accessible. Come back into your up stretch position. Hand, foot, hand foot. Round your spine to a lifted elephant. Now move the hand to the center of the bar, turn both feet, turning toes, and then lift up open into your side.
So much more accessible. From here, we can do anything we want, pressing out through the lower body, coming up to close the spring. We could also reach and look into that palm, find a side bin to close the spring. We could also then take a lowering into and come back up. But again, we're back into working the lateral sling and finding all of the stability through your back and front body. Last one, coming up.
Now to transition, we're gonna bring the hand down lift the feet, back through your up stretch, move the right hand over, change the toes, and open up. What we did on short box should really set you up for any variations you wanna do in your side bend or your side arm plank, up and over. One more, and up and over, return into that up stretch, and I like to finish, uniformly, we'll go back into one more coming forward, chin to chest, rolling up through that thoracic flexion, lumbar flexion, and home. Stepping down with control, and now we're gonna finish with some easy standing exercises that really, really bring it all together in terms of what we have to do through our front and back body, as well as when we add rotation in that transverse plane. We're gonna come down to one red spring.
Anything more is a little too much. Anything less, not enough. You're gonna stand close to the reformer. This is my left leg And I'm really gonna bring that foot all the way into the frame of the leg of the reformer. My other foot, right leg, is gonna wrap and drop the heel around the edge of the carriage, similarly to how you would intend and stretch.
I'm then gonna lift up tall and summon what my body knows about pumping on the chair. And I'm not pumping, but I am going to push as I push away. Let's bring hands behind the head. The spring is pushing back into me. The challenge is to accept that into your back body instead of falling into the front of the hips to try and move the spring and pull back in.
Does the knee need to straighten? That's up to you. You do have to control the carriage and you have to hold your balance. Press out and come back in. Now we're going to add a rotation as we press out.
Twisting towards the reformer leg. Press twist, pull it back in return. Press and twist and come back in. Two more, I really feel this in this leg. However, it is a fire on this leg. One more.
Twist and come back. Of course, we have to dossy dough around to the other side because the amount of fire that's happening on that standing leg needs to be felt on the other side too. So I come around And again, I'm standing very close. My ankle bone is actually touching the leg of the reformer. My heel wraps down, gives that bird on a perch tendon stretch feeling.
And as I push out, the spring pushes back into me. It's a meeting of forces, as well as the acceptance of gravity as a force down into twisting towards the leg, and return. And twist, return. Two more. Reach all the way into that spring. Come all the way tall back up into gravity.
One more. And two. Now that is a pushing away from the back body. Let's do a pulling towards it. You're going to very carefully step inside the well. Which in traditional world is breaking a very big law, but we can do what we want.
So you're gonna mindful of the ropes or the leather, step into the well, and turn and face the carriage. I'm gonna step slightly off center to the side, and I'm gonna be a good distance away from the headrest. You'll see why. I'm gonna take my right leg, and I'm gonna hook my heel just over, flex the foot, already engaging that hamstring, let's reach arms out to the side. So now it is a hamstring curl that is gonna pull into my back body versus push.
And I can only bring it as close to me as that headrest hits my shin and let it reach back out. Believe it or not, the carriage returning is where I really have to find the opposition so that the spring doesn't pull me with it. Now when we add rotation, I'm gonna pull and hold, rotate towards the leg, then I'm gonna also add contraction trying to square my collarbone parallel even with the edge of the frame. As the leg stretches back out, lift and open, exhale contract back into. Inhale, grow, grow, grow, exhale squeeze the air out.
Two more, inhale, and exhale really working to mirror the line of the frame Last one, contract, stretch it out, come back to center, carefully return, again, being mindful of the ropes. I'm gonna step off center to the left because if I try to do this from center, then it's too open for the width of my pelvis. Okay? So I come a little bit over, bring the heel to the shoulder block, arms reach out. Hamstring curl pulls it in as I press down to go up.
That is the opposition that we started with in footwork. That should be the main goal of everything you do in pilates, and stretch back out. Now we add the rotation. Twist towards the leg as you have that hamstring really engaged, and then take a contraction. As the carriage returns, lift and extend still holding the rotation, contract, and reach.
Contract. Two more. Breathe in and up. Exhale squeeze the air out one more, and return to carefully remove the leg, and then we're gonna step carefully out of the well Now that you've seen and done the workout, go back to the tutorial and really try to connect the information to what your body physically feels. Also spend time studying the PDF, where I break down the actual muscle groups that are involved in the anterior and posterior oblique slings.
Intermediate Reformer: 40-Minute Classes


Comments


You need to be a subscriber to post a comment.
Please Log In or Create an Account to start your free trial.
