Description
About This Video
Transcript
Read Full Transcript
Hi, everyone. I'm so excited to be here there for my last class in the "Frail to Fit" series for Pilates Anytime. The first class was a principles of strengthening class that was designed to help you start the thought process for designing a strength program for someone with low bone density, that's either frail or fit. So somebody that can't get down to the floor and back up again would be considered to be frail. I don't call people frail to their face, but it is a label that is used in the healthcare industry.
So to describe people that have frailty, or decreased leg strength, and inability to move around independently. So my goal is to help people be strong, active, and healthy for the rest of their lives. And this series was all about that. Again, the five-class series is gonna be on Pilates Anytime, and you'll go to pilatesanytime, forward slash, live. to access the whole series, and all of the classes will be posted after this one ends.
So you can find all of the classes there. The second class I did was more of a intermediate mat class for the fit older adult with osteoporosis. The third one was for advanced students, like Pilates teachers who have low bone density that want a really challenging, advanced, more fast paced workout. That was class number three. Class number four was last week, and we did a senior kind of preparation for this type of class, getting all the props together that you'll need.
So I'm not gonna go through all that, because you can look at that fourth class and go through all the props and setup and everything that you need. I'll certainly mention all the safety issues as I go through the class. Today I'm gonna imagine that I'm in a recreation center, community center, or working with an older adult in their home and can be on a Zoom or in person, and I'm taking them through an entire class. So I want you to get all the exercises that are listed in the handout that is gonna be posted as one of the resources for the class. Here is the handout here.
And, yeah, and you can see that once the classes are all posted, all right? So you'll get those handouts with all your cheat sheets and everything. Okay, so we're gonna get started and you'll need to take your shoes off first, and have a chair that's sturdy. You don't necessarily have to have arm rests on the chair. It can just be a sturdy chair that is not gonna move around when you stand up and sit down, it needs to not slide.
So against the wall is actually a good place to put it. I'll be twisting the chair back and forth a few times so that you can see all the exercises properly and see the alignment of my body as I'm doing the exercises to demonstrate. So you'll need your dowel. You'll need tennis balls. You'll need your little box that I suggested last week, your little shoe box with all your props in it.
I have my eight-inch ball here, which can just be a ball from the toy store, or Target, Walmart, wherever you get an eight-inch children's ball is fine. If you're gonna lie down on it, you need something more sturdy. We got this little elastic loop. I send these for free to people. So if you want one, just email me, I'll send you one.
Send me your address I'll pop one in an envelope to you for free. And then they Fletcher towel I love using, and a medium tension TheraBand, a dog leash, and tennis balls. So those are easy to get at the health club where the tennis coach is always looking for a place to give their balls. Okay. So I'm gonna sit here and put my accoutrements all out of my way.
So I don't want anything in the way to trip me. So I want it either to the side or preferably under the chair. Okay? So we're gonna start with opening the toes and then round the toes. So doing little inch worm crawling forward, really getting the feet warmed up.
And I did this in a lot more detail last week, so if you wanna see the kind of prep of the toes. I want those feet alive, working, and stimulated. All right. Now the next next event is I'm gonna get two tennis balls out. Since I'm sitting I'm gonna get two tennis balls out and I'm gonna roll my feet on the tennis balls.
So you want to roll from the big toe to the heel, between the first and second metatarsals to try to get those to spread apart. And then between the second and third metatarsals, and then the third and fourth, and fourth and fifth. So spending as much time as you feel like you want to with that. What I usually do is have people do this while they're waiting for class to start, and put these under your computer desk. You know, if you're working on the computer, sending emails, you can roll your feet, or watching television, you can roll your feet anytime of day.
All right? And then the next thing is to wrap the toes around. This is what I call the "parakeet action," kind of takes the place of the reformer, or the foot corrector, and wrapping your toes around and really trying to deal with the hammer toes and the bunions, and plantar fasciitis if you have it. Okay, so that being said, we're gonna get rid of the tennis balls, and then next event is gonna be our dowel work, and looking at the hip hinge, okay? First though, I wanna show you something that I do to kind of warm up, and use the eight-inch ball for that.
I'm gonna turn the chair to the side for that. All right, so putting the ball as high as you can on the chair. What I love about this chair, two things, one, it was my grandfather's chair, and it's very special to me. And number two is that it has a really high back, so I can get way up, really high, with the ball, and get right into that dowager's spot. So I wanna get at that first thoracic vertebrae there and see if I can get that vertebrae to push forward.
So I'm gonna get my hair out of the way, I'm gonna put my hands under my skull, lengthen my spine, and then wrap around the ball, and really try to get my neck to wrap around it. And my thought is that I'm gonna push that T-1, or that first vertebrae, forward in the thoracic spine that has a rib attached, and wrap it around the ball. Breathing in. You might feel something in your throat with this because the vertebrae is right behind your esophagus and trachea. So that's normal to feel something in your throat, which is why forward head posture makes it harder to breathe.
Shuts down and closes down the esophagus and trachea, makes it harder to swallow, can lead to problems with heartburn, and certainly breathing disorders. Okay, now we're gonna take the ball down another notch, and then arching back, wrapping around. Inhale to take it back. And exhale, sitting tall. Inhale, take it back.
And exhale, sitting tall. Breathe in. And breathe out. Breathe in through the nose, and out through the mouth. And now let's take it down one more time.
And then we might even be able to go one more after this too. So it's right at the mid thoracic area, inhaling, stretching back, wrapping around the ball, breathing in, and breathe out to sit tall. And then one more time down. And then that's probably about as low as we're gonna be able to go. The lower thoracic area is the last point, because if you put it in the lumbar spine and start arching back, you're really gonna shove those vertebrae forward and people with stenosis or difficulties with that lumbar spine with extension may have a hard time with that.
So we are gonna put the ball into the low back now. Now that our shoulders and upper thoracic is nice and mobile, and you're gonna have your hands on your knees with your arms straight, and let's just do a small pelvic curl. And I'm gonna try to press pretty hard into the ball so you can really see me smashing the ball. So you see that I'm smashing the ball there, and then exhale pressing back, and inhale, release. And exhale to press back, and inhale, release.
So I'm just doing a little slight pressure into the ball so that I am working my abdominals and really releasing the back. So this is a really good one for releasing back tension. Exhaling, stretching back. And one more time. Ah, it feels really good, I love that one.
Okay, now taking the ball, and we can place it between the knees, and do a little squeeze of the ball, reaching your arms forward, and then do the curl, the pelvic curl, with the ball between the knees. And then just for a variation, you don't have to have the ball between your knees, but you can do that to add some adductor work with that. Exhale, curl. Inhale, sit tall. And then exhale, small curl.
And sit tall, so not losing the length in your spine. All right, now we're gonna take the ball and put it aside, roll it across the room, 'cause we won't need it anymore after this. And I'm gonna take the dowel and put it on my back. So I've got a couple of options for you with this. So sometimes this is really challenging for people's shoulders.
So if you have a hard time reaching up with one shoulder, try the other one, or I'm gonna show you how you can kind of tie the stick to your back. So we're putting the dowel at the three points of contact, the head, mid back, and sacrum, and we're keeping the thumb in between the stick and the low back. So here's the issue, if someone has a lot of thoracic stiffness or kyphosis with stiffness, and they cannot get their heads to the stick, then it's gonna be really challenging to try to get your arm back there and hold the stick. So you can either hold it with just one hand and do just two points of contact, or if you can get your hand in there and make a little spacer with your thumb, so you stick your thumb into the back of your head, and then like that. So that can help with a rounded upper back with some forward head.
And so that you can feel the three points there by filling up that space. And then the other thing you might think about doing is getting a stick and putting a strap around it like this, just like the TheraBand, and then you can just tie the stick around your back. So can do like that. Then you can hold the stick to your back. Now, of course, you're gonna have to have it really high so that you don't sit on it, but you'll slide the stick up and just tie it around your back, and that way you don't have to hold it to your back.
That's a nice thing to do if you're practicing lifting, or gardening, or just practicing your technique at home, doing your squats, and you don't have to hold on to the stick. Okay? I showed this stick too, because this one does not have a rubber stopper on the end. And if you put this on the floor, it's gonna slide. So if you're on a hard floor, or tile floor, wood floor, you need to make sure that you have the rubber stoppers when we get to the next part of that class.
Or you put your pole on a carpeted surface. If you're on a carpeted surface, that's fine. It's actually safer to exercise on a carpeted surface because if you were to fall, you wouldn't hit such a hard surface. But it's hard to balance on a carpeted surface. So hard floor is easier to balance.
Okay, so getting the stick, and putting it in the position that works for you, and we're gonna hinge nose over toes. So, so often, I was just working with a patient yesterday, he did not want to get his nose over his toes. So he kept wanting to get up without leaning really far forward. When people get older their balance diminishes, and it's really scary for them to bring that face really far forward over the toes. So that's something you'll have to practice and get used to.
So I want you to really practice getting the nose over the toes. And it really almost needs to be in front of the toes, and take it back up. Another way to practice this exercise is to get against a wall. So get really close to a wall. So I'm just gonna show it here against a door.
And trying to get your head to come all the way to the door, right? So that the stick can't be this long, you won't be able to use the stick to do this, but you get your head really close to the wall like that. And then you figure out how far you need to be. And then you don't feel like you're falling into space. You have something to press against if you feel like you're going too far.
And then another idea that you might think about is to touch the wall at the level that brings your nose over your toes. So I love that way of doing it. I've worked with patients in hospital settings a lot with this technique, really trying to do this. I can't do this in a big group of people, but if you're at home, or if you're in a one on one setting, this is a wonderful way to get that whole idea of getting the nose over the toes. 'Cause it's really important for standing, and it's the only way they're gonna be able to do it properly.
Okay, so from here I'm gonna slide back a little bit, I've got my little sliders on the chair, and I'm gonna hinge forward, like I said, and you can use a hand to get up, you can use your dowel to get up, and we know that we have weakness if we have to use our hands to get up or something to pull up on. All right, so I'm gonna stand with all of my accoutrements under the chair so I don't trip. And then I have a firm sofa here that I can hold onto, that is a really sturdy object. So that can be a countertop. It can be, like I said, a heavy dresser, or a buffet that is as sturdy object to hold on to.
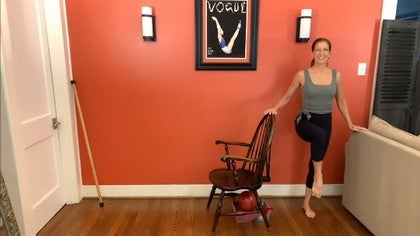
You want to make sure you have that. And then I've got the back of the chair and then the dowel. Okay? So starting with my feet together, I'm gonna stand up and rise up on tiptoes, thinking of my standing and centering cues. I went over the Fletcher standing and centering cues last week with the tripod of the foot, the magnet between the legs, the bolts through the pelvis, keeping the pelvis level front to back and side to side, the girdle of strength, having the ribs over the pelvis, making sure that you're not forward or backward, and then the ribs are stacked up right on top of the pelvis, and then the collarbone upper body alignment, shoulder girdle, and throat pulling back, and then finally the breathing, so making sure that you're practicing your costal breathing.
So now that we've practiced our posture and we've done our heel raises with heels together, sometimes people cannot do that with their heels together because of valgus in the knees, so you just use a little spacer to do that. If you have severe valgus, I've used the eight-inch ball as a spacer sometimes. So if somebody has really severe valgus, that eight-inch ball is really great to put between the heels. Okay, so now we go onto one foot, lifting one leg up and you wanna stand on the side that you have the most support. So you want your weight to shift over that leg.
And that's sometimes hard for people, so they don't want to shift their weight, and they're kind of scared, and they're not confident on that standing leg, so you wanna shift that weight over and then start your heel raise. There's always trouble with this one because some people are very weak, don't bend the knee, so you wanna put your foot maybe on a stool. I'm just gonna turn, because there's a little lip on this chair, and I'm gonna pretend like this is a stool. And then you can just do that, and that takes some of the weight off the standing leg. You'll want to do at least 25 of these.
As you work up, you don't start with 25, you can start with 10 and then work up to 25 in a row for someone that is 65 years old and older. So anywhere from 65 to 80, you should be able to do 25 of these. If you're over 80, about 20, okay? All right. Now other side.
Lifting up and then you try to lift maybe the dowel, maybe put the dowel down and lift your hand off the chair and just hover it above the chair. And then if you can lift both. So you've got things next to you if you need to grab hold again. Please feel free to put the dowel down, get your bearings, focus on a vertical line in front of you. That's usually really helpful for stabilizing the balance.
And then rising up. Okay? Now from here, we're doing maybe one set of 10. Maybe we're doing three sets of 10, maybe we're working up to where we can do 25 in a row. But you do want to get to that goal of normal strength, not optimal strength, not super human strength, but normal strength is 25 in a row.
Okay? So now we're gonna go to single leg stance heel raise with proper ankle tracking right here, and then we're gonna start to slightly bend the knee. So this is where the trouble starts a lot of times. I wanna put my foot down here for a moment, and then I'm gonna bend. So this is just a parallel, those of you that are dancers, this is a parallel plie.
So you're just barely bending, sliding down that wall behind you. I can stand against the wall and do a wall slide. So small wall slide. What usually happens is knees bumped together and the valgus knee happens, the feet collapse. So what you want is to slide down the wall with the knees slightly apart.
So keeping those knees slightly apart as you bend. The other thing that I love to cue is the big toe, so keeping the big toe lifted, and then bending and straightening, and then finally going to one leg, and then bend and straighten. If you have knee pain, just stay with the heel raise for about two to three weeks until you get a little stronger, and then you should be able to start doing the knee bends. Okay? Other side.
And slowly lower down. So a lot of times I'll start with just three weeks with never doing any knee bends at all, and working just on the single leg, straight leg heel raise. All right, now we're gonna take a little rest. Come to the chair, and we're gonna get our, use our good body mechanics, reach under the chair, and get your Fletcher towel, okay? And we're gonna turn, I'm gonna turn to this front so you can see me better.
And I'm gonna start with using the towel as a band around the rib cage to get more costal breathing. Okay, so if someone has upper lung breathing, that's usually shallow breathing, It's what I call scalene breathing, it tenses up the neck, and create tension and pain in the first rib and the neck area, and getting the breast down low first, usually, is the best thing. Working on diaphragmatic breathing with belly expansion and then working towards costal breathing after that. So let's wrap that strap around our ribs, really feeling it tight around your rib cage, and then when you inhale, see how the strap opens up, and the shoulders don't rise? Breathe in through the nose, exhale through the mouth.
Breathe in. And breathe out. And breathe in. And breathe out. Okay.
Working on that two-inch expansion and two-inch contraction, which is normal, optimal breathing for, or mobility for the rib cage with inhalation and exhalation. Okay? So taking that Fletcher towel in your hands. This is something I do preliminary with Fletcher towel work. I worked on this with Ron and he loved it.
He thought that was amazing. It was funny. I was telling him about the rotator cuff, and I'm telling him the muscles that were being facilitated with his work and how he thought it was so great for realigning and reprogramming the shoulder girdle with the Teres minor and infraspinatus being facilitated, he was just like, "I always had the melody, but I didn't know the lyrics." And we all laughed. But anyway, he loved this one. I call it shoulder setting.
He called it Sherri's shoulder setting exercise. So how do you say that three times really fast? And so we're just doing a little pull, and we're trying to get that humeral head to rotate back in the socket. And I'm not squeezing my elbows in by my sides, I'm just keeping them relaxed. And I'm gonna separate my hands a little bit more, keeping the feet together as I sit, and then pull apart.
My Ron's pet peeve was people standing on one leg, or standing with their feet wide apart. He liked people to stand close together. And what I love about that is it challenges your balance and it also promotes more muscular effort at standing. So it'll turn on those gluteus medius muscles, and it'll turn on those pelvic stability muscles, when you stand with your feet together more often. That's one of my favorite postural cues.
It's really hard to slump when your feet are together. All right, let's go one more time. We're gonna pull apart even more. So go to your end range. You're gonna feel like, "Oh, I'm not very strong there.
"I can't generate much contraction." But really all you're trying to do is activate that rotator cuff and get the humeral head more centered in the socket. Okay, now from here we're gonna fold the towel in half, put it across the shoulder girdle, from folded end to open ends, and then you're gonna hold it at the open end. So by the time I get it set up, I'm double the distance of my shoulder girdle. So, and I measure from collarbone to collarbone, right? And then lock the elbows, do a little pull.
Not great, right? That's really just straining your elbows and your neck. And if you bend the elbows just slightly, you feel how that eases neck. That's the shape. So you want that parenthesis arm shape and then pull, and release.
And pull gently. So you don't wanna twang the towel, right? You wanna pull gently and release, keeping feet together and sitting tall. So everything we're doing is encouraging postural endurance, with good form and lengthened spine. And again, pull and release.
Alright, now gentle pull on the towel, just keep it slightly taut, and let's press the shoulders forward and back. So can you keep the arms in that parenthesis shape while you pull the shoulders forward and backwards? So it looks like this, forward and back. And so you're not straightening and bending your arms. It's not a row.
It's a scapular protraction and retraction. And then when you go up overhead, you want to protract your scapula, take the arms overhead, and see if you can get them up to the crown of your head, and then slightly shrug, unshrug, and then shrug up and down, and then slight bend, pull. And release and pull. So you're gonna really feel those armpit muscles. I always say that the armpits are the shoulders best friend.
And the neck too. If you can get your armpits working, which is the Teres Major, you will likely relax your neck. All right, so from there coming back down, and let's hold the towel at collarbone height, and then let's bend one arm. And return. And the other one.
And return. I'm gonna turn to the side so you can see. And return and pull back. So your elbow stays parallel, and you can bring it lower if it's pinching your shoulder. So feel free to bring your elbow down some if that hurts your shoulder.
Really working those shoulder muscles. And one more. All right. And then we take it down. And let's put the towel aside.
Time for our next standing sequence. We do standing, sitting, standing, sitting, so that we can get a little rest of our legs, and then work them again. So we are actually gonna use this TheraBand. Now, if you have very compromised balance, or you feel very unsteady on your feet, you have any dizziness at all, do not use this band, okay? This is only if you feel confident with your balance, or fairly confident with it, and you want to use resistance for the next exercise.
So feel free to do this next exercise with or without resistance. I'm gonna put the band on the floor. What I love is, grab my dowel here, what I love for people to do is put the band on without touching it with their hands. See if you can get into it and work your feet a little bit. And then you've got the band on your legs.
And then what I want you to do is just kind of test to see, does that feel like it's gonna strain your hip? Do you feel okay with that? Is that too much? If it's too much and it just feels like, "Oh, that's really hard for me," then take the band and let's put it either up higher onto your shins. That actually take a lot of the strain off of the hip.
'Cause this is targeting the hip this next exercise we're gonna do is targeting the hip. And now take it up up here at your thighs, and then you can do the abduction here, and there's a lot less resistance there. So you choose which way you want to do it. And then let's scoot forward in the chair. We're gonna hinge at the hips, and then see if we can reach one arm forward, nose over toes, knees and feet parallel to each other, knees apart.
You get all that set up before you start. Your chest lifts, your eyes come forward. Now you get up, right? You don't wanna get up looking at your feet. I want you to see your feet for a moment to see if they're in alignment, but then you look forward before you get up.
Okay? Now we're gonna go around to the side and turn the chair so that I can face you. Okay, so I've got my chair here, my dowel here, and then I'm gonna stand with one foot forward, and then lift. So again, you can have the band around your thighs. You can have it around your shins or your ankles, progressively challenging yourself.
And then you can take it off if it's not right for you. So if you're new to the class and you've never done this before, then as best you don't use it at all. But if you're not progressing, you're regressing. So I want everyone to be challenged as much as possible at their level to keep strengthening and keep facilitating that muscular contraction and bone health. Okay?
So the other thing is to keep that in a really straight, you're gonna really work that muscle right above the kneecap, and distribute the force across the quadriceps so that you're not getting that hip flexor too strained. Okay, let's do the other side. And then see if you can lift one hand. And then if possible, could you take the strap down a little bit? It's up to you.
And then work. It's a lot harder when it's around your ankles. And then take your hand off, and then take the dowel off the floor, if you can just hover it above the floor, so you you've got it there if you need it. And your pelvis is as much as possible trying to stay level. All right, one more.
Okay? Now we're gonna go to the side. And take it out, and out, and try not to hike your pelvis. You don't change your spine. And again, this one's a tough one, so if it's too hard with the strap, then bring it up higher or take it off.
Seven, eight, nine, and 10. Okay. I'm gonna turn around and I'm gonna hold onto my sofa here. And one, two, three, four, five, six, scrape your heel on the floor every time, nine and 10. All right, now next event.
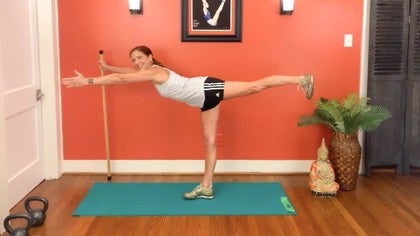
We're gonna take it back. I'm gonna turn and face the chair, extend the leg, flex the foot, knee straight, lift. Now you're gonna want to do that, right? You can do a hamstring curl, but the hamstring curl is not really gonna target the hip as much. So I want you to target that glute, and get that hip to extend, and lift.
So now, couple things, back might start aching, bend the standing leg. Right knee might hurt a little bit, bend the standing leg, see if that eases it a little bit, 'cause if you're locking that knee, we might be jamming it into extension. So you can tilt forward a little bit and that helps a lot. It doesn't mean you're rounding forward, but you're tilting forward at your hip joint and the neutral spine. And then that usually takes the stress off your back.
Really working those glutes, super important. Okay, I'm gonna turn around and face the other way. So you can see the outside leg. All right. If I need to tilt forward, I preferably want to stay vertical 'cause I want you to get strong in this position, lengthened up, be able to extend the hip, very important that you're able to extend the hip.
And then keep that back foot parallel. You can do a set in parallel. You could do a set in turnout, 'cause that will engage the glute even more. I like the parallel alignment to get that hip extension in that position for walking. And I like turn out to get more glute activation.
So, and then again, feel free to bend the standing leg until it's over if you need to. Okay. Excellent, all right. Now I'm gonna take this off, just step out of it, put it back in my little box, and then come to sitting. Put that on the side and come to sitting.
All right, our next event is to work with the elastic band. I'm gonna get the elastic band out of a little box, and again, put the little box under the chair, so you don't trip over it. And we're gonna do some exercises with the elastic band. All right. What I love about this next one is it does two things at once.
I love exercises that multitask. So I'm gonna wrap the strap around my foot, extend the leg out with my back all the way against the chair, and leaning back and support it. Sometimes people have tightness in their hamstrings, and leaning back is actually easier for them. But what I would love for you to do, gonna turn to side so you can see, so here I'm leaning back, so that takes a lot of stress off my hamstring. Can I get my legs straight?
Can I pull my toes back? Now I'm gonna see if I can sit up tall. Yup, there's that hamstring stretch. I actually feel it there. And then lengthening up so that I'm at a 90 degree angle.
And then if that's enough stretch for you, absolutely, that's fine. And then you're gonna flex and point, and flex and point. Now lift the arms up and go into a little rolling action, pulling the shoulders back. So you're doing two things at once. You're flossing sciatic nerve.
You're flossing the fascia around the hamstrings and the calf, loosening all that up. If that hurts you or that doesn't feel good, or if it's achy, you're gonna lean forward or scoot forward, let the leg be lower and then try the flex and point. I like it that you're having to lift the leg up. I don't want you to put the foot on the floor and do it. I'd rather you have the leg lifted as high as you can so you really activate your quadriceps, and then flex and point.
And then you're trying to feel like a little pull, or a little bit of that sciatic-y kind of feeling if you have that when you pull your toes back, when you point it goes away. Flex comes on. Point, it goes away. Okay? And then let's change sides.
Extend the legs. So you're starting here, leaning back. See how that feels. Can you get your leg straight with the foot flexed? All right, now can you sit up tall and feel that little bit of that stretch now?
I feel it right there. So I'm gonna work here. When I pull back, I feel, ooh, there's that little ache down the back of my leg. When I point it goes away. Flex comes on.
Point goes away. Flex comes on. Let me lift my arms up so I can get some work in my back as I'm flexing and pointing and flossing my hamstrings, nerves, calves, posterior chain. All right? Now again, if I don't like that, that doesn't feel good, if it hurts both directions even with the foot pointed, you're gonna have to bring the leg lower, and then flex and point.
Flex and point. Flex and point. And so you have to kind of be careful because the strap does roll around on your arch. All right now, next event. And I go again into that extended position, sitting up tall.
And then I'm gonna do a little bicep curl. So set the shoulders down and back, sit up tall, bicep curl. Two, three, four, five, six, seven, eight, nine, and 10. Okay. Now we're gonna change legs and do something on the other side.
We're stretching while we're doing something else, right? I'm not a big fan of passively stretching. All right, now I'm gonna rotate to one side five times, two, three, adding that resistance to the thoracic. Last one. All right, I'm gonna rotate to the other side.
One, and two, and three, and four, and five. All right, now I'm gonna put the foot down, and change sides, choke up on my strap if I need to, or release it if I need to. I'm gonna sit really far forward for this one, sitting tall and then pull back, arms straight. So here's your tricep press. We can turn it into the Pilates chest expansion.
Maybe one more, pull back, hold, turn right, turn left, center, and release. All right, other side. Pull back four times, two, three, open through the collar bands, pull the shoulder blades together, and last one, pull the shoulder blades together, and rotate left, and right, and center. That chest expansion's so cool, it makes sure that you've got your upper body working, your shoulder girdles working, and then your neck is still free to rotate. So brilliant exercise.
Way to go, Joseph. He is amazing. Okay, now next event, we're coming to standing. So usually I have my dowel close by, but this time it's a little far for me. All right, you really just want it right here, but I was afraid it would fall down.
Okay, so got my dowel next to me. Gonna do our next standing sequence, okay? We're gonna shift forward, and we're gonna do our little hip hinge, hip hinge, right? Nose over toes. We can reach into the wall if we want to.
Take the dowel way out in the front, and come back up. Another way to do it is to take the dowel right in front of you, and bring your nose to the dowel, and back up. So if you can sit up tall, I'm gonna turn to the side again, if you can sit up tall, have the dowel out in front of you, and bring your nose to it, that's exactly the distance that you need to hinge forward. So if you sit straight up vertical, not leaning forward, not leaning back, but vertically, ear over shoulder, over hip, straighten out your arms, grab your dowel, that's exactly as far as you need to bring your head forward over your body. So if you look at the dowel, bring your nose to the dowel.
I used to tell people to bring their head to the dowel, and this is what I got. I'm like, "No," but if they bring their nose to the dowel, then their eyes are forward and their chest stays lifted. So it's a much better cue. It's really important what cues you use, especially if you're working with people that are at home, and you're in a Zoom class, right? So leaning forward like that.
And then once that nose gets over the toes, it's super easy to get your hips up. Right? So it makes you a lot lighter. Okay, so now next event. We're gonna start with lunges.
Okay, so I usually, I was just gonna kind of show you how I set this up, I usually am like this with one hand on a surface and another hand on a dowel, and I'm stepping back like this. So I think that'll work. I want to make sure I'm on a sturdy surface. And if I need more sturdiness, I can be against this sofa and do it, which would be better for home, and then you rise up and down. So we're gonna start with that.
We're gonna start working with long strides, okay? So I want your hands reaching out and stepping back. So everyone wants to start right here. And then by the time they stepped forward their arms are behind their backs. So that's not gonna be really great for their shoulders.
So you want to reach out, step way back, and then step forward and make sure you got those long strides. So I'm even gonna step back even further, because I don't want to have my arm behind me. I wanna make sure my hands are in front of me. Now, both legs are pointed straight ahead. I'll show this from both angles so you can see.
And I'm on a railroad track, so my feet are about three inches apart, and I am keeping my knees straight because I want to get this hip extension right here. This is our walking practice, long stride walking. When people get older and not so confident with their balance, they've fallen or they've broken a hip, they have a lot of fear about standing up. Fear of falling makes people walk differently and changes the way they move. So what we're trying to work on is someone that maybe is like this taking short strides, never extending their hips, right?
So their glutes gets get weaker. The thoracic spine gets more flexed. So what we're working on here is trying to get the hip to extend. I don't let people do lunges until they can do a three foot stride of their leg extension here. So I want that three foot stride length, from toe to toe, lifting the heel up.
And then once the heel is lifted back, leg is straight, you can do a three foot stride, then we start thinking about, "Hmm, can I bend that standing leg, that back leg, without dropping the pelvis?" 'Cause normally what I see with lunges is people just drop to the ground. So I want you to keep your head scraping the ceiling, bend the back knee, and then bend the front knee, and then can you bend both knees and go straight down? Quarter of the way. Halfway down. And then full, whatever that is for you.
So it might not be all the way just yet. You've got to be able to manage your body weight before you ever start thinking about having resistance or weights. And one of the ways that we have been working on this is to stand against the door frame so that you open the door here. I'm gonna lean back, put one foot back behind, standing tall, and then sliding down the doorframe. Wonderful way for knee pain, support for the back, support for the alignment, or weakness.
So it's a wonderful, easy, easy, easy way to help with supporting someone that's having a hard time with those lunges. Okay, now we're gonna do the other side. I'm gonna demonstrate it this way so that you can see the other leg. Step one foot forward, one foot back, lift up through the low belly, and really try to get the back hip to extend and the pelvis to be vertical. So you wanna be trunk in a neutral position, and that deciding factor is that hip and how that extends.
So we lose hip extension as we get older, we only have about 25 to 30 degrees to start with. So we want to really try to think about preserving that and improving that as we get older. I always say that hip extension, thoracic extension, balance, and leg strength are your fountain of youth. All right, one more. Now we're gonna lift that heel, and you might be three or four weeks just doing those, which is fine, that's great.
That's gonna strengthen your calf. That's gonna mobilize your hip. It's gonna strengthen your leg a little bit. Now we're gonna bend both knees, if you're able to do that without dropping, without pain, without dropping that back heel. And then lower and lift.
And lower and lift. And lower only as low as you can go without pain, and without compromising, I'm gonna show you something else too that I think is helpful. Putting your heel against the wall and then trying your lunges. You won't be able to go all the way down, but it's a great way to stabilize the ankle if the ankle is weak, because a lot of times people have wobbly ankles. And the other thing is, people have sensitivity in the ball of their foot.
Sometimes the pad of the foot is very thin and you can wear your shoes with this. So feel free to put your sneakers on with this and that cushions your feet a little bit. Okay, stepping together. And now we go back to the chair. And we can do another exercise.
And sitting. Yeah. All right, so arms forward, we're gonna do a hinge back. And forward, doing a little abdominal work. Hinge back.
And forward. Showing it from the side. Hinge back. And forward. Hinge back.
And forward. Okay. Another exercise I love is marching, 'cause if you stay tall with this, you're gonna really use your core control and pelvic stability to be able to lift one leg. And then if you want to lean back in the chair a little bit, and just kind of sit back, like you're lounging, right? And we're not gonna lounge too long, and then arms forward, lift one leg.
And scoop the belly a little bit, think of lifting your leg with your low belly. This is a wonderful way for older adults to get a little more abdominal contraction, a little more dominant facilitation. Lifting up. All right. And then after that, come up to standing again.
Again nose over toes, reaching for the wall, or whatever those cues worked for you, and then standing up. Now we're gonna go to the wall and do pushups. So you're gonna lean against the wall, hands at collarbone height. And then we're gonna do elbow bend, slight elbow bend, and then little bit deeper. So these are hard actually.
If you brought your elbows all the way to the wall, it's really hard to push yourself back away. Now I don't recommend that you do that as against a door that's that opens this direction, but I'm gonna do it just for show, okay? Just so you can see. So I think this door is locked, okay. All right, it's latched.
All right, elbows down. So I want you to see that I'm keeping my elbows pointing toward the floor. I don't want you to do pushups like this, because that's gonna be an impingement position of the shoulder and could be a problem for somebody with shoulder issues. So elbows down, wanna do a tricep version, and working on that. And then as you get better at it, you might be able to put your hands in your chair and do a little pushup, right?
So you can do shoulder blade prep. I love these for preparation. You do the leg pull here. It's really nice, but you want your chair against the wall. You notice my chair just moved. (laughs) So I've got those sliders on it so I can move it back and forth for the class, but I normally wouldn't have that for a client.
All right, then do your little bend, and up. And bend, and up. And if that was too low, you might go to the sofa here, and do it like this against a sofa, or something that sturdy, you know, a dresser or something like that, a countertop. So the wall, countertop, maybe sofa, maybe chair as a progression of difficulty. Okay?
Another one I like in this position with the chair is putting your hands in the chair and then, make sure I got room behind me, and then a little quadruped exercise. And lifting up. And then you can add an arm, arm and leg lift, and then if this is too tight on this leg, so sometimes the hamstring is limited, just bend the knee, and get a little more work here. Really trying to keep that neutral spine, chest lifted, cuing the chest, pressing up and forward. So like you have a headlight on your breastbone and trying to get it to shine forward.
You can also do arms out to the side. I love things like, half-moon here, that's a little more advanced, but they're kind of fun, little variations for people. All right, coming up to standing. And then you gonna take the chair a little bit forward here, and then I'm gonna show you some dynamic side stepping. 'Cause we also need to work on dynamic balance.
So we're gonna step out to one side and then back together. And I'm gonna do it without the chair for a moment because I want you to see the legs. And if I'm behind the chair you won't be able to see and I need to step sideways. So always, of course, holding something sturdy. I want to be behind the chair and then stepping out.
Hopefully you can see pretty well. And just step together. And then step out with a hand reaching, and together. And then hand reaching out, and together. And, obviously, you've got one hand holding something the whole time.
Then I can turn my head. That's challenging the vestibular system. Turning the head, reaching out. One more of that direction, and then other side. So I can either do both hands holding or one hand reaching.
I love to practice the reaching because that helps to train people for stepping and reaching out for fall prevention. So if you were to fall, you want to get your hands out as soon as possible. You drop whatever you're holding and reach out to try to get your hands to hit the ground first. So you protect your hip, unless you have your grandchild or a baby in your arms, do not drop the baby, right? And a computer even is not as important as your hip.
So throw the computer down if you're about to fall. All right. Good, so everybody's good? Now there's a myriad of variations that you can do with dynamic stepping. You could do something like step out and hover, step out and hover.
We can do step cross. I do that all the time. You know, where you're really stepping over and then stepping back like a little curtsy. I want to go in all directions, and see my little box was in the way, I shouldn't have had that, needs to be under the chair. And so I do a little curtsy and reaching back.
And so you gotta make sure all this stuff is out of the way, just like I kicked the dowel and the box. So finding that alignment and balance is really helpful, and getting that idea of quick movement is also very important. Okay. So last exercise, sitting in the chair with excellent form. Yes.
And I'm gonna turn to the side, and I'm gonna do Eve's lunge. This is one of my very favorite exercises for office sitting, too much sitting, airplane sitting, board meeting sitting, can't tell you how many PMA board meetings I've been in (laughs) doing this stretch under the table. But you're trying to get the hips pointed straight ahead, the pelvis pointed straight ahead. You won't be able to get that leg all the way straight, unless you're very mobile. I've worked on this a lot, so I'm pretty mobile in my hip, in extension anyway (laughs).
And then extending out as much as you can. So you go to the point that you feel a deep kind of groin stretch, and obviously no pain, pull up through the low belly, try to stay vertical, once you get to that point, look at your back foot. Is it parallel or is it turned out like that? If it's just turned out like that you're gonna tweak your knee. So you wanna really have that back parallel, arm up into the air, and then lengthening up.
You'll get both ends of psoas if you add that little side bend, and then really tuck your tail under, and pull up to the low belly to try to get that extra hip extension. Breathe in. And breathe out to release. Other side. Facing straight ahead.
So, basically, you got one cheek off the chair, one cheek on the chair, and then extend the leg back. Parallel alignment, railroad track alignment too, and then pull that right hip forward if the right leg is behind you, and then once you get to the point where you feel that stretch, everything is in alignment, you can use your hands here at first to help you push up, and then lengthening one arm. And then add a little bit of a side bend. That beautiful Eve's lunge developed by Eve Gentry, breathe in, who tended to work with more older adults when she moved to Santa Fe. I'm very inspired by her work.
Breathe in. And breathe out. Breathe in. And breathe out. Really trying to think of breathing into that same side that you're lifting.
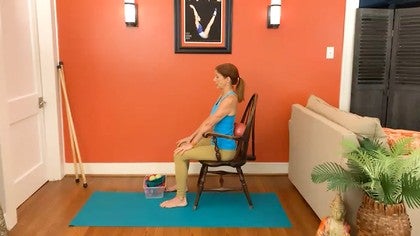
And then coming back to center, take the legs apart, lift the arms, stretching up, exhale, lower. Inhale, stretch up, palms up. Lengthening up and exhale to lower. All right, now sit all the way back in the chair, and let the chair support you. Press your pelvis all the way to the back of the chair.
It's very important that you let the chair support you so that you don't sit with your pelvis forward and slump back. So press that pelvis all the way back, lengthen the rib cage up. Let the rib cage be supported by the chair. Shoulders roll back, and then close your eyes. Let's just find something in our body to be grateful for.
What is it that you could do today that you didn't do yesterday, or didn't know that you could do? Send a message of gratitude to a body part that might be painful or weak. Wrap that body part in golden healing light. As you breathe in, breathe in golden healing light, allowing that light to travel to where it needs to go in your body. As you breathe out, exhale whatever you don't need.
Imagine breathing out toxins, byproducts. As we breathe out the carbon dioxide feeds the plants, and they give off oxygen that we need. Send a message of gratitude to the Earth for that recycling process. To our body for the recycling process that happens all the time without our knowledge. Be mindful of the awareness that you can strengthen your body, your bones, and your muscles at any age.
Let's repeat in our minds. I am happy. I am well. I am strong. All my friends and family are happy and well and strong.
And let's imagine all beings on the planet being happy, being well, and being strong. Let's wrap ourselves in a blanket of peace, and let's wrap the Earth in a blanket of peace. Returning our awareness to the room with new eyes, new perspectives. Feeling a sense of joy and vitality and hope for the future. Thank you so much for joining me.
Hope you enjoyed the classes.
Empowered Aging: Get Fit with Sherri
Mention
 |
Sherri Betz (Teacher) |
 |
Celeste E |
 |
Maria P |
 |
Marie-Laure M |
 |
Pippa B |
|
|
Rosemary |
|
|
Julie K |
 |
Carly S |
 |
Ana C |
 |
Paulinka S |
|
|
Cynthia G |
 |
Beverly L |
Comments


You need to be a subscriber to post a comment.
Please Log In or Create an Account to start your free trial.
