Description
About This Video
Transcript
Read Full Transcript
Hey, everybody. Are you ready for a challenging workout? You might be surprised to see a barbell here. We're gonna do a class that's targeting the fit older adult who wants to build their bone density, and have a challenging mat class. So we all know that Pilates mat classes are usually you know, done on the mat.
There's not really a lot of standing and balance and leg strength exercises in a mat class. So I'm gonna be incorporating those things into this class. The first class in this series, "From Frail to Fit" that I did for Pilates Anytime was two weeks ago, I did a strength training principles class. So be good if you log in and take a look at that one. And then if you missed it, and then the next class that I did was last week, and I did a modified Pilates mat class, it's more for the intermediate person who wants to start to incorporate those strength training principles.
So we didn't do a lot of extra weight and a lot of extra resistance, but did add some resistance. So this class, we're going balls to the wall. So this is gonna be my kick ass Pilates mat class. This is a rare event because I don't teach this class very often, unless I'm teaching maybe teacher training program or in my Advanced Teacher Training Courses where I'm working with Pilates teachers are very fit people who have low bone density that want a really challenging workout. So for once, I wanna say a couple of things.
So I'm trying to bust some myths here. Please wear shoes, if you're gonna lift weights, the last thing you wanna do is drop a weight on your foot. So I'm starting out my class with shoes. And I also start my classes with strength training, especially if I'm gonna be loading the spine before I do mobilization of the spine. You never wanna do strength training, after you've mobilized the spine because you're basically stretching the ligaments, you're mobilizing, moving the spine making it more fluid and for weight training, you want it to be strong and stable.
So that being said, I'm gonna get into started with warming us up. You'll need a dowel and I'll call out the props as you need them. I did list the props that you needed in the explanation and description of the classes online, so you should be ready, okay? All right, so I'm gonna stand about the width of the mat. I'm gonna place my doll against my back, and I want it to touch my head, my mid back and my sacrum, and I'm gonna start with a hip hinge.
So I want to make sure I'm not sending my hips forward, I'm sending my hips back. This is going to be very important if you're gonna add resistance with this, what we call the deadlift, and I'm hinging back and forth and then the goal being before you ever add weight that you can actually touch the mat. Touch your fingertips to the mat without changing the spine at all. So no changes in the curvature of your spine. You're keeping the spine in that neutral position, and if you cannot do that you should not do any weightlifting, you need to get to the point where you can do that before you do weightlifting.
All right, that's the last modification I'm really gonna give. We're gonna get started now, okay? So I'm gonna put the dowel aside and then if you don't have a barbell, I'm gonna show you the barbell lift first and then if you don't have a barbell, grab a box that has some weight in it, I suggested putting soup cans, water bottles, dumbbells if you have them, bags of sugar and flour. So load it up and give yourself an arbitrary amount of weight that you think you can handle. Alright, so now barbell's coming out, this barbell is about 95 pounds.
And I know that sounds shocking, but for human function, everyone should be able to lift their body weight. My first goal though, for people is to be able to lift about 50 pounds that weighs about as much as your suitcase. When you go to the airport to check in, you should be able to put your suitcase on the scale and handle it yourself if you're gonna travel. So I use 50 pounds as my first sort of barometer for goals for people and then beyond that, if they wanna keep going, then they would use their own bodyweight as a goal. So luckily, I don't weigh very much.
So this is again, 45 pound barbell, and then 225 pounds here so that makes 95. And I'm gonna set myself up so that my hands are right over my knees, and I'll turn to the side and do this lift as well. And then I lift my chest, I really lift my tailbone, my eyes are gonna be forward so that I don't round my back and retract my scapula, breathe in, breathe out and stand up, right? So it looks, you're not gonna see it very well from the front, but I'm gonna show you that. Now I'm gonna turn it to the side and make sure I'm not hitting my wall here.
And then you notice when I pick the barbell up and move it a little bit, I keep my back really, really stable, okay? So I'm gonna spread my feet apart, hands are the same width as the as the feet, knees are gonna go right behind my arms, then lift my chest, get my butt way back, breathe in, breathe out, retract my scapula, standing up, and then my back position should not change. My knees should go straight ahead and then lifting like that, okay? Now I'm gonna get rid of the barbell and so I can join you guys if you're using a box with a box lift, and I'll show you how to do the box lift. So now I've got all my little accoutrements in my box.
And my box weighs about 35 or 40 pounds actually. This is a heavy plastic, you know file box, and you wanna have something sturdy. Now it does have handles on it, you could start with the handles. I'm gonna straddle the box, hinge my hips, and get to my handles. So I want you to do one with with your handles if you have handles and we're gonna do one on the bottom.
All right, breathing in, chest lift, breathe out, standing up. Right, so notice my spine position does not change, but I don't really have to go very far down, not gonna get much glute and leg work out of that. So I'm gonna tip my box, get my hands underneath it, just like if you got a box from Amazon, and you're having to pick it up and bring it in. Alright, shoulders down, chest lifted, eyes forward, breathe in, breathe out to stand up, touch the box to the floor, hips way back. Notice my shins are fairly vertical.
That's gonna protect your knees and really work those glutes. So you should be filling your glutes and your back muscles. And one of the best things you can do to build bone in your spine and your hip. All right, there's four, five, six, got to be able to get to eight. If I can't get to eight, with good form and alignment, it's too heavy.
If I can do 15 it's too light. All right, I'm gonna do a couple more and then which means if I can do more than 10 I can actually add more weight. All right, cool down a little bit. And again, notice I have shoes on, when we're lifting weights, we use shoes. Alright, so our next event is going to be lunges.
And I have kettlebells. You can hold kettlebells for your lunches, right? Or you can just take bags of sugar, five pound dumbbells, three pound dumbbells. Make sure my mat is straight. Alright, now I'm gonna stand at the back of my mat, put a little railroad track on my mat, step forward, big step, warming up my ankle, stretch the heel down and back, up and forward.
Super important that you warm up your ankle and calf and you have the back foot parallel. So that back foot parallel is gonna protect your knee and that's usually the tough part for people. The hips needs to extend enough to get a long stride, that protects your needs to. All right heel lifted, here we go. We're gonna ease into it just a quarter of the way down.
Notice my torso is vertical, and then three quarters down. And then full, touch the mat, if you can, if you can't touch the mat, take the weights away. You can't get all the way down without tilting forward. And if you need modifications, look at my other class from last week. We did modifications in that class.
Alright, three more. Breathe in and out, in and out. You're gonna notice with the weight you're going to be a little more breathless. Alright, now take it back and step together, other side. Stretch that heel down and back and up and forward.
You wanna be in at least a three foot stride. Up and stretch. Exhale up, inhale lower. Make sure that back foots parallel. Keep that back foot lifted or back heel lifted before you start your lunges.
Okay, so here we go front foot flat back foot lifted, bend both knees, go straight down, quarter of the way two, and then halfway, and then three quarters and then full. Two, and three, and four, and five, and six, seven, eight, nine and ten. All right, step together. All right, well, we've got the weights in our hands, straddle the mat, hinge at the hips, and let's do some flies. We're gonna take these kind of swing around a little bit, so I try to grip them close to the bags of sugar and flour and lift, and lift, thumbs back.
And then the more parallel you are to the ground, the harder this is, right? If you feel like your neck hurts, then just change it to a row. And there I go with my modifications it's in my DNA, so I wasn't supposed to modify, right? So I don't want you to hurt yourself. Alright, feel free to stop any of the exercises that feel painful to you.
Okay, we're gonna put these aside. And then let's take our shoes off because the next event we can do without our shoes, I like to do balance work in bare feet so that I have the proprioception and stimulation to the feet in balance activities. Okay, so you'll need your dowel and we're gonna stand with feet together. (exhales) And then lift the toes, breathe in, free the toes, spread them out and breathe out and press the toes down. All right now lift the heels. You'll notice my dowel is down, super easy.
And then we're gonna lift both, lift the dowel. Keep the heels glued together. If you have valgus knees that bumped into each other, you can use a tennis ball in between, just to kind of get yourself ready to go. Everything lengthened and lined stacked up. All right, now, we're gonna shift our weight to one side, and you want to shift your weight towards the dowel.
So make sure that you've got the dowel in the hand that you're standing on. Okay, so here we go. Breech and lower and then see if you can lift and two, three, four, five, six, seven, eight, nine, ten, 11, 12, 13, 14, 15, I know when she's gonna quit, 16, 17, so those of you that know this, how many should an older adult be able to do? 19, 20, no, not 20, 21, 22, 23, yes, it's burning, 24, 25, so the first one being as high as the last one, so an older adult over 65 should be able to do 25 heel raises. Who can do that, right?
No wonder we're weak. All right, now lift, other side, right? Two, three, get your bearings, lift the dowel. Four, five, six, seven, eight, nine, ten, 11, 12, 13, 14, 15, 16, 17, 18, 19, 20, 21, four more, 23, 24 and 25. Alright, check it out.
Yep, you might wanna turn your camera off and get out of here, run for your life. No, it gets better from here, it gets a little easier from here, so don't feel scared. Alright, so now we're going to do something called the golfers lift. So a lot of times when people are playing golf, they just want to easily get down and pick the ball up, but it takes a lot of balance. You got your golf club here.
Now you just reach down and pick up the ball. So it's a lot like an exercise or a pose from yoga called warrior three. So, see if you can do that and then keep the front leg forward the right leg forward and change hands and see which side is easier for you. Sometimes it's easier to put the golf club in the left hand and then pick the ball up and see if you can do that with a neutral spine, right? Okay, now, I'm gonna change this into a little bit of an exercise.
I'm gonna stretch out long and then I've got same arm, same leg lifted, and I'm going to lift. two, three, four and five, and then I could bend the knee and two, just showing you some variations of things you can do for challenging balance work. and then step together, other side. And then let's try the other side. And then we lift, two, three, four, and five, and now bend the knee.
one, two, try to keep the pelvis level like you have glasses of water on your head mid back and sacrum. And last one, okay, then you could do it, or you've got opposite arm and leg lifting, that's fine. Then come back to center. All right now another one I love is half moon pose from yoga, like I call it the cartwheel pose. So this is the start of it, and really get that dowel way out there.
And see if you can balance there. And then when you get further and further into it, you can go into this sort of side balance, which normally in yoga, you're gonna have your hand on the floor, and then take it back up. So this is really a nice way to do it. And then take it to the other side. And then get your dowel way out there so by the time you get tilted over, the dowel will be vertical.
And then little cartwheel pose here, this one's really fun. And then also known as halfmoon pose. Hold there then take it back up. All right, now, you're gonna need a little loop or a thera band tied around your legs. So I like to have people step into the loop without touching it with their hands.
And let's see how dexterous our feet are. Usually takes people a few minutes, a few seconds to get in there. All right. And then you have it around your ankles for the most resistance, and all around your above your knees for less resistance. So feel free to bring the band up if it's too hard, and then don't ever put it at your knees, okay?
So now, I'm gonna step the right foot forward, and then I've got my dowel in the side that I'm standing on. Alright, so I'm gonna flex my foot, really important to tighten up muscle above your knee and keep your knee really straight. You'll notice when your leg is very straight, that you distribute the muscle work across the full muscle. If you bend your knee, you're gonna get it mostly in that hip flexor origin up here. So you want all the quadriceps to participate.
And then that's gonna take some of the stress off your hip flexor and get your quads stronger. All right now, let's lift the dowel if we can, five, six, seven, eight. Now let's pulse it forward, ready, and... (Fletcher Percussive breathing) Last set. (Fletcher Percussive breathing continues) Then the Fletcher percussive breath I love that, kept setting the pace for the movement.
Alright, now we're gonna send the leg out to the side. Now we don't want to hike the hip. I want you to scrape your heel on the floor and lift it out and then see if you can balance. Two, three, knees straight as well and pretend like you're standing against a wall, scraping that heel on the wall. Seven, eight, nine and 10, now pulse it out.
If you're standing leg hurts, bend your knee a little bit. Okay, ready and... (Fletcher Percussive breathing) Last set. (Fletcher Percussive breathing continues) Take it down, shake it out, feeling those gluteus medius muscles really working, excellent for balance and stability, all right? Now I'm gonna turn to the side so you can see the next move.
Extend the leg back, straighten the knee, and then flex the foot. And if you're okay in your back, then pick the dowel up. You're not so okay in your back you feel compressed then you can bend forward a little bit, okay? So here we go. One, really feeling that leg straight so you get your glute working, three, four, five, six, seven, eight, nine and 10.
Now turn out a little bit, let's do some pulses in the turnout position. (Fletcher Percussive breathing) Last set. (Fletcher Percussive breathing continues) And take it down. All right, changing sides. Here we go.
Change the dowel, lift the leg, knees straight. Here we go, lift and hover, two pick the doll up if you can, three every opportunity to practice balance, four, five, six, seven, eight, nine and 10. And let's pulse it forward ready? And (Fletcher Percussive breathing) Last set. (Fletcher Percussive breathing continues) So we get right out to the side, go right into the next one.
No rest for the wicked, okay? And three, four, five, six, seven, eight, nine, feel the burn, 10. All right, pulse it side, ready? And (Fletcher Percussive breathing) Last set. (Fletcher Percussive breathing continues) Take it down.
All right standing. I'm gonna face this way so you can see what to do. Extend the leg back so make sure that knee doesn't bend because you want to target your glute, not your hamstring so much you bend your knee, you're going to really get more hamstring. You keep your knees straight, you're going to get that glute fire. Flex the foot parallel alignment, lift, and hover, you won't have very far to go, you only have about 20 or 30 degrees of hip extension, four, five, six, seven, eight, nine 10.
Now pulse it. One, two, three, four. (Fletcher Percussive breathing) Last set. (Fletcher Percussive breathing continues) Then take it down, all right? Shake it side to side.
And then one other thing I wanna share with you about this loop is that you could take it up to a little higher and then do what we call monster walks. I think it's such an ugly exercise, but it's actually a good one. Take the dowel out in front of you and then step side, and in, side, in, side and in, other side. So it gives you that resistance and more of a tilted torso position. I'll turn to the side so you can see.
In, side and in, side. So you're kind of hinged forward a little bit, we call it monster walks. So feel free to put a band around your legs. You'd actually do a little bit heavier band with that. All right, so we can put that aside.
And now I want you to have a couple of things available. You want a TheraBand, a dog leash or yoga strap, so something to put under your back for abominal work. And then I want you to have either two water bottles or two dumbbells nearby. Lastly, you'll need a round object, like a ball or a towel roll. So these are the towel rolls that I use for a thoracic extension when people don't have a ball, I just got two towels rolled up tightly.
And I have a YouTube video that says it's called "Gather your props for our classes" and it shows you how to make that and all the props that you need for my classes. All right, so I've got the pillow here, when I get ready for a prone work to cushion my ribs. Alright, so everything's set. And now I want the TheraBand close by for our next exercise. So put it next to you on your mat.
All right, standing at the back edge of the mat. We're going to make a graceful transition to the mat. And I want you to step forward, big long stride and then we slowly transition to the mat. Just makes that lunge a very functional transition. And then have your knees about hip width apart.
Place your dowel beside you, take the TheraBand in your hands. This is kind of inspired by Fletcher Towel Work. And then you're gonna pull the band apart and hold it steady like that. Tuck your tail strongly lift up through your low belly, and then hinge back and forward and you know, this is thigh stretch. Exhale back and inhale forward.
Exhale, take it back, and inhale, and exhale back, and inhale forward. One more time, exhale, back, stay there, stay there, breathe in, breathe out, lift, stay on that diagonal, really load those thighs to stretching and strengthen at the same time. So great for patellofemoral dysfunction. I get back and then returned to vertical, all right? And then let's do one more set.
Exhale back and inhale forward, exhale back and inhale forward, exhale, take it back, and inhale forward. Now take it back and hold. Lift the heart arching back, lift arms and return, lift and return, really make sure your back is okay with this. And lifting and lengthening supporting that low back and return, all right? Place the band aside and then put your hands on the mat, quadruped head position for beginners, plank position for advanced shifting hips back and the heels back and forward like a little battering ram.
And then take it back and forward. Now hold here. Keep the glasses of water on your head, your mid back and your sacrum, lift one leg, two, three, four and five, put that foot down. Other side one, two, three, four and five. Place your hand in the middle of the mat.
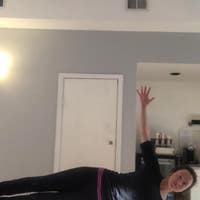
Turn to the side, here we go. One, two, three, four and five, all right? And then turn your hand and then go straight on to your back, hands pointed outward and then stretch both legs out, lift, one, two, three, four and five, and the other leg, one, two, three, four and five. Now bend your right knee and then shift your weight over to the other side, the right into your side plank. One, two, three, four and five, come into your plank position.
Give me five push ups, one, two, three, four and five, hinge up to a V, nice little rest position here. Bend one knee, stretch the heel down, lengthening the spine. And then let's come all the way down to the mat. And then turn around, you know, put your hands behind you. And then we're gonna rotate those knees right and left.
This is your little resting transition after that tough series. I love that series. I used to teach that to a hockey player that had a clavicle fracture, and I said, "If you can do that series really well, you're discharged." Because they hated physical therapy. They didn't want to come back. Some people hate physical therapy.
Some people love it, but all right, and then take it back. And then let's take the legs up into that modified teaser. And then let's extend the legs. So if you guys are Pilates teachers, you need to be able to do your teaser. I usually keep the hands behind, and then lower and lift.
So we don't do the spine rounding, little curl in the pelvis. Three, four, and five, bring the legs back in, place the feet down. Move your hips forward on the mat and just slide your hands apart and plank down. And then flat on your back here, feet slightly apart. Breathe in, pressing through the shoulder girdle, press into your sacrum, breathe out, let's peel up into the bridge, going into almost shoulder bridge, I don't go quite as high and then breathe in.
I don't want to go up onto my neck so I'm going to keep my bra line down, bro line and then roll down. And then so you want to keep the kind of the 10th rib down on the mat. You don't wanna go up too much onto the neck. And then you're doing that slight lengthened articulation and then exhale, curling up. And then let's roll it back down.
All right, that was your one rest. Now we're going to bring the feet together, peel up, you won't peel as well then knees together. Everything lengthen as best you can, take one leg up, do not let the pelvis drop, flex the foot. Gonna floss that side it nerve a little bit. Flex and point, flex and point, flex stay flexed, lower the leg point to lift, lower and lift, lower and lift, lower and lift.
Now flex the foot, let's pulse it up for 10. one, two, three, four, five, six, seven, eight, nine and ten. Put the foot down and then other leg up. Now stretch it back as much as you can. You don't have to have it high, but you need to have it straight.
Flex and point, you won't floss aside nearly as well for knees not straight. So you might be here if your hamstrings are tight. And a lot of times hamstring tightness is because the sidekick nerve is coming entrapped somewhere along the way. Flex the foot, lower the leg and lift and lower and lift, lower and lift, lower and lift, last one lower and lift. Flex the foot, pulse it up.
Two, three, four, five, six, seven, eight, nine, right glute's working and then place the feet down, separate the feet, let's take the right pelvis down, a little mobility here and pelvis down again. And now roll it down all the way to the mat. Okay, now here's where you'll need your dog leash, or your yoga strap. This is gonna keep you honest in your exercises in your next abdominal exercises. You're going to put the yoga strap or dog leash under your waistline back into the strap so you're doing a slight pelvic curl, flattening that low back to the mat.
If you have a big arch you need a thicker strap, okay? So you want something to tell you that you're keeping your spine stable. You're not going to let your belly bulge, taking one leg up, keep the belly firm, no bulging of the belly, no arching of the back, tuck on the strap, extend one leg lower, keep that strap down, bring it back in, extend the other leg lower and then we're going to keep moving forward, right? If you can, if that was challenging enough, just do that. Extend the legs out lower and lift, lower and lift.
So you might recognize this as double leg lower lift, right flex the feet, point the feet, flex the feet. I'm still pulling on that strap making sure my back doesn't arch and you might not go as low as you normally go, especially with your head down and with the strap, making sure you're being honest. All right, now, I'm going to take the legs in, bring the arms out into your hundred position. Reach the hands toward the feet, extend the legs. And then let's lower those legs down to our 100.
three, four, one, two, three, four, one, two, three, four, one, two, three, and four, pulsing and pulsing those arms, big pulses. Keep pressing that back down, check to make sure your back is down. Holding that extension outward and two more. Last one, take the arms behind your head, or you could do little single leg stretch without the rotation, just bring it in and out. And then if you want to do double leg stretch, bringing the knees in, you've done sort of a series of five with the head down.
If you feel like your neck getting too involved, put a pillow under your head, that helps a lot. And then take it out. All right now bring it right remove the strap. Let's roll over onto our right side, flex the feet and then lengthen the spine. So you're on your forearm, getting ready for sidekick, right?
So to get a little more resistance in this exercise, we're going to lift the hips up, lift the top arm, lift the top leg, side kick, with hip lifted, and lift and extend 'cause side kick with the hip down is probably not going to build much bone. But which part of your body is getting the bone building right? The bottom hip. All right, and then take it back down. Another way to add some resistance is to take your Thera band, hold it down with your bottom hand, take your top arm up in front of you, and then pull up and then add the hip pull up, lift the top leg and then we're pulling with a strap.
So you can add that resistance with a Thera band, probably need a blue Thera band for this one, it's a little light for that and then coming down. Now come on to your forearms. I think of a proud lion guarding the castle position, getting ready for a single leg kick. Scoop the belly and then keep the pubic bone pressing into the mat. And now we're going to scoop even more lifting the pubic bone off the mat holding here.
And then let's bend the heel toward the buttock and put it down. Heel toward the buttock. I like to milk it a little bit instead of doing it so fast, I like to keep the pelvis lifted and really milk that stretch, to really playing tug of war with the pelvis and pulsing that heel slowly and making it more of a thigh stretch than just choreography all right? And then let's keep the pelvis lifted and do it on the left. Two, three, four and five, and placed that foot down and then lower yourself all the way down.
All right, go into the other side, I'll show you from the back. And then we're thinking of a wall behind our mat, our heels, calves, buttocks, shoulder blades, and head against that wall. And we're going to lift up into the position, lift the arm, lift the top leg, side, kick forward, and stretch it back, really emphasize the extension part. Two, and, three, and four, and five, and then take it down. Take a Thera band hold on to it with your bottom hand.
Top hand abducts horizontally, and then we're going to take it up and then lift and pull one, two, three, four and five, and take it down. And then we're gonna sit up, find our round objects so that way to be a foam roller, a ball, preferably a very farm ball, or filled with air, yeah. And then or your towel rolls or your foam roller, okay? So we're going to put the ball right underneath your shoulder blades and right around the upper waistline so do not go into your low back with this. Let's start with the elbows wide and get into our starting position.
I'm thinking of a normal eight foot ceiling and I'm looking at the crown molding, and that's usually a good starting position. Now I'm going to wrap my spine around the ball, arching back, elbows wide. Breathe in, breathe out to curl ribs to pelvis, no further than looking at the crown molding, looking at the ceiling, collarbone eyes or looking at the back wall if possible. And then maybe your head touches maybe it doesn't. It depends on your mobility and the size of the object you're bending over.
A really softball is a good place to start with this, but the firmer the surface, the better. And with a foam roller, you get the ribs involved, which is why I like the ball better for this particular activity to mobilize the spine. So notice we're doing spine mobility at the end of the session, lift your hips, move your hips toward your feet so the ball gets closer to your head. And then let's bring the elbows forward to separate the shoulders and think of your eyes looking in the same direction as the eyes of your elbows. So elbows, looking at the crown molding, elbows looking at the ceiling, elbows looking at the crown molding behind you.
And then if they can go even more, see if they can wrap even more. And then ribs to the pelvis to bring you up. So you're not moving your neck at all. You could put on a soft cervical collar that we as physical therapists, we call that a litigation brace because if you were a soft cervical collar to court, you get more money for your settlement. So you could put one of those on and do this exercise because you're not moving your neck, you're focused on moving your mid thoracic spine.
So the segment that's on the ball gets the most immobilization. And you get a little abdominal workout too, and lift your hips, move your hips toward your feet. And let's do another one. So we usually do about three spots. And now you're up at sort of the Dowager spot.
And you might start to feel something in the back of your throat, says vertebrae moving forward and kind of pushing it a little bit to your esophagus. Sorry if that's kind of creepy and then lengthen out so that your cervical spine is right behind your trachea and esophagus and you will feel something in the back of your throat. All right, from there, you can if you wanted to go right into a little neck massage. But we are focused on strengthening today so you can do your massage after class. All right, we're coming off the ball.
We're coming up to seating and then we're gonna put the ball aside, and you're going to need for the next event, either dumbbells or water bottles. I'm going to put him at the front of my mat here. And then a pillow, gotta have that pillow to cushion your rib cage. Okay, because we're going to be putting a lot of pressure on the ribs. So now, ribs are on the pillow, chest or breasts are off the pillow then you've got a little cushion under your pubic bone, place your hands stacked up under your forehead.
Rest your forehead on your hands, lengthen your pelvis away from your ribcage, draw the shoulders down and wide. Breathe in and let's breathe out and lift the face away from the hands, holding the gaze on our thumbs. Now, from here, press a little bit more into your arms and glue your forearms to the mat. Glue your pubic bone to the mat. Draw your armpits toward the floor.
And now see if you can lift your left arm to your forehead without dropping your head. Press firmly into your pubic bone so you don't arch your back and lift your other hand up. Now you're really targeting that upper back, shoulders down, elbows lower than hands, touch the elbows to the mat, and lift, two and lift, three, and lift, four, and five, and six, and seven, and eight, and nine, and ten. That's my favorite exercise for posture correction and bone density of the spine. So really getting rid of that thoracic kyphosis strengthening the back especially after we've mobilized it, we've got to strengthen.
Alright, now goalpost position, elbows at a 90 degree angle, hold here, lift the arms. So this is a rotator cuff, external rotation exercise. I love this one to kind of get started in the right direction because if you can get the rotator cuff firing, get your shoulders and scapula depressing, you're gonna have a better chance of using your mid back. Because people just do this, lifting their neck, or letting them that drop and lifting their head and going into that cervical extension thinking that they're doing thoracic extension, but they're really not. Alright, so we're lifting our face as far off the mat as we can, glue in the forearms to the mat.
Eyes are looking at the front of my mat. Press the pubic bone down, lift the arms. Now you know what we're doing right? Lifting the elbows cool. Yes, lift your elbows, just two inches off the mat.
Keep the water bottles higher than the elbows or your dumbbells, whatever you're using for weight soup cans are good. Yeah, that little extra weight makes a huge difference. six, seven, eight, nine and ten. All right, take the hands down. Slide those hands back under your shoulders sort of traditional Swan position caress the pubic bone into the mat.
Straighten the knees, pull the elbows toward the knee, feel the length in your neck and spine. All right now we're pressing up eyes are looking at the front of the mat. If you come up any higher, you might have to look at the wall in front of you. So keeping the back of your neck length and imagine that you have a tattoo on the back of your neck and you want it to show so you don't want to be here, you want to be lengthened, lift your hand, hold that position, lower and lift. This is why you need that pillow because you're gonna have a lot of pressure on your ribcage.
If you want to add resistance, grab those water bottles, palms down. Three, four five, six, seven, eight, nine and 10. All right now when I think about the water bottles is they're going to help you lift, stretch those hands towards your feet and push those water bottles down the backs of your legs. Keep them off your legs, but near and open to the collarbones and really lengthen and lift. And lift and lift, last one, everybody lift, alright.
Put the water bottles down, press into your hands. I want you to do a perfect push up from your knees or your feet, whatever you can do. So you can either do from your knees here, or from your feet, let's do five push ups, traditional ending, thank you, Joseph Pilates for the inspiration. One, two, three and four, and five, knees down. And then we can go into the prayer position which almost of my students are thrilled, and they start praying to God and thanking God that it's over.
And then lengthen the tailbone away from the hands. Head is not on the pillow just yet. You're really planting your hands and stretching your spine feeling a really lovely stretch here. Make sure your knees are wide and then let's sit back on your heels, letting the hands drag on the mat creating, lengthen the spine, and just feel that lovely stretch to your lumbar spine. It's a safe way to stretch your lumbar, you can shift your weight your hips to the right, and you get more of a right lumbar stretch.
And then shift your hips to the left and do a left lumbar stretch. And then come back to center. And then let's come up to all fours and then find a place to sit. All right, you did it, I did it. So a little breathless, but trying to keep the pace and really keep the flow and make it into a challenging flowing workout that you can do safely with bone density issues.
So great for people with normal bone density that want to keep their bones strong and great for people with low bone density that are stronger that want to really challenge themselves. Remember, if you're not progressing, you're regressing. You've got to always progress. So you've got to add weight or resistance if you want to keep building strength, and bone density. Remember what builds strength in the muscles also build strength in your bones.
So making sure that you're keeping those repetitions within that 70 to 80% of one repetition Max, meaning you're tired between eight and 12 repetitions, you do 15 repetitions of something, it's too easy. I mean it's too easy. And then if you can only do eight repetitions of something, and might be just right, but if you can't make it to eight, it's probably too hard for you. So if you start having pain with something, the load is probably too much. So if you decrease the load and the pain goes away, it's a strength issue.
So those of you that are working on your strength and you're trying to build resistance, and you start having some pain, you got to just back down a little bit. It's just the muscle tissues or the the tissues of the body can't handle the load that you're putting on them. So you have to make it more gradual. And so that's kind of how you can judge it if it's a strength problem, or if it's something that hurts, you know, that you need treatment for. If you just do a plain squat without weight and it hurts you, you probably need physical therapy, or somebody to do a little assessment to figure out what's going on with your body.
Okay, so I love to end my classes with mindfulness, and a little bit of meditation. And it's been shown in the research that when we balance our cortisol and serotonin levels, which is what meditation does, it actually helps to improve bone density. So we really want to make sure that we have that time to relax, to be able to sleep well, to make sure that your body is in balance. You're always on adrenaline running, running, running, that adrenaline converts to cortisol, cortisol eats up your bone density. So sometimes people are under so much stress that they can't sleep.
And that's one of the issues that tells you that your serotonin and cortisol levels are off and you could be doing everything perfect, and then you're still losing bone density, and what you need is to balance your serotonin and cortisol levels. Taking a minute or two to meditate is just could change the world. So let's find that vertical posture. Everything that we just did in the class is helping to enhance our vertical life. So I want you to put your hands on your low back, massage your back muscles, the back muscles should be relaxed.
If you're aligned properly, so you want your pelvis to be vertical ribcage on top of the pelvis, shoulders on top of the ribcage and head on top of the body. So pulling the throat back often engages the abdominals. Please don't walk around squeezing your abdominals that's not great for your pelvic floor, which is down on your abdominal contents. So you want to think of length and alignment and let your nervous system decide what muscles to contract. So don't tell your body to contract a muscle individually.
That's not really how our nervous system works. Alright, so once you get into your alignment, find that length in your spine and if this doesn't feel like a good position for you to be in, I'm often really comfortable in this position where you've got your feet back like this. This is my gardening posture, I have garbage bags that I sit on. And then I like to sit with my body up a little higher, and then straddle the garbage bag so my knees feel good and my feet don't go to sleep. So I sometimes meditate like this, you can also sit on a yoga block, that really helps to get things aligned so that you can get your pelvis in a vertical position because if you're pulled by your hips into that flexed position your hip flexors, are not gonna not feel good.
And you're gonna be pulled back into a bad posture. So got to get that pelvis vertical in whatever position that you're in if you're gonna stay for a period of time. Alright, so finding that length within and crown of the head, aiming toward the sky. I'm sure you're feeling your heart pumping. And let's slowly change our breathing from our Pilates more costal breathing, ribcage expansion breath to a low belly breath.
And I challenge you to keep the length of your spine as you breathe into the low belly. Let your shoulders soften while the center of your body stays strong and long. Noticing your breath, deepening and slowing down. Feeling that sense of satisfaction and well being and working hard in a class doing something good for your body. Imagine wrapping yourself in a blanket of peace Let's wrap the planet in a blanket of peace.
As you breathe in, breathe in positivity. And as you breathe out, breathe out negativity. Breathe in joy, exhale, pain. Breathe in vitality and healing, and exhale, anxiety, stress and suffering. Continue to imagine that flow of your breath, breathing in what you need and exhaling what you don't need.
Visualize something in your body to be grateful for, give some love to a body part that needs help. Sometimes it just needs to get stronger. Breathe in healing light. Let's bring a smile to our pelvis, a smile to our collarbones and a smile to our face. Thank you all for joining me.
This was really fun, I hope everybody's okay. If you have questions, just put them in the Q&A and the Pilates Anytime folks will send me your questions and I'll try to get back to you with my answers. So I would imagine you have a lot of questions about today. So I've got like the dialogue. Thank you for joining me, have a great day.
Empowered Aging: Get Fit with Sherri


Comments


You need to be a subscriber to post a comment.
Please Log In or Create an Account to start your free trial.
