Description
About This Video
Transcript
Read Full Transcript
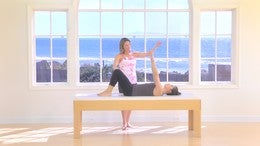
Hi. I'm Sarah Bertucelli, and I'm back to offer you another shoulder experience. What we're going to do today is a bit of a mat workout, but focus on the shoulders. I did a class earlier on, where we played with just moving your bones and sensing how it feels different in your shoulders once you've moved things around. Most of the work we did in the previous one was what we would call open chain, where our arms are not connected to anything.
Well, that's more like real life. It's a little bit hard to feel, or to really use the muscles that are needed in order to kind of wake things up on the upper body. So this time, I've been playing a lot in my practice with finding ways to fine tune the hands, forearms, elbows, essentially, to then affect the shoulders. And I've been getting really wonderful results, both in my own body and my client's body, so I thought it would be fun to share this with you. It becomes important for you to just pay attention to where your bones are.
So I'm going to ask you to really look at placement of hands, and wrists, and elbows, and shoulders, and what not while we're doing this. It also is important to remember that in order for the upper body to work the way we want it to work, or the way it should work, the lower body needs to be intact. So in this class today, I am, in fact, going to address a little bit the lower body. We're going to do a little bit of strengthening and awareness work, a little bit the core, and then we're going to put a lot of energy focusing on the upper body. So I've got Kaita here to help me out.
So go ahead and come on over Kaita. And why don't you stand up on the mat there for me? If you're on a squishy surface, you might find it a little bit difficult to do squats, but Kaita has some good balance here, so I think it's nice for her. So we are going to start here, standing with feet underneath the hip, and allow the knees to bend. The arms can float up when you do.
And then stand tall. So here, I'm just asking you to sense your bones. Sense your joints. Can you feel your ankles moving as you bend your knees? Can you feel your knees moving?
Can you also sense that your hips are moving? So as long as you're not tucking your pelvis or shifting out of neutral alignment, there is a movement in your hip joint. So, sense it. Very graceful, simple movement here. Also notice that your arms are just floating up.
And again, today, in this class, we're focusing on just what your bones are doing, and noticing what your muscles do as a result. And last time just like that. We're going to float the arms up, and we're going to hold. Now sense here that you've got your abdominal in tact, so you've got a little bit of a support system from the core, both the abdominals and the upper back. Now the hips are going to pitch back as the arms go up, and we're going to find those legs here.
Nice little squat. And we're going to stand tall. Beautiful. So that very first knee bend, the body doesn't pitch forward. And then, we sit back a little further.
The arms go up, equal weight on both legs, and we're going to stand nice and tall. And we're just going to do two more like that. Nice little squat. Now if you don't feel comfortable going into a deep squat here, then don't. Stay with that very simplistic knee bend.
And on this last one, go back and hold here. So feel equal weight on your feet. Sense that your pelvis is not tucking, but you're also not overly arched in your back. Feel length through the crown of the head, and your arms long. And then, stand nice and tall.
Beautiful. Now here, go ahead and roll down one vertebra at a time, articulating through your back. Beautiful. And then in that roll down position, stay for just a moment. Bend your knees, and then straighten your knees.
And bend your knees. And straighten your knees. So one last time. Bend the knees a bit. Get your hands on the floor.
And walk out to your hands and knees. So I want you to feel what a plank position would feel like. We're not there yet, but that's where we're going. So that you'll feel what it feels like a little later. So your hands are underneath your shoulders.
You have as neutral of a spine as you know how to be in. And you're going to stretch one leg back to a plank position, followed by the other. And just be there for a moment. Sense what it feels like right here in this moment. Perhaps bend and straighten your elbows a few times for a push-up, and see what that feels like.
If you don't feel warmed up or ready for that, then don't. It's OK. But I just want you to sense what your body feels like when supporting on your arms. Hold here. Put your knees down.
And we're going to shift onto our backs. I like to cross the legs behind, roll over the feet. But if you need to get there a different way, then that's OK with me. So now, we're going to warm up the abdominals a little bit. Lie on your back.
Feel your feet. Start with them together, and then separate them slightly. Feel your spine in neutral, so the pelvis is heavy, the ribs are heavy, the chest is open. With flat feet, we're going to inhale here. We're going to exhale and go right into the pelvic curl.
So pressing the pelvis nice and high, we feel those thigh bones staying still in space. We want a little tuck of the pelvis, a little bit of activity in the abs, and then we're going to lower down one vertebra at a time. So the idea here is that if we warm up the core really well, we'll be more likely to get in tune and in touch with the upper body. Exhaling to peel up again. Feel the inner thighs working.
Heavy feet. And then exhale to lower down. And we're going to do two more, just like that. Beautiful. Exhaling to peel up.
See if you can create more elongation through your spine. So we're looking for this energy out through the kneecaps, simultaneously out through the crown of the head. And then we lower down, trying to separate each vertebra and create more space. And then with the next one, we're going to hold up there for a little bit. So, exhale to peel up and stay.
Feel that the thigh bones are still in space. The abs are active. Lift your heels off the floor, and then press them back down, waking up the backs of the legs. And we'll go again. Inhale to lift the heels, and exhale, pressing down.
So each time you press the heels down, you're looking to almost tuck the pelvis a little more, so you can feel the backs of the legs working. Last one. Flat feet. Take a breath. And then articulate down through your back.
Beautiful. Reach your hands up to the ceiling for me. Stretch your arms open. And then bend your elbows, Kaita, because you're on a raised mat, so you have something to hold onto. If you're on a flat mat, you're just going to want to keep your arms outstretched to the T.
Bring your knees and feet together, and twist the legs one direction with the inhale. Beautiful. And with the exhale, we're going to pull back to center. Gorgeous. And again, we're going inhale to twist feeling that we're maintaining-- let me say that differently.
We're not tucking the pelvis to achieve that twist. Pull back to center. Many of us, when we go into rotation, we tuck too much. And you want to kind of feel like you're wringing your spine out without bending it one way or the other. And again, inhaling to twist.
The legs are stay glued together. Are stayed glued together. That was a great cue. They are glued together. One last time each direction, please.
Nice, wonderful twist there, keeping the shoulder blades down. Exhale, pulling back. And last one. Inhale here. Wonderful.
And exhale to pull back in. So heating up the abdominals a little bit, will you float the hands up to the ceiling for me. Palms are facing away from you. You're going to exhale to lift your head and chest. Inhale here.
Exhale to intensify that curl. And gently lower down. I want you to play with the idea of keeping your heels together. If you can, keep your heels and the balls of your feet together, and lift up. When I say balls of the feet, inhale here, exhale to intensify, and lower down, I just mean there's three bony landmarks.
Go ahead and lift again. I want the heels, the ball of the big toe, and the big toe touching if possible. Intensify the curl, and lower down. And one more time before we add on a little bit. We exhale to lift again.
We intensify that curl there. And then we're going to hold that. I want you to lift your arms up a little bit, and put your middle fingers so that they're touching. You're going to keep that connection to the middle fingers, and you're going to draw a straight line in one direction with an exhale. Draw that straight line past your center.
Exhale the other direction. Inhale, pass through center. Exhale the other direction. And inhale, staying lifted. And one last time, exhale.
Come back through your center, and lower your body down. Stretch your arms long. Stretch your legs long. Reach your hands to the ceiling for me. You want to try to keep those legs pressing together if at all possible.
We're going to lift the head and chest. If you're not ready for a roll up, then you can lift a leg and assist. But if you've got the strength and flexibility, we're going to do some roll ups. Inhale here. Exhale to peel back one vertebra at a time.
Enjoy that articulation through the low spine. Stretch the arms back. Keep the ribcage down. Lift the head and chest. That's the inhale.
Use the exhale to round and roll up. We want to keep that c-curve in this high position. Think of pressing those legs toward one another as you peel back. It's amazing how when you hold the legs together in their proper alignment, it actually connects to the psoas in an important way. We're just going to leave it at that.
It makes you work your gut a little bit better, which is a good thing. Beautiful. And exhale to peel back. Gorgeous. And the idea here is to just heat up the abdominals, so that we have a foundation to work the upper body.
This will be our last one. Good. Holding this lifted position, scoot forward on your mat, just a little bit, preparing to roll like a ball. With your feet on the mat, round through your low back. And then reach your hands as close to your feet as you comfortably can, hovering the feet off the mat, keeping the round shape of your back.
Inhale to roll back. And exhale to find balance. Inhale to roll back. Finding that balance using the center, using the core. Just two more like that.
Gorgeous. And one more time. Balance on your tail and hold. We're going to stay there. Bring your shins parallel to the ceiling.
Take the hands to the backs of the legs, and slowly peel down, using your arms to assist, pressing your legs into your hands, your hands into your legs. You're in a chest lift position. Stay there. Hold your right leg. Stretch your other leg out.
Single leg stretch. Switch. Switch. So we're moving nice and slow, and controlled with the legs. I want you to sense the elongation of the straight leg each time.
Also, sense the pulling in of the bent leg each time. It's as if you're having to push up against a wall, deepening the connection to your core. One more time each side. Both legs come in. Put your head down.
Take a breath. Lift your head and chest again for me. Make sure you've got a nice, high curl here. Take both hands to the outside of your right leg, and find a twist. Stretch the other leg out for me.
Place your hands then behind your head, and hold here. Now if this is too much for you, you could put your feet on the floor. Otherwise, you're going to stay here. Just the bent leg goes down and up. Exhale.
Down and up, exhale. Two more just like that. And exhale. I'm giving her a little extra work. It's kind of nice.
Here, both legs come in. Hands go to the other side. Twist a little bit more. Lift a little bit more. Place your hands behind your head.
I forgot to tell you to stretch the other leg. That was my bad. Stay there. And the bent knee goes down, and exhales up. Good.
Keeping the height of the curl there. Beautiful. And two more like that. Exhale up. And one more time.
Lift and hold. Pass back through that center position, both knees bent. Lower your head down. Put your feet down. At this point, your abdominals should be a little bit heated.
You're going to want to scoot back just a little bit, Kaita. So you can roll up to sitting, or you can just come up to sitting. That's OK. Cross your legs in front of you. And I want you just come into your hands and knees position, please.
So you're going to want to be a little bit more spread out than usual, which means I want your knees back a little bit further. And then, bend your elbows and put your forearms down. So I want you to pay attention to how you are here. Your bones are in alignment. So you've got your head.
You're on a diagonal here. So your head's in alignment. It's not hanging down. Your upper back is kind of puffed up, is the cue I'm going to give. Your abdominals are working, and you've got what we would call a neutral pelvis.
So you don't want to be tucked here, but you don't want to be spilling out in the low back either. You're going to look at your bones here, and you're going to sense the center of your elbow joint. And you're going to draw a straight line through the center of your wrist, through your middle finger. And then, I want you to look at your wrists, and I want you to allow your hand to bubble up a little bit, to get both sides of the wrist firmly down. And that's your focus.
Now, many of you are going to not have any idea what you're working while you're doing this. And you're also going to find it very difficult to do. But you are going to find also that something is working. So I'm looking for the fingers to rest, but to notice that there is a little cup in the hand. Beautiful.
So the elbows are not going to bow out at all. That means you're working on slightly rolling your underarms together, or drawing the elbows in a little bit. Technically, what we're doing is staying in external rotation. Now, we're working on pronation of the forearms. What's going to happen is the whole shoulder mechanism wakes up.
It's exciting. It's cool. You see me perking up. I can feel these triceps working. It's lovely.
Now this is where it gets hard. We want to make sure that the head doesn't change. Because that's what's going to want to change. The second it changes, everything that's happening in the shoulders changes. So we're going to come forward a little bit.
Beautiful. Right about there. We want to change, but we're not going to let it. The head goes back a little bit in space. We're puffing up this upper back a little.
And you're going to bend your elbows, and go a little further forward. Stay right there. Beautiful. Now this is the point where I'm going to ask Kaita to really work. I once had a client tell me that she's never worked so hard to do nothing before.
And that's what we're ready for. You're going to keep both sides of your wrists firmly down. That's the most important part for me. Your head's not going to hang low. But you're going to hover your elbows off the mat, without letting me know that you've done it.
Me, oh, my. Stay there. Good. Puff up your upper back a little bit. Now, that's your starting position.
And my friends, if you're doing this at home, you know this is not easy. From here, you're going to keep the alignment of your upper arms and press your arms to straight. We're maintaining external rotation. Now, you're going to notice that you're not directly over your wrists. That's OK.
We'll get there. Bend your elbows and go back down. But are you going to rest your elbows, my friends? No, you're not. You're going to work really hard to do nothing.
Haha. Press back up again. Notice that the head doesn't sag. It's going to want to pull your head back as if it's on a head rest. And bend your elbows again.
Beautiful, beautiful, beautiful. So the key here is really keeping both sides of your wrists heavy. Notice the hands are just sort of relaxed. But my friends, you probably don't feel anything in your wrists. Bend your elbows one last time.
Gorgeous. You're going to press up, and now it's going to get really hard. Ha, ha, ha. Shift forward, so that your shoulders are over your wrists. Keep the puffy back.
Keep the head alignment. We've got this bit of external rotation in the upper arm, with this bit of reverse action in the lower arms. So, soften your elbow a little, Kaita. Good. Now from here, try to bend your elbows without going back.
Just try. You might have to move back. You might not. But it's definitely going to feel very, very, very difficult. Beautiful.
Oh, we're not done. Press up one last time, please. Stay there. Head back. Please puff up the back.
Gorgeous. It's all about the bones, my friends. I haven't talked about muscles, have I? Plank position. Put one leg back.
Put the other leg back. Now walk your toes forward. Do, do, do. Perfect. So, your shoulders are over your wrists.
I want hips a little lower. Good. I want head back in my hand. Nice. Feel that.
Your plank feels different. I'm sure it does. I know it does. I am not pushing her head down. I just want her to keep her head there, so I've got my hand there, so she has something to look at or feel.
Now here, you're going to put your knees down. Good. Bend your elbows. Go back to your elbow plank. Nice.
Good. If you've had enough, you can take a break, but we're going to continue on, because this woman is an animal here. Press down through the wrists. Here we go. Now you're going to shift forward as far as you can here.
Deep, deep, deep elbow bend. What happens is it gets a little easier. It's not easier so much, but it's more accessible, right? Now I want you to hold this position completely still. The wrists are heavy.
The arms are kind of pulling in at the upper arm. You're going to slide one leg back to a plank position, without letting your body go back. You're going to slide the other leg back to a plank position. Now, you're going to lower your hips so that you're in a real, true plank. Head's going to go back a little, Kaita.
Good. Chin in. Good. See if you can lower here. Nice.
I like it. Now, try to hover your elbows. It ain't going to happen for most of you. But take that feeling of hovering your elbows. Good.
Such beautiful English, it ain't gonna happen, huh? Put your knees down, sit back on your feet, and take a rest. So there's little balls of sweat here underneath Kaita's hands and elbows. And again, what I want you to sense when you practice this is, you may not be able to put your finger on what is working. But I tell you, friends, you're opening up a chain reaction of muscles that need to be working by paying attention to where your bones are.
That's all I'm looking for here, is this feeling of something a little more solid. Simply shift back to the plank position one last time, and just sense how it feels. So try to organize your head, your arms, all your pieces, your abs. And then, I don't know. Try a couple pushups, and see how they feel.
I'd be willing to bet they feel a little lighter. I'd be willing to bet they feel a little bit more manageable in some ways. Good. You might also be tired. And that's OK too.
Lift your hips up nice and high. Press your chest toward your thighs. Walk your hands back to your feet. And roll up to a standing position. Now, I'd like you to stand for a moment, and I wanted to say something at the beginning of this.
But I'll say this now, and you'll watch it again. And hopefully, you'll do it. If you have the opportunity to look at yourself in the mirror before you do this, notice if your arm is a little bent, or your shoulders are rolled forward, or you're out of alignment. Just look at yourself in the side view. And then look at the other side, and just notice what your arms look like.
And then do this. And then, stand up and look at yourself again, and see how your bones might sit differently without a whole lot of effort. Yeah? Thank you. You feel different, right?
So it's interesting how just arranging the bones slightly differently will affect how you feel. There's a lot of scientific muscular mumbo jumbo behind it all, but let's just stick with playing with the bones. Yeah? Thank you for playing.
Tips for Teachers: Keep It Fresh! Exercise Tutorials


Comments


You need to be a subscriber to post a comment.
Please Log In or Create an Account to start your free trial.
