Description
About This Video
Transcript
Read Full Transcript
Hi, my name is Porsche page and with me today I have Lizbeth Garcia. We're both from San Diego and both faculty members for balanced body. Today I'd like to go over a little tutorial about how to modify challenge five pretty common exercises that we use in place mat classes. So the first one that we're going to touch on is the roll up. Alright, so first I'm going to have Lizbeth actually show you the Rola in its most common form that we do the exercise lying down with the inner thighs together, feet flexed, arms over the head.
She's going to lift the arms up to the ceiling with an inhale and exhale, roll the spine up. Notice the legs. Do not do that little Frankenstein lift she has. She reaches forward. She's got a nice, nice hallowed effect here in the abdominals. And then she's going to sit up nice and tall. Next inhale, arms reach out in front and exhale without collapsing. She'll roll down one vertebra at a time.
So that's the exercise as we see it. She makes it look extremely easy. So first what I'd like to do is show you a modified version of this. So I'm going to have her come to a seated position. Of course she's going to do it as a roller cause she can do it so easily and she's going to start with her knees bent, feet flat, and from here she's going to actually hold the backs of her legs. Here she can bring herself up to a nice tall position.
And from here practice what is usually the easiest part of the roll up and that's the roll down. So if she rolls back, she's going to draw the abdominals in without collapsing. Reached the legs long and extend the arms over the head. Looks very much just like the regular roll up. Here's the difference though. The roll up now becomes a side role. She props herself up and continues to roll to the sit bones, grabs the backs of the thighs, takes a deep breath and rolls back again.
The next time that she comes up, she's going to come up on the other side so that she does this evenly to both sides. This is a really great way to modify this move for any number of population of people. Pregnancy is one that I'm thinking of. I can remember when those Beth was private and we had to use this one quite a bit. So now I'm going to show you a challenge for this exercise. So we went from the actual exercise itself to a modification. Now it's time to challenge and I know Liz Beth can handle this so we'll take her down to her supine position on the floor, inner thighs together and strong feet flexed arms overhead.
This time when she lifts up with the inhale, she's going to try as much as possible to keep her head framed within the arms and then she reaches up and over here getting that nice long stretch takes another inhale, sits up tall and the exhale is going to roll back. The arms come up framing the head again, again, making this a lot more difficult and down she goes. She doesn't really make it look difficult but it is. So that was the challenge. One exercise down, four to go. The next one that we're going to do is the roll over.
So we're going to have Liz Beth show. This one to you hands are going to come down to the hips. This is the standard version of the rollover, so she'll bring the knees up over the hips, extend the legs long starting position here. Heels over hips. She takes a deep breath with the exhale, presses into the hands and rolls over the body. The legs stay parallel to the floor and as she takes the next inhale, the legs separate, toes flex and she rolls down.
Keeping this nice long spine controlled and ease. Inhale, the knees, legs come together, toes point and she begins again. We can do this in both directions, so I'm going to actually have her roll down with her legs together this time. Okay, this is a little tougher. Yes, and now we're going to move right into our modified version. This is a really great movement for people of any level, but not doable by most people, especially at the beginner level or people just starting out in [inaudible] or people with really tight lower backs or maybe lack of core strength.
So with this one, we start with the knees bent. She's crossing one foot over the other at the ankle joint, so that lets the knees widen out. It eases the movement in the hips and allows her to bring the knees in a little closer. With the inhale, she preps the Xcel. All she's going to do is bring knees over, eyes pressing into the hands again. So she gets his nice stretch in the back.
Now she'll extend the legs long if she can. In this case she can and she'll uncrossing recross the other way. So this just gives her a different positioning of the legs and as she rolls back down again keeping this nice scoop, she bends the knees and let some widen and then reaches the legs long or just keeps them here. We're going to keep them here for now. Let me show you that one more time. Or have Liz Beth show you that one more time. This time. Keep your knees bent.
Okay. Because this is perfect for the person that is really tight in the lower back and has difficulty with this really great move. Again, as she rolls over knees, we'll just come to the eyes so there's just a little lift here and then she'll roll back down. Good. And then she can uncross red cross the other way. So she gets a different positioning. We don't need to have her show it again, but you get the idea. This is a really great way to modify this. Now let's move on to the challenge. So she's going to uncross the legs, go back to our original version and what we're actually going to do.
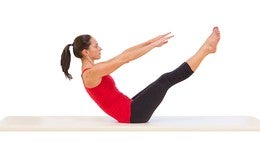
The challenge this move is moved from a rollover to a version of Jackknife. The inhale preps, the exhale rolls her over. Good inhale legs are gonna reach up towards the ceiling as she opens up the Jack Knife and then she'll exhale to roll down again, very difficult move. And again, Liz Beth is making it look like just the breeze that she makes everything look like. With that, let's take a break and bend the knees and that was the rollover. Now we're going to move on to teaser, so since we're already into the position here, I'm going to allow her to lift her legs up and bring the arms up over her head, and she's going to show you the traditional version of teaser.
Inhale and exhale. She lifts up, she comes into this beautiful teaser position. Arms lift up on the inhale. Exhale, she'll roll back down, articulating through the spine, leaving those legs at a 45 degree angle. Beautifully done. Let's show the modification. Knees above hips. Now as she rules up, we're actually going to start with the arms lifting up and I'm going to give her this little reach with the legs and give her a little support in the feet. Very easy for her to do this and then roll back.
And as she does the knees bend, we bring them right back over the hips. Now I'm going to let her do this on her own. So the next level up would be without me in the picture. And as she rolls up, she's going to tap her toes, keeping the knees bent. So let the toes tap actually on the floor. That gives her this added lift to get the nice long spine that we're looking for. And then she can roll back toes, stay here until she can just start to lift them up with control.
Knees over hips, head back and arms reach over and then she can move on from there by straightening the legs as she reaches out to, let's just show that actually start with the knees bent Lizbeth and as she rolls up she'll extend the legs long and there she's worked on to the next level of our teaser. Bend the knees as she rolled back, keeping the feet off the floor, and then eventually she would move up to her version of the teaser, which we showed already. So are you ready for a challenge? Lizbeth okay, let's extend the legs long. She'll start with our normal teaser. So coming up into the beautiful V, she's going to reach one leg down long on the floor, lift up other leg. You notice here that nothing is happening with the torso. One more time with the left Lizbeth and I'm going to have you show both because you do this so beautifully and roll down gorgeous.
Bend the knees, bring them into your chest for a nice long stretch. Now we move on to one of my most favorite exercises in the entire world and that is the pushup and plank positions in general. So if you would please Liz Beth. So we're going to show you without the standing portion of this a standard push up. So you're going to come into nice long legs, good extended legs, bending the elbows, they come in by the ribs. Exhale, she stays long and straightened up. Plank, bend the knees. You just have to show one. There's our push up. Now we're going to show you how w how I like to modify this spring, the knees underneath the hips coming into an all fours or horse stance. Position. Knees are hip distance apart, wrists or underneath her shoulders.
She's long and straight through the spine. Abdominals are drawn in. The first modification is just a bend of the elbows back towards her thighs and then she'll come back up. You'll notice that the entire torso moves. If you could just do one more of these. This actually helps her with the bending and straightening of the arms one more time, but we're also getting the triceps to begin to activate and we're starting to feel this activation here along the sides of the body, even down into the sides of the torso. Now we move on to the next level, so from the all fours, she's going to move her hands about four to six inches in front of her. Then moves shoulders over risks and come into a modified plank.
So now she's got a long straight line from the knee, sorry, from the head down to her knees. Now when she bends the elbows still in line with her rib cage here, it's a little more difficult. She's doing a wonderful job. I won't make you do another one. Let's just take a seat back so you get a little rest there. That was level two. So we went from all fours, just bending the elbows, moving the entire torso to modified plank.
And then we would move into full plank. So can you show one like that with a leg lift? So we show a challenge. I won't make her do the one arm I was thinking about it, but I didn't prep her for it. So I don't think that's entirely fair. So here, lift your right leg and lower into a push up. And because I have to keep her balance lift up, I'm going to have her lower the right leg and lift the left and I'll give her a little assistance here. Right at the hip bones and lower down. Beautiful job, Liz Beth. And that's how you can modify and or challenge your pushup position. And now are you up for one more? And that would be our side.
Okay, so you're going to come into our yes. Let's actually extend the legs out. We're going to show the full version. So you're gonna Cross your back leg behind. Lift the hips up. Hello. Drain. All right, now she's going to exhale lower the hips. And lower the arms. Look down towards the feet. And on the inhale she'll lift up, extend long, and look down towards the hand. Take a quick rest here.
This position in the side plank is extremely difficult, especially for her one side and you are weaker on your left side, aren't you? Thanks for showing our weak side. That was really good of her. So I'm going to show you a modification for this, which is a really great way to work up into any side planking exercises. And that's the side hover. She's going to bend her left elbow, bring it right underneath the shoulder. Move the feet back. So keep the knees bent. Lizbeth keep both these bent.
And you'll see here that the knees are just slightly in front of the hips. It's kind of important that you see this cause if you bring the legs all the way back, she's going to arch your back. So we don't want her to do that. Bring the knees slightly forward. Elongate through the torso. Now extend the top leg out, press the inside of the foot down and lift up onto this knee here. So in this side plank position here, she can really activate the muscles around her scapula, getting that engagement through the upper body here and feeling this nice long stretch. This is a great workout in and of itself and a great place to start, but we can also do a portion of the exercise we were doing earlier by lowering the hips and lifting up. It's a great way to modify and then take a break.
I won't make you do too many of those. Do you want to show the challenge on the other side? Yeah, so eat your right arm working here. So the challenge for this exercise, we're going to get her up into that side plank position. So plank is usually on the hands and elbow is the hover. So now we're back to the plank position. She going to lift the top leg. I'm going to give her a little bit of support here. Just holding.
This is in and of itself an exercise that is difficult, but now I'm going to ask her to move a little bit. So she's going to do a little circles with that top leg. Why don't you circle the other way, so you're balanced really nice and long hair. She can also do some kicks if she'd like little tight. Oops. There we go. And we'll just leave it at one. Take a rest.
Lizbeth take a little rest here and stretch out that side so you get a nice long stretch on the side. They're really great exercises, really commonly seen in Mat classes, those five, and with those modifications, you can easily take somebody from zero to a hundred in just a few minutes as we did there. Nice job was Beth. Thank you. Thank you very much.
The Teacher's Corner: Teaching Tools


Comments


Marketa, in regards to people who tend to hyperextend their elbows, try getting them to engage their upper arms (especially the triceps). Follow up with tactical feedback by manually cueing the Serratus to wrap & support, guiding them to push the floor away. If they are still hyperextend, then try modifying by placing them in a hover (bend the elbows, place the elbows & forearms on the floor, elbows under under the shoulders). This is a good modification for side plank also.


You need to be a subscriber to post a comment.
Please Log In or Create an Account to start your free trial.
