Description
About This Video
Transcript
Read Full Transcript
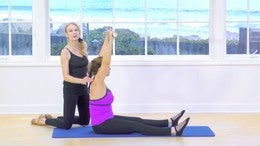
Hi there. I'm Jillian Hassell and today I'm going to reconstruct a couple of exercises, series of exercises from the Cathy Grin era at Henri Bendel's in the early eighties. When I studied with her, I have a double curvature of the spine and Kathy devised a lot of interesting work for me using this heavy red pole. It weighs about three pounds. You could make it lighter or heavier depending on your strength and ability or your clients. It's the same length as a regular roll-up bar, but it is made of a heavy metal. You can make one at home if you like by a hollow metal tube and fill it with gravel or sand or just a heavy weighted pole. And I painted it red in honor of Kathy. So, um, I just want to uh, introduce my student Michelle, who also has a curvature of this mine. Hers is a little different from mine.
Why don't we face the camera first this way? So many cameras. Um, Michelle has a right c curve. There's some similarities to mine with a higher shoulder, but I want to, um, make this more generalized. Anyone who has, let's go ahead and, um, stay here for a moment. I'm going to put the pool down. Um, anyone who has kind of a kyphotic posture, which is just about everybody today working at the computer and um, texting with their phones, um, can benefit from this work because we are going to be working on opening up the pectorals, lifting the chest and having the shoulder blades ride flat against the back of the ribs. So I just, um, it's hard to see in this view. Michelle is also a teacher so she knows how to correct her body, but she does have a higher right shoulder.
The arm hangs a little bit more forward and there's also a pelvic rotation in her body that goes in opposition to her right shoulder. So let's have you turn sideways, right? And it's not real easy to see, but when I'm looking from this view, I see a, um, more protruding, right thoracic, upper thoracic rib and shoulder area. Um, we also check, go ahead and turn once again the window of the arms. I'll get out of the way here. Um, we want to see if the window of the arms are even and you can see that the arms don't hang evenly. So if I press in on her hips and pushed down, we can also see the right hip is a little bit higher than the left.
So we're going to be addressing some of that here today. Go ahead and lie down on the map. We have Michelle supine now and I want to do a little bit of an overview of the estimators that we looked at when she was standing. So the first thing that I want to do is have kind of a eye view from the top of her head and check to see what's going on with the hips. And I can see that the right hip, I call it advancing.
It's a little bit tipped this way. So we have these scolio wedges and they are pretty terrific. There's large and small sizes. Michelles curvature is not that large. So I'm not going to be using the large wedge today.
I have two sets and I'm going to use two small ones, but because her hips are tilted and I call this counterclockwise with the right hip advanced forward, what we're going to do is tip underneath to kind of even her out. And the wedge can go in either deeper or less to the point where we see that the knees are level. Okay. And then what I'm gonna do here is work my hands under her ribs and see do we need any wedging under here? This is her protruding side of her ribs. This is the hollow side of her ribs. So she's um, getting my hand quite a bit farther underneath the rib cage area on the left side. So it's a little bit counterintuitive, but we're going to be wedging with another small wedge because her curve isn't great up on the protruding side. And the effect of the wedges is to let the spine Dee rotate.
In this case, she's rotated clockwise through the ribs, so we're wedging her counterclockwise. So we've got an oppositional wedging to work to even out her body a little bit through the torso. Now if we come up to the high top end here and I work my hands under her shoulders, hopefully you can see on camera here, I can get my right hand way under that high right shoulder that's rotated forward. The pectorals are very, very tight, less so on the left, although there's a bit of tension I think for everybody these days in the pectorals. So we're not going to wedge that, but we're gonna do a little bit of a manual adjustment first to um, help that. So I'm going to do the right shoulder first because I want to show how the adjustment helps that high, right shorter drop down. And for a moment before I come back and do the left, you'll be able to see that the right shoulder will actually drop below the level of the left one, which is quite interesting.
So I'm going to have her take her hand up into what we call the goal post position. Reach underneath and grab that scapular, which is a triangle shape bone and draw it down manually a little bit, opening up this pectoral area. And in a lot of, if you have someone with a um, a dual kyphotic shape, when the hand comes back in this position, it won't even be able to rest flat on the floor. They'll be kind of climbing like this and reaching back through the wrist. If you have a client like that, what you're going to want to do is take your wedge and I'll, I'll do that in a moment. Um, if she were up here, I would support her with a pillow so that the hand is not reaching and tense but relaxed back and open. So we're going to do the left side now. And from the bird's eye view, what's interesting having done that correction is that now I can't get my hand under there and I still can get my hand under the left shoulder, which is the more relaxed one.
So that's a better position for her to open up her upper thoracic and get everything stable here. So we're going to take the left hand and bring it up and again, quickly drop that shoulder blade down. Our cue is quite often into the back pocket. This is the hollow side of her ribs, so she's going to have to work a little bit harder. We call it one lung breathing to inflate into this collapsed side of her ribs.
So it's impossible to breathe into one rear, but it's a visualization to activate the muscles on this side. It's rather compressed. So now she's in goalpost. I just wanted to show some of these smaller wedges that can be used, um, or padding. If her hand were not riding flat on the floor, we could wedge it up and have it supported resting there. She doesn't really need it.
But just so that you know for your clients at home or for yourself. Well actually this hand does look like it could use a little help. Good. I'm glad we're not perfect. So now we want to take, I'm one of Eve gentry is fundamental. It's called breastbone breathing and I'm going to place my hand right onto Michelle sternum and half her inhale. And the breastbone should rise with the inhalation into the thoracic cavity.
As she exhales, she's going to engage her lower abdominals, of course, but as she blows the air out, we also want to see the breastbone falling. So it's a full inhale, deep in through the nose. Exhaling, engaging the lower abdominals, and then feeling all the air out right through the upper body on once again, inhale and exhale. Now you notice that the rib cage is dropping down as the breastbone drops down. She's going to add some movement, a goalpost essentially from here, extending the arms up on an inhale and then exhaling, pulling back to the goalpost position. So it's an inhale, extend, exhale, dropping the breath down. And once again, inhale, extend, and exhale. Dropping the breath down. And this is a great way to feel that the arms are working not just out of the shoulder joint, but off the entire shoulder girdle.
And we're getting a wonderful stretch here. Now I'm going to give her a manual stretch to, um, increase the mobility here in these tight pectorals. I want to warn everybody at home. I would never stretch from this side. It's a little bit too intimate for the client. I would come from the overhead view, but I don't want to block the camera so I'm just going to take her elbows here.
Take a breath, Michelle. Inhale and again, exhale, drop the breastbone and I manually tractioning her elbows straight out horizontally from her shoulders. And again, inhale and exhale. So we've done quite a bit of opening here now and hopefully she has a little bit more feeling of these shoulder blades lying flat against the back of the ribs and against the map. So we're going to go into now and Eve gentry fundamental called puppet arms. I usually do give slight hand weights, uh, maybe one or two pounds to the client here. The idea is that the arm doesn't move at all from the elbow, but it's a protraction retraction of the entire shoulder girdle.
So on an inhale, just single arm first, she's going to reach up on an inhale and you can see all this airspace. Xcel, she's just going to drop that down. And then the other side, inhale, exhale, drop. And what's interesting, we were practicing this earlier this week and we noticed it really want to give into gravity. If you've got a hand weight, it helps, but it was harder for her to make a sound dropping that shoulder blade down on the right side because the water rides forward. So just having the weight and working with gravity as our friend, which is nice to know. Sometimes gravity can be our friend. Good. Now let's do a double reach. Inhale, reach, reach, reach, and exhale drop. So just remember at home you can give your client a little bit of hand weights. Now we're ready to launch into Cathy's red pole series.
So we're going to take the pole and she's going to gently hold onto it, but not grip too hard and the arms are extended. The bar comes to about the middle of the thighs. What we want to do is make sure that those shoulders remain for this entire exercise as best we can, riding flat against the mat and we're going to work. So mobility. Now remember when the pole goes overhead, it weighs three pounds. It becomes quite heavy. And the tendency is to pop the rib cage. So that's where the work begins.
So we're going to move incrementally in threshold breathing at first. So Michelle's going to take three breaths to come to a vertical line where the puppet arms were. Inhale through the nose, exhale and float the bar and pause and inhale. Remember she's dropping that breastbone. Alright, good. And one more breath. And she's up to vertical right to the puppet arms in here. We've got some weight now, so we're going to reach the knuckles up.
Inhale and exhale, dropped out. Wait, we want a real puppet arms. Inhale up and Durer up. That's right. Inhale up and Dura and inhale up and drop. And one more. Good. And now as if she's pressing two columns of air, really activating from the lats. Exhale back to the, to the thighs, right? That's right. Good. And we keep the elbow soft. We don't want to lock out the elbows. Locked elbows are kind of like hyper extended knees. We disengage the glutes.
When we lock the knees, we disengage the lats, which we need here when we lock the elbows. And we're going to make it a little more complicated now. So she's going to take one exhale to float to vertical, and now we're going to start dropping back overhead. So she's going to inhale and go back three breaths. One inhale, dropping down through the ribs to add one more and three.
Now if we hadn't done all that opening of her right shoulder, what would probably happen, and it happened with me with my shoulder, is that sorry, it would be this way. There's high right shoulder would be so tight that the bar would be tipped. We've done a pretty good job of opening you up. It looks good. So now we're going to breathe in and we want to think of squeezing the scapular down, squeezing the lats down, float back to vertical, and we work in incremental breasts. And one more breath back to the thighs to rest. Good.
Very nice. Now one breath. We're going to move on an exhale, right to vertical and we're going to stay there. Now I ordinarily would do another set of floating back overhead, but she did so well. We're going to go on. So now we're going to start shifting the bar side to side. I'm going to have her work to keep her shoulder blades flat against the back of the ribs on the mat. It gets a little tough if you have a large breasted woman because the arms get in the way. But we're going to work through that. Okay.
So take a breath in. I'm going to float the bar diagonally to the right and we want to keep the bar horizontal good. And then take it back to center. Nice. And same thing to the left. Inhale at Sam and take it back to center. Good. And once again, and I'm going to take the overhead view here because I can see better what's going on. Nice. Michelle, pull that left shoulder down. Yep.
And we want to watch that. The shoulders stay down and the elbow stays soft once again to the left. Pull that right shoulder back and down. Back and down. Yes. And come back to center and now we're going to float. The bar up. Once again, take a breath and come to vertical on the exhale. Good. And then we're going to float it to the right on the next exhale. Stay there.
And now incrementally, she's going to come back down to the thighs down through center. So the left shoulder has to pull down here. That's right. And she's floating down good. And then flowed back up through center and we'd go to the left. Good. And float to the left. Inhale. Exhale.
Inhale. Now here, her right shoulder really has to work to pull down as she floats back around to the thighs. Good, very nice. Now we're going to add the overhead component. So we're going to take a breath, float the bar to vertical, take another breath and float the bar back. And we don't want to go all the way back because the bar will hit her face or her hands will hit her face. So take a breath and go diagonally, right. And then take a breath in and diagonally. Back to center. Sorry, back to Sandra, right. And one more breath. And come to the left. Nice. And the is tipping a little bit there. Yup. And come back to center.
Good. And back down through center all the way down. So now we're prepared to do a full half circle. We're going to take a breath and float the bar just a couple of inches off the thighs. Take another breath, float it to the right. Good. And then incrementally coming towards that high, mid chest, diagonal. Good to the high overhead. Diagonal. Good. Nice. Right to center. Take a breath, squeeze. Don't go off to the left, right. And come right back through. Center all the way down.
So we've done a half circle. Nice. Very good. And float to the left. Good. Keep the right shoulder down. This is the tricky side. And up to chest level on the diagonal and back, keeping those ribs funneling down towards the navel. Good. And to center and straight down again, squeezing down through the lads.
It's a lot of work. They're very nice. Okay. So now we could do a full circle starting from the thighs and Kathy did, but we're gonna go on to finish out the whole series and then you can create more for yourself at home when you play around with this float up to the overhead position. Or we'll use this now as the home position. This is very, very difficult to maintain. The ribs really have to button down. So now we're going to start a circle from this being home. So go off to the right on a high diagonal good and down to the mid chest level on the diagonal. Right. Really Nice. You're not breaking your risks. I love it. Off to the diagonal.
And then float to home position just above the thighs and start off to the left. Good Michelle. Very nice. And then to chest level, right shoulder down. Yes. Good. Don't break the wrist good. And to the high diagonal on the left. Very nice and all the way back to the home position and then very slowly floating to Mitch chest level and one more breath all the way down to home position. So that's a shorter version of Cathy's red, heavy red pole. Very good.
And you might find you're really sore in your tricep after you've done this. It's a tremendous amount of thoracic stabilization. That's the end of part when you're ready for part two. Thank you.
Comments


Thank you!


Your connection to your client was unmistakable. Your succinct cueing made the Red Pole easy to follow. I can't wait to do this for myself!
You need to be a subscriber to post a comment.
Please Log In or Create an Account to start your free trial.
