Description
About This Video
Transcript
Read Full Transcript
Hello, uh, my name is one, and today we are going to do a class that is, it's intended to help you to explore the Hansen movement and we're going to use both math exercises and, and the chair, uh, in order to facilitate and to assist you in, in the process of doing a handstand and why to do a handstand. It's because why not? It is, it is challenging. It's a subset down. It's fun to do and something that, that we are going to law of exploring. Uh, in order to do a handstand, you really need to have some features in your movement and your anatomy that has to, has to happen. And so it's going to be very positive for your health. So it is necessarily to have enough strength and stability in your wrist. You really need to have like full range of motion into the shoulder flection.
You definitely need to have a thoracic extension to, um, to get the arm over over your head. You need core, uh, trunk stability to control the specially the sagittal plane. And it's actually, even though the legs are up, uh, it's a, it's a little work for, for the leg. So, so you, in the process of doing Hansen, you'll see that you are going to work out with your whole body. So it's really, it's really fine. This is good. So first thing we're going to do is to prepare the wrist. You'll see that the wrist is probably the biggest challenge. Now, uh, for most of the people who wants to start a handstand, even not a Hanson, even some of the abilities exercises, uh, the way that we put on your wrist is too much for the preparation or the adaptation that that reads. So we need to increase the tolerance of, of the risks, uh, too low. And it's important to understand this.
It doesn't matter how strong you are, you are as weak as your weakest point. So if you raise this your weakest point, there's a lot of things that you can do, even though you have a powerful core powerful legs and a lot of mobility and you can perform from a lot of things. If your wrists are weak, you are as weak as your risks are. So, so it's important to balance and go for this weakest link and trying to improve it so you can do more, uh, challenging and fun, fun things. So let's, let's work on the, on the wrist. Um, we're gonna use the qualified position. So, uh, as a general rule, when we are doing handstands, one of the things that we want to see is, and sometimes it's not very well, um, John is to really spread the hands out. Okay. So the index finger is going to point forward because it's, it's really the, the finger that connects with the line of the arm. So the index finger is going to mark the neutral position of the, of the race. So index fingers forward there others fingers are gonna be like very well spread out. And from there, one of the things that you will need to learn to do is to kind of hold and lift the arch of their, of their hand. The same we do with the arts of the food, uh, in, in their foot class, uh, in the hand. In this a handstand class, we really need to understand how to engage their core or the other hand.
So the idea is like the nails gets little bit wide so you're agreeing more pressure there so you create a little bit of space into your, into your hands. So that could be the first exercise we can do. Just press with their fingernails or their fingertips and release and press and release just for a couple of seconds. Okay. When you are ready and you know that you have this motion covered, we can start playing with a very easy exercise. It's just a rotation of the elbow. Okay.
If you want to load your system upside down, you really need to lock your elbows. I know there's a lot of grace about hyper extension of the elbows. Sometimes you happens, some people have, but not that many people as we usually do. Like every class, there's people with, uh, hybrids in the elbows and their really, their realities that is not. So in my case, could look like my elbow is in hyper extension, but I have a pretty good range because my tendency is to be lagged, but it's stable. So if you go to the elbow of your client or your elbow and you go into end range and you feel that there's stiffness there, that doesn't mean that it's unstable. So you can load it and you really need to, uh, look it because if you don't look it, it's impossible to load your, your weight.
So set that we come back to the position and we are going to do our external rotation and internal rotation. Okay. So we need to get and understand this control. So you can do it like, I don't know, 20, 30, 40 times, depends of what you want to do or how much movement you need here. But that could be a very nice exercise to, to start with. Uh, once we have done that, uh, you have to make sure that you are able to take the weight into the, uh, pisiform bone. So the external part, the lateral part of the hand. So one of the things that you need to try is to see if you can live the thumbs and raise them down.
This movement can be very challenging for some people that very, very weak wrists and that could be a very good starting point for, for the wrist. So you lift the thumb and then you release a release back again. All right? The next step would be from with a thumb up and you can load your hands a little bit more. And then you go into a little poles on the, on the wrist and the metatarsal Phalangeal joints. So metacarpal Phalangeal fallen Jojo, sorry. So then you go down and the thumb is going down, so thumbs up and then you press to leave the wrist and then slowly you go down and then you come back with the thumb.
So you can make it more challenging from time to time. So the more weight you apply, the more difficult it is. The idea is that you are building the strength in a very progressive way, in a very gradual way. If you try to do too much too soon, your wrists are going are gonna complain. Um, and they will probably get some sort of pain or inflammation and it won't allow you to, to continue to do it little by little. And even though you feel some soreness or pain if 24 hours after their workout, you feel that you are in the previous stage, you are okay. That's a good adaptation process. So, so if you feel that you are getting a lot of low than after 24 hours of the workout, the restarts still complaining to the too much.
So send to rest and next time you come back to the workout, do it in a, in a easier way. So not, not too much. Okay. So there's, that would be the next exercise. So the third exercise, we're going to take the risks facing away and we are going to move from side to side. Okay. If you can spread your toes as we were talking, great. If you can create some sort of connection with the fingertips, that will be perfect. So we are creating a little bit of movement here. You can do it slower or you can do it faster depending off of your level of what you want. Okay? But that is the idea. From there we make them a fingers, face our knees and then you go back from there trying to keep the uh, the heel of the hand on the floor all the time. All right? If you want to make it a little bit more challenging, you can go farther and then you do the same exercises before. Okay.
If you even wanted to do even more challenging, but it's not necessarily for, for now, you can go into more extremes, range of motion sometimes where you are working so much, you need this kind of relief or stretching into the arms, but it's not necessarily just to give you a another option. The last exercise would be, again, with the hands pointing forward. And then we try to take the weight over so our shoulders over the hands, if you look at the fingertips, they will need to be a little bit wide. So that means that you are actively holding or pushing the floor with your, with your fingertips. Okay? So, so it's important that you, this, this warmup before loading your wrist, uh, it's necessary to prepare the wrist to create information and, and uh, to avoid excessive, uh, low without, without the proper preparation to, to do a Hanson, you really need to have some, uh, abilities covered, uh, show the flection. It's, it's completely important to you. You really need to be able to keep this line with your chest. Uh, so your test has to have the ability to go into full extension. Uh, that's, that's completely necessary. You need to have an, uh, enough core stability.
You're going to be upside down with a lot of weights and a long lever of your legs moving all over. You really need to control that with your trunk muscles. And in order to avoid all that movement, you also need to have some sort of stiffness and strength into the legs. So the easiest position to understand this and to work this out, it could be like two doing on, on a prone position. So I'm going to show you, so in prone we're going to make like a checklist of the things that we need to cover to do the handstand. So first is an arms over the head, the nose, this is a slightly touching the mat just a slightly, so the neck is long.
It is important that you have this freedom here. It's not like this, not like this, it's really over your head. Okay? Once we are here and we are slightly touching with the nose, it is important to create a little bit more pressure from the hips in the in the groin. So really below that pubic symphysis or at the level of the pubic symphysis. So that is going to be very important. So you can, you will need to engage the glutes in order to press forward with the hips. And at the same time, what you'll notice is the ribs, the lower part of the ribs get separated from the floor a little bit.
All right at the same time. And you need to squeeze your sit bones a tiny bit. You need to extend your knees. And when you do that, you probably feel less weight on your feet. So this is basically engaging all the muscles of your or your body so there's not room to breathe. Um, and that is normal. You are learning a very difficult exercise.
A is challenging and you're upside down and is uh, breathing is going to be just enough to, to keep living, to, to, to maintain your life. So don't expect to have like a whole diaphragmatic breathing because it won't happen until you are, you become very, very expert on doing this and you are completely familiar with the pattern and the Hanson. So at the beginning is normal that the breathe is short and you keep engaging the, the abdominals. Talking to that, it is important to understand that it's not hollow is not trying to get the belly button up to the spine. You know, it's a bracing. So now he's bracing. Why? Because the low is Cho high that you really need to control from the ribs. So, so be sure that when you are doing this bracing positions, you are not bulging.
So that's why when we are doing prone, we want to keep the ribs and the abdominals out of the floor. Okay? And that's why we put the weight on the hips. All right? So let's do it. So the checklist is hands over the head, the nose sided touching, uh, the rips out of the floor, the hips forward, pressing forward, the knees extended sit bones together and fit, kind of floating. And what I want you to do is just to keep this position for one minute. All right? So you will be breathing.
You will be trying to keep the uh, ribs, abdominals, the hips forward, the buttocks, uh, engage, uh, the knee extended feed, really, really, uh, light and the arms forward. And You keep doing the, that same checklist. Hands, ribs, abdominals forward, hips see bones together, Knicks News, extend that feed floating. All right? So you can one minute, uh, it is challenging if you really go on and gates, uh, everything is maximum capacity. You will be very tired after one minute. So, uh, I recommend you to do one minute of holding the position in prone one minute of rest and do it two, three times at the beginning until you get used to that position. But because this is what is going to happen when you are doing the Hanson upside down and you need to prepare some, Huh? All right. So now how can we keep working on this?
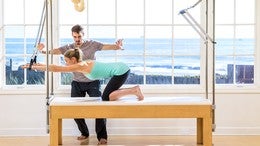
Using the chair? We're going to do an exercise that they will help. So with a alive, a spring, like wide spring, it's in the second position, I guess. Um, that will be enough. All right. So in order to keep working on their sagittal stability and the control from the, from the hips, um, we are gonna use, um, jazz, the support of the pelvis on top of the chair and the help of the springs and the pedals to facilitate the movement. So here I want you to recover the same ideas and or the same checklists we were doing when we was when we were on prom. So, uh, pelvis forward, ribs behind you squeeze your glutes, you extend your knees, you lengthen, uh, your feet.
And from there you release some of the weight from the pillows. Okay? So now you're doing the same, but you need to support more weight than before. On the, on the mat, one of the things that I like here is like you can keep playing with the shoulder mobility while you are holding, but the emphasis is going to be into squeezing the bat, pressing with the pelvis forward, extending the knees, lengthen the fit and the less support that you can get into your arms. So it's going to be very important to control from below, from the pelvis. Then from the arms. Okay?
So you can rest here and you can release. Um, we can do the next position could be a little bit more challenging for, for the stability of the trunk. So again, the checklist pelvis forward, you squeeze your, squeeze your glutes, extend your knees, lengthen your feet. And now with the ribs behind to learn thin, the thoracic spine, you learn understanding forward. And from there you can do a push up. This is going to help you to create stability, thoracic extension and the stiffness and control from the legs, from the pelvis. Okay. So here's Berlin [inaudible] hand and here's a petitia.
But the idea is that you hold this for least one minute. So the emphasis here is to keep this con connection a bit longer because it was what you will need to do there to do the handstand. Okay? So again, you can do a couple of series of this with the idea of creating even more connection here in the hips and the legs. So once that you have that, um, we need to keep working on this rains. So for some people is very difficult to get all this range of uh, shoulder flexion and extension. And the chair is, is an amazing tool to, to facilitate that and keep working on the same idea of stiffness from stiffness from the legs. So the exercise is also very well known.
It's not that I'm discovering you or new exercises is just thinking in this exercise for a purpose, for a goal that this case is to do. Hence then so I recommend you to use a lighter springs in the lower position. Um, one of the things that I really want to focus on is in this grip, it's important when we are doing this exercise that is the swan from floor to do this like fake grip from the wrist. So you can create some sort of connection through the elbow that is pretty stable and it connects directly into the, into the shoulder, shoulder blades. All right, so let me show you how it is.
So the way I approached to the exercise is with the initial position here. I mean with the little bit of tension into the springs, all right? The head has to be between the, the, the arms. Um, one of the things that happens when you're doing enhanced and is that you really need to press the floor. You really need to press the ground and you really need to reduce the space between the shoulder and the ear. So this is a very nice opportunity to explore this, this range in an assistant way. So that's why I like this exercise so much.
So if we go to the Prune, uh, framework, the prone, uh, basic exercises for, for the hands down, we need to do the same here. So the hips are going to press forward. You're going to squeeze the bat, you go on to, uh, extend the knees and you're going to flow the feet a little bit. From there, what you do is you go into elevation until you touch your ears. And from there you go into the pressure. So this control the shoulder blade is going to help you a lot when you're doing Hanson. Because to do a handstand, you need to move up and down. You need to adapt, you need to, you need to adjust. So it's really, really important that you become familiar with this movement. All right?
So once you're there, you can increase the extension and you can play with extension and retraction or you can play with extension and elevation like this, okay? So this is a very similar feeling of what, what you'll get when you do enhance stance but in prawn instead of upside down. All right? So you learn thing, length and length and you reduce the gap between the ears and the shoulders and then to the press. And you can go deep into your extension and you keep it. And at the same time doing the elevation as much as you can. It's very important. This, this is holding, this is pressing forward, the knees are extended and you probably see me some sort of sugar in is normal after one minute of, of connection, okay?
But this is going to help you allow to be stable on their hands. All right? So this is the emphasis that we are doing in this exercise. Um, we are building a little by little, well, the features that we need to, uh, to go into, into the, into the hands. Okay. So now we're going to load our wrist like seriously and, and we're going to do a hand strings, uh, three on the chair. Again, in this case we'll, we will need probably more assistance. I'm going to play with Choo, uh, black springs on their highest, uh, position. Uh, the idea is like is that you reduce the weight, uh, smarts as you, as you progress, but again, always give you enough assistance so you can be successful.
So to put you in a very difficult situation is not gonna enhance your learning. It's gonna enhance your frustration, but make it too easy is not going to help you to progress. So, so find the sweet point where you can really challenge yourself, but keep your learning at the, at the same time. Okay, so again, we keep applying the same principles as we were as we were talking before. Uh, if we go to the idea of the risk, we, um, we can, uh, applied here into their chair. Okay. So the forehand is going to be on the on top of the chair. Sometimes we did this exercise here, but we cannot do a hand stance handstand like this.
So we need to use the finger. So that's why we cannot change this to this position. Index finger forward the core of the hand, engage elbows, locked shoulders a little bit retracted and depressed. This is very, very important. Okay? You really need to be Steve there. You remember you're going to load your weight on your hands so you cannot be lose. You really need to be stiff and stronger there.
So from there, the first exercise is a little volume variation is trying just to move forward and to hint in the hips just a tiny bit and then you come back. So you go forward, you keep the spine the same position. You put more weight on the fingers and from there you go deep into the hip. You try to give the Lordosis and then you come back just a tiny bit. This is going to help you to find the sense of low into the hands and it's going to help you to, to create a stiffness and engagement into the, into the trunk. Okay.
So once you have worked with this four or five, six repetition, maybe eight, you can go to the next one. The next one is going to help you to transition from the floor, from standing into, uh, into the hands. Then, okay, so now we go to a more traditional version of hamstrings, but we are doing kind of same button in this, in this, uh, in this variation where we do is we go into flection and I want you to go forward and a lot of protection. Oh, the shoulder blades. So the show, the blades are protracted, you move forward and you let your head go down, down, down, down, down between your arms. Okay? So most of the weight is on your arms. It is important that the head is down on the shoulder, blaze l projected and elevated.
And from there you go slowly keeping the weight on your arms. The idea is to lock the elbows, shoulders depressed. A little bit retracted at the beginning. Then you move forward. When you are forward, when you're loading your hands, you go into neck flection and then the thoracic collection happens because of the projection of the shoulder blades that this is very important detail. So you go in, press, press, press, press, press, press, press. In order to create more flexion in the thoracic spine, then you could the head, you keep pressing and then you've tried to keep it and breathe.
This is what happened when you do the handstand, you really need to breathe. And if you can talk, that could be a nice, uh, proof that you can breathe and keep it and then you come back.
So it's important to do it right, elbows together for together. And then you interlace your fingers from here. I want you to make a big circle, like a circumduction slow. And exploring the whole range of motion. It's important to keep the elbows together, to do it slowly and then you go to the other, to the other side.
All right. The other way, don't be hurry to do that. Really take your time. Do it slowly and whole rates. Okay. Elbows, elbows to go. Then you can play with this button. This button will help you a lot because most of the time we are going, we are going to load the risk here. So going into this flection, it's going to relieve, it's going to help you. You're going to like it. Okay. That would be another exercise that you can do.
The third one would be a very similar, but here she put the doors door, dorsal part of your hand together and then from there you put it on the chest and then the elbows are going down and back behind a little bit and the elbows and the shoulders. Okay, so you go here and tried to go into more flexion of the wrist trying to keep it together as much as as you can. And again, jewel find, you'll feel a lot of relief here. Uh, probably so, uh, the last one is just taking the elbows together and shake it. So shake their hands in lateral way and then in this position, okay. And finally to just let them randomly like making circles and following so that you can see the, the fingers that you really don't see the finger, they move, they move very, very fast. Okay. So after a while you feel more relief and you will be able to, to continue. Okay. So now that we've done the 103, that is a very nice exercise to make yourself a low your hands progressively to go into the inverted position to understand the uh, pressure into the shoulders, the elevation, the protraction, the thoracic flexion to jump into their Hansen.
You can go through a little bit more challenging, uh, progression. That is our like, uh, inverted press and we can use the, the chair too. So the idea here is, uh, to go into a more, uh, vertical position to the Hansen. You send that the height of the, of the chair. Okay. So we are going to put the fingers there, the toes over the, the chair and the same idea with the hands. Fingers forward. You engage the core, you love the elbows.
And from there you are going to extend the legs. So that pelvis is going up here. The focus, the emphasis is this. You really want to take the sternum towards the chair, okay? And then you want to keep for a while from there. Next progression is elevation, depression and elevation and the depression. Okay? So you keep it for a while. If you need to rest, you can lower your pelvis on, you can step back and rest for a while. So now finally in this, in this progression, uh, we are going to use the wall. Okay? So it's a very logic process that we've been doing, trying to understand what are the needs to do a Hanson.
So we started preparing the wrist than we will to prone trying to understand the position on prom. Then we work on the shoulder flection, the thoracic extension all the time working on the uh, stiffness and engagement and the squeeze from the leg that every expert in the Hansen world will tell you that you need to quit your bat. If not, you cannot do it. Or of course at the beginning, um, and then we went into an inverted position. We were loading the hands and we were working on this pattern of elevation because when you are doing hands and you want to press the floor, you want to press the ground. We, I know that sometimes in bladders we are very focused on taking this space. But what you want to do when you are doing the Hansen is really the ground to connect with the line of, of your thoracic thoracic spine. All right, so in order to transfer this into the handsome button, we are going to use the wall. I know it's very easy or very, very common to kick up and do it facing away from their wall. But the idea is to face the wall so you can get the sense of every element that you need is happening. Okay? So this is how we're doing. Uh, we go, we, we left there, the wall behind us. So when you, when you are going into their handsome pattern against the wall, uh, at the beginning, probably you will, uh, need to be farther away from the wall.
And little by little you go closer to the wall. But it's, there is something paradoxical happen here that is the, they're more separated from the wall. The more deliver is your do you have in your body. So it's, your weight is more, even though it's more scary to do it closer to the a wall, you are more vertical. So here you really need more strength. So don't be afraid. I'm going a little bit a little to the wall because sometimes it's your fear of not being able to do it that is preventing you, but make sure that you have somebody that is spotting you or helping you, or you have a soft mat or you have a escape route. So you do have escape plan, uh, in order to be safe.
Okay? So it'd be be be careful with that. So again, now it's time to take everything together. First thing we can do is just bending your knees, taking the hands forward and work on their thoracic extension like we did in the chair. Okay? So from there you press and you play with the elevation and depression. If this is clear, you can go into the pattern of, of the hands. Okay? So you little by little go closer, then you release, they fit. And now it's time to recover what we did at the beginning.
So squeeze your butt, extend your knees, press within shoulder blade with the eyebrow. You just look at the hands a little bit, not too much, just a little bit. So you brace your chest, the pelvis is forward and the ribs are behind. And after a while you see my self like fever and it's normal. But make sure that you have enough strength to go down.
All right? So if you go up to the end of your strength going down, it's going to be a nightmare. And you probably will will fall. So take some energy or some reserve in order to, to come back. So one of the things that is, is very important and probably I haven't pointed out before, and when we were doing, you can work with the split pedals to work on this pattern because it is something that you will need to come in an outer Henston. Okay? So sometimes what we do, it's just going here, take the knees on the floor and play with these patterns. And when you feel ready, you can take a little bit of weight. It looks scary, but you do it every everyday a little more.
Uh, but the idea is it has to be dynamic. So if the hands on is just so static, it's going to be very difficult for you because you need to get in to get out, you need to control yourself. Eventually you will take the feet of the wall. So this is an amazing opportunity to create that environment, that connection into our neural system and endure muscles. So when you go into the hands on, it's, it's easier to do. So thank you for watching.
I hope you like it and you are now are more prone or willing to do the handstand. That is very fun and interesting to do, so thank you.
Comments


 position.
 And those tips to keep our wrists safe are really useful. See you soon.


Un Saludo desde Fuerteventura.


You need to be a subscriber to post a comment.
Please Log In or Create an Account to start your free trial.
