Description
About This Video
Transcript
Read Full Transcript
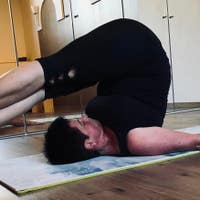
Hi, I'm Diane Diefenderfer and this is Laura Hanlon We'll be working together today, and be talking about the knee stretch series. And I've chosen this exercise, similar to another tutorial that I presented, the stomach massage, because it's a original classic exercise that Joe Pilates created, and it is difficult to do correctly, and it's difficult to teach. So I've decided to just dig in and talk about this one. And also, Laura's gonna show all three of the knee stretch versions and also, I'm gonna have her show some incorrect ways, things we see and what can happen. So all right, you want to go ahead, my dear, and kneel on the carriage.
And the feet are against the shoulder blocks, making sure the toes aren't stuck in there. Lots of times, people end up like that, so we don't want that. Or, I'm starting here at the feet today, or they frequently angle outward. So we wanna really make sure, as in everything in Pilates, that there's good, hip, knee, foot, ankle alignment in either direction, you're gonna look at it, and talk about it. So there she is on her knees.
The first one is a rounded back, which actually has some similarities to the stomach massage in the respect that the flexion of the spine is consistent from the bottom of the skull through the cervical, thoracic and on down, lumbar and the tailbone. So it's a beautiful sculptural shape of roundness, and a concave middle in the front here. I like to have the student, as best they can, and you may need to bring the foot bar higher if they're a shorter person. She's on two reds, by the way. I like to have the person start sitting pretty far back, almost to the point where they can't really, they can but they're pretty far away from holding onto the foot bar.
And then they're less likely to use the bar to do the work. All right, she has her fingers nicely extended, instead of, do that deep flexion, gripping, or this one, I see a lot of too. So you gotta look at the whole body as you're teaching or working. All right, excellent. Her shoulders are rounded but they're down, all right?
Often, we see the shoulders kinda do that, yep. Or part of that in the course of the movement. So the shoulder area is open wide and rounded. All right and I do not like the imagery of punching someone in the stomach, but there's that idea of that pole in the belly, which creates the rounded spine. So you don't just round your back.
It has to come from that deep abdominal contraction. I often will hold the hips. Are you okay? I'm talking a lot. I hold the hip and pelvic area, so she maintains a tucked, curved, flexed low back, tucked pelvis. You're ready to go, I think.
Go ahead and press the carriage back and forward, and you can do a few. Inhaling back, exhaling forward. So I'm not pulling her, but I'm almost pulling her hips back, so she doesn't do the dreaded, drop it, and then refind it and drop it. This is one of the problems. Yeah, let's get out of that.
Or the arms start doing the work, even with the elbows straight. That happens a lot, the body drops too low. So those are two things that can go wrong. I like to also use this as a cue if you feel comfortable touching a client with that kind of physical, tactile cueing. She's really using her buttocks.
She's really using her low belly. She's maintaining that curve. And I can be guaranteed that she's feeling her quads. Rest, you can sit back on your heels. Ron Fletcher, he used say this exercise is really a misnomer.
It's not really a knee stretch. You're not stretching your knee joint. You're really working your quads and your belly, and your hamstrings and your glutes. Good, another thing, stay, we have a handy pole here, rounded again. You could use this as a cue.
So you're gonna keep your hips connected to the pole, yes. And then really flex in the hip flexor as you bring the legs forward. So I'm maintaining an even pole position for her. And rest, nice. Another thing that you could do as an imagery, this is kind of funny, is Ron used to talk about a barbecue skewer.
It is funny but anyway, you put the skewer in one side of the hip. And it comes out the other side. Of course, I can't do that to her. But the idea is that again, this stays the same. It's just so important.
The thing I always remember too is when I finally got this exercise, it took a while for me, Ron said, "If you feel like you can't move the carriage, you're probably in the right position." Rest, whew, that's a hard one, all right. Okay, then from there, the process, I'll use the pole in a minute, the process of going into the flat back or straight back should start by releasing the pelvis. You can go ahead and stick your tailbone, and your sitz bones over your heels, shoulder blocks. And then slowly, you walk up the spine, step by step by step, until you are in a straight back, beautiful. And then I could lay the pole pretty much along her spine.
Yes, how nice is that? Great, all right, so having done that, I'm again going to put my hands here. And go ahead, Laura, back and forth. So here we have the maintenance of the released pelvis. Sometimes, I'll tell my student, which I don't usually like to say, is stick your butt out, which will keep them from doing back and tuck.
So they'll do that. They'll stick the butt out (laughs). And then they'll tuck. They'll stick the butt out and they'll tuck. So that's kind of nothing, it's not correct.
It's neither the first exercise or the flat one. So the flat back.... You don't have to, yeah, good. You maintain the neutral, not tucked pelvis. This one's hard too because, relax, you have to really cue to use the low belly without going back into a contraction.
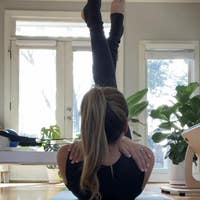
So that's a tough one. Nice, you're looking good. All right, and she didn't use her shoulders, and she's kept her fingers extended. 10 of each of those. And then you do the knees off.
So round your back by using your belly, deep contraction. And then the knees come just off the carriage. Hovering and go, out and in and out and in. The back is gently rounded. The neck is in line with the spine.
She's staying low, the knees don't punch. You don't need to straighten them. Nice, and I'm not counting (laughs). But you probably are. Beautiful, she's maintained this alignment.
Excellent and rest, oh, lovely. So what do you feel? Everything. Everything. That's the right answer.
I didn't tell her to say that. Quads, hamstrings, glutes, belly, not your knee joints. All right and I can say one thing, I have a total knee replacement, so the only one of these exercises that I still do is the last one because I'm not kneeling on my knee. So that's just a little side note. But wonderful exercise, it's an original.
If you have any old photos of Joe Pilates, you may notice his positioning in the rounded back and the flat back, and it looks exactly like this. So, yes, thank you. Enjoy your knee stretches, you'll come to love it. Thank you.
Exercise Breakdowns & Tips: Tutorials with Diane Diefenderfer


Comments


You need to be a subscriber to post a comment.
Please Log In or Create an Account to start your free trial.
