Premium Continuing Education workshop

You can view a 2 minute preview. For details, scroll down below the video.

Workshop #690

Support The Arms

2 hr 30 min - Workshop
36 likes
Loading...

Description

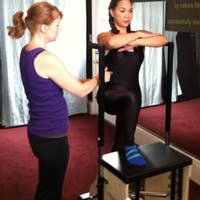
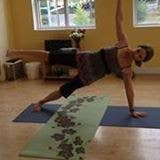
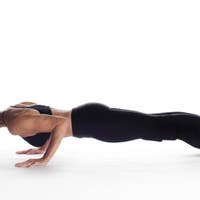
Support The Arms: Thorax to Hand.
Discover how to improve the ability of your clients to support their body with their arms. Weight bearing on the arms is challenging especially if the connection is weakened between the upper spine and hand. Distinguished Instructor Madeline Black will lecture on the alignment, building strength, and dealing with issues along this chain, specifically the wrist to shoulder relationship. You will also learn how the wrist effects shoulder function, and its action when the elbow flexes and extends. Weight bearing Mat and Reformer exercises will be presented. Madeline will demonstrate how to progress into the more difficult Pilates weight bearing exercises.

Objectives To understand the alignment, and simple biomechanics of how to support the arms in weight bearing Pilates exercises; Looking at the connection of the thorax, shoulder girdle through the arm to hand; Learn how the wrist functions in weight bearing; Address common issues with weight bearing with the arms; Learn a strength progression of modified mat exercises and build into full arm supported mat and reformer exercises.
What You'll Need: No props needed

About This Video

(Pace N/A)
Jul 28, 2012
(Log In to track)

Transcript

Read Full Transcript

Chapter 1

Okay, welcome. We're gonna be studying how to support our arms through the connection of our wrist, hands, through the arm bones, into the thoracic spine. So not a lot of people like to practice arm supports, arm balancing, because it's hard. It's hard because it's having to connect into the core and your shoulders, but most people complain about wrist issues and then it becomes a, "Let's just avoid it," you know? And there's a really wonderful chain of muscle contraction that happens when the wrist is really placed well, and that's what we're gonna talk about and how it connects into the strength of the forearm muscles, this is where people are very weak and then the co contraction of the bicep and the triceps.

And it really brings up a lot of posterior deltoid, triceps strength, which is what people really need to have healthy shoulders, and even their neck gets affected. So this is what we're gonna be exploring and looking at for this workshop. So in the arms, if you look at that picture of the heart, there's also a significant feature about our upper quarter, especially the expression of our arms and our hands. They're very expressive. People use their hands to talk, they're sensory touch, obviously.

You get body work or any touching, you're sending messages to people by touching or not touching or how you touch. So all of that feedback comes through the hands, you know, through not only the nervous system, but through the circulatory system. So I love this picture of the left hand here, because you can see how the heart is the center. And then you've got the carotids that go up the neck connected this whole chain, you know, through the arm. So it's a very expressive area.

And if you look at a young child, you know, just walking one or two years old, the way they wanna be held and they reach their arms, they're so open with their heart and they express it through their arms. And as we get, I don't know, more socialized and traumatized in our lives or whatever, do you know what I mean? We start to like tighten up in this area. So it's not just physical tightness and restriction that we get in the arms that come from working the mouse too much, or sitting too much or carrying things or whatever our day might be but it's also how we express or don't want to express ourselves with that. So working with strength in this area and opening up in this area, can have a real significant shift in someone's wellbeing based on just how they feel, you know?

And so it's also a really wonderful way to work. So arm supports really give you that feeling too. So we're gonna be playing along with that. So first we're gonna start, I just wanna look at some anatomy and some relationships with different anatomy. So I understand that there's some basic anatomy I'm assuming you know, which most people do.

And I want to just show you some relationships between not just the muscles, but also how the fascia is connecting with these. 'Cause that is the relationship. You know, you can think of just a separate muscle, but it's the fascia and the muscle, the muscle's embedded in the fascia. It's very difficult to separate the two and they create these relationship from front to back and side to side. So that's what we're gonna be really looking at.

So first off in the bony cage, the architecture of the body of this area, it's the misalignment of the spine and the thoracic that changes where the shoulders sit, So we have this lovely three-dimensional round ribcage. And you can imagine the ribcage is almost like ringlets in a three-dimensional way. So you've got like one circle next circle, 12 circles, like a barrel all stacked on top of one another and attached to the spine and then coming into the sternum or into some cartilage, in the front here. So the shoulder girdle is like a mantle. That's how I look at it.

If you think of the fireplace mantle is just sitting on top of this ribcage here, So if the ribcage is shifted to one side, the whole mantle's gonna go like this. If the ribcage you is extended and more forward this way and the back is more extended up here, then the shoulder girdle's gonna get, and then maybe the shoulders are tight, so they'll start to roll in and then the back won't be able to support it. And you certainly won't be connected into the front or vice versa, if someone is just more common, the over kyphotic person totally takes the shoulder girdle off of its alignment. So now the bones of the shoulder girdle, your clavicle here's a top view, you can see them ringlets here, the clavicle and the scapula and that head of the humerus start to distort their relationship to one another. So there's somewhat of an ideal relationship.

It's different in every body because your ribcage has a different shape. You know, some people have a more narrow ribcage or they have, someone's maybe has more depth to their body in that way. So we can't really say there's an ideal, neutral, how they should look in the shoulder girdle. You have to look at the body from the front and the side and see what is the optimal position of the shoulder girdle on this ribcage, who you're looking at. And there is some parameters of saying, "Well, it's best if a," right?

So one of the best, if possible, is from the spine, the spinous process towards that medial border of the scapula. So the medial border of the scapula is also not a straight line. Do you notice the line here? As a line comes down the more superior part, the superior angle, the medial part there is closer to the spine, than the inferior angle. So there's a slight angle the way the scapula sits on the ribcage that way, and that's functional.

The scapula should actually have contact with the ribs, So there's a fascial relationship between the scapula and the ribcage and to function for, have that scapula to do its rotation that it needs to do, and the three-dimensional movement, it has to have contact with the ribcage. And if the thoracic spine is extended, it pulls those ribs forward and then you have a big gap between where the scapula is and those ribs, does that make sense? So that's where in our movement, when you're working or breathing, you could be cuing with breathing or work on specific movements to bring, and we're gonna do that, to bring the ribcage back towards the scapula. So we have that contact, So the question is now, "All right if I see this big gap between my scapula and ribcage, is it the ribcage that's too far forward or is it really just the scapula what people would call winged off?" Sometimes winged scapula aren't really winged. They looked winged because that ribcage is too full forward, it's not touching.

And if they can bring the ribcage back and have that contact, then you'll know that the scapula is actually not winged, it's the spine. So just keep that in mind. And many people just assume they see the scapula winging and it's like, "Oh, you have winged." And then you try to get them to do that serratus and do that lower trap and really try to, and then it doesn't really, they can't access it because the spine is not there, it's from the spine, all right? So that's something you have to play with, but you can see if the spine is there and they're still winging, then that's another issue. That's two different things that you would have to address in your programming when you're working with a client.

Is there any questions about just that so far, yet? It's pretty clear? All right, and of course the other extreme is too much space. So ideally like in the middle, between the spinous process and that medial border of the scapula, you want about two, three inches, about three. They say from scapula to scapula, like six inches, they say, I'm basing that on Kapandji books who has all the engineering drawings and measurements.

When you look at someone's back, you wanna see two and a half inches, let's just compromise between two and three, somewhere around there and equal, right? So if from the spinous process to the right scapula is this distance and this one is the same, that's pretty symmetrical, that's pretty good. But usually, you'll see one is much closer and the other one's too far. So then you have one abducted scapula, and one scapula that's too abducted. So if you really look at the scapula in relationships with the spinous process, that will give you a little more sense of where those scapula bones are sitting on the ribcage.

So that's something that we look for. And the clavicle, you know, there's, again, there's different shapes of the clavicle here. And what's important for the clavicle is that it actually should not be from the sternum, the sternoclavicular joint over to the chromium here, the scapula. They shouldn't be level, really. That's pulling this down.

The head of the humerus actually floats up and sits. So there's a slight angle upward. Now, in some people you see like a V here. Now, that's like, "Okay, that's too much angle," do you understand? But in some ballerinas, you might see where actually this is down and this is up.

And that is actually, I mean it might be an aesthetic for the artistry that they're doing, but in reality, it's actually a great strain on the scapula and what they're doing is trying to keep their shoulders down and they're creating an image, you know, for the dance. So that's what I mean by an artistic choice. The dance world chooses to have, 'cause you're creating an image and a style, it doesn't mean it's good and functional for the body. But that's a lot of strain and pull on the neck. A lot of neural tension happens through the neck and then the head of the humerus is really down, like really stuck down.

So then when you start to move your arm, there's more impingement and less space in the joint. So our head of our humeruses need to float. Our armpits need to have space. So we're gonna talk a lot about that relationship, the armpit, all right. So here's an example with this picture.

You can see this particular person, this man has a real flattened thoracic. I wanted to give you that example to see it in the body. You see the medial border of his scapula, it looks like it's winging a little bit, but actually his thoracic spine is very flat, a reverse curve there. So this gives you an idea that this type of person we'd wanna work with that spine, bringing it back into more flection. So let's just look at some basic anatomy, So we're gonna look at just some relationships.

So Pectoralis Major, we're all familiar with, all right, this is a muscle that's chronically tight on people, and that's when we see where there's that shortening forward this way, all right? There's different fibers of the pec. As you see, there's a major attachment all along the sternum here, and then it has another clavicular branch. And it literally is like a separate muscle though. So even though the anatomists, whoever named all the muscles, grouped it as Pectoralis Major, that particular clavicular portion of the pec is very significant in when it's tight, what it does is it pulls that clavicle down and then heres it down.

There's also a very small muscle under the clavicle called the subclavian, which then also gets very tight. And then the clavicle actually can't move. So there is movement, not only with the arm, with the clavicle moving in a certain timing, that's your scapula-humeral rhythm that we've learned in our Polaris trainings, right? But if that scapula, I mean, the clavicle doesn't roll up with the arm, that's because it's being held down here. So this is this is an important area that we're gonna wanna watch for.

Many people do a lot of their arm work on the reformer over pecking, the muscles tightening. So a good cue to look at when you look at someone's arm, it's when their arms are, let's say they're out here for like row front, as an example, is this area through here. So how much space is between here and here when the arm comes forward? Do you see? So what's the relationship of the humerus?

See the difference between like pecking it? It's very tight, I can't even get my finger in there. See that? Or can I open my armpit up? Have some space and still extend my arm forward and have my pec in a more longer contracted position?

Now that's really hard. But you have to find this balance between the back and the front together in order to find that position. But that's when people start pulling their humeral heads forward like that. And then that's not helping a lot of compression on the neck through here. So I wanted you to be able to see, just to have that visual about the pec.

So here's your opposite muscle that plays another role on depressing the head of the humerus down and tightening up and creating less space in the joint and that's your Latissimus Dorsi. So on the back it's attached into the fascia on the spine all the way down to the ilium. So it goes into the thoracolumbar fascia here, and then it comes up and joints with the Teres Major, but if it comes around and it comes into the front of the arm bone here, and it's remarkable how thick this attachment is on the arm bone here and on this attachment, not only do you have the lat, but you have the pec too. They're fascia joined right here. So here's one co-relationship, is that redundant?

A co-contraction or tightening that people have, it's pec and lat together. So that pulls the head of the humerus down and now I can't really move the arm up unless I do something in my back to get my arm up overhead. Now I have to move through my ribcage to... I'm not moving my arm anymore, I'm going... Now I get my arm up so I can grab a glass from the top cupboard or something.

So this relationship is very important to understand that we have to find a balance between the pec and the lat and when should they be working and are they overworking? And the other thing the lat does is it does internal rotation of the humeral head. So again, with the pec and the lat, it's gonna shorten the space here and internally rotate the humerus, which is not optimal for a scapula-humeral rhythm because if I have this held here and I try to lift my arm up, I'm already feeling a neural tension here. And the head of the humerus is now jamming into my little space here, your thoracic outlet which is right under the clavicle. So I have my nerves coming through here, the vasculature coming through here, and then it slips under the clavicle through a little space and then it starts going down your arm, So this arrangement here, you will close down the space and then they lift and then they're not only impinging on the nerves and the blood vessels in the lymph in this area, but you also are then now impinging on the supraspinatus, that's the first sign when somebody starts getting some pain here, is that supraspinatus gets, it's getting pressured every time and then it eventually starts to have little tears, because it keeps getting butt up against this bone.

So it's really important for people's shoulder girdles to really try to find that optimal movement to open the space in the armpit so the bones just slip by and then you've got that freedom of movement through there without any impingement on this area. So let's look, I have another picture of the armpit. It's a odd picture to look at 'cause it's a view like this into the armpit. We don't really look into people's armpits very often, do we? But what you can see from the side, when you are looking into the armpit in this picture is that here's the pec coming in this way, and my lat is coming in this way into the arm through here and then you can see the connection of the ribcage below that, all right?

So this is the lat coming all, this is my lat right here, this whole thing right here. And it's coming in this way and attaching on here and my pec is joining it through here. So this is thee critter that's tightening up and inhibiting our scapula-humeral rhythm there. Another relationship that we're gonna be working a lot with, you're familiar with the serratus anterior? So it comes from the medial border, anterior surface of the scapula and moves into the ribcage.

Now these fingers of muscles come down from up high through here, but also underneath the pec major is your minor, which is coming from the scapular also coming downward in this angle right through here, tightening through here. And that's another muscle that can actually adhere the scapula in that position, which also makes it hard to move. But next to it underneath, in this angle this way is this serratus anterior and it's continuous all the way into the external obliques. So in cadaver, when you look at it and if you look at pictures of the cadaver and I have one, I'm gonna show you in a second, there's no, this ends, this starts. It's not like, "Oh, there's a serratus and now the obli.." it's like, "Which one of those fingers is now the external oblique?" It's like, "Serratus, serratus, serratus, which one now becomes external oblique?" It is also continuous.

So that's the direct connection of the serratus into the external obliques, which is giving us that support that we need. It's like core for your arms, core connection into the arms for there. Now we can be too tight in this area, and actually, right, there're many people actually have this two tight oblique too tight. So that's not a balanced posture either, if it's too strong, these muscles are too strong because now my back is weak. So there is a balance with what we have to do with the engagement, the elongation through here with a counterbalance with the back.

So that's the relationship. Here's a picture where this is where I was describing, now here's a very interesting picture 'cause you've got serratus anterior, here are the fingers. See, now this one's external oblique, that one serratus, that one's external oblique, and these are the ribs, this drawing. Now underneath is the lower ribs here and here's the iliac spine, the pelvis here. So running in this direction.

So you've got your serratus and obliques running in this diagonal and underneath the ribcage, you've got the internal oblique running this way under the ribcage. So the internal oblique is also important for supporting up under the ribcage, giving us a long waist really. So if I have too much tone in my external obliques, and too much tone in my serratus and through here, then the line of my internal oblique gets shortened. It's not really functional. So it's that support of the internal oblique that lifts here with this sitting up on top of it.

So there's a balance that we have to look at between that, between those two. And that is why their pelvic position, see, that's why we can't just talk about the shoulder because the pelvic position, if it's also in maybe more of a tucked position, I certainly am not into any internal oblique here at all, it's all just... So this is this way. If my pelvic position becomes more neutral here, then I have a better possibility of engaging through the internal oblique, which by the way, wraps all the way around into the back here. So that's your back to front connection down here, low.

And then the external oblique is here to support your ribcage, but not to over contract and push down this way. Are there any questions about that? The fibers that run around the internal obliques run this way, the fibers that come around to the back, what direction are they? Well, they do serve this- Wait, they maybe kinda just go- Yeah, they're in the thoracolumbar fascia as well. So they're coming this way too, this way.

So they're going this way 'cause we have this and this way, and then they come in around, they change angle. You know, I can't really say they might flatten out. Actually it would also depend on where your pelvis is, this way. Some people actually, now this way, if I were more arch this way, then that's very tight. It's not just QL here, it's internal oblique.

The posterior fibers of it, you see? So now this is another idea to be thinking about, it's not just one muscle that's tight, it's actually, are you talking about the posterior fibers or the anterior fibers? Because you can have tightness in the posterior fibers and then weakness in the anterior fibers of the same muscle. So actually this pelvic position is key as to what that would be. But let's see if we can tell, this is hard to see 'cause it's a dark picture.

So we're not gonna be able to see that very well, but I can get you a copy of it and it might answer your question. I'll have to look up exactly. But I think each body it's the contour of the shape, it's gonna shift as it goes around the back of the body. But in addition to, so what I wanna, I don't know if you can see this here, but here are the ribs here going this way and in between the ribs are the intercostals and intercostal muscles actually right match the diagonal, the direction of the muscles with the external oblique and internal oblique fibers. So when you start to peel away the layers and you look at it, you start realizing there is this, even this relationship between the internal oblique and if it goes up into the ribcage is the intercostals and vice versa with the external obliques with the fibers.

So the intercostals are important for ribcage motion. You know, it's like an accordion. We need to be able to move, the ribs need to move, the spine needs to move. The ribs can't move if the spine is not moving. You know, their articulation here, this has to happen here and then the intercostals have to move as well.

So intercostals are mostly known for its breathing part, when you're breathing, inhaling, and exhaling but also when you're moving into working with your abdominal muscles, so even when you're working with your external oblique and internal oblique, you are working with the intercostals too, they should be also working. So that's another little piece I want you to think about through there. All right and so, here's a, I had an artist friend draw for me this drawing and it's very abstract 'cause she's an artist. And I said, "To ask someone to do a really anatomic..." I mean, she's not netters. But I think it gives the idea.

This is the armpit. So the arm is like this, that's the shot this way. So you can see this is serratus anterior here but the idea that this fascial connection is not just only through the external oblique, but it actually continues all the way across to the opposite hip, So we're actually even talking about serratus external oblique, oh, internal oblique over here, this pulling. And that's what gives us the ability to do these diagonal movements this way, pulling this way in our torso or twisting this way and that way. So it's a nice visual to have that connection.

The other idea of a connection of muscles together is that's, what's called the serape effect and that's the idea of putting a serape on, and you've got your rhomboids here. So they're attached to the spinous processes and comes across and attaches on that medial border. So of course, if the scapula is too far away from the spine that rhomboid's being overstressed, it's being lengthened and with tension and that actually creates a little more pain than actually a shortened muscle there. So if it's too close, the rhomboid's too contracted, so somebody who's too protracted in the scapula, they need to short, you need to like bring that rhomboid in. It needs to like relax a little bit and come in a little bit, in order to get the co-contraction that we want, which is between rhomboid, which then, if we were to, and I have another picture where I had to do the spinous, the medial border of the scapula and then take the bone away, you'll see it in a second.

So that you can see that the rhomboid is continuous with the serratus and then it comes around the front into the abdominal center. So you've got this connection from the right side of the spinous processes into the scapula around under the armpit, across the ribs, all the way into this hip that way. All right, so that's like one continuous... And when they're in a balance, meaning the bones are balanced, so if that scapula is balanced, the spine is bounced as best you can and then these muscles will be able to function as a unit, instead of one doing all of the work, which is a compensated movement. So here's that picture.

So, here's that rhomboid coming in. Here's the scapula, and now we took the bone away, you see? So this is just representing the scapula here, but it's continuous. It comes in there's your serratus, and actually she even included some of the fibers onto the ribs to do external oblique here without even knowing what she was drawing really. But here, (whooshes) that way, all right?

So that is and it comes all the way along to the front to that diagonal this way. Does that make sense? And these are things that when you find this connection in arm support, when you find that alignment and especially when you're on your hands, 'cause when you set up a closed-chain effect through the hands and all of a sudden, it's like little light bulbs go off, it's like bang, bang, bang, you know, into here, into core and it's like, all of a sudden you're like, "Oh my God, I can hold this all day." It's not an effort because everybody's coming in to play and supporting you and it's working and it's not as hard. Than if someone's like, (groans) struggling to be in a pushup position or a plank. So the back body in the fascial connection again, and these are the trouble ones usually when they're tight.

So coming from the base of the occiput, so we've got our upper trapezius through here and the entire trapezius muscle through here and then on top of the deltoid, and this is a pain side too, like trigger points. So if you were to go into this area here, like up here, So if you press in here, it's like, (whoops), right? If you press in here, you can feel it, press here, you go along the deltoid here. And then it continues a line down the arm here. So these can be lines and I think they follow meridians as well, though I'm not a, I don't know too much about that, but facially, yeah, and then if you press into these points, they shouldn't be too tender.

But for many people they are, that's where the tightness and then you've got your lat. So look at that, person's posture, it's this. And then the front, it's the same. We're gonna have SCM tension, still upper trap through here. This is actually probably, yeah, it's probably upper trapezius fascia, but also what's right behind the SCM too, is some posterior scalings, which also get very tight on people through here into the neck and then you've got your pecs and your deltoid and lat again.

So, that's like a whole relationship together. You got that visual? So, another line of connection that we have, and it's a queuing that actually we use quite a bit, I say we, I mean teachers at my studio and myself and in the arm, so when you are trying to extend the arms, most people are very tight in all their flexors. I mean, this is a very common tightness, not only sitting at your desk and the mice and all that kind of stuff. I mean the mouse on here, but even if it's a neurological response too, this flection thing.

I mean, we're born like this and then we come into the world, we live world and then what starts to happen? (groans) So, you know, the flexor response. So what happens, this is just naturally our pattern of being tight. So it totally weakens this side. So facially, there's a connection between the outer edge of the ulna and up through the tricep, into the scapula.

And this is where people wanna get strong, posterior scapula. Those are your rotators here, your rotator infraspinatus, teres minor, those muscles get weak, triceps get weak, right? So if you're doing some arm movements and I'll be saying it when we do our movement classes to really reach to the pinky side of your arm. I mean, it's a nice cue to give people 'cause people tend to pull, we're stronger here, these fingers, were always pulling here. So that's gonna be the flexor response.

And I'll show you that, there's the flexor response. So tightness in the neck, tightness in the shoulder, down the bicep, into the wrist, and that weakens the posterior part. So now we're gonna come down to the elbow and the rest. So we have a super nation and pronation of the forearm. And what's interesting about the arm is that the elbow joint, the ulna, of course, is your elbow.

So this is pretty thick bone here, I think you can even just palpate your own bone here. And then over to the thumb side, if you take your finger, you can feel that that bump on this side of your elbow is literally looks like a little wheel. You see the drawing? This is not just made up. It actually looks like that.

It's actually, the bone has a round flat top and rolls around, it's quite interesting. But as the bones go down the arm here, the ulna starts getting much thinner, and look at the radius becomes the bigger bone at the bottom. So most of the small bones in your wrist are articulating with the radius and then you've got a couple that articulate at the pinky side here but it's not a whole, it's not very stable out here. The bulk of the weight. So like your legs, if you think about how the bones, the weight of your femur goes through the tibia and the tibia goes onto your toe, so I mean, it's like, boom, the fibula is not a player really for weight bearing.

The arm's different because we have the bone big at this end, small here and vice versa, they're sharing the role. So this is where this action of pronation and supination, 'cause when we're weightbearing, we're usually in a pronated position. And the way we live our life, we are typing, eating, cooking, our hands are like this lot and we should be able to do this, we have to do this. You can't type with your palms up. Can't do much in super nation, can't cook with your palms up.

I mean, how could you love someone with the back of your hand? You wanna hug someone, you're gonna turn your hands over. So, you know, this is a very important function that way we have to be able to do, and between these two bones, is a very thick membrane. it's called the osseous membrane and this needs to slip and slide. So if you take your arm out like this and hold your arm this way and set your shoulder in the socket a little bit, some of you are, and actually hold your humerus more and then go ahead and start to turn your palm over and don't let your arm bone go with it and just see how far can you go?

Don't let your elbow turn at all. It's just purely the thumb rotating down. Now this is flat. We can reach whatever, a hundred and eighty degrees, whatever you call that, flat. We're not designed to be flat here.

This is not in the books. It says, "No, no, there's a few degrees where this point and this point will not be at the same." Here, they're the same, but when you go into pro nation, it's not, and this is where many people are tightened. Actually you'll be shocked if you took some of your clients, especially if they're tennis players or golfers, you'll see that they'll start the turn and they'll only get to about here. And the only way they can turn their hand down, their palm down or exactly is to go like that. So if they're cooking or living life, they're doing this constantly.

And even though they come in for their Polaris session and you open their shoulders and you're strengthening and everything, and they go home and then they go, because they're cooking, they have to 'cause they don't have this range. So this is where working on this area, I think is really important to help people really have, freedom in their shoulders and not just work on it in their session and then blow it when they go home. So that's really important. When your arm is hanging, free form, like this, then the center of the line goes through here through the middle of the bone and actually goes through like the third finger. So when you're down here and you're rotating your arms, you have more motion here and it's going through that third finger, that way, that's the central line.

And then if your arms are up, you'll notice you have less range. Just play with that for a second. So just feel that rotation. Now have your arms down a little bit like that. Now see how much more you can rotate because you have less stretch going on with the body.

You're already lengthening and stretching out that fascia, so it's being held a little bit. So you don't have as much as you do with your arms down here and then the hand, because we use our hands for tools and everything, if you make a fist now, and let's say you're holding a screwdriver or something, then as you start to turn right, or you turn your key to your house, now the center point is actually around your thumb. And the thumb side is where the radius is. So now the radius is the little wheel is rolling around there to do this action that we do to like unlock the door, whether we go this way or this way. So it changes depending on what you're doing and your action with your hand.

If I'm doing this, it's my third finger. If I'm actually turning something with my wrist, it's more the thumb is the central line. It's very interesting with that. And so here's that picture of how the bones actually crossover. So the little wheel turns and the two bones make a cross, you see, and you can see now that the radius has a very interesting shape to it where the bone also is has a bowed shape so that when it crosses over, it actually is snug.

So this position, actually, the bones can be set up that way and it's very stable and strong 'cause now you got two bones together like that as opposed to when they're open, you see, it's not as stable. So I know it's a great way to avoid when people are impinging on their shoulders to maybe do things like hundreds with your palms up or some circles and trying to keep the palms up. You know that's great for the shoulder but like I said, they're gonna go home and turn the key in their house and just, they can't, you can't help them no matter what training you do, unless you address this area, they have to be able to do it this way. It's why Joseph Polaris didn't do hundreds with his palms up. Do you see what I'm saying?

But if it's something that helps someone out of pain in the moment, it's a good tool to use, but then that should tell you really have a project to work on with them to get this back for them, okay? So here's the shape of the bone here. So when it's in super nation, it's not cross and it has this wonderful bow to it and then it crosses over. And in between the bones is this osseous membrane that knits the bone together. And it's not uncommon for this area to be really tight through here.

And I could show you just a really simple way of even just giving someone a little relief in that area. In fact I'll show you right now. It's not on my agenda, but can you go stand up for a second? And you can maybe do it to your neighbor, it's very simple. So you can even just sit down.

So if you have your thumb up, what you can do is hold this end of the radius here at the wrist and this end, right now, just relax. Let me hold your arm. Totally relax your arm. Yeah, let it hang and I'll hold it. And you just let gravity, and it just takes about a minute.

The person starts to really relax. So do you see how gravity is now pulling her ulna towards the floor but I'm holding the radius? So in between, can you feel that? Just relax. It's like it feels like it's relaxing, it's letting go of the fascia stretching.

That's all it is, very simple, yeah? Mm-hm. And then you can even feel if it's tight. So if you've been, I don't know, writing a lot or doing something a lot with your hand, like if people are gripping a lot on something, they're doing something that's requiring a lot of grip, I don't know, maybe skiing, gripping- Or carpenters or hairdressers- Carpenters, hairdressers, oh my god, yeah. This is very tight.

Carpal-tunnel syndrome. This is where the complaint is. I mean any pain or any restriction and everybody goes, you know, it's like piriformis syndrome. "Oh, I have piriformis syndrome." And it was like, "No, not really, your hip's just tight." You know what I mean? So people think anything in this area is carpal tunnel syndrome, but, I know, you know that, but if you could just actually just fund that, just let him sit there, like give it one minute or two, you know, and the more severe, the tighter, make it three minutes, hold, just hold it, you know?

And then talk to them about just relaxing, let it go, let the gravity pull. People, it's hard when you hold someone's arm like it's... They don't wanna just let go. There's so much holding in the area. It's very simple.

So here's another view of the membrane and it has an extra little part down here between the radius and ulna at the bottom, at your wrist here, the osseous membrane. So we have little bones in the hand. We're not gonna spend too much time on them. This is a funny picture 'cause she didn't draw the distal part of the fingers. So just the carpals here.

So we do have more fingers here, right? I know I have to change that picture. But it's just to represent so that you can see the ulna and the radius here and then the smaller bones of the wrist and this is a picture just representing this area. You know how the radius and ulna fit into those bones and there should be a very slight little movement in between each of the bones. So I'm not sure if you want to palpate someone's bones, but can you come up one more time again?

You know, the bones need to slip and slide a little bit, as you go into the flection and extension of the wrist, they have to move a little bit. And you could do this to your neighbor, if you wanna just see. So you can find the radius and the ulna and then go towards the fingers. So it's pretty much like the base of your hand here through here, and you can just relax your arm and then have your fingers, the top part of the hand and the bottom part this way and just see if you can get a little bit of movement. So what I'm doing is like this, can you feel that? Mm-hm.

So yeah, it's pretty good there. There's not moving. You feel that right there? Yeah, and this arm has a little nerviness today. Okay, see, that's not moving right in the middle.

(indistinct) Yeah, it's a nice- Curve but still (whooshes). Yeah, well we're not going there. No, but sometimes a little direct technique is good for that, but I mean, you can even just play with just feeling and even if you just keep doing that and moving it around, see, it's already starting to soften a little bit. I have to say, it's really minor what she's doing. She's not like massaging deep.

Yeah, it's like, no, I'm just like doing this. Do you see what I mean? It's just like I'm taking the movement. It's very light. You're just trying to...

Does that make sense? Could you feel where some move and some don't move? Is it right between the bone, where- Yeah, it's like from the thumb, if you trace back. So here's the last part of your thumb bone right here. Not the distal part, the more proximal part.

See, and it's right there. So here's your thumb joint. That's a place where people complain, right here, right? And then right here, will be the bones here and the same thing at the end of each finger, the bone, and then it's here. So it's basically from here to here.

Can you see that? Yeah? So to have a little bit motion there, so sometimes just rocking it a little bit, and then of course doing little movements for the rest are good too. But they need to have a little bit of glide. It's very subtle glide, very, very small, but there needs to be just a little glide between those bones as you start to move your wrist back and forth in this direction.

And again, there are ligaments too, and that's what you're feeling, you know, they should be able to move and stretch with it. So there're quite a few ligaments also supporting those bones through there. Okay, great. So that's the end of the anatomy thing. I'd like to spend a little time-

Chapter 2

So let's take a partner and why don't you face one another?

So one person be the body and the other person be the observer. So choose who's looking and who's... Right? (student murmuring) So at first, just take a look at their arm length. So, you have to step back, no, right in front.

So one, you're gonna see whether or not one hand is longer than the other. One arm is longer than the other. And one way of doing that, here, come here for a second would be to take their hands like this. You could just look straight ahead and if you can't see, get down to this level. You can even unfold their fingers like this and look to see that one arm is longer than the other.

So it's your right arm is longer than the left. Can you see that? And if somebody even, that's awesome, (chuckles) but most likely you'll see one arm is longer than the other. So you just make a mental note of that, all right? All right, so that's good.

So let's move on to looking at the scapula, the shoulder and scapula levelness. So why don't you both come over here then I can keep doing this here, yeah, okay. So what we can do, that's fine. What I'd like you to do is take your fingertips and find the spine of the scapula. Can you feel it going across?

And then take your fingers and cup them a little bit like this and put them, just let them sit right on top. It's a little closer to the medial border, than closer to the shoulder. So make a little... So you're holding the top and then reach your thumb down to the inferior angle and get your thumb there. So it's like you're holding like this, yeah?

So you got the spine here and the inferior angle here. Now just stretch your arms out. So you get your eyes, wherever your eyes or wherever you see the best. Like I have to go back like this. That's it, and then just look with your eyes, preferably your dominant eye 'cause sometimes it looks like, "Oh, the right one's higher.

Oh no, the left..." You know what I mean? So your eyeballs make a little funny thing. So see what you can see, which one's higher or lower. (students murmuring) Nice, and then you can also notice that medial border in relationship to the spine of the thoracic spine, the spinous processes, right? So what's the distance from the medial border to the spine?

The right to the left? So her right scapula is low and it's much further away. So it's also abducted and that's her longer arm, correct? Mm-hm. So that matches like her whole arm is falling down which is also pulling the scapular.

It just makes you (indistinct) like this, it's rotated or if it's just a frame on her- Exactly. Right? Yes, exactly. So it'd be rib rotation or it could just be her scapula- Right, or both. (laughs) Most likely both.

Yeah, exactly, yeah. Yeah, excellent. Does that work? Did you see that? Yeah.

And did that match the arm that was longer? If the arm is longer than the space between the spine and the scapula would be greater? In some cases, yeah. I mean, you know, there's, I don't ever do a steadfast rule. I just observe what's there with the person for that moment.

I don't say- Well, it could work on both hands. Look, not only that, but you might have somebody with a long arm whose scapula is abducted then you go, "What is going on here?" Do you see what I'm saying? There's not a- It's obviously longer. It's nice when they all match. It's nice when they all match, but don't be surprised if they don't.

So I don't wanna say yes, that is the case. I probably a high percentage of the time that's the case, but I don't want you to get stuck with what a pattern is 'cause that's all you'll see. You see what I mean? You need to have fresh eyes every time you look at someone. All right, so the next step...

(students murmuring) (student laughing) So we just looked at the thoracic spine, So we were looking at it more when you see the distance we're deciding is it an extension or a flection, right? Is it a rotation? You're already jumping ahead, right? That's the transverse plane, but there's also the coronal plane. Do you understand?

So the spine itself, and then usually it's a three-planar view here, but one can be more prominent than the other. Does that make sense? So you always have the three planes, so a person will be stuck in extension, rotation to one direction and side bending to the same direction, do you understand? That's a pretty set rule. Or they're stuck in flection, side bending and rotation.

So what you want to see is which one is more prominent 'cause you might see that, "Wow, they're really extended." And the side bending and the rotations, not as obvious, you see? But it's there. Does that make sense? Sometimes on the body, you maybe don't notice the extension and flection so much, but you see, "All right, scoliosis people, coronal plane," you see that, that's their major presentation, but there's always that flection extension and rotation with it as well. It's just their coronal plane is the big one.

Does that make sense? Or you might see someone who looks pretty centered and vertical, but they got this, they're rotated. You're like, "Wow, you got rotation," but it's not just rotation. They're side bending, flection or extension with that. It's just that that's what they're presenting to you as a primary.

So in a strategy now, if you're thinking about "How would I approach someone like this?" One strategy would be is that you could work in a more subtle plane. So if they're a coronal plane person, instead of going, "Oh, well, I'm gonna do coronal plane," 'cause you're really major coronal plane, maybe they need to work on maybe just a little rotation or maybe that flection extension, because it will have an effect on the other planes. That's a law actually, I didn't make that up. It's a biomechanical law. So when you affect one plane, the other planes immediately are affected.

You see? So you have a strategy of like, this side bending stuff's not really working for this person, scoliosis like, "Oh no, that's not good," right? But try maybe they need to work on flection extension or maybe they need to do a little more rotation. And then you go look at them and all of a sudden, instead of being like this, their coronal plane is less, does that make sense? So when you're looking at the spine now, through the scapular, you might notice, so we noticed the rotation on you there.

So her scapular was a little bit away, but really the big question was, is it her scapula that's protracted off because of her tightness in her pec and her lat? Possibly, sure it is, pulling it this way but then also this right side of the ribcage was a little bit anterior. So her scapula is not really sitting right on the scapula. So she's got a little thoracic rotation and a pec lat tightness pulling her shoulder girdle forward. Does that make sense?

But it does look like a wing? And it does look like a wing. It looks like a wing. Yeah. But I bet if we got her not as rotated in a thoracic and work on that lat, pec fascial tightness, her scapula would all of a sudden sit better.

And then we can strengthen that lower trapezius and that serratus connection, right? Yes. I mean, that would be the strategy. That's what I'm trying to get you to see. And so ahead of the humorous, elbow, joint and wrist, so if you just look at the person, so if you guys would come up here again, what you can do for the head of the humerus, so turn around.

What I like to do is to feel with my hands so that I would come forward like this and put my head up, not on the chest, but actually on the head of the humerus here. And yeah, I can definitely feel it. This one's more forward. You also wanna look at the arm bones, So where are they being held? So turn and face this way.

So as we look here with her arm bones, all right, there's flection in the elbow, you see that? But she's got this tightness that we talked about, the upper trapezius pec, look at the bicep, her arms, look at my arms when I'm hanging, they're straight. She's a little like this, which is not uncommon. So the arms are hanging and because of that, her humerus, now look from the side, her humerus is behind her body. You see?

It's back here. Do you see that? That's not where the arms should be, but people try to keep their chest open. "I have this going on, so what am I gonna do?" I have clients do this all the time, I yell at them all the time. I'm like, "Would you quit doing that?" They bend their elbows and they're trying to pull their arms back because they're trying to do this but they're doing this instead.

It's a habit, you know? And then they walk around like this. Now you're gonna to start noticing it, it's really crazy. So from the side, I'm gonna do is place her shoulder blade and her humeral head on her ribcage the way I'd like to see. And you're gonna see what arm arm does.

So what I'm gonna do, can you do it more like this way? Just a little bit like diagonal? So can you guys see? Uh-huh. Okay, so I'm gonna stick my thumbs, just let your arm hang, in her armpit.

All right, and I'm gonna put, and you might wanna try it with your person. Can see, it actually kinda fun. So I got that back hand on the spine of the scapula and I got the front hand under the clavicle. You got the bony landmarks, so under the clavicle, thumb in the armpit, on the spine and the scapula, thumb in the armpit, and then what I'm gonna do is lift it up and you just relax, I'm gonna lift it up, It looks so easy. So easy.

It's supposed to float up here. It's supposed to live up here a little bit, and then I'm gonna place her scapula on the ribcage. Can you feel that? Mm-hm. Can you see that? Mm-hm.

Now I'm gonna hold it here. How did you place on her back? I moved my back hand and moved it into the ribs. See now, look at her chest now. And her arm...

So now look what her, no, don't change anything. You're a good example, thank you. But see, now, look at this forearm. It's crazy. It's tight here and tight here.

Yes, so we've got this fascial line, SCM down through here, through here and that elbow, so when an arm is hanging, so when the arm is hanging, she should be hanging like that a little more. I can't force her, but that's where the arm should be. So many people's arms are back here. Do you see that when you're hanging? So I tell this to some people, "If you really believe in evolution the way we're taught, who knows?" But from here, you got what I'm saying?

Mm-hm. So when you come upright, arms are here. So if you're in your core, the weight's balanced on your feet, shoulders right over the pelvis. The arms should hang on this angle here. Should not be next to your side, we're not military, and certainly not back here.

This is like (exhales), really changes the spine. Can you see the difference? Yeah, so try that on, did you try it on each person? So spine of the scapula and under- This is the sore bit. Is it sore?

This is the side that gives me problems. Okay, so be gentle. And this is the side that's has all the issues. Yeah, so you wanna be just gently under the clavicle, not in the body, but just under the bone, that's it and then you take the whole, your hand grip is this way and you lift the clavicle up and you roll the scapula back and in. Does that make sense?

Are we gonna just stay there? (laughter) Well then, well, we have to work it. So then I would go like this, like, hold like this. So you hold it. Now, see what happens there with your ribcage?

It's all space. Yeah, yeah. It's all right. Everything else wants to compensate for it. Yeah, and then we have to work on that serratus oblique connection which is what will come next, see?

Okay? And then you can look at their elbow and their wrist alignment, yeah. But just relax. Is her grip okay? Yeah, you wanna be gentle.

When you put your thumb, it's not like you're going into the armpit. It's just, you're holding like this and you're picking it up and moving it back, yeah. And then people realize, "Oh my God, is that where my shoulder's supposed to be? Because what is everybody doing? I'm trying to get my shoulders down.

Don't have shoulder earrings," I've heard that cue, right? Yeah, but you don't wanna be depressing them down either. They're floating up here. They should actually float. So let's switch.

So you can look at the other person, looking at again, their arm length. So looking at their hands, face each other, if you haven't done it already. So do we do the elbow joint and wrist also (indistinct) placement? Yeah, well we're just looking at the arm as it's hanging. Right, so if it's not contracted and...

Right, and facing a little bit of an angle. Like your thumb should be forward, this is neutral, the wrist. What do you look for in the wrist? No complication? Yeah, neutral, but thumb forward, your palms should be facing you.

Okay, so if you have an extended thoracic, I mean her scapula looks to be on the ribcage but the thoracic seems to be two parts spinning. So shoulder placement- Well, come up here because that's not possible. And it can't be on the ribcage and extended. Well, the thoracic seems a little flat. Okay, so flat's a little different, yeah.

Yes, she is extended here. Now, I'm gonna bring your diaphragm a little bit more, just relax for a second. We need to- That's what I want. Is the move to get back the ribcage back to the scapula rather than the scapula to the ribcage. Yes, that's what she needs to do.

It's like more softening here in the sternum, yeah. So a lift through the cervical, a drop of the sternum? Yeah, yeah. I know, she's trying to... Yeah, that's better.

So pelvic floor, pelvic floor, diaphragm over the pelvic floor. So the front of your diaphragm needs to just relax and just be heavy in the front, there. I know it feels like you're forward, doesn't it? Yes. Yeah. It feels-

That looks better. Yeah, and that's changing this. So this is where the pelvic position and the relationship of the ribcage.... There you go. I know it's more forward.

Now, where's your weight on your feet as you stand? No, don't look down. Just where are you feeling it? The weight of your feet? Center, now it's centered.

Okay, now pull your pelvic floor up a little bit. Move your pelvis forward actually just a little bit. There you go. So you feel how this is like making you work here. Okay, now all you have to do with your eyes, which you've already done is just look, open your face and look forward.

There you go. That's unusual. Yeah, that's centered. But that's typical for more busted breathing at myself. You kind of counterweight.

Oh, the counterweight, yes. That is a problem with some people. Or people try to hide it. Just sink that too, but, yeah, right, so that is something. So you have to have a little more support through here to support that, but otherwise what's happening, you're really throwing your shoulders behind your hips, which is flattening out that curve.

So for her, it's more of like that positioning more from the TL junction and pelvis up. (students murmuring) Okay, are we good? Did that make sense? (students murmuring) Yeah, that's a strange posture. Wow. Yeah, all right.

Any questions? Okay, you're ticklish when- I have to breathe. Okay, try this. Can you come up for a second? Come on up, come up for a second.

'Cause this happens with people they're ticklish. Well, you can come up too. I was gonna breathe through it. No, so try this, put your hand. Let's take that hand and put it on my hand.

Let's see if this is gonna work. I'm making this up completely, or maybe try this hand. Put this hand, maybe this one on me. You can drop that one. So just kinda touch me, okay?

And just keep your hand on my hand. Is that still ticklish even though you're touching me. Yeah. I just have to breathe through it for a second, compose myself, I'm good. Oh, the idea now, let go of my hand now.

Okay, let's start again. So stay composed, that's good. If I venture on this one while you- (students chuckle) Sure? No, okay, so, see already, you're like, "Okay," right? No, I was concentrating.

Okay, all right. See, a lot of times I find that when someone's ticklish, if the person who's ticklish, his hand is on my hand while I'm doing it, they really stay with my hand, it's almost like you're putting my hand there and then your nervous system is not so sensitive to it. Does that make sense? Yep. So you could try that.

'Cause that seems to work with my clients who are ticklish, but it works. If their hand is on my hand and then I'm moving, whatever it might be, even if I'm just touching them here to cue them, I don't know, it somehow changes what that is. It wires some more than others. There's some I can barely touch and they're like, "Whoa!" We can talk about that later at break, there are a lot of reasons for that. Okay, good, I'm giving them a chance to finish.

So I just wanted you to be able to observe this observation of the posture and then also the positioning of that shoulder girdle and the thoracic so that when you are teaching your, as you're watching, you can see where that should be and then you do your verbal cues or your tactile queuing to help them to come to that place. Now, if you're working one on one, now I have a lot of information on what I would wanna work on with the person in a private session, you understand? All right? So we've got a lot of neural tension and tightness in the flexors that we wanna address. Tell me your first name again.

Tara. Tara, and then your first name again? Tatiana. Tatiana? Tatiana was really more about her positioning of her ribcage and connecting over her pelvis and her feet, which actually changed her shoulders a little bit here.

So it's a different approach in my training technique and what I would try to do in a one on one session with Tatiana, right? Does that make sense? So that's where that information can be helpful or in a movement class, you just can know that this person really needs to reach to the pinky side of their arm because she's gonna be in this flection part. Okay, great. So now we're gonna do a little bit, I want you to feel this co contraction and in a, of the arms of how they work together in a close-chain position before we get on the floor to feel it.

And it's something that I found useful when I'm teaching a class like a mat class or something, or even a reformer class, because you can do it in partners and then the students can do it to each other. So come on up again. So we're about the same height, so that's perfect. It's actually really good to do with someone who's close to your height. It's hard if you have a really small person and a tall, that doesn't really work so well.

So what she's gonna do is put her hands on my shoulders and I'm gonna put my hands on her shoulders. And for the student or your body, it's easier for them to feel it if their arms are on top versus see how mine are underneath? So if you're the teacher, I would suggest going underneath. So you could try it both ways and see, but okay, now what I'm gonna do though, when I do this as the teacher, I look at their shoulder girdle, 'cause I'm the teacher. Now you're gonna be on the side of the deltoid.

And what I'm gonna look for is how tight her pec is. So relax a little bit and let's just bring that back and down a little more, great. Okay, you see how I just rolled her? Kinda like what we did with the scapula, I just kinda rolled her that way 'cause I do want as best as possible to have that humeral head in the socket there. And so we're gonna pull the thumb and the second finger a little bit away, just a little bit.

So I'm going for that pinky side. So I'm not gonna push with my thumb, right? So if I peel it off, then I'm not gonna be, have a tendency to push that way. So this is a an odd queuing, but what I want you to do is I want you to press your hands on my shoulders, great, so that's her flexor align and relax and now can you press your humeral head? I tried to say the top of your shoulder, push your shoulders into my hands, not your elbows.

Those are your elbows. Yeah, you see? So I can feel and tell her, "Yeah, that was great." Now relax. So now what I want you to do is press your shoulders into my hands like you just did and at the same time, press your hands in on my shoulders. But you have to balance.

Okay, so, at the same time? Yeah, and the same amount of effort. So I need a little more from your shoulder. No, you're going back like that, that's okay. Just don't do the hands yet, do this again.

She did it beautifully. Now, arch your elbows a little bit. Shoulders, it's different, isn't it? It's a widening. This is what you need, the widening through here.

Yeah, not back. You retracted a little bit. Wide, sideways. Feel my hand here, there, you just did it. Can you feel your triceps?

Yeah. They really kick in, there! Okay, now press a little bit into my hands. So the ulna and radius, the lower arm bones are coming in, do you see? And her upper arm bones are going out. Does that make sense?

Can you feel that? It's beautiful. Feeling a lot of upper trap too, unfortunately. All right, that's your neck position, but this is a great co contraction of your arms. This is really good.

Okay, relax. Yeah, you can do it with them too. I mean, I could have done it. 'Cause if you break it down like that and then feel what they're doing and when they start doing a different movement, say, "No, that's your elbows," "No, you're retracting your shoulder," you know what I mean? Or you can say it's softer than that if you want.

Somehow differently than my... No, don't do that. (students murmuring) So pair up again. So let them feel their hands first just pushing on your shoulders. Make sure they're on the side.

Tatiana, lower on her deltoid, lower. It's on the outside of the arm, yeah. Outside, is it? Outside, yeah. Both of you should be on the outside, there you go.

And then try to get them to press out with the upper arm without pushing in the elbow. (students murmuring) (students laughing) Very good, yeah, you should- So are we supposed to feel? Yeah. Oh. Come on up here.

Come here, both of you come here. They're not strong. No, no, no, it was very good. So do it again. Okay, so I had this underneath, (indistinct) Yeah, or you can use these three fingers.

Just don't push with your thumb. Are we gonna do this exercise at the same time? Yeah, you can, yeah. Oh, okay. Yeah, you can.

But you know, one could be teacher and one... But if you're doing this in a class, the students will do it together. Okay so I'm pressing my shoulders out, not my elbows and you do it too. Don't fold your shoulders yet. Yeah, so relax.

Can you switch? Your are longer. There you go. So now, wait, before you start, teacher, look at her shoulders. Yeah, just a little bit.

They need to be back. So she's reaching towards you and then displacing her shoulders. Yeah, there you go. Are you reaching back now? That's fine, she's good.

And get your thumbs upright, no, she's good. So now first, both of you just push your hands on each other's shoulders. Don't bend your elbows if you can help it. Yeah, now relax. That's easy to feel, right?

So now press your shoulders and get your hands a little flatter. She needs some contact. What I don't want you to do is push with your second and your big thumb. Don't do just pinky. She needs some feel, she needs to feel something, yes.

Feel me? Feel me? Yeah, and now press wide, wider push in. Yes, do you feel the difference? So before you were contracting your pecs and pushing forward and your press wides.

And then take the forearms in? And then try to press in, so this is going wide and this is going narrow, does that make sense? And then you could feel the connection down into your back and into the obliques. So you can feel that from here to here, does that make sense? Mm-hm.

Did you guys feel that? Yes. What happens is the triceps really come up. I mean, it's pretty powerful firing up here, but then you do get that connection through here into the ribs as well, without a clamping down. Does that make sense? Yes.

It takes a little finessing on the queuing when you're doing this, but enough. Yes, you really have to- Yeah, but it works once you get it, once you feel it, it's now take... Okay, she's trying it. And then if you take, if you think about row front on the reformer and you pull those arms forward like this, arm bones in, upper arm bones wide. So as I pull this way, I'm thinking of these two bones moving inward and my upper arm bones, just like what I did are pressing wide.

What works with so many of my clients is not letting them have those so called bat wings. So when they widen and flatten between the shoulder blades, that when it goes into the triceps, softening the elbows and- The right line, yeah. But then they're wide and flat. Yeah, that works great. They're activating (indistinct)- If you're successful, great.

Do you know what I'm saying? But a lot of times, if you're queuing just through the musculature and telling them to put their shoulder blades on it, generally, I find they're really not doing it as well, do you see what I mean? So I'm just gonna ask you when you do it again, really look at their spine and look at their ribcage in relationship to what they're doing through their arms too. That all has to be together 'cause a lot of times people think they've got the... You can get the triceps up.

I can really engage here and I can really engage my shoulder girdle, I can get them on my ribcage. Do you see how clamped down I am? And now my ribs I'm gonna like, and I'm (grunts), do you know what I mean? And yet I see the muscle tone and my triceps. I'm not saying that's what you're doing, but just really broaden your view and make sure that you're seeing that and the arms should be floating.

There should be no tension, you should be able to open your armpits up when you move your arms up this way, the armpits should open, you should see your armpit. It's not this clamped down, pulled in. This is pec, I can't even get my arms up there. It's like uncomfortable. So I just like to use it as a tactile teaching tool, like one time or two times, and then I just refer to it in a session or refer to it in a class.

It's very effective in a class 'cause you can just use it as a cue and then people have already felt it and there it is, okay?

Chapter 3

Okay, so let's explore weight bearing on our hands. So I want you to come into a quadruped position. All right, and I'd like for you to look at your hands, and what I want you to really pay attention to is where the radius and ulna meet the wrist. So look down and see if the crease, when you're in this position is a straight line.

So the ulna has a very prominent bone, can you see that on the near your pinky? It sticks out a little bit. Now that bone actually shouldn't stick out too much. For some people, when there's a restriction in the wrist, like you can see it on your right, right there you can see that? Yeah. It's a good example.

This bone will actually, because of the action or the lack of action of the radius and ulna around each other, the ulna will just roll in and compress in that joint. So when you're weightbearing on the hand, you wanna align your hand so that this bone, the ulna here actually pulls back a little bit. So it's not rolling in. So you can play with that, that's better. So that you will see and don't spread your hand too much, but you wanna see that there's a straight line, actually turn your fingers just a little more inward.

Good, there you go, that's a little better. Does that make sense on seeing that? Mm-hm. So I had a shoulder and a inner wrist injury many, many, many years ago. And so it's still a place for me that I have to pay attention to.

So when I put my hands down in this position to start doing my arm balances, I have to pay very close attention to this right bone here. And my right hand, in order to line this up this way, my fingers have to be on a slight angle outward in order for this to be straight. So everyone's gonna have a slightly different positioning of where the central... Remember I talked about the central line being the third finger? But in this case I have to rotate the base of my hand, slightly outward my hand.

So the center line becomes my second finger. Does that make sense? Now some of you might be just fine, third finger or second finger as long as that looks really good. But that line is... Don't spread your hands too much.

Don't spread your fingers too much. Just be a normal, like, relax. I'd even think that's too much, your fingers are spread too much. So come off your hands for a moment. It's curious, so your gloves are they...

Does they have a pad here? They have. Okay, can you take them off for this? Sure. Okay.

The reason is, is that I am asking her to take the wrist things off- So I can see. Well, not only to see, but I wanna see as we work with the elbow and the shoulder joint and the wrist, when people have trouble, I mean, they tend to prop their hands up here and what that does, is it, again, it's like a little bit of a crutch, right? So you don't really access this motion that I'm going for through the whole chain up into the torso when you have to prop the wrist up. And I'm convinced that when you work, and this way that we're gonna work, it's gonna change enough that you're not gonna need to prop up. So obviously if someone has a severe spring and you're not gonna be doing this, but just doing it in quadruped, you're not putting a lot of weight on your, you're not like in plank yet.

So for someone, if that's an issue, I would suggest working this way in the quadruped until you really feel comfortable with it and you see that the bones have lined up and then progress outward from there. The hands though, the musculature of the hand, what we wanna do is get the weight... So we talked about this line here. So the radius and ulna, and I really try to work on keeping that ulna bone back as much as possible, not letting it roll forward, but then also to feel that the weight is at the base here and here of the thumb, both here, here, and here. So it's like your foot, We talked about the big toe ball, that contact and actually the first three rays of the foot being more of the weight bearing.

So with your hands, similar idea where we wanna try to get the weight here, here and here. So we're lining up the humerus over that radius which is the bigger bone at the bottom and putting our weight there. So your radius is here, the top of it here and so you've got the bulk of your muscles coming through this way and down the arm. So when you line up your wrist so that these bones are straight, I want you to also feel that this bulk of the muscle now is turning towards the thumb a little bit. So we're gonna play with that a little bit.

So we're gonna play, where's your elbow in relationship to this? SO let's see you get your hands lined up again. And the thing about spreading your hands, which I didn't finish saying is that you're actually weakening the hand by spreading it too far this way, all the muscles are on the stretch, it's not supported. So the hand, you can actually cap your fingers a little bit, the tips of your finger, like little claw, without lifting the metacarpals off the mat. Does that make sense?

See how that engages the muscles in the forearm? Yeah, not too much claw. It's just pressure. It's just like putting like suction cup kind of thing. Do you feel that?

So you're engaging, and the hand muscles are engaged and now try to get the weight towards the second finger and the base, and that's it. Now think of your elbow creases. So what I want you to do right now is just turn your elbows out completely. Some people cue that way, so you're opening up. See that gives you that illusion and feeling of outward.

So they're facing out as much as possible, external rotation. So that it kind is giving you that sense of like, "Oh, wrap the shoulders around." Now can you feel your lats and your pecs here? Mm-hmm. Not optimal for the support, correct? It does stabilize the shoulder, but it's also compressing it.

And then if you were to go into plank or whatever, there can be a lot of strain throughout the whole arm and the shoulder. Okay, now turn your elbows way in. So these little creases are actually turning in way too much. Yeah, go in, in, in. Same thing, now, do you feel how your humeral heads came off the ribs and you're more elevated?

So obviously we don't want that either. So guess what? We get to find the happy medium, but the elbow creases should face slightly inward, not facing outward. And if you notice now with the arms, can you see now where the radius at the top, the proximal head here. So when you've got your weight in a nice position on the wrist, this part, this bulk of this muscle runs on a diagonal towards the thumb, can you see that?

This way, not this way. When I turn out this way, also feel a lot of weight on the outside of my wrist here. And I lose the weight right at the second finger and I feel locked down here. So in a class, it's actually fun to have people just roll them in and out to feel that action here. And so what I try to say is that you want those creases, elbow creases to look at each other or do a little cross-eyed looking, does that make sense?

A little more cross eyed, not directly at each other, that's too much. A little bit of a cross eye. And if you need to, you can engage the hand more, but press down into that second base of the finger there and also the thumb and then get your shoulders now over the wrist and see if you can feel that way. How does that feel in your arms? Can you feel how your back's engaged and the triceps are engaged?

Now line up, push away from the floor, bring your spine up against your scapula there and look straight down so your neck is in alignment, so don't be looking up. Yeah, push away from the floor. Now think about what we did standing, lower arms inward and shoulders wide. not elbows, the top of the shoulder, just like we did standing as partners. Can you feel the activation?

Mm-hm. Good, okay, and come off your hands and rest, shake it out. How'd that feel on your hands? It's okay? Yes.

Working it? Yeah, so that's what I would do in like little doses, like I'd rest. And actually, it's a nice thing if you just put your hands like this while you're sitting and just let your hands relax. So in between you can just let this unwind this right here. So I would, if I had a wrist issue and needed support, I wouldn't be doing front support and back support just because it's there and it's an advanced exercise and you know, it's just like, I have this issue now and I'm not gonna do that, but I'm gonna work my wrist and my arms and this connection through the close chain in the quadruped, and I would repeat that about five times and really work it.

And then that's it, that's enough, don't do anymore. Does that make sense as a training effect? And then eventually, you work yourself back into doing front support. It's okay. I mean, I think that's what being respectful to the body when you can say, "I know I can do front support.

But, uh-oh, I overdid something. I worked too hard in the computer. I, whatever, played too much tennis 'cause I was having so much fun this weekend and now my arm's really sore. I'm not just gonna do front support and then compromise and be in pain. No, I think today I need to just do it in quadruped.

I'm not gonna do front support." Does that make sense? So train the wrist so it can do that action. Does that feel good? So that's just one step, step one. Get to get your people to start weightbearing on the wrist.

So is there any questions about that? Is that clear about feeling that alignment? Okay, good. All right, so now what I want you to do is come down and we're gonna go onto your elbows this way. Yeah, no, you're gonna be kneeling quadruped, okay, very good.

So here, we're obviously taking the wrist out of it. But I'd like you to make sure, bring your elbows, some of you in a little bit more. So you really are the center of your elbow's through the center of the third finger. So even in a more. It's gonna feel like way in.

When it's lined up, it's like really in. All right, now feel that base of the, first the thumb, first finger, there you go, and then feel your feet, your fingers, not your feet, your fingers there. Good, how does that feel? Now drop your sternum towards the floor a little bit and just feel how you're scalping. And now push down through the elbows and bring your sternum up towards your spine a little bit.

So there's your protraction. And let's have the shoulders a little more forward over the elbows, there you go. So you're not quite, so there you go. So, play with that a little bit. There's your extension and your flection of the thoracic spine.

Can you feel that? It's between the shoulder blades, it's really sternum. Yeah, let's see, very good. So you're getting scapular, protraction and retraction, but also let the spine, not the thoracic, not the lower part of the thoracic, the upper, that's very different, isn't it? You gotta watch that 'cause even though you say to someone, "Lower your chest or your sternum to the floor," they're gonna move maybe from the TL junction, which is not where we want it to move.

We want it right between the shoulder blades, very nice. Now find a happy medium. So some of you don't over protract. That actually looks very good. Now how about your necks?

Let's just drop the chins just a little bit. So the neck is in a line. Yeah, 'cause you're on an angle, a downward angle. Now start walking your knees backward a little bit. We're gonna go for a little shoulder stretch.

Stay on your knees though, and just walk back and you're gonna be moving your body back as well. Your shoulders are now gonna move past, that's it, now lean back with your hips, easy. Now, what happened to your elbows? Did they wing out? Some of you they did.

So come back, rewind, come back, fix your elbows. Don't let them come in and try not to lose the amount of pronation that you have. Very nice, good. All right, bring this elbow in a little more, very good. Now, start to go back and try to...

Easy, just easy. Can you feel the stretch in the shoulders there? Mm-hm. Good, very nice. Just watch your neck a little bit and feel that width here, there, don't go too low in the ribs.

That's it, and then come back. So some people have flexible shoulders, some of us don't. Now we don't wanna elevate here. So we don't wanna drop and come back. Your chin is tucked too much.

See, the cues that I'm telling each of you, what I'm doing is I'm observing what your neck and your thoracic spine is doing as you're moving your shoulders back and forth. So we don't want too much tension in the oleigh, the base of the neck. Now you're a little over, come back so your shoulders are right over. Now draw the scapula in and down a little more, there. So there's that connection.

I want you to keep that, and now as you go back, this is rotating in this direction, there it is. Can you feel that? That it, stay right there. That's your lat tightness, you feel that? Mm-hm.

SO that, don't go past that point and then bring it back. That looks better. Do you see how your scapular is staying on your ribcage there? Can you feel that in your lats, the lengthening? Okay, let's sit up and can we observe a couple of people?

I think you'll find it really interesting. Would you mind coming up so we can repeat what I just did so you can see? And then I'm gonna look at yours too. Okay, good. Do you mind if I just take your hair over here?

Can you see well enough? Mm-hm. All right. So at first, I don't know if I can get her to repeat what she was doing. She's really pushing down into the mat.

At least it looks that way and she's very protracted. Do you see that? So here's her spinous process, here's her medial border. I mean, this pretty far. So I do want this so that they're in that more neutral position.

So for her, it's like I had to bring her scapula back more rhomboids here. Yeah, that's better. It's not about protracting that way, that's great. So now her scapula really on the ribcage, all right? And then the width through here and the neck is great.

This is a nice curve to the neck and the head is perfect. Okay and what I want here, and the action is from under here, it's that stretch. So what we're doing is stretching the lat here. So as she goes back, we gotta keep that relationship, there you go, and the rotation's so much better. Does it feel different? Mm-hm.

Can you walk your knees back a little more for me? Yeah, a little more? Very good. Okay, there you go. So the goal is not to go down to the floor.

There's no goal here. It's to feel what we're... Yeah, that's it, that's the end. You feel how it starts to tighten up? Yeah, so just breathe there and just, easy, good.

And then come back up. So what she's having to do is really open this line here. So this right here, when you look here at someone, when they start to stretch this way, we want this as long as possible, not a little V there. Does that make sense? So can we look at yours? Mm-hm.

Different kind of thing. Which side is it? It doesn't matter, I guess we'll see. I'm looking at both of them. Okay. Yeah.

Good, yeah, good. Okay, hold on. She's so eager to go. So if people get into a position, they just wanna move. And so I just wanna make sure that before we start again, this happens, 'cause we're doing this with our arms.

So of course, we're gonna wanna do that. And what's happening? That pec tightness. And we know from looking at her earlier about the pec tightness here. So I'm gonna really encourage her to keep the scapula a little bit closer to the spine, nice.

That's much better. See, I actually even see tone now in her muscles here, the lower trapezius area here, which is, can you feel it working? Mm-hm. Yeah, it's very nice. You lose that when you over protract.

So now she's just gonna start to push back. Very good, and we're gonna get this length here. This is so much better. Oh, that's different. Okay, and stay there, that's great.

How's that feel? Better, 'cause when I was doing it over there, I felt it on this bone, my humerus bone all the way down to my elbow. Some pain? Yeah. Like neural pain? Yeah, pain.

Okay, and you see her pronation is, you started losing the pronation, so come back. So maybe it's a hair too far. So the thing is listening to your body, but also watching someone and knowing where's that barrier? What is too far? It was a little too far because she actually started losing her pronation.

So you gotta look at that too. So she goes back. I want her to still keep this going this way, right there is the end, right there. Is that better? Mm-hm.

And there's a little more opening through here and then she could do is just now, no, don't change your shoulders at all, walk your knees back. So now we're getting the lateen, you know how it attaches through here, the fascia, if you need to call it anything and then she can lengthen this, very nice. Yeah, very good. Is that okay, no pain? Yeah, it's better.

Okay, come back up. Better is never, the answer should have been, "No more pain." (laughter) That was different, huh? Yeah. Okay, good. Then just stand for a second for me.

Just stand again, and can you face that way? This way? Yeah. How's her back look? You don't do anything, just relax.

Don't do anything special. Arms are still a little behind, right? We haven't done any- It's different. But your scapula is different. It's more on the back, your right one.

Do you feel that? It feels better. Yeah, it's on your back more. So that's just a nice movement to do, but if you go past, so can you come up? One last one, 'cause I'm gonna go past, we're doing this a little bit.

Okay, good, walk your knees back a little more. So we're gonna show, going a little bit past. So as she went back, I saw the top here, the upper trap, she's not doing as much as she was but you get shorter. So it's not just elevation, but what starts to happen again is this starts to roll in the lat at its end, so it's starting to pull this in and she was getting short across the top there, that's already better. And I could feel it in my neck and my tongue just sitting there watching you work with other people, that's where I was feeling.

Yeah, right in through here? Uh-huh. So drop your head a little more, there you go, good, and then bring that elbow in, there's a tight shoulder. And then, if you're right handed, it seems to be the, goes with the nature. Yeah, I see your upper trap already come back.

So it's tricky. So for her, I think it's more like neck stuff. There you go, that's better. I would stop right there. Now walk your feet back though and stay where you are there.

Keep that length there. Now without pushing through your arms or anything, just try to lengthen, curl your tail tiny bit, just a little bit. Now, lean back. There you go, from your hips though, pelvis back more. Go ahead, just lean there.

Not your shoulders. So I'm trying to get you to... It's like pull this way with your femurs and keep your, yeah, go ahead and pull back with your femurs, lengthen, there it is. can you feel that? Mm-hm.

See, so I know instead of stretching further in the joint, I'm trying to get her to lengthen through here more. And if I had two hands, I'd pull her thighs this way and that's much better. How's that in your neck? I don't feel it in my neck anymore. Okay, good.

Okay, and rest. Very good. So again, if I'm retraining this area in the body, I would do the quadruped and really work on the wrist part, putting the weight on it and then work on this area here. Good for neck and for getting that to work.

Chapter 4

Okay, any questions on that?

Pretty good? I know it changes your neck without actually having to do anything with your neck. If you feel the freedom there. So let's come back to the quadruped position again, lining up your wrist, lining up the elbows, feeling your scalpel on the ribcage. So you have that set, it's set on your back.

Lower ribs connected. So you don't drop through there, neck aligned, good. Feel the hands, good, very nice. All right, now keep the arms straight. What I want you to do is go ahead and again, drop your sternum towards the floor.

So you're gonna adduct the scapula and don't do it through scapula muscles, So don't be using your rhomboids just to pull the shoulder blades in, but actually move your breast bone towards the floor. It's a different feeling. The scapula could move in towards one another, but they don't over contract, you see what I mean? So push away from the floor. Good, yeah, we gotta keep working on that, setting them on the...

Now just the sternum, so if I put my finger on her sternum, so you can push into my hand with your sternum. Do you feel the difference? So now your spine's extending and now push your sternum away from my finger or lift it off of my finger. Yeah, excellent, and pushing down. Can you feel the difference?

It's subtle, it seems subtle, but it looks very different. So let's sit up again 'cause I do want you to see this. It's good, could you come up for, and I'll cue you through that? All right, so here's the difference with the look. So first for me, go ahead and you're gonna move your sternum to the table, but I want you to do it through bringing your scapulas together.

So adduction and you drop down, see? So sometimes we want to do that. And then now AB duct or push away from the floor and now the sternum's up. I mean that's a gross motor, like sternum down, adductors rhomboid, (crackles) and then the reverse. So not really looking for that, what I'm looking for, for spinal movement.

The scapula is gonna move because it's on the ribcage, correct? But I want the scapulas doing the gliding. So a lot of times, I'll put my hand right on the sternum here so they can feel it and then I'll say, just press your sternum into my hand a little more, let it drop down, that's it. The scapula is gonna move, don't be afraid of that part. There, can you feel the difference in the musculature?

She's not using her rhomboids per se overly, but she's getting extension through the spine. Do you see the difference? And now move the sternum away from my hand into your body. You don't push too much with your arms. Yeah, there.

Wow, her sternum lifted right off my hand. So she started pushing through the arms. So do it again, start from my finger, the sternum, nice. That's enough, good, and now start at the sternum. Bring the sternum...

You see at the base of her neck now? So now I've got movement happening where the base of the neck is moving back. Do it again, sternum into my hand, that's it. Now lift the sternum off my hand, very nice. Do you wanna try that for a second just to feel it?

It's pretty neat. So why don't you pair up? Thank you. You're welcome. That was really good.

So you've got the sternum notch right here in the top, there's this little (crackles), you don't wanna be there obviously but you wanna be just a little bit down, high on the breastbone. It's actually the very top of the sternum. It's where the manubrium meets the sternum. And it's second rib ish. It's like right around the second rib on the sternum.

I can elevate it. Yeah, isn't it neat when you feel it move? And then you can watch the spine, you can watch the scapula and then she tends to like to rhomboid, to use her rhomboids. And then in the vertices, (indistinct) Nice, and then to feel the sternum just lift right off your hand, it's pretty neat. Okay, switch.

Did she do it? You feel it? I felt she was (indistinct) Well, try it again. And her care length to look the way this was- Yeah, I want you to feel the sternum. Well, this looks good here, she just needs a little reminder to keep that syrupy feel you see through here, and now- To drop into it?

Yeah, do you feel it move? Now move it away. Yes, yes. Now, do it slower and move the sternum off of her finger a little more. So I want more like it's base of the neck, right there.

So it's second rib. We're really looking for the second rib to come back up. Do you ever notice in people that that's the part of the back, like the second, like T2, one and two, tend to be, for some people it tends to be a little reversed before C7's really prominent, you know? So to get a little bit of movement through here, this part, the upper T spine, one and two through here brings the base of your neck back in alignment. And then your head can be just more free on top of it, so base of the neck.

If you have someone that can't get on their hand and knees, how would you- Oh well you could just sit. How can you sit (indistinct)? So she wants to know, if you have a person who can't get onto the floor, their knee is injured or they're uncomfortable. You can do it on the wall. You can stand, put your hands on the wall.

You could do the same thing. You could sit, the person doesn't even need to have, I like having the closed chain, but you certainly could have someone stand and just put their hands on the wall. So now we're gonna do one more thing. (students murmuring) So, did you all hear that question? So I don't think you all heard it.

Like if somebody let's say they're older or their knee hurts and they can't kneel, you can do this on the wall standing and you could still put your hand on the sternum and move through there. It's just nice that when you're in the quadruped, if you're gonna be moving towards doing front support, you're already in that position, and then you can use that as a cue. So that's the other thing. It's bringing the awareness of the movement of these subtle places and then they feel it, and then it's a cue now. So if they're in a plank position and their sternums drop forward and they're extended up here and they're in their rhomboids, so you can say, "Move your sternum back." And then all of a sudden they're moving the sternum back and now all of a sudden, now they're connected into that whole line of muscles that we want them to have to support themselves.

So it can become a very simple cue or if you're in a class you could walk around and then just put your finger right here and say, "Move more off my finger," it's a cue we use a lot, "Move away from my hand," this kind of thing. All right, so now I wanna do is play with the breath a little bit in the same position. Get back on your wrist there, it's good practice. Again, think of the alignment, think of where your elbow creases are facing so you line up. Now really be active with your arms.

This is work to be in this position and you're not even putting all your weight on it, but the lower arm bones in. See and this is gonna be a challenge for you 'cause of your biceps. Press in here more without turning, move there. Move this bone into my hand, there, this one in more. Don't turn your elbow so much, just move the bone over.

Push into my hand, don't turn. I know, there, can you feel? There, you're starting to straighten your arms. Look at her triceps, that's great. Okay, now what I want you to do is you can do the sternum drop again, all right, what we did, but this time, what I want you to do, so I want you to do an inhalation and drop the sternum towards the mat like you did so inhale and then exhale, move the sternum away.

(exhales) Now when you exhale, don't over effort through your external obliques. Really feel it from the sternum, not your rib, not your lower ribs. They're gonna do something natural, that was better, naturally, but don't over exhale with the external obliques. Does that make sense? So try it again.

Sternum drop, inhaling, and then as you exhale, oh, much better. Now, can you feel how the lower ribs did lift and connect into your body? Yeah, it should happen naturally with that. Does that make sense? Yes, very nice.

Okay, let's look at this. Could you come up? 'Cause it was interesting what you did. Are you okay in the wrist? Mm-hm.

Okay, so come on up on the table. So the first time she did it, when she did the exhale, she did her good Polaris exhale with a good oblique action. And then I saw nothing move up here because it was all right here. But then the second time she, after I changed the cuing, she went and changed. So it was great.

So I wanna see, hopefully you can repeat- I hope so. Well, you did. You know, sometimes when people, they do it one way and then I try to... And then they fix it, it's hard to go back which is a good thing. So I'll try and cue you that way.

So she's gonna inhale, the sternum goes down so that she did this part good, very well. Now exhale and do it here. You see? This area got more flu, this is where we flex, this is easy. This is not what we want.

Our head goes down, you see that? So that's what I say. When you exhale, it's not about external oblique, you know, that kind of... Do you see the difference between the two? All right, let's do it one more time.

Inhale with the obliques too much, exhale, external obliques, and then back to neutral, what a great model. And then sternum down, inhale, and then exhale, pull this up. Can you feel your obliques when you do that? That's awesome, and she's connecting into the arms. So breaking it down, thank you, that was great.

Breaking it down with first getting the person to do the movement, I mean, they still have, they have to feel what that is and then adding the breath and then they get, that's the connection. You got the whole package working there. All right, and then you just say, "We're gonna now put one leg back and you get into plank and can you do the same thing, same queuing, same breathing." Okay, so let's try that. So let's come on to your hands, just start in the quadruped again. Now some of you may not wanna go into plank and that's fine, so just repeat this, like for your rest, maybe, maybe you don't wanna do it.

I'm good. Okay. She's gonna help. All right, so set yourself up before you go to stick your, we're gonna start with bringing the right leg back first, you know, like this, to set ourselves up and then we'll go up into the position. But before you do that, so come back onto your knees.

Before you do that, set up the arm. And I just wanna go through it step by step. So you're checking out your wrist, you're feeling the weight on your thumb, second finger you've got your little grip in your fingers, the lower arm bones are pressing inward, so you're trying to... Yes, really activate the arms and you're widening across the shoulders there. The sternum is lifted towards the spine, and then just take an inhalation to hold.

Don't change the sternum. Inhale, exhale, bring your right leg back. Feel that connection of the sternum. Good, great. And inhale again, now next exhale, go on back with the other leg and feel that connection the sternum moving into the body, keep moving the sternum into the body.

Catch your weight, inner arms, the lower arms in, elbow facing in a little bit, upper arms wide. Very nice base of the neck back, base of the neck. Yes, and then the knees and come down. Did that feel any different to you concentrating it that way than if you were to normally do that in your practice or kind of the- To work, it's fine. Not much work.

Not much effort. Yeah, it's not as much effort in a way, which like, you think, "Well, is that okay? I wanna work hard." Do you know what I mean, but actually you're working hard. It's just that a lot of things are all working together and you're getting the support. And if you keep doing that, the strength and the development through your arms and everything, it's powerful, the strength there.

I see that one guy held a plank for how many hours, did you see that? I forget, what it was that a whole day or something? I don't know, anyway. Let's hope he was breathing. (laughs) Set him up as a table and people can just (indistinct).

No, really? God! So I think we got that down. So again, that alignment, and look for that, even on, and we're gonna look at it in a little while in a minute. So that's also on the reformer. Looking at that same thing as a little different than the reformer, 'cause we've got a bar, not a flat surface.

All right, so let's look at the side plank, same idea. You're gonna come on your side. You can face me so I can look at you. All right, so, elbow under the shoulder, palm is flat and I'm still looking for in my hand, that pronation, so I'm going for as much weight towards my thumb as I can through there, and my second finger and this here, right under. Now, this elbow really, it's feels like it's under you more than like this feels like it's under my shoulder, but do you notice, see how the angle's that way?

So you're angled a little, bring your elbow in more, yeah. It's way under. So that you can feel a difference when you connect into your ribs here. Space in the armpit and line up. So you can lengthen your legs, it's all right.

So, you can do, you know, the side bridge. But what I want you to do, instead of just pushing down with your arm and lifting your hips up, what I want you to think about is your ribcage here. So what we're gonna do, is yes, you are gonna push down with your elbow and your arm into that, but what I want you to do is lift the ribcage. You can translate your ribs up, translate the ribs up, and you should feel that connection into the obliques here and then the head is in alignment with that. And come back down.

Can you feel how that work? So I'd like to queue through the ribcage where the ribcage is gonna lift and I'm translating through the ribs and that's how I'm gonna hold versus now just push your arm down and lift up. Can you feel the tightness in the pecs and the lat there? I mean I'm straight, it looks pretty good. But I feel a lot of, a lot of compression in my shoulder, but the idea is that your arm is stable, you're weight bearing on it and you're moving your ribcage over the shoulder.

So the serratus has two ends. You got the end that's on the ribcage and you got the end that's on the scapula. So in this way, we're actually working the ribcage on the arm as opposed to arm on the ribcage. Does that make sense? So just even thinking about that way is very helpful with the side plank.

Okay, now backwards, let's face backwards and we can do it with the knees bent. Again, I just wanna work on the arm position. This one is difficult in the shoulders and arms, but do have the fingertips facing inward. And again, you wanna check that we have that straight line basically here. So you gotta be careful not to have a slight bowed out positioned this way, making the angle on that way 'cause then I'm gonna be again, compressing into this part of my wrist and the joint.

So if you have to look back and see that you've got your hands and those wrist bones are lined up. Now we're starting with elbows bent a little bit 'cause we haven't really pushed up yet. So let's talk about that for a second. So just rest for a second. So there's a different action when your arms are straight and we're levering our body up, like we just did in plank, we're not going through a pushup.

There's a different action. There's a little spiral that happens because of the cross and uncrossing of the radius and ulna. So in the wrist, it actually changes when you go bend and extend, the weight shifts. Maybe we actually should start that with the quadruped position again. 'Cause it's the same in the other direction.

So if you're here back to this alignment and I'm gonna bend my elbows, and I'm gonna bend them inward so they're gonna come back in alignment. So we're gonna be going into this, that position we were just in before, feel the difference of how you've got the arm bones, the lower arm pressing inward, the weights more on the thumb side, the radial side of your wrist. But as you turn your elbows down into the floor, do you see how it shifts to the outer part? You feel that? So now your weight's a little bit more towards the pinky side there, and then as you press up, there's a little bit of, you've gotta do that pronation of the arm towards the thumb.

Isn't that cool? There's just that little spiral shift there that you should feel. And get it over the thumb, nice. Didn't that feel good? So if you wanna try a pushup or not, but try see if you'd concentrate.

If you wanna try it from the plank, now watch your elbows. When you first start, don't turn out that left elbow, turn in, turn in. Yes, get on the thumb, inner arm bones in and then start to bend. Now rotate, get your weight towards the pinky but don't lift... Be careful, don't go too far that you're lifting the second finger off the mat.

You still want this contact, but you're gonna feel, so when you start you're here, there you go, don't turn yet. There, there you are. Now you're gonna spin that way. Keep some ground, ground your second finger but feel the weight from here and now shift it to over there, yes. Yes, very nice.

Can you feel how that works the arm there? Isn't that cool? Yeah, yeah, and you could still work with the sternum moving back up, okay? So when we're here, it's the same kind of twisting. So to start, you're actually gonna feel, 'cause your elbows are bent, if you start bent.

I mean you could start straight, but if you start bent, you're gonna be more towards the pinky side. Just like you did in the pushup, fingers and the wrist here. You can bend your legs if you want. Just so we can practice the arms or if you wanna do them straight, that's fine. But from here, so as, and elbows are inward, so as you start to push up, you wanna try to transfer the weight a little bit more towards the thumb.

Yeah, just feel what your arms are doing and the shoulder and then sit back. Yeah, just this experiment, don't worry about going too high yet and just feel what your wrists are doing. So pushing up, think of which way your elbows are fa... Yeah, good. Well, that looks really nice.

Does that have a different feel or a different way than normally like when you do back support? Yes. Yeah, it really does, try it one more time. Yeah, that looks fantastic. You don't need those gloves.

Yeah, I wanna just see this arm here. Can you come up? Come on up for a second. Are you striving the elbows again, when they're back there, that cross-eyed elbows 'cause I was trying to figure out where it is- Where that is. Yeah, well, in a sense, yeah.

It's the same, but it's back behind me, you see? But I'm not gonna do this. You see this I'm like all on my... There's a lot of strain. I could feel that, but yeah, but I'm gonna be going, there's like that little bit. So I always think of this corner over this, you know, even that looks good.

So as I'm doing it, see, there's a little turn here. It's subtle, I'm not rolling my shoulders in to do it. And I'm still pressing through these points in my hand. I wanted to see your right wrist. So what I was noticing when you went up, let's see.

So this is actually a little hard for you to even... A little rotation that shoulder, huh? This hard for her to get into that tightness in the front here. And so you really feel it. bend your elbows a little bit more.

Is that okay? Bend your knees too so we don't have to, we're not gonna do plank yet, we will. That's better. Is that okay? Mm-hm.

That looks better. So try to keep grounded right here if you can as you're straightening. So go ahead and lift your hips and try to get, remember inner arm bones and this arm is good. This one in, there, wide in. That's better, do you feel your hands?

She's shaking, yeah, it's a little weaker. Okay, come down. Her triceps a little weaker there. That was better. Again, it's that idea of the lower arm bones in and the shoulders wide, even in this position.

That was better. Yeah, it's really... Usually, I'm (indistinct). Yeah, no, so to me, I know you're strong and your guys are really good movers, but isn't that great training just to do that? Why do the full back support when this could be something...

If my focus is, "I really wanna strengthen this and I really wanna work on this chain and I'm shaking doing that, this is my exercise. This is what I would be doing to work on it." Good, thanks, all right. Good work, all right. So let's look at some things on the reformer.

Chapter 5

All right, so let's...

Are we starting? Yeah, go ahead. Okay, so let's take what we did on the mat and look at it in our repertory that we know. And I have a few things that you did on the mat that's actually fun to do on the reformer to work on the shoulder work. So what gonna do is a light spring.

So I have it on a blue spring, very light, and we're gonna take the box and actually take it crosswise this way. And you gotta make sure when you place the box here, that it truly is stable. I have placed it slightly off the bar, and then as soon as I leaned on it, it has fallen. So you wanna really make sure. So I usually try to place it on the mid bar and then I push on it to make sure it's okay, all right?

So would you wanna try? Yeah. So kneeling and your feet, so it's like knee stretch, kneeling, and you can do the forearms just like we did on the mat. So elbows under the shoulders, finding that pronated position and exactly what you did on the mat. So all the alignment things, and then there's a number of things you can do here with a client.

But I'm interested in the shoulder girdle, so what I'm gonna ask her to do is to just press back with her arms, not the pelvis and I'm getting that same, it's the same as you walking your knees back, you see? Now, but she has to do is pull herself in. So now you're getting a resistance, see it's from the reformer. So the other one on the mat is just really flexibility movement. Here, she's actually engaging.

So there's more strengthening and getting the motion. Yeah, very nice. And again, you can cue if they start to drop their sternum, have the sternum here, you can have them inhale as they push out and use the exhale to come in. So that exhale being the sternum, exhaling the sternum up. So you have that connection into the ribs, you see?

Now you can also, if you wanna add a little more challenge, have them push their legs back into more like down stretch. So if she pushes back and lets her hips go down, you can go all the way down if you want, which is a little bit more hard, it's harder that she's gonna have to support her weight, there you go. See on that angle and then do the same thing here, pushing out. Good, exhale, now bring the body up over, very nice. The elbows right there, good, and back.

So this is more of a core challenge. She's got more weight on her arms, 'cause she's in the down stretch position, very nice, and then bring the knees in and finish. So we use this one a lot. It feels really good to get that motion going in the shoulder, yeah? Great.

Yeah, you did great on that, okay? Someone else wanna try? Why don't you try? Just different to see different shoulders doing this. What we're doing here is we're training the client more proximal, proximal meaning closer to the spine before adding the hands on the bar.

You know, down stretch actually. Isn't that the hardest thing to get someone? I mean, usually most people don't do that very well. It's really hard to be in that position and have those scapulas where you want them. But here you're training the proximal area first and then the person gets it, the body gets it and then they transfer and then you work on the wrist and all of a sudden it changes how they're down stretch looks.

I'm just move your hair so I can look a little bit, there we go, nice. So what you tended to do was to over, yes, good. So have a little more sense of the scapula on the back, there you go. So that means when I say that, if you notice what I had her do is a little more lower trapezius came in, a little more rhomboid for her. 'Cause it's so easy to push and get too wide.

So just the arms push back , great, and coming in, and I think at this level you can choose either way, inhale or exhale. If you wanna follow the knee-stretched tradition, it's the inhale out and the exhale in. So without confusing someone, I could just keep the same thing, inhale out. Good, exhale pulling in, can you feel how that works, the serratus? Mm-hm.

Okay, one more, it's good. Good, now move your legs out. And you know what? You could even have someone move just that far if you wanted. Do you see?

You don't have to go to the full, look ahead and go to the full hip extension. So then the body has to come up a little bit 'cause you're on this plank line. Drop your tail a little more first. Lift a little more here, yes! (whoops) Yeah, now push out. That's far enough, exhale, pull it in.

Feel your ribcage lift up, that's far enough. See what I'm stopping or the shoulders right over the elbows and press back again. Good, now pull yourself in. Nice, can you see this working together through here both the front and the back? Very nice, and then bring the knees in and rest, good.

It's a lot of hard work. I know, it's so deceiving 'cause when you're watching it, it looks so simple, but it's really a lot of work. I think it's harder than doing like the full thing really, because it's so specific and so connected. So that's training, that whole recruitment that we want to try. Somebody else wanna try?

Do you wanna try it? Yeah. So let's see what it's like. I would like a little more of your hands on just here, that's okay. And it might mean that we move the carriage out a little bit, see what I mean?

It's just to have the hands not have that, I like the having that contact that we've been working with. Now for you, it's a little more base of your neck back. So that sternum lift away from my hand, there, and then just look, I'm just gonna turn. Now, I want your neck that way, great. So another cue could be Adam's apple area, like right here at the base of the throat.

And I might say, "Can you lift this off my hand a little bit?" Not your head, your head stays here. This part's lifting off my... There you go, is that okay? It's a weird cue, but it works. So I just had my hand here and asked her to move away, just right here, not with the head.

All right, so just press, that looks really good. Press back, how does she look from the front? The pecs? Yeah. Yeah, this is the shoulder that has the issue.

So we wanna make sure that- It's way more developed than the other shoulder. Yeah, it's pretty good. So what I'm looking for is this line through here, just to make sure that she's not shortening in the front 'cause that's what she's gonna tend to do here. Can you feel that it opens your armpits? Mm-hm.

And now pull yourself in. Yeah, you gotta like drag yourself in. Again, I have one light spring. So you could probably go maybe a red and it's in the second gear here. The left scapula is witting, it's delaying.

Delaying its motion compared to the right one? Yeah. Okay, let's pause for a second, this is good. How about a little more... Wait, wait, don't move anymore.

Move your sternum back up towards your spine a little bit. Yeah, there you go, and that base of the neck again. See that's her area, I think. Now as you start to push the scapula, try to keep the right scapula from moving just for the first like nano inch, you know, whatever, just a tiny little, good. Don't move the scapula, push away and stop and then come in.

Keep working that. Good, don't move the scapula if you can. Sternum up towards the spine more. Good, push away. Don't move the scapula, the right one's moving.

Can you feel it? Good, that's all right. So we're talking about, it's just I wanted to go from, she starting at about this would be 90, so she's starting more, I don't know, 75 or something, 60 maybe, and I just want her to do just a little lift 'cause after that the scapulas should move. Even just hold it- Push away it in? Yeah, yeah, yeah.

Push away? Yeah, push away without moving. There you go, now move, keep moving. Go ahead, and now you're gonna rotate. So can you feel the right and left scapula together?

No. Okay. Yes, so that would be a training thing. So pay attention to that. So don't move the scapula at first.

There you go, and now continue, and now they're both gonna move. Move that left one. So it could be that the left one- Yeah, much better. Yeah, good! And then pull them both in, great. And again, don't move them at first, excellent, and now move them both.

Nice, you see? God, it's visible! Isn't it visible? Yeah, it's very nice. I have to really think about moving my lap. It's like the right one just wants to do everything.

Yeah, it's very mobile there. But that's good, come stand up. See, that's all I would do. I wouldn't do the push out with her into the down stretch. It's so tiring.

Yeah, you were fatiguing, we could see it. But let's take a look at her scapula again. You know what? It's sitting back more on the right and her arm's a little more forward. I mean, without doing any actual releasing or fascial, any stretch, you know what I mean?

Just by the movement itself and the cuing and by firing up the pattern close, it's already changing, and think about it on top of getting... Yeah, let me see it from the front, let your arms hang down. Just, it's really different across here, can you feel that? Yeah. Yeah, it's great.

It's not so forward and isn't that amazing without actually having to do any kind of hands-on stretching or fascial stuff? So it's great. It's really important to work proximal like that and to get those muscles fired up. 'Cause then eventually if she were my client coming regularly, then all of a sudden it's like, "Okay, now plank, now pull," 'cause she's there. But I don't wanna push her into that more advanced level until I know that she's got that integrity there 'cause it's not gonna serve her at all.

So it's beauty even though it's simple. So now we're gonna do one elbow on the box. Someone wanna try who hasn't tried? You wanna try it? Yes.

Okay, so same thing, except for we're doing the side plank. Now you're gonna put your right knee kinda more in the middle here and then you're gonna lean onto the box with your hand facing that way, exactly. Just like we did on the mat, it's exactly the same. This leg will be off the reformer 'cause you're gonna be level, right, exactly. Now this is where our queuing is gonna be for the ribcage.

This ribcage here. So we wanna make sure she's arranged well from the back and that they're level. And so what I want you to do, as you move away the carriage, you're gonna lift your ribcage up and move away. Not too much though. Okay, don't go forward.

So this is where you gotta... You went forward instead of... Just think of the whole, as you push away, the whole thing is lifting your arm, yeah, you gotta move the carriage. There you go. Do you see?

So there's space in there and then pull yourself in. So is she going any further down? No she's doing too much. So stay connected in the carr... All right just move the scapular away, push away.

I've got to have it show this from the other side. That's it? No, not yet. I will though. Go ahead, We're not quite getting it yet.

So before you start, I want you to... Don't think lift, so that's not working, the cue for her. So what I want to do is the whole ribcage as a whole, I wanted to come up off your arm a little bit. There you go, so we're not even moving it. Can you feel the difference?

So you're really lifted off your arm, that's better. Now just maintain that as you go out, there you go. A little more, go a little further. Keep it lifted up, go this way. There you go, and then bring it back.

It's a challenge and again, there you go. Can you feel as you do that, that that I want this scapula... Okay, we're gonna do one more. I want it to slide away from your spine here. Can you get it to slo, yeah come back.

Okay, rest, it's hard. Let's try the other side. Didn't quite get it. It's okay. And it's one of those things that when you're on it and you've done two or three, you can't just keep, 'cause she's tight, there down, well, we just have to try another approach to that, but you'll be able to see, I think on this side as well, now she did the plank and all of that.

She was good this way. It's very different going this way. This is the area you need to work on. So see how she's sitting her weight into the arm and we've lost all this connection here into her ribcage? 'Cause she likes to extend.

So what I need to have you do is lift that armpit a little bit off the arm here, there. The pec's gotta lift, you got it? Yeah. Yeah, and connect the lower ribcage into your elbow. So you wanna find this connection through here.

There you go, so keep that lift here. Good, keep lifted off both my hand, there! So minute. Yeah, well it's pretty big from your back. Now move, go ahead and stay off my hands. So I'm lifting her pec up is what I'm doing.

Ah, there you go, can you feel that yet? Mm-hm. And I'd like to see is that scapula move a little bit more. Okay, go back, this is hard. So I would have to stick, all right, come back up, it got better.

We'd have to stick to the mat actually then the moving to make that happen. But did you feel it changed? Did you see it change for a moment where... What I did was I stuck my hand in her armpit and lifted the pec up like that. And then she was able to get that scapula down into that mode this way, but if you're tight, if she's here, weight bearing here, do you see how it's popping out?

I think, my scapula. But if I can get that lifted, do you see how that comes in? Mm-hm. So let's try it one more time. 'Cause I just had a thought.

So does her elbow need to go with that? Well, that's what I was... You mean outward towards me? Yeah. I'm not sure about that.

I was thinking more of... No, actually, come outward towards me more. (indistinct)? Mm-hm, okay, yeah. It's more like what's going on in here, her ribs here.

That's the feeling, can you feel that? Mm-hm. There? No? No.

There, now what I'm doing is giving her armpit space. Do you see how I'm pulling her arm bone this way? 'Cause now use this to come up your ribcage there. Can you feel the obliques there? Yeah.

Now connected a lot, there! And the shoulder blade is flat? Yeah, serratus oblique, but I'm holding her arm here. That's it, girl, that's what you have to find, okay? Okay, come on out of it. I don't wanna leave it. I don't wanna leave it.

So I literally was pulling her arm in here to give her space. The lat pec was restricting her ability to find that and then when you did, it was like intense obliques to hold that, right? Mm-hm. So it was kind of an assessment in there. So I'm just trying to demonstrate, how to do this little exercise.

But of course, if I saw her and we were in session, I'd be like, "Okay, get up." And then I'd be doing other things with her and then we'd come back to this to see if we could get it to happen for her. You see the process? Okay, great, did someone else, let us see another one. Do you wanna try? Face this way?

Yeah, we'll do both. Okay, (indistinct) (Madeline laughs) So in the middle, so it's a funny position 'cause you're on your right leg and your left leg's not on the carriage. So go ahead and- (indistinct) on the blue spring? Yeah, still on the blue spring. No, let's bring this knee more in the middle.

Yeah, come way over and you're gonna be on the side of this leg. That's it, and this leg will be off the mat like that. Just match your knees. Yeah, good, so your hips are level that's important. Good, and then body in line through there, now bring this part of your body, not your pelvis, but your wrist, so it's a twist this way.

Come forward this way, the other way, there you go. Now lift your ribcage up a little bit, there you go. That looks pretty good. Can you see? That's what we were trying...

Good, nice. We'll have her turn around, but you guys come around this way. Go ahead and push out, that's excellent. And that's the right arm that was shaking in the back support, correct? Yeah, push down, great.

So she has strength in one area and then- See, I was saying her plank was excellent, but her side not so good. This is great. Okay, let's see the other side. She's still shaking. That was a good example, thank you.

Let's try this side. Now you'll be able to see the difference between the two bodies. She's shaking already. (laughter) Just the thought of it. Okay, good.

All right, you gotta let go. Let's just get your neck a little more, there you go, great. and push away. Excellent, pull it in. Good, very nice.

So of course this is a good prep for your, this is what should be happening if you ever do star. (indistinct) Really, I mean the idea of it. Nice, and come back in. Did that feel good? Excellent, that'd be my star for the rest of my life.

(laughter) Just work on that, okay? All right, great. And now let's see what we have here. So backwards, I'm thinking more of like your long back stretch. So I'm just taking the same positions, but it's hard, there's no real modification except for feeling that position.

(carriage hinges squeaking) So, who would like to give this a whirl? Anybody wanna, you I wanna try? Okay, 'cause it's tough. This one is tough on the wrist. Sticky?

Sticky mat in a basket, maybe, On for the bar's pretty sticky or you mean your feet? Okay, thank you. (students murmuring) So come sit, so then get your legs to this way and I want you to, let's work on the wrist here. And I want you to stay seated. We're not gonna do the full exercise.

And then, I mean, we're gonna work towards it, but let's check your elbows out. So you can see how I'm lining them up, right? And then go ahead and you can even just lift off, you see? Don't even go into the position and then do the bend. Just see how that feels.

So a little pinky side, and then that spiral, can see that right one for me is more difficult. Just try that. It's pretty sticky mat, but nice. You're slippery. So where's your thumb?

Okay, good. Hey you are hot. (laughs) Now see here where she's starting? This is too far forward. So I'm gonna ask you to turn your hand a little bit, there you go.

So try to keep this, this is what I was saying about keeping this bone back as much as you can, good. You can relax your elbows a little bit, there it is, you feel that? Nice. This is the wrist that wants to, you really wanna... And I think it's common.

Mine does the same thing where it really wants to turn. So you gotta really work that this way and there you go, all right. So now go ahead and push out. Come off your bum and you can bend your knees, there you go. How's that?

You okay? Yeah. That looks pretty good. All right, now bend the elbows. Easy, feel that rotation.

So thumb, think thumb, yes. Straighten, think, "Little finger." I think I have bent, easy thumb, more thumb side. A little finger side in. I'm saying it backwards a little, there you go. I'm sorry, I was saying it backwards, so when she's- Oh, okay.

Yeah, but you were doing it well actually. There you go, little pinky thumb. What I wanna see with this arm, 'cause this is how you prevent hyperextension you guys. This actually has to turn... There you go.

So you get all the way through the arm. Can you feel the difference? Uh-huh. Yeah, and again, so I'm gonna hold her so she can get this one, your right shoulder is a little easy. There's a little spiral in, or that's an outward spiral here and then inward easy, good, and rest for a second.

You okay? How's your wrist? Okay. Okay, good. Come on, does that make sense?

Seeing that it's not, it's harder with your weight bearing with that. Any questions on that with that? Okay, I was saying it backwards, but what was happening though is when she was bending, she was actually lifting her thumb point off the bar. So even though we're wanting to go towards the pinky side, when you bend, I don't want you to get too much space under here. So that's why I was saying pinky, but the cuing was...

Does that make sense? So when we're bending, your weight is going towards the pinky side, but not sacrificing the thumb coming up. And then when you're straightening, the spiral's going towards the thumb. Then of course you do the full exercise. Okay, good.

All right, so let's look at, just real quick, let's look at knee stretch, down stretch with the arms and I wanna look at up stretch as well. Someone else, do you wanna try? You wanna come? So down stretch, facing this way. Or let's do knee stretch first, knee stretch.

So just kneeling, hands here. I don't think we need that then. Your hands aren't slipping, are they? So feet against the shoulder rest. The real McCoy now.

Now she didn't get to practice the proximal stuff. So we're gonna give her credit for that. So here, I'm looking for the same thing. Now you wanna make sure that the wrists aren't straight. We do want the bend.

So I would back your hands up a little bit on the bar, so that you have contact with those points here and here. We're not gonna have so much contact point here. Now depending on the person's hands, if you keep their hands extended, of course, that engages the hand muscles and the forearm muscles, which is stable. If I see a lot of tension in the wrist here, then maybe yes, wrap around the bar. So I think that's a choice, but don't always choose to have the hands extended if you're seeing a lot of tension in here.

But you do both well, so let's extend. How's that feel to you? Fine. Okay, stay at the bumper with your knees. Now sit back a little more.

Just a little bit, just a little bit. So the hips, the way I like to do knee stretch, I like to start in more than 90s so you're more like a hundred and ten maybe of hip flection. You're not in a 90 degree. Because we want to get the head of the femur back into the socket, so sit back some more. Don't move the carriage.

And then that gives you the connection into the CLS and through here, in the hip. So that's important and then looking here, great. And the arms are extended. Now queuing in our arms in, (whistles) shoulders out, so you could just stand right here. So I sometimes put my hands here and then here sometimes, all right?

And then she would just go ahead and push out inhale and nothing really should change through here and exhale in but this is what I'm looking for in the, when I'm doing knee stretch. So whether you're doing even, now let's do a round back. Let's come in, you don't need to do the exercise, it's fine, I think everybody knows it, so curl. Now a little different here. Drop your head a little more.

Think more of the sternum. I think the bar's a little high, but that's okay. So what you want like a continuous curve through the whole neck. So I want the base of the necks, there you go, better, and then curl through here. Now I still want my hundred and ten degrees.

So stay at the bumper. Is it too light for you? No, it's fine. Okay, we'll stay in the bumper and lean back more. So you have to actually reach.

So this is where you're getting the thoracolumbar fascia stretch. And remember it has to go through the head, through here. Yes, how's that feel? It's a better curve, isn't it? And the lift through here.

So keep that activity in your arms, lower arms in, wide through the shoulders. You're gonna feel that connection, yeah, that's really good. Can you feel that into your obliques? Yes. Yeah, it's really nice.

All right, and then you would just do the movement here. Inhale out, exhale in. Good, don't go so far back. You gotta keep your connection into the obliques, even the internals, right there is the end. Do you feel the end? Mm-hm.

Yeah, now Bring it in. The work is actually on the end. In this where the work is. Not the back so much. I mean, you're working in the back, but the emphasis of that.

And the exhale, good. Okay, now down stretch. So bring your pelvis forward and up. Come on up, very nice. Okay, so here we are.

No, she's pretty good here and shoulders. Good, now how about her writs though? Elbows facing a little bit cross eye, it's a little more, there you go. Weight on the thumb point and a little more in through here. Do you see her arms came up?

And that feels strong? Mm-hm. People love having that feeling there, that's great. Good, how's her lower ribs? So let's not be too arch.

We can always just arch then not so arch. No, draw this in a little bit. Now bring your entire pubic bone to tailbone forward. No, no, forward, towards the bar. No this part, your pubic bone towards the bar, there, but don't drop your ribs this way into my hand, and it's just tight in the front.

Relax your butt a little bit for me. Now move your fumeral heads forward right here. Do you see this point? Push into my hand here, come into my hand, come into my hand, more. I wanna enter your glide, there.

Now that's good, now stay there, try to keep the carriage where it is. She's working it, keep it there and still reach off the bar. There you go, feel your arms, tricep, there. Beautiful, now she's got gluteals, deep gluteals working, not her exterior ones. Do you see that?

Adductors are working. That pelvic floor is lifted, now we have to bring, go more upward off the bar. Not backward, not towards your back, but just more straight up and reach up off the bar. Widen your shoulder blades a little more. There, keep those groins forward.

Keep your groin forward though. Where I had you, more groin. (chuckles) I know, forward here, forward here. Yeah, don't lose that. That's your given, this is where you're staying stable here.

So you're working deep in here and in the inner thigh, stay there, there you go and push out. Nice, now lift your body up and over your hands and go up forward over the bar, not backwards behind you. Yeah, you're going forward over the bar. Excellent, and rest and curl. Curl back, that's all right, rest.

Your shoulders are getting tired. Yeah, it's okay, rest. It's tough, that's a tough one. Did you feel the difference in that position? I did.

Okay, good. Full body engagement, right? Good, okay. Is there any questions about those? I know you're familiar with those, but you see where just fine tuning can really kick in a few more muscles that are working instead of just going back and forth and back and forth and back and forth?

Yeah? Okay, all right. Let's look at one more. Let's look it up stretch. It's a totally different position 'cause of the arms being up.

Who'd like to try up stretch? You all ave done something. Do you wanna try up stretch? Nope, she's like, "No." I'll do it. You wanna do it?

Come on. So I don't know if this is too light. I was gonna say, what spring did you have for her arm? A red and a blue. That's what I usually do it on, but it's in the second gear and I tend to do- I saw that too, I was just wondering if- Yeah, no, I usually do it in the first gear.

So, I mean, it made it hard because it was a little light, I think, did it feel that way to you, the spring? No, it was actually different. Just the position. Just the position, okay. All right, so great.

So even here, now we have full upward rotation of the scapula. So they are wide and on the ribcage, this is where even people in this position, can you lat and pec it for me a little bit? Just pull, they pull down this way and then I get tightness in here. And then the neck comes up like... Yeah, and well this gets very short.

Can you see that? When she really think, think lat, pull your lats down. Engage your lats, there you go. Well, do you see the tension in the joint here? Okay, relax.

Relax now. Come on up for a second. Just come off your arms. So I know that in the olden days, (students chuckling) there was a period of time where there was a lot of stabilization of the shoulder being said about the latissimus dorsi. Lucky for me, early on in my training, I had some teachers, you know Mark and Molnar and Sean ClubWestin, they were the ones who taught me right off the bat that that was not a good way to stabilize 'cause it's a mover.

You need your lats and your pecs for doing movement, not for stabilizing. So this idea of using your lats to pull the shoulders down is a concept I hope that we can move forward on and get off of. They need to be strong, but for most people they're very tight. So it's not helpful for stability. I think you got that now.

So in the up stretch, let's go again, we want the lat, they're gonna be lengthened. They're in a long position, it's not that they're totally slack and relaxed, but we're looking at this line through here, right through there and that the shoulder blades are sitting on the ribcage. See, now she doesn't have that tension in the top. And not even that, you will actually like pushed into your arm. Now people who are...

Okay, relax again. Relax, come on up. I just wanna stay there because I wanna talk. There's some people who are... Nobody here is really hyper mobile in their shoulders, but there are people out there that actually are really hyper mobile.

So this idea of what we've been working on Is extremely important for them to engage the muscles. The way to know if someone's really hyper mobile, if you look in their armpit, I'm not an example, 'cause I have tight shoulders. I'm always working on it. But do you ever notice when someone puts their arm up like this, that there's this ball here, do you have that on your shoulder? Yeah.

Do you have one of those? Can we see? Sure. Do you have- I do. Yeah, because that's the head of the humerus popping out of the socket.

Yeah, I can see. There's a little bit here, you can see. Right here, do you see that? Have you ever seen that on people? She's showing her armpit.

So and see on mine, I don't have that, that's normal. We're all (indistinct). We're all checking our armpits out. (sniffles) Oh, okay. But that's normal.

I mean, so somebody who is very loose, you know, the danger is that this humeral head will pop out. That's how people dislocate their shoulders, through there. Well, I've never been hyper mobile, so maybe it's just my musculature. That's good, that's good to have that. But you know, you see that and people are doing, when they bring their arms overhead like this, just be really careful, especially if you're doing something on the barrel and you're arching over like that and you see that really coming out, I would not put any weight in their hands or do anything like that.

'Cause there's a good chance that that could pop out. So that's the kind of person that actually needs to draw those in. So come on up. So what I do sometimes with that type of more hypermobile person is in this position, I'll put my hand like this and I'll come around into the socket, that was her right one. So I'll just like push it in a little bit, you see?

Now it's in the socket a little better. So she can feel where she should support it instead of hanging, not to hang. Yes, see how that comes out? Yeah and this one doesn't do it and this one does. Do you wanna feel it?

Do you wanna feel that? Sure. Yeah, quick, quick, quick. I know it's right there, go ahead. See how it pops into your hand?

Yeah, yeah, everybody wants to feel. Yeah, this one. Oh, yeah. This one more than that one. Don't do it too many times, but you get the idea, you wanna feel it?

Right here. She'll show. She'll show you later, I just don't want her... Can you feel that? Now get your hand around more Yeah, there.

So anytime you're in this position with the arms like that, you wanna make sure that that's not sitting like that. So that you do stay engaged and then the engagement stays and then you push out. So one more time. So I'm looking at that same alignment. So nothing's new or different than what we've been talking about all afternoon.

But at the same time, what I wanna work on with the legs is that I do wanna get this length from the fascia. Remember the lats, 'cause I do want her to find that length from here to here. So some things, so she's got the flexibility, but for some clients I might encourage them to reach their inner thigh bones backward more. And then reach your sit bones away from the bar move the carriage, but reach away. You see, now I'm getting this fascial length and can you see that?

And it feel good? Yeah, and then she can push back from there, the carriage and then pull it in, that's far enough, you don't have to go all the way down and then pull it in. And as you pull it in, you're pulling the legs forward, inner thigh bones back. And you can create that fascial lengthening. You just dropped a little bit here, but see there's the length.

So you drop again a little bit. If you have a little drop, you're shortening. Now reach back with that length. Ah, nice, that's far enough. And then bring it in and continue that length.

Wow, nice. And you have to lift like crazy under here. That looks great, didn't that feel good? Good. Yeah, rest, good, thank you.

So you could just take these alignment principles really into any of the weight bearing ones. You know control front is a little different, the wrist and everything would be the same, but you're moving the carriage. You know, any of our weight bearing exercises, you can do that through. Is there any questions? No?

Good to go? Mm-hm. All right, well thank you so much. Thank you. (students clapping)

Chapter 6

Okay, so this is gonna be a shoulder girdle, support your arms, a little movement class, just connecting, getting some mobility in the shoulders and some connection into the core with it.

So it's just a little nice shoulder sequence. So we're gonna start seated. So you're sitting on a box and if you're on a short box, go ahead and cross your legs 'cause I really need to have your pelvis in a nice upright position. You can do this sitting on a chair at home, you could sit on a physio ball. As long as your pelvis is level, and that you can find your spine.

So let's find a few landmarks to begin with that I want you to be aware of throughout the movement class. So first just put your hands on your lower ribs. Not so much in the front, but more on the side in the back, whatever's comfortable and actually look down. So look down at your lower ribcage. All right and see that the connection, it's a V connection coming down this way.

So the lower ribs as if you have little suspenders on these lower ribs that are connecting to the ribcage. You're not squeezing the ribs in this way. So you're not trying to pull this in and close this down, try that for a second, just like put on a corset. You can't breathe, correct? So it's not that, it's more that this side ribs are dropping back this way.

Can you feel the connection? So if you look down, you can see that. Now maintain that. Can you hold that position and from the sternum, so put your one hand on your sternum, keep the other hand on the lower rents here. Now keep this connection you're feeling with the lower ribs with the pelvis and then just bring the sternum up, do it very slowly, so you don't come forward, loose that rib connection.

So you're gonna see that you're looking down at the floor. Right? Mm-hm. So that's okay. SO keep that connection.

Now bring your fingers, now come under your collarbones here. So we're just building on top of each step, layer by layer. So take the clavicles now, the collar bones and then see if you can roll them up and back this way. And you're gonna feel the base of your neck move backward and you might even experience that your shoulder blades in the back have fallen downward without you pulling them down, yes? Good, and then let go, and then I want you to keep that experience of the base of the neck back and then I want you to like open your face, feel your face open and almost like it's moving forward.

Does that make sense? So it's just an opening, good. So now we have this connection from the lowest ribs up through the head. So I want you to bring your arms down this way so your palms are facing out. This is why we're sitting because then you have to be able to hang your arms.

I want you to think of like a inverted V, does that make sense? So the point of the V is the top of your head and then exaggerate the arms so it's really a V position. So they're not just hanging loose, but you're actually opening up and now spread your hands a little bit. Now, what happened to our lower rib connection? I just became aware of mine.

So just connect back into that and then get that sternum and clavicles. So can you feel the inverted V from the point of your head, through the arms down this way? Very good, and now we're gonna do with some cervical neck movements. So take your hands up and hold the back of your head as if you're creating like a little cap, you can interlace your fingers and really get a good hold of your occiput. Now, if you have tight shoulders or any kind of pain or impingement, you can go ahead and have your arms and you can actually place them this way instead of on your head.

So hopefully you're comfortable here because I wanna do is, now with your hands, you have inter-clasped hands. I want you to think of pulling one hand this way and this hand, this way, just do that a little bit and see what happens. You're attached to your head. So if you pull your left hand, your head's gonna turn with it, you see what I mean? Pull, pull your fingers a little bit.

Can you feel how that happens? So that's the action. I want you to be aware of the back of your head. Okay, now come back to the center. Now what I'm seeing in some of you in the neck right here is a little bit of tension.

So part of that is 'cause the elbows are being pushed back. See what happens there? And then you lose the rib connection as well. So bring those elbows forward a little bit. I don't want forward this way, but it's just in so that you feel this line connecting down into here.

Can you feel that? And now connect into the lower ribs and elongate your spine up from the top of the head and do a little like nose wiggles. So you feel that your neck is free and you're supporting through those lower ribs, yes? All right, so we're gonna turn our face to the right, but what I want you to do is feel the back of your head turning to the left first. So back of the head to the left, your face goes to the right, move your head with your hands and then bring your head back to the center.

So again, move the back of your head to the right and your face is gonna turn to the left. Good, and then move your head back and do that again. So moving the head in one direction in the back, moves your face. Your awareness is on the back of the head and then come back. And if you could imagine you have eyes on the back of your head, it's like your eyes on the back of your head are looking to the right and your real eyes are looking to the left.

Does that make sense? So the movement of your head is coming from the back and again, one more time and breathing in and exhale center, breathing in, so we're really getting just the cervical. Don't let your ribs or shoulders rotate too much and come back. All right, so now we're gonna do it two more times, each side. As you're turning your head to the right, can you feel your heart moving to the left?

See if that's a possibility to you and then come back, move your head in front of your head to the right, can you feel your heart moving the opposite direction? And come back. And again, as your face looks to the right, the heart is rotating to the left and come back. And one last time turning the heart as well and come back to center, very good. So now we're gonna look up and down, but what I want you to do first is we're gonna think about the heart.

So, to lift the heart a little bit and then lift your eyes and look up and reach through your elbows and then bring the heart back and down. Now the heart's gonna move down back, and then it's actually gonna go up in the back. Does that make sense? So it rises up in the back. Now the heart's gonna come down, it's making a little swing and then it's gonna come forward and it's gonna go up and then the heart's gonna move down and then a swinging back, and as you look down, it's actually moving up and back and heart moves down, comes forward and it lifts and floats up very nice and bring the heart down and back and let the heart sink and go up now, up and back and then come center and good, side to side.

So drop the heart down into the right, good and come back to center. So the heart's gonna drop down and go to the left. And what does that do? It sends your head to the right and come back. Does that make sense?

Yes, and down move to the opposite direction as your head goes and come back and down. Side bend, good, center and let go of the arms and just let them hang. Take a couple of breaths. Just feel your neck now. Just move, should feel a little lighter.

A little less tension in your neck. Very nice. So now inhale, bring your arms up. Now we're gonna do a high V. So now we have the V here, it's an upright V.

The point of the V is down into your pubic bone. So we're gonna connect the fingertips down to the pubic bone, and then bend the elbows and come down and do the inverted V, feel the top of your head connect into your lower ribs. Good, this is work to kinda, I feel lift through the body. Good, inhale and come up upward V, connect into the pelvis and the pubic bone. Let the elbows release, inverted V, open the palms out, stretch, open the arms, find that connection of the arms to the floating ribs.

One more time and up, reach and down and reach, good. And relax the arm. So now we're gonna make a little cactus arms. We're a cactus, and what I wanna do is just some shoulder circles, but instead of the circles being this way, you can do a few of those, it's always good to do, rotating this way. I want you to think of the wheels of your shoulders going this way.

So what this looks like as you bring your shoulders in, they go up, now reach for your elbows. Go wide. Let your scapulas just drop. You don't have to pull them down, they just drop and then drop down and in, up, out and down. Now pause for a second.

I'm noticing that elbows, our hands are in front of the elbows, can you see that? So that's a little internal rotation. So bring your hands, bring your elbows forward more. Let your hands fall behind you, let them fall back. That's a stretch right there.

That's the position I'd like you to be in. Again, in, up, reach your elbows out and down. The shoulder blades are circling in a flat position this way down. So they come in, they go up and now you reach and they widen and come down and up. We call these coronal shoulder circles.

Coronal is this plane of motion here. Very good, we're gonna do one more and up, and then let the arms hang. Shake them out, yeah, doing okay? Cactus again. So get the hands falling behind the elbows here.

Hands flat, not just loose hands. Like really open up the hands. Now, what I want you to do is take your left hand and see how your internal rotation is. See if you can drop down. This is where you get to see all the tightness in our shoulders, good.

And then bring it back up. Just easy, just let the weight drop. Good and come back up. Now what I'm trying to do, ideally. So do it again, this side, this part of the arm is not gonna drop.

You're just literally rotating around. And what I'm seeing a little bit is the arm is dropping. See the elbow and this space is dropping. So it's just the forearm going down. So we're doing a pivot around the humerus here.

Rotate, good. All right, now let's do it together. We're gonna start with the right hand and you're gonna drop down. I want you to inhale and look to the left. Exhale, come back to center.

Inhale, look to the right, exhale, come back to center. Inhale, look to the right, exhale, center. One more time. Inhale, look, exhale center, stay here. We're gonna look to the right and drop the right hand down.

Inhale here, exhale center. Good, inhale. It's a little different to look at the arm and let it internally rotate, yes? And out and in. If you're getting tired or fatigued or feeling like nerve, there's like a neural stretch going on, you can certainly rest, but this is our last one.

And come in and relax, shake it out. Yeah, good. All right, all right, very good. We're gonna do a couple of nerve stretches that are very useful. So we're gonna do a radial nerve stretch first.

So what we're gonna do is reach your hand out, cross your thumb and hold onto the thumb. And then you're going to flex the wrist this way. Turn your shoulder in. So you might be feeling a stretch already. Now see, it's turning the shoulder, and it's okay if it comes forward a little bit, but don't over-exaggerate that if you can.

See, if you can just find that rotation that we have, is what I did some of that and really flex the wrist here this way, yeah, and now let your head lean away. Ooh, doggy, yeah? And then bring the hand up a little bit. If you're at max, just stop right here. Now bring your shoulder towards your ear and your ear towards your shoulder, just shrug a little bit and then release and let your head fall and reach your arm away.

And again, pull it in and release. You might notice that that neural tension's starting to lighten up. One more and in, and reach away and maybe go up a little more. Is that easier now, huh? And relax.

Just feel your arms and your neck now. Nice, okay, other hand. So you cross the thumb, grab a hold of it. Turn your hand in, and you got to flex the wrist as much as you can. All right, so first just bring the arm up and get to that point and back a little bit too.

You'll know when you hit the line, it's a distinct neural line, there you go, and then start to let your head go away. Oh, scale ins, this is is really good. All right, now ear to shoulder, bring it together. We're shortening up through here and away. Ear to shoulder and away.

Do you notice how the tension releases as we're doing this? So we're putting slack in here and then it's allowing to slip through that thoracic outlet. One more time, in and out and then a little bit higher. A little easier, huh? And then relax.

Ooh, let's do this. We're gonna exhale, reach our shoulders up. Just breathe out, put everything on slack and then inhale. And when you inhale, really feel the domes of your lungs are right here. People don't realize that lungs are right here.

So when you inhale, really fill up this area. So exhale, just let your neck relax. It shouldn't be tense. Just letting it be slack and then inhale. Fill up the lungs and exhale last time, and inhale, good.

Now we're gonna hold a tray, turn the hand in. Now watch the line of this arm. So we're not again, the elbow behind the hands. We wanna have the elbow a little in front of the hand if we can. How much can you bring the fingertips?

Reach across and go ahead and pull this way. Feel the stretch? This might be enough for some of you, especially out in the audience here. So if you feel a stretch, then just hold and breathe here. Some of you may be the fingertips come to the shoulder, reach your elbow out and up.

Can you put your hand on your ear and drop that scapula a little bit and reach? Good, bring your head in center so you're not leaning on your hand. (laughs) There you go, good. And then release, that seemed pretty good. That's the ulna nerve stretch.

Hold the tray, turn it in. So first start, this is test. It's my right arm, it's gonna be a little tighter. So might feel different on this side. It might be easier for some of you being your left arm.

And then bring it down to your shoulder. And then again, if that's intense for you, just stay right here, otherwise come up to the ear and stretch, good. Don't lean into your hand. Bring your arm up and your hand to your center of your head. Very good, and then release.

The true test is go like this with your hands. Do you remember doing this as a kid? Up in the Junior Batman? Batman. Right now, how about those ribs?

Can we connect into those lower ribs? Can you reach your elbows out? Can you bring the base of your neck back? And really open your eyes and release. Very good, okay.

Let's come on to a quadruped position now. Or actually we're gonna stand, I'm sorry, standing circles. So we're gonna stand and you could actually move the boxes out of the way, 'cause we're gonna stand and then we're gonna work our way to a quadruped position. Now we have an option, you can use a one pound or two-pound weights, nothing heavier or some balls come weighted. You can hold a soup can if you have at home if you have.

What'd you say? Water bottle. A water bottle is better than a soup can, it's too much salt and soup. Cans. We don't do canned soup.

Okay, we'll put the weights down to begin with just nearby 'cause it's just an option. If you feel enough of a stretch and an opening, this is for a fascial opening, we're gonna do some arm circles. We're gonna start with the right hand and you're going to bring your palm up. All right, as high as you can, up and over and then turn your body and reach behind you as much as you can. See, that's the action and then come forward.

So you scoop up, inhale and then exhale, circle as far back as you can, and really roll the shoulder in. So the action is external rotation here. And then as you reach back, the head of the humerus is rotating over, okay? And let's do the other arm. So for some of you, if this is enough of a stretch and difficult for you, do not add weight, okay?

However, for these advanced Polaris teachers in this room this should be fairly easy, but it feels good. Reach away behind you. So let's try it with the weights. So grab a hold and just hold one or two, but circle up, rotate back and around, good. You can go a little quicker, up, back and around, up, back and around.

One more time and up, back and around. Good, other arm and lift and back, and lift, and back, and lift, rotate back. The last one, lift, rotate back, very good. Okay, let's place the weights down. This goes back to the old Merce Cunningham dance days.

This is a wonderful shoulder exercise we're gonna do. So, you're gonna bring your arm up over your head, thumb is facing this way, so your palm is facing center. The idea is to come to this lower tip of your scapula here, you don't have to touch it, but I wanna point to you. And what you're gonna do is the lower tip of your scalpel is gonna press into your ribcage, which then brings your hand back behind you and then release. So move from here.

This comes back into the ribcage and you bring your arm back, good. So bring your arm down. So just feel, bring the arm from behind your back down, bring this right arm up so you got the action now. So breathe in and back and release. So you try to go a little further each time.

Back, but it's moving from the scapula, not from the hand. Scapula back, good. Now what happened to our ribs? Don't go back and lose your ribcage. A couple more, keep this lower connection, try to feel that lower tip, great and down.

Other arm coming up, lower tip of the scapula moves into your back and that's what sends your hands behind you and release and back, nice, and release. So it's the lower trapezius working. Back and release, back and release. Watch the ribcage. Some of you, the ribs are coming forward.

So as you go back, I get a little bit of that counter. So to really isolate the lower trapezius, you wanna really stay connected to the front. So you can repeat that again if that was enough or we can do it with the hand weight. So we're gonna lift up and back and release and back. Be careful the rib.

The other thing that happens when you do one arm is shifting to the side in the ribcage, all right? So don't let allow that to happen. Just stay stable in the ribs, very good and down and other side and reach and release, stay connected here, reach and release, good. A little further back and release and back and release. Very nice, and let's put this down.

Put your weights down and then come stand on the back edge of your mat. And then what I'd like you to do is in standing, we're just gonna roll down to a quadruped position. So rolling down, just nice and easy onto your hands and knees, and then walk out to that quadruped position. We want the hips over the knees, shoulders over the wrist and now look at your wrist line. I want you to notice that across the wrist is a straight line.

So you don't have a diagonal on the bones at all here, so that you've got your weight. Now with your elbows here, turn your elbows out completely so they're facing forward. This is where we tend to hyper extend for those who can do that and now totally turn them in. Do you feel like when you totally turn them in how it kind of tightens up and shortens near the pinky side of the wrist here? So we wanna be in a place where neither one of those two things are really happening.

So what tends to happen with the elbow creases is that they tend to be looking at each other crosswise, this way, very good. So that's the alignment we're really gonna work for. And then I want you to feel that your lower arm bones are moving in towards the midline, so you're actively pressing inward this way without actually sliding your hands, and at the same time, you're widening across your shoulders in the back. So this is work just to be in this position. So from here, we're gonna do a little cat camel exercise.

So inhale here. Now push your shins into the mat for me. So you're really active and then exhale from the sit bones and the tailbone, curl it back, try to feel that the lumbar curve you are lifting your pelvis up off your thigh bones and then release your shins, move from the tail, connecting to your ribs, be concentrating on your arms, drawing them in and now as tailbone goes back your sternum goes forward, reaching forward and come back to the center. And again, let me take a look and curling back, push your shins into the mat so you can really drop the tail. Lift the pelvis up off the thigh bones.

Let your head just hang. Don't over push with the arms, and then move the pelvis back, sit bones reaching back, coming through the neutral. Continue moving, sit bones go up, the sternum comes forward. And come back to neutral. Rest for a second.

Come up off your hands. I wanna show you, we're gonna add a little elbow bending. So what you're gonna feel in the wrist is the elbows are gonna turn and they're gonna go towards the floor. We're not going all the way down. we're just gonna unlock the elbows here and turn them this way so you're gonna start to feel the weight a little bit more on the pinky side of your hand.

But at the same time, my body's not gonna go down like a pushup. Okay? This is the trick you wanna try to do is you wanna go up with the chest as the elbows are bending. So I'm really not going down at all. Do you see that?

And it's not a huge bend, I mean this is about, some people have more extension, maybe you go more and then your elbows will bend more, but for me, this is about as far as my spine can lift, you see I'm going up and I'm pushing into my hands and then I'm gonna curl and I'm gonna push back and I want you to exaggerate now and push yourself back further. So I wanna get a stretch through this part of the back. So it's a little more exaggerated kind of cat camel, okay? Great, here we go. So let's start with the curl first.

So go ahead and inhale as you exhale, curl, and then start to push your arms back, back, back, back, back, back. So your armpits are now way off your wrist. That's it, but keep curling. So you're lifting the lower spine up. You should feel a nice long stretch, very nice and then bring it back to neutral, and then here we go.

Turn the elbows in, go towards the pinky side of your hand, but bring your breastbone up as your elbows bend, your elbows are definitely bending, they have turned completely in bend your elbows more, but go up, go up in the chest. Bend your elbows more, you're not even bent. Bend, bend, bend, bend, go up with their chest and then curl. Straighten the arms, good, lift the spine, more curl, lift. The thighbone should be off your thighs, the hip bones I mean, hip bones up off your thighs.

Yes, and then come back. Let's try that again and start to bend, really bend, but go up. Turn your elbows in. The elbows have to rotate in as you bend as you're bending. As you're bending though, as you're bending, that's it bend your elbows.

You're not bending your elbows, you're dropping your chest. Bend, bend, that's it go up with your chest. There it is, bend down. Lift your chest up and push away and rest. Okay, come off your hands.

That's a hard concept huh? Mm-hm. So watch one more time and hopefully you can see it. All right, so basically what I'm doing in my arms is my elbow creases are facing inward, not totally in, but just on that, like towards my thumb. And when I bend my elbow, they start to turn inward this way, elbows come in.

That's how I'm bending in this direction, you understand? That's what I need to see. Some of you are trying to lift your chest, but your arms were never bending. It's a balance between how much you're bending and how much you can lift. It's an extreme amount of work in the upper spine for extension, all right?

So it looks like this. So I'm rotating in, but I'm bringing my chest forward and up. Can you see them bending? I mean, they're bent, they're facing in and I'm going up and then push to stretch that out 'cause that's a really deep stretch there. Try it one more time.

All right, so here we go. Elbows are facing your thumbs. Let's say the inside of your elbow's facing your thumbs, very good. All right, here we go. Curling, so push your shins down, exhale and curl, really lift the lower back up so that the pelvis is up off the thighs.

You're not just bending in the knees, you're lifting your pelvis up off your thighs. So don't go so far back if you can't keep that lift, there you go. And come forward now with the chest, turning those elbows, very nice, good and beautiful. That's it, bend and lift your chest up. You got it, bend more, bend.

Yes, and then curl one more time. Beautiful, curl back, let your head go. Lift the pelvis up off the thighs and bring it back one more time. Doing a little lift without going down. We're going Up with the arms up and reach, good, and then come back and rest.

Okay, let's come down onto the elbows this way, we can rest here. We're gonna do a little shoulder stretch. Now, back yourself up a little bit on your mat so that you have room to stretch your arms out straight without coming off your mat. So here we are, we're gonna be with the elbows in, elbows in line with the shoulders, elbows in line with the wrist. Second finger straight ahead.

So our wrist is not deviating either in or out. All right, here we go. And now drop your sternum towards the mat. Not your lower ribcage, but just the sternum and then push your elbows into the mat and lift the sternum up. So the sternum is gonna drop, which makes your shoulders come in a little bit and now lift from the sternum and press your arms into the mat, very nice.

Now stay in this position and then start to push backward. So sit back onto your heels. Keep your ribs connected into this, keep your shoulders wide, just easy, and then come back back to center. Get your armpits over your elbows, some of you might wanna walk your knees back a little more so you get a little more range. Yeah, your wrist is a little bit funny.

There you go, that's a little better. All right and push back again so you can go a little further. Nice, don't let your elbows splay out. The elbows need to stay inward and then bring your weight back. But for some of you are more flexible and this feels good to you, go ahead and bring your foot back.

I'm gonna go into a plank position, come into the plank and then lift your hips up and reach back. So we're getting a little more weight bearing in the arms and a little more length and then bend and your knees and come down. You can bend them together. Okay, let's try that again. I don't want you going up onto your feet if you can keep your arms stable in this position.

So some of you are starting to splay your elbows out. It is not good for your shoulder to be in that position with your elbows like that, so don't do it. It's okay, we're not being judged on this. So be really true to your own body, all right? So your choice, whether you're staying on your knees or if you're gonna try going up, all right?

So, and again, so I'm just worried about this elbow, get it in a little more. There, there you go. So try to keep it there. Go one more time, going back. Great and lift the hips up, keep the width, watch the lower ribcage so that it really stays lifted.

Don't push it too much. Bring those in more, there you go. Now just reach through your hips not your shoulders so much. There you go. Very good and nice, very good, and bend the elbows and come down.

Very good. Now we're gonna be still in the quad, you're all right? So we're gonna do is bring our hands in front of us with your arms straight. And what I want you to do is cross your thumbs and actually turn your hands out this way, all right? Now, here's the contrast.

What you're gonna wanna do is this with your elbows. Do you see that? So I don't want you doing that with your elbows. So I want your hands in a little V like this, but can you spin your elbows inward and keep your hands in this turned out position a little bit? It's hard, isn't it?

It's an engagement in the arms. Okay, so in that position, I call this the tiger stretch. You ever see a cat stretch with their legs, and their arms or paws or whatever out in front of them in the front? So that's what we're gonna do. It's a little tiger stretch.

So you're gonna push forward with your arms and lean back and sit. Don't let your head drop down. Keep looking out at your thumbs and look down at the mat. Good and reach back, reach arms forward, and then come back up, inhale and do it again. And exhale, pressing back.

Feel the width of the shoulder. Now don't let your neck shorten, you should actually look down at the mat, but don't let your head drop below your arms. Does that make sense? So keep the neck long, there you go, and come back up and again, and one last time. So this is a little more extreme stretch.

Watch the elbow creases, yeah, very good you guys, that's it, good. And come back. Okay, come sit up and just rest your hands this way. Doing okay? Yeah.

'Cause it feels good? Doesn't it? The little less tension in the... Very good, so now we're gonna do is come onto our backs, but this is how I'd like you to do it. And it's a continuous thing.

So we're gonna be back on the quadruped position. I'd like you to take your right leg and cross it over. And then you're gonna take your right arm, slide it through, come onto your side and roll onto your back. A little transition here, okay? So lying onto your back with your arms down by your side.

Good, so just take a moment here and feel the bottoms of your feet. Feel your big toe ball into the mat, the center of your heel into the mat. The pelvis nice and relaxed. Good, all right. Now inhale, reach the arms up so that they're at 90 degrees, palms facing each other.

We're gonna do is what I call scapula reaches. So we're gonna start from the base of the scapula. So the right scapular first, I want you to rotate your hand outward so your thumbs coming out and reach your scapula towards the ceiling, that's gonna lift the shoulder off the mat and then turn your hand back so your palm's facing in and let your shoulder drop, other arm. So reach, turn your palm outward and let the shoulder blade reach towards the ceiling and then place the shoulder blade back down. And again, inhale as you turn, reach the scapula up, exhale, turn it back, other side, inhale.

Reach, exhale, coming down. Now we're gonna do the opposite. Turn your thumb in towards the midline so your arm is spiraling inward, palm is gonna face out and do a reach here. It's a little different feeling and then turn your hand back out, spin the hand in, reach it up, exhale down, one more each side. Turn and reach and place it down.

So you keep turning your palm out so it gets a nice rotation and lower back down. Okay, keeping the arms here, what I'd like you to do is you're gonna take an inhalation and bring your arms back over your head but don't go too far. Let's say from 90 to maybe a hundred and twenty or something if that makes any sense to you, but just a little ways back. Good, rewind, a lot of you, just a little bit. Rewind your arm some.

Some of you are too low with your arms, can you bring them up towards the ceiling more? Yeah, there you go. Do you see? And I'm gonna do a progression here, so I don't want you to go to the end. So now connect into your lower ribcage here and you're gonna take a breath in and as you exhale, I want you to drop the sternum into the table.

So you're get to drop downward and just look up. Don't lift your shoulders up. Just look towards your pubic bone. Look up and look at your pubic bone, check into your ribs, how are they? Keep them connected, lower the base of your neck down in your head and then inhale, move your arms a few inches more back.

Now, hold them in this position. Inhale, exhale, drop the sternum, bring the head up, looking towards your pubic bone, maybe the tops of your knees, and then lower down base the neck head and reach a little further back. Hold the position there. Inhale so your arms are moving with you. Exhale, can you see how that connection?

As I move my head up, my arms move with me and I'm lowering back down and reaching a little further back. Two more times. Inhale, exhale, connecting the arms into the obliques here and lower back down. Reach a little further. Last time, inhale, exhale, and curl.

Good and lower back down, good. Now continue moving the arms all the way down so your thumbs are on the mat. If that's uncomfortable in your shoulders, then just bring the arms around and down by your side. So this should be a position for someone whose shoulders are flexible enough that are comfortable to rest on the floor. I'm gonna move forward 'cause I'm not resting on the floor.

We're gonna do a little bridging from here, keeping the arms in this position. So take an inhalation as you exhale, curl the pelvis, rolling up. Now, I only want you to go to the shoulder blades, So you're gonna keep the weight on your shoulder blades and lift the pelvis as much as you can and inhale, exhale, roll through the spine all the way down to the neutral, connecting to the ribs again. Inhale, exhale, curl, drawing the ribs down. Now, lift through the hips just onto the shoulder blades, reaching the knees over your toes and rolling it back down.

Getting a nice length in the spine connecting the ribs. One last time. Inhale, exhale, curl, reaching up. Good, inhale there, exhale, roll it back down. And once you come down to neutral, take another breath in, exhale.

Start with the shoulder blades, slide them down and let the arms just float up, feeling the weight into the shoulders and lower the arms down. Very good, all right. Inhale, exhale, let's just bring the right leg up, tabletop follow with the left and extend the legs up. Good, now inhale, bring the arms up overhead again, exhale, now you could leave your arms by your side if you'd like and bring the position here. Now, inhale, exhale.

And I want you to float the arms and your head up slightly off the mat, you're not coming very high. You wanna connect into the armpit into the ribcage and just drop your chin, nice and easy, just looking at your feet or you can keep your head down. So we're keeping the shoulders down, flex your feet and do a little lower, point your feet and come back up. And again, exhale. It's a very small movement, keeping this very still, connecting here, finding the connection from your armpit into the ribs and up legs are just floating keeping the connection here, good, one more and lower the head base of the neck down, bend the knees, circle the arms around and just keep them out to the side for me here.

Bring your feet down and rest. Okay, we're gonna take the right hand and we're gonna turn the palm over. Roll your shoulder over, you can do a little shoulder stretch and turn your head to the left and then roll the shoulder out palm up. Left shoulder rolls in palm down, look towards the right, roll the shoulder out palm out and again. So we're turning the palm over and turning back to center.

Good and turning and come back. So you're looking at the hand with the palm up. Let's start this again. Some of you are lying with a V that's too high. This should be out in a T position, so let's look center.

I'm gonna start with the right arm. It's gonna stay facing up. You're gonna look to the right and roll your left arm in and come back to the center as you roll the shoulder out. Very good, and roll the other shoulder in turning your head at the same time, and roll the shoulder. Very good, one more time each side and roll and turn the neck, roll and come center, one more time, roll and look and come center, good.

Now we're gonna do the reverse. So you're gonna look to the right, but roll your shoulder in and come back to center, turn your palm over, look at the other hand as you're rolling in and center and turn. We call this rotating arms, center and turn and center. Very nice and bend the elbows and bring them down by your side. Shoulders doing okay?

This is all about trying to open all of that up through here. All right, so what I'd like you to do is lie on your side. So why don't you face me and have your arms one on top of the other this way. So if you're at home, you could get a pillow or a small towel to roll under your head to support it or it's okay to have your neck just side bent here, it's a nice stretch. And what I want you to do is reach your arm long.

The top arm is gonna, and you can do a little twist and come back. Make sure that your knees are at 90 degrees. Some of you are lying a little bit too open. So you're reaching here. So reach again, reach across and just roll and then come back to your arms ursine.

Now, so this may be your exercise if that's enough, okay? Otherwise I'm gonna have you do is reach pass, and now make your arm come over the top. You're making a circle on the floor, all the way around. Keep following your arm with your hand all the way around. You're gonna keep making a complete circle.

Come over your hip and continue all the way around till you reach past your arm. Keep making a circle. So the idea here is you're making like a pinwheel with your arm. Nice big circle rotating around, just rolling forward. Let's do one more time.

Reach past your arm, roll it over, open up the stretch here, nice, around to your hip and come back. Now we're gonna do one more but here's a transition, so watch for a second. You're gonna come over your head, just watch, don't do anything. You're gonna roll onto your back. Now you have to connect into your ribs and your core, and you're gonna roll your shoulders up.

So here you are lying with your arms in a T. I'm gonna run out of space, but now let your knees fall and roll onto the other side. Okay, so let's do that together. Bring your arms overhead. Now from here, start rolling onto your back, connect your knees.

You're not twisting, you're moving in one piece. Your arms come out to a T, other arm comes overhead and you roll onto the other side. Very good, all right. So reaching that right arm or some of you it's left, but reach your arm past and circle the arm overhead. Good, all the way around.

We're making one full circle all the way around. Come over your hip and just look "Jury 8" in this motion. There's no right or wrong. This is just to get a full little twist. Let's surrender into the floor.

Just let the weight of your body open up the spine, keep breathing, just let your head fall, motion, opening the back. One more circle and around, open, come on to your side again and then push yourself up just sitting up, great. (huffs) Feeling so relaxed, now I'm gonna make your work a little bit. So we're gonna do a little front support. Front support and a little back.

So I'd like you to do, it's really optional what you'd like to do and what level. So let's come up onto hands and knees, a quadruped again. So all that alignment we've been talking about with the wrist and the elbow is important. All right, so for some of you, you might just wanna walk your knees back and find that nice plank position, maybe bend the knees here in this position here. And then what I'd like to do is define that elbow rotation down again, lowering your body and then exhale, pushing up.

And you wanna try to do that without letting your sternum lead and your shoulders slide on the back. You wanna keep this scapula stable and you're lowering your body down in a plank and you don't have to touch the bottom. Keep the scapulas from moving inward toward your spine. Try to keep them wide. Spiral your elbows in and feel the spiral come back.

Good, for those of you want more of a challenge, you would try to do it with the legs straight, find the same rotation in and pushing away. It's a little bit harder, good. Two more times. And stretch, good, find the spiral of the elbows and the wrists, very nice and push away and rest, very nice. And we're gonna do a few back dips, so come sit this way.

Again, let's arrange our hands so that the fingertips are in and I'm looking for that straight line of the wrist on both sides. I'm gonna take more of a bridge position here, all right? So we're gonna come up into bridge this way and the neck can be just forward. We're not gonna look up or back, we're just gonna look forward. And I want you to do is just try to lower with your elbows, let your hips come down so we're gonna sit a little bit and then use your arms and press and use your hips.

It's a little bit easier this way. So back down, feel the elbows, stay connected into, press and you lift. So this way we're getting not only the arms, I'm getting some hamstrings and gluteus with it as well. Really plant your feet and reach, good. Two more times down and stretch.

Last one down, you can always stop when you're tired and up and hold and sit down and rest. How's that feel? Wrist feels pretty good, doesn't it? Having that alignment? It's not that stressful.

If it's feeling a little stressful, you can just do little circles and if you interclasped your hands and just make figure eights in through here, that's fine. All right, a little mermaid. So we have a couple of choices here, So for those of you who feel like that's enough effort in the shoulders, we can do it in a side bridge this way. So I wanna show it for our audience out there, So we're just gonna press down and you lift up. And the idea is to try to feel the ribcage lift up.

So the shoulders right over the elbow, lift up this way and hold the position, but check your neck so it's not forward and then sit back. Not so bad, try this, palm up. So we're not gonna have... And then lift the ribcage up again, feel a little different a little more in the ribs? Make sure you're not sitting back in your hips, that you're really lifting straight up.

So it's your choice whether you like to have that or this, and okay, if that's enough of a work, you could continue doing that or let's do the mermaid with the hand facing fingertips out this way. And again, I'm looking for this weight of this bone, over the base of the thumb and second finger, all right? So with the legs bent, arms here, think of lifting the ribcage up and you're gonna extend the arm out and straighten the legs out. So you're one on top of the other. How about your elbow?

What's it doing? Is it stretching out or can you keep your weight there? Very good, push away from the floor, just hold the position. Yeah, nice, good. And then bend the knees and come down.

Different, huh? Play with that a little bit. So go up in the mermaid and do that with your elbow. You're gonna see it's a lot harder to hold and a little more compressive, but with the idea of this alignment of the elbow right over that thumb, it actually connects you and it's easier to feel, all right? Let's do it two more times.

All right. Ready? Inhale, press up, straighten the legs. Good, feel the chest open, connect the ribs, enjoy the moment, breathe in and down. One more time and up. Good, feel your neck, the base of your neck and your face.

Enjoy it, having fun? Open the chest, it's that heart line that feels wonderful to open. Good and come down. All right, other side. Well, since we did some on the elbow, let's make sure we're even on our bodies.

So you want a long bent position and I actually think of the heels lining up with the buttocks here too, so that you're not too bent. All right, so coming up, good and down. Watch the ribcage, there's not side bending. The whole thing has to lift, connect through here, alignment of the head and it does help to engage the legs too, inner thighs and down. So maybe that's your exercise.

We're gonna do three with the arms up here. For the advanced people, check out your wrist and your elbow. You ready to go? Here we go. Inhale up, straighten the legs, connect the ribs, feel your head, breathe in.

Just like breathing it's that easy, huh? And breathe in and open. (inhales) (exhales) And last time breathing in, up and then rest, good and come around. And let's sit up again. Actually, you don't need your boxes.

You can just sit cross legged and face me, that'd be nice. So just sitting upright and just turn, bring your right hand across or your left hand across, right-hand behind you and don't push your twist, just be in a comfortable position. Actually, can you all look in line with your sternum? So you're gonna be looking more towards maybe the edge of this window. So I don't want you in a full twist yet, not with your neck.

I want your nose to stay over your sternum this way. All right, so feel both sit bones. So you're not leaning on one sit bone more than the other. All right, and then grow your spine long by lifting up through the front of the body without sacrificing the back, inhale. Now exhale, turn your ribcage a little further.

Don't overturn your neck. See if you can just turn your chest. It's gonna be very small, inhale again, lengthen and exhale, turning the shoulders. Feel like you're just turning your heart to the right and don't over crank your neck. One more time, inhale, exhale, turning the heart.

Good, and come back to center, other side. Now just sit for a second in the center. Can you feel the twist? Mm-hm. Yeah, so we don't need to crank on the neck to look behind us, okay?

All right, so go ahead and cross and pay attention to where's your nose. If you were breathing out, the air should hit your sternum. If you blew through there. It's a funny cue, but that's shows you where your nose should be and your neck. All right, so here we go.

We're gonna inhale, lengthen, exhale, and turn a little bit. Again, it's more like the hardest turning to the right. Inhale, lengthen, exhale, turning and you can just let the neck be easy and turn with it and again, inhale, lengthen and exhale. Very good, and then untwist nice and easy, very good. Okay, now come sit at the end of your mat with your knees bent and find a nice upright position.

So you can hold your knees and lift your spine up. Good, and I want you to make two fists and place them in between your knees here and then engage gently. So imagine your hands are like an egg, so you wanna hold it, but you don't wanna crush it and you don't wanna drop it. And you should feel when you do that, that there's a direct connection into the pubic bone area. All right, and we're gonna inhale here and exhale.

We're gonna start to roll the pelvis back, just your pelvis. Try to keep your shoulders over the hips. As your hips, move back, your shoulders will move back with it, but your shoulders don't lead. The pelvis is moving back until your arms are straight. So you should you feel that lower rib area again, and then inhale here.

Exhale, engage your egg and curl forward. Bring your shoulders forward, your nose over your pubic bone and then roll through your spine and sit up again. Inhale, exhale, start at the pelvis so the tail's curling under. The pelvis is moving back. The shoulders and the neck are just floating along with the pelvis.

Good, and then once your arms are straight, engage the egg, exhale, bring that over and come up and now bring your arms out in front of you. Same feeling in the leg. So even though your fists, aren't there, inhale, exhale, and roll down. This time, I want you to go a little further, allow the back of your head to move and float with it. So your eyes are actually coming down a little bit.

Don't go all the way down, just part of the way, and then exhale, come up, feel the lower ribs and then sitting up and again and rolling back. And then we're gradually gonna make our way down to the floor but not yet. We're gonna do two more, so just to the lower ribs, maybe. Hmm? Good, exhale coming up and lifting up and again, exhale to the lower ribs again, but not all the way down yet.

Nice and easy, let your head float. Don't tense your neck, good, and come forward and up. Sit up, all right, last one. Lying all the way down. Lower ribs, very slowly.

Roll through, bring your feet in. Bring your arms by your side, take a wide stance with your feet and allow your knees to fall in. So they're just resting on one another. Bring your arms up, palms facing each other, and then over cross your arms so you widen your shoulders. You can even just tuck your shoulders a little bit and let your arms just rest.

Feel the weight of your arms on your chest, relax your back and just breathe. Okay, and just rest and just stay there as long as you're comfortable, thank you. (students clapping) (Madeline chuckles) They weren't ready to clap yet.

Continuing Education Credits

If you complete this workshop, you will earn:

3.0 credits from Pilates Association Australia (PAA)

The Pilates Association Australia (PAA) is an independent and not-for-profit organization established by the Pilates industry as a regulatory body for control of quality instruction, member support, and integrity within all legitimate approaches to the Pilates Method.

3.0 credits from National Pilates Certification Program (NPCP)

The National Pilates Certification Program is accredited by the National Commission for Certifying Agencies (NCCA)

Comments

13 people like this.
These should be free and part of the membership fee.
5 people like this.
Loved this workshop. Thank you for giving us the opportunity to learn from these very distinguised instructors. It's priceless!
Thank you for your feedback Jessica. The folks in this workshop Paid $150.00 to participate live. This is a discount from what the normal rate of what it would cost to take a workshop with someone of the caliber of Madeline Black ($225 -$250).
It is the express interest of PA to offer the best in Pilates education when we can. I'm sorry we cannot do it as part of the $18 a month subscription fee. We hoped that $69.00 with unlimited access to view it, for as long as we are in business would, suffice for those who could not travel to see Madeline in person.
For those who chose not to view Madeline's workshop, we made sure they could still get to know her by offering several of her classes, including a few that were offered in her workshop, as part of the membership fee. Click here if you haven't had the chance to see them.
${"link_type":"url", "url_id":"730", "url":"//www.pilatesanytime.com/ins tructor-bio/24/Madeline-Black-Pilat es-Teacher", "title":"Madeline Black's classes on PA"
11 people like this.
I want to thank you for bringing these workshops to us. Not only does it save us money on the price of the workshop but also travel and hotel expenses.
You are most welcome Susanna. What you have said here is specifically why we started including the workshops. Thank you for sharing your feedback!
Ditto........
That is to say Ditto to Susanna.. well said.
3 people like this.
In addition to saving money, I'm able to get my cec's, at my convenience, when I have the time, and in the comfort of my own home. And can watch again for review.
You guys are as good as a commercial! I'm so glad you are happy! We have more great workshops on the way. Thank you all for sharing your thoughts here.
5 people like this.
It's nuts to think a workshop of this caliber would be free. I think it's fantastic to have access to this learing and education from the convenience of my home or studio. I had the privilege of meeting and visiting with Madeline and having a private session with her a few weeks back when in California. This is a wonderful opportunity. Thanks Kristen and PA
1-10 of 42

You need to be a subscriber to post a comment.

Please Log In or Create an Account to start your free trial.

Footer Pilates Anytime Logo

Move With Us

Experience Pilates. Experience life.

Let's Begin