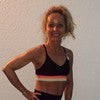
Description
About This Video
Transcript
Read Full Transcript
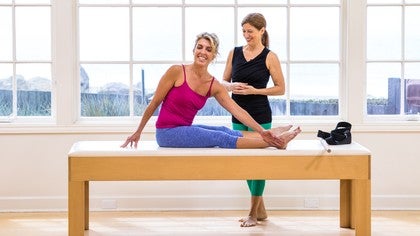
We're continuing on with our modifications and variations for osteoporosis. We'll be doing the sideline and sidekick series. If you could lay on your right side please. And I'm going to have you lay all the way down on your hand. Now, if it's, if it's available to you to lay like this with the shoulder, you can do that. Or if you need a pillow, certainly you can be here for the um, sideline position.
I want to take a moment to have you bend your knees and then because we don't have that much thoracic rotation in the program, I like to start with a little bit of rotation. So I'm going to have you lift your left arm up into the air and I want you to bend your right arm so that when you take it back like that again, this is where you might need a pillow. And we're going to just do a little bit of a book opening exercise. So we're going to look at the hand as you rotate back, keep the pelvis stacked and just, it's such a nice um, transition during the different exercises, allowing someone to get some safe rotation and then I'll reach forward [inaudible] nice. And then take it back up. And I like to think of the arm and the collarbones being in one being one bone and so that the whole arm is not leading the way.
So this would be the way I see a lot of people do it. So it's about the arm. I want it to be about the spine. So you always want to be able to see your hand and you want to keep aligned between your collarbones and your, your arm. Good. Okay. So it's just a nice little variation to get started. Now straighten your legs, flex the feet and then lift your waistline slightly.
And then I'm going to take my dowel and put it behind her back to make sure that she has the three points of contact, usually the rib cages forward. So I'm going to have you pull the rib cage back a little bit. There you go. And you feel the abdominals immediately. Once you get that rib cage in relationship to the pelvis, most people will feel that abdominal wall, um, set right up there. Okay, now you can take the legs back a little bit more even. So I like this neutral position and I know some people teach the sidekick with that. Um, 30 degrees forward, you know, with a little bit of hip flection.
But in my world, I am always trying to get more hip extension. We have 140 degrees of hip flection. We only have 20 to 30 of hip extension if we're lucky. And I always want every opportunity to work on hip extension. So I don't even really care if you do the forward part.
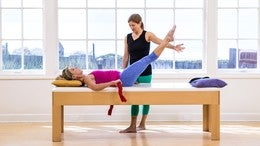
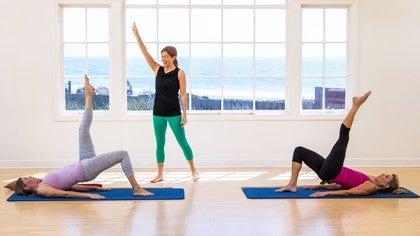
I want to do the backward part. So we're going to start there. So now you're lifting your waistline, you're pulling the ribs down towards the pelvis and then lift the top leg and just let it hover. And then I want you to take your leg back as far as you can without losing these three points of contact. Okay? So as she extends this leg, she's going to wobble and this is going to be really challenging for core control. So I'm going to give her a little help with their pelvis and I want you to press that leg back and then come forward and take it forward. Now in this position, you're probably not going to be able to go as far forward, especially if you're not holding that hand onto the floor. Now extend. You don't have anything back here to help you.
So sometimes I have people get against the wall if you're at home and a stick your leg into a doorway and then open the leg or go in front of Your Sofa and put your back against the Sofa and have your leg free to move back. So sometimes that helps with feedback. Yeah. Nice. So you can see the, the, the wobble and that's what I want. I want her to be working there to be able to stabilize. Okay. Now to get a little more control of the hip and get a more emphasis on hip extension. I'm going to have you come up to your elbow and then you're going to make sure you're flexing your feet.
Now the reason I want the feet flexed is if you're not too bow legged, then you're going to have your medial Malayalis lifted as much off the floor as you can. Um, she can, yeah, she's just like a quarter inch off the mat, ankle joint in a neutral position. I love this exercise. I feel like if you do one mat exercise a day, do this one because it does everything. It's, it's a neck stability, it's shoulder stabilization, it's core control and torso strengthening. It's going to work your hips, your hip extension and your ankles. So multipurpose right here. Now you're going to keep this lift of the rib cage off the pelvis. You know, make sure the elbow is just under the shoulder and you're not feeling any pinching or pain in the in the shoulder. And then if you want to put your neck, you don't have to put it straight out to the side.
You could do it this way if you feel more comfortable in the neck. Cause sometimes the neck is the deciding factor of the exercise and you can't continue cause your neck hurts, right? So now you put your neck in a comfortable position. Now lift the top leg and hover. And then let's take it forward in jet the hip [inaudible] and then reach it back. Now what I wanted to focus on, I'm going to hold her pelvis here and Christie, I want you to extend that leg back as far as you can. And yes, the glute fires up very nicely. And I want you to do that every time.
Feeling that lengthening in the front of the hip and fill it. That glute fire. Now the gluten fire because she squeezed it, the glute fired because she extended the hip. And that's why I think that people's glutes go away over time is because they never extend their hips. They're always in a flexed position. So you're taking it forward and then back. And then take it back and then pulse it back. Yeah, there we go.
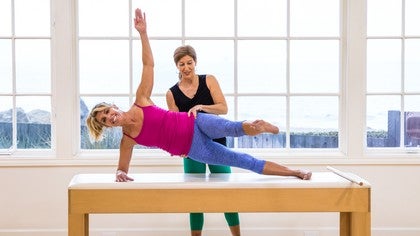
I'm really holding the pelvis really holding onto the abdominals so you don't let the pelvis move. The less movement in the pelvis and the more hip extension, the more glute firing. Excellent. That's great. You could add an ankle way to this exercise if you wanted more emphasis on hip abduction. Now are you okay here? Uh, we'll go right into the side lift, which I think of it is a variation of the side bend side bend is up on the hand, right? And you have a lot of spine side bending. But this one's going to have less side bending, but much more core control, much more pelvic stability. And I think this is such a great indicator for pelvic and hip strengthening, especially when people have arthritis in their hips. Maybe I've had a hip replacement or need one. Um, this is such a great to do with them.
Now I want you to see if you can lift your hips up into the air and I want to see that she's in a perfect neutral spine alignment. Pelvis stays neutral, hip stays open in the front. Ankle stability. This is not easy. There's a lot of joints that you're controlling here. Now take the arm up overhead, that's it. And now you're going to lower [inaudible] and take that. Keep the arm overhead. Straight vertical. It's actually easier to do this way.
So sometimes I help people by reaching over cause you have less leverage. You have more leverage and less weight coming down through the shoulder. Okay, now you're going to lower the hips about three inches. And then exhale, lift up, inhale to lower, and an exhale to lift pelvis. Forward Room's back a little bit. Head back a little bit. There you go. And then pelvis, lower and lift. Now hold there. And then lift the top leg and then back down.
Don't expect that you're going to be able to do this the first time you do this exercise. Lift and lower. One more time. Lift and stay. You can add the side kick. Now take it forward. Exhale back. There you go. And forward only one more and back. Place the foot down and lower all the way down. So there's your full body workout for the day. Good job, Christie.
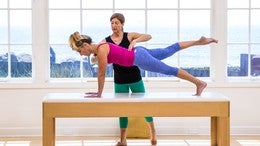
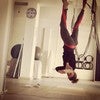
Our next exercise is sidekick kneeling, so I like to start that exercise from quadra pet. If you want to come up to all fours right now to get in her in her neutral spine position and then take your hand, your right hand and put it here in the middle of the table and then take your left leg and extended out. I'll make sure you don't kick the doll. Yeah, that's it. And I want to see that she can get in a pretty straight line as much as possible from her head to her left foot. And it depends on how long your arm is. Luckily her arm is long, so that's good. All right, now take your left hand and put it behind your head and then we're just working on getting everything in that one plane so that she's not in any hip flection and she's in that neutral position there. All right, now take the leg up, flex the foot, and then take the leg forward and then press it back and then forward and back. That's it.
So she can work on stability as well as hip strength with this and hip mobility as well. And then I like to pulse it forward a few times and backward one, two and back two and front two and back two and then she can take the leg to the side again, flex the foot. I like the foot flex because then you know you're not rotating like this. I don't want that to happen. I want the leg to stay in that parallel plane. So now take the leg up and pulse it. Boy, that really gets that gluteus medius and pulse it up, up, up, up. Take it back a little bit. Now pulse it up. There you go.
That's the part where she needs the work. How's the face and then come down. Excellent. And take it down and go into child's pose. Position, stretch. Wag your hips to the left. Oh yeah. And the right [inaudible] so you can kind of sit back on the hip there to stretch that to him. Gluteus medius work. There we go.
One of my favorite things to work with older adults is on the Gluteus medius. That is often weak and people that have poor balance or difficulty with walking. All right. Thank you.

Bone Health: Modifications for Osteoporosis
Mention
 |
Sherri Betz (Teacher) |
 |
CADM |
 |
Lauren McCarthy |
 |
Louise P |
 |
Silke L |
|
|
Deana |
|
|
mickey |
 |
Lisa A |
 |
Ira R |
|
|
Ronie Petter F |
 |
Molly Gillogly |
 |
Lynn P |
 |
Kimberley Michelle |
Comments


Fuchs, R. K., et al. (2017). "Physical Activity for Strengthening Fracture Prone Regions of the Proximal Femur." Curr Osteoporos Rep. 15 (1), 43-52.
You need to be a subscriber to post a comment.
Please Log In or Create an Account to start your free trial.
