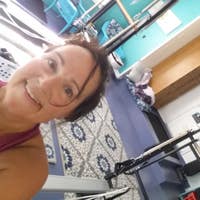
Description
Even though this is a prenatal workout, it is great for anyone. She does offer modifications for pregnancy if they are needed. If you are pregnant, we recommend consulting with your physician before starting a Pilates program.
About This Video
Transcript
Read Full Transcript
Hi I'm Courtney Miller and I am so excited to be here with you today on Pilates Anytime. I have a special workout and I've got some special news. I'm pregnant and I'm almost six months pregnant. I have continued my pilates workout all the way through my pregnancy and physically I'm feeling great. I would say that my biggest change that I've experienced in the last six months has just basically been emotional.
The way that I feel, the way that I feel about the world, myself, my partner, my body, and it's been great actually, it's been a very cool process to help me grow and evolve. So I wanted to take all of those transformations that I've been going through and relate them to pilates. For me my body and my mind are so closely connected and I've been doing pilates for such a long time that I feel that when my emotional state is a little rocky I can remedy that through pilates but I also feel that when my body is maybe not moving as well as I'd like it to it could have to do because of my emotional state. So I've come up with a series of videos that I'm gonna be filming for you here on Pilates Anytime to take you through your journey of pregnancy if you're following with me, that are going to help you grow, hopefully physically and emotionally, maybe process some things that are happening in your body or in your life, here on the reformer or on the mat and hopefully again those help you in everyday life so I wanna plant seeds that will continue to grow with you and help you even after the session is over. The theme for today for this workout is strength, and what I mean by strength is not power, it's not that I'm trying to power through life or force things.
For me, power means having an inner strength and having an inner passion and being focused and being very committed to my goals and I do have certain goals throughout my pregnancy and I also have goals that I want to achieve in being a parent and se having the strength to be able to see those through and that's what this workout means for me. Whether you're pregnant or not, I think you're gonna enjoy this workout so I will be making modifications for the pregnant body of course, but you can continue with me whether you're not pregnant or post partum, a lot of these exercises will work for many body types. The prop I'm using today is the ball, so if you don't have one, you can use an arc, you can use a bosu, maybe even a wedge or foam roller. It's to stop me from lying flat onto my back. Since I am in my second trimester, I'm not exercising in a supine position.
The foot bar's in mid position and locked in and I have my footwork settings on less one spring. So normally I like to do foot work on three reds or if I'm feeling extra strong, three reds and one green. I have two reds on, okay, so placing the ball on and coming into a seated position. Now I'm gonna need a little bit of room behind me so I don't want the ball all the way up against the shoulder blocks. You'll play with it and find the right spot for you.
I think right about there is gonna work for me. As I lie down, I want the ball to be in a supported position so what I mean by that is I wanna feel that my abdominals are working in this position to help hold me up but more so I feel support. I don't feel like I'm only working my core, that the ball is offering me a little bit of assistance to hold this flexion, so for me, this is the right spot. Taking the feet up onto the foot bar, I'll be working in a pilates V to start, heels together, toes apart, hands down beside me, eye line forward, knees are shoulder width and sacrum is heavy. All the good things you know and love.
Inhale to press, finding length through the front of the body, exhale to pull. Inhale to press, exhale to pull. Now one of the great things about this position is I'm able to see my knees, my feet, my hips, my abdominals so I can self-correct. So I encourage you to do that. If you're noticing your ankles are dropping when you press out or perhaps you're not straightening your legs all the way and feeling that connection between your adductors, you can see it and now you can fix it.
Let's add something with the arms as I press out. My arms will lift up. Now if you feel that lifting up sensation is a little too much work for your core or maybe your neck, then keep your hands back down. Exhale, press out, and pull in. I'll do about 10 repetitions per variation.
Of course you can modify by reducing the reps or increasing them, whatever feels best for you. Taking the arms out to a T. And squeezing them back in. So my core is working to stabilize this shape. But again, the ball is helping.
Tailbone is heavy. Three more here. And pull, two. And one. I'm really trying to find this connection between core and arms and legs in this series.
I've just separated my heels so now I'm in a parallel position. The heels will be lifted high, press all the way out. Now to be clear, my heels are only lifted as high as I can stabilize alignment through my big toe and baby toe, so don't lift your heels so high that your weight shifts to your baby toes. Knees traveling right over the mid feet, pressing out. Pulling in.
So each time I draw my hips towards my heels, I think about an engagement through my abdominal muscles. And now more than ever I'm very conscious of this three dimensional contraction so that's compression through the front, through the sides, wrapping all the way around through the back. I'll be adding something with my arms, one arm will lift and it'll circle to come back in. I'm gonna stay on the same side, so not to overcomplicate things. So pregnancy brain happens, right, let's just stay on one side.
Reach and hug. Two more this side, reach, hug, reach. Switching sides, so reach out as the arm comes up. Circle, hug towards the mid line. Inhale, exhale.
Reach, and circle. Trying to move the arm without allowing any tension to creep up into the neck here. Moving the arm as if you are swimming through water, creating resistance. Knees traveling over the mid feet. Last two.
And one. Pressing out, taking the hands behind the head, lowering the heels, and allowing the upper body to drop back, nodding the chin towards the chest, lifting the heels high. A little bit of core work, finding that length. Just let the upper body drop onto whatever it connects to, so I do have those shoulder blocks for some support. Four more, heels down, chest down.
Nod the chin. Three. Two. And one. Coming all the way in, great job.
Taking the heels on, feet hip distance apart. Anytime you need to adjust the ball, just go ahead and find a better position for you. I'm gonna start with the hands down again, gonna come into some single leg presses. Beginning with the leg extended straight, press all the way out and I'm only gonna do five reps per variation here. (exhaling) Hips are staying square.
Adding my bicycle. You can plant or flex or adjust your foot if that's more comfortable for you. Last two. And one. As you come in, make the switch as smooth as possible.
Now you may notice one side, it's a lot easier to stabilize on, certainly is the case for me. So trying to find that symmetry. Adding your bicycle. Three more. Last time.
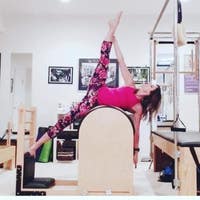
And coming all the way in. Now you can repeat additional sets of those or you can move on with me. I'm gonna use the ball as a head rest so just place it right on top of the head rest. Reduce my spring tension so I only have one spring on, and the spring color I have on is a blue. Coming into a side line position, feet and legs under the bar, head comfortably onto the pillow, legs extended long.
So in this position hips are square, as are the shoulders. I've got he strap in my hand, my arm is extended straight out in front, my bottom hand could be on the silver peg or another position if that's more comfortable for you, and I draw the arm down by my side. Inhale as the arm lifts up, exhale, to pull down. Now the great thing about this series is I'm not supine so there's really no modification here, and I'm engaging more through my abdominals and through my obliques because I'm holding up the weight of my legs. Awesome, I don't feel my hip flexors gripping.
Mostly I feel my obliques and my upper body working. About eight repetitions per variation here is ideal, although you might build as you continue to get stronger. Flip the palm back, reaching the arm forward. Now as the arm travels in front of me, I actually feel more core than I did before. The reason being is as the resistance goes forward, I have to tighten my abs op oppositionally against it to keep my spine straight and neutral.
Another trick here is to allow your top leg to be heavy, so your bottom leg has to work harder to hold it up. This is going to work your inner thighs a little bit more. Adding a circle. Now this is the same type of circle you would do if you were supine. So the positions are like this, you pull back, flip the palm, lift up and then keep the carriage stable as you draw down.
Pull, flip the palm, lift up and stabilize the carriage as you pull down. One more this direction. And reverse the direction so go forward, keep the carriage stable as the arm lifts, squeeze and draw down, palm points back, arm forward, carriage stable, squeeze, flip the palms, keeping the collarbones wide here. Gaining strength from the back body. Even though the strap is in the hand, pull from your back muscles.
Last time. Flip the palm, this time drawing the arm back. Bending your elbow and exhale, straightening your arm. Now a simple modification here if you're feeling like this is too much in your core, maybe too much in your legs is to bend your bottom knee in. By bending your bottom knee in, you create a wider base of support so you may feel more stable and more comfortable here.
Keep your elbows glued to your side, but pointing toward your hip bones, and on the next one we'll straighten the arm. And come all the way in. Now keep that strap 'cause you're gonna need it and help yourself to rise up. If your ball rolls away, that's okay, we'll get it later. The strap is now gonna go into the top foot.
I'd like to be clear where the strap goes, so not close to the toes, not at the high arch, but as close to your heel as you can get it, okay, and then the leg pulls back. Now two reasons I'm in this propped up position. Inhale the leg sweeps forward, exhale back. The first one is I really want to work on my upper body strength throughout my pregnancy. I don't do a ton of push-ups and planking because it just doesn't feel as good on my wrists as I'd like it to but this modified position being onto my elbow and forearm is almost like being in a side plank position, so I feel my shoulder girdle working, which helps me to connect through my obliques on that side.
Awesome, and of course I get that great booty work too. Let's draw a circle now. The other reason I wanna be up in this position is I really wanna challenge my ability to disassociate the movement of my leg with my hips and pelvis. Now if you're feeling pain, maybe there's some sort of SI dysfunction, SI pain. Perhaps lying down and having more support will help you.
Reverse. For me, I don't have those symptoms so I wanna stay strong in my seat, strong in my back and by staying propped up like this, I have to stabilize against the resistance. Using all of those muscles I just mentioned. Two more here. And last one.
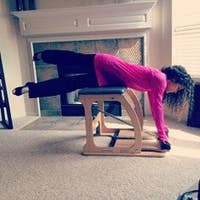
Now I'm not done yet. Place the foot onto the ground or a stable surface and come into a four point kneeling position. Your stabilizing knee will not necessarily be centered in the carriage. Instead, your stabilizing knee will be centered so that your knee is underneath your pubic bone. Hands onto the shoulder blocks, abs engaged.
Exhale, sweep and lift the leg up. Now what's important in this position is that I'm able to maintain my shoulders behind my hips, so I'm not leaning to one side. I'm trying to create length from my hip bones through to my ribcage on both sides. Inhale. As my leg sweeps down, it's going slightly out to the side.
Two more like this. I love this challenge because I really have to stay engaged through my core to avoid extending or flexing my spine. Placing the foot down on a stable surface. Also, working the posterior chain of the back body during your pregnancy is a really wise thing to do. I'm gonna come down onto my elbow and forearm on one hand.
Do you see how it was the original hand that I was on? So it's the opposite elbow to leg. My other hand will stay up onto the shoulder block. The leg will lift again. Now in this position, I'm rotated through my hips and through my shoulders, but they're rotated to the same degree, okay?
So my shoulders will open, as will my hips. My leg will continue to lift up, open wide to the side and come back down. Up. And circle. So trying to create that length again and maintain that length from the hips to the ribs, very challenging.
I love this 'cause I really get a sense of opening as I circle. Two more. I also feel my stabilizing glute a lot. And last one. And take it down.
It's rare in life that we get the opportunity to create that circular type movement at the hip so I think when you can do it, you should do it. Now before we continue on the other side, come up so your knees are against the shoulder blocks. Take your hands onto the wooden rails and walk yourself all the way up to the risers. Sit your hips down. Opening your knees if you need to and just allow this decompression to happen, I'm just gonna rest down on the ball, let my head drop, breathe into my back and sides.
Coming into a neutral diagonal, and pulling my chest forward and back. (exhales deeply) Each time I pull my chest forward, I'm thinking about deepening my abdominals. I'm thinking about drawing up through my pelvic floor during the pull, but I'm also practicing a release through the pelvic floor, when my elbows extend. So again, strength without rigidity is not what we want, in life and it's not what we want through pregnancy. So we have to be able to contract our muscles when we intend to and relax our muscles when we need to.
Last time here. (exhales deeply) In order to get yourself back, you have to walk it back. Don't go crashing in and come all the way up. And we'll start the same thing from the other side. So we've sort of progressed from side line up to our lounge position to four point kneeling and so on, so here's the strap.
I use the ball as a pillow. My legs are extended along, under the foot bar. Ideally my hips are square. I still have the ability to draw those ribs in and up so as long as I can, I will. Top arm to the ceiling, exhale, pull, down to my thigh.
Now hopefully from this angle you can see what's happening to my back. As my arm comes up, my neck stays long. Exhale. So I have to think about squeezing my armpit as I lift. Now I'll show you what it would look like if I did it incorrectly.
That's me allowing the tension to move my body, when instead, I'm using my muscles to move my body, not the springs. The springs are making it harder (chuckles). Exhale as you pull straight arms, straight wrists. This is also an excellent time to think about that wrist alignment, guys, because it's quite often to have issues in the wrists during pregnancy because of that relaxing hormone and additional weight. So here's an opportunity to keep the wrists strong and long and strengthening.
The arm goes forward, exhale. So as the arm goes forward, if you remember, I said it, it's a little bit harder to stabilize. As my arm moves away from my center line, I have to work harder. This is a great opportunity because as our bellies continue to grow throughout pregnancy, our center of gravity shifts and we have to work harder to stabilize and to balance. So this is a great training tool.
Let's practice our circles. We pull in. Flip the palm, lift the arm so that it's about above the shoulder, arm goes forward, carriage doesn't move. Flip the palm, stay long through your neck. Arm goes forward.
Can you relax your neck into the ball, so just sort of release into it. The work here is in the back body. Squeeze your inner thighs together, thinking about your top leg being heavy and your bottom leg doing the work. I'm reversing now, going up. Pulling down, flipping my palm back, straight elbow, straight wrist.
Flipping my palm back, lift, pull. Think about the why behind all these exercises. So keeping this postural muscles strong, bending your bottom knee in to modify, tricep extensions. It's gonna become so needed as we continue to, our bodies continue to change, we get larger through the belly, but also post-partum too, if you choose to breastfeed in that position, but even bottle feeding, you're so flexed forward in a slouch so staying strong in the back is gonna be so important to help alleviate back pain, neck tension. Last time.
Not to mention just the functional aspect of picking up all your baby gear, which is not light. So here I am now up and onto my elbow and forearm. Strap goes into my top foot. Closer to the heel, then to the arch or the toes, leg extends long. Now here's another opportunity to see, so the reason I'm propped up like this, two things, one is so that I can really engage through my upper body and back as if I were in a plank position right now.
So I'm trying to stay strong in my shoulder, long through my neck, working those obliques. (exhales) The other thing I'm trying to challenge and strengthen is my ability to keep my lower back and my hips stable against the movement of my leg which is something that I'm gonna need to do throughout my pregnancy, throughout life so not to aggravate any issues that could arise in the low back. We'll do two more here. And transitioning to circles. Now these circles are more of an oval.
The accent of the circle is definitely the forward and the back, not the up and down. Strong seat is so important, reverse. To help balance your posture throughout your pregnancy. And like I said this workout is great for many populations, those people who sit a lot for work. This is also a great exercise.
Create some strength in that tuckus. One more. And come in, you may notice that one side feels more challenging than the other. I certainly do, so maintaining that balance is, again, another important factor of having a functioning body, pregnant or not. Knee is underneath my pubic bone, my center line, and my hips are behind my shoulders.
Elbows are soft, the leg lifts up. I'm trying to stay as lifted through my belly and long through my lumbar spine as I can. Inhale, sweep. Exhale, up. In addition to creating a strong back body, I'm also trying to create length.
Mostly in my torso, so I'm thinking about the space between my ribcage and my pelvis elongating. And the reason I need that space is, I'm accommodating a person (chuckles). Inhale and exhale, pull. As well as all my organs that are shifting and moving. Side note, if you need to use the restroom at any time, do it.
Exhale, pull. Last one. Exhale pull. Awesome, put the foot down on a stable surface. You can readjust for the next series.
So I'm using my opposite arm to foot in strap and I'm placing the elbow on a forearm down, back to that same position I was in earlier. My shoulders and my hips will rotate. So I'm in a rotated position as the leg lifts. The hips and shoulders stay in a rotated position as the leg circles up and open down. And open down, really feeling a sense of stretch and opening through the front of the hip.
Strength through your stabilizing leg. Stability through the torso, two more. And all the way down. Take the foot off. Come to your kneeling position.
Knees against the shoulder blocks. Walking yourself forward. Hands are on, hips are back, so just let it stretch you for a second. Let the shoulders widen behind you. The head can drop.
Breathe in into the back and sides. Rebuilding the spine. So here I am in a long, neutral position. Now our last set, we did a narrow row. If that felt right for you, continue.
On this set, I'm gonna angle the elbows slightly wider. I can even adjust my hands to the tops of the risers if that's more comfortable for you. So just targeting a different area of the spine. I have to work to pull those ribs up. Inhale, stretch.
Exhale, pull. So again, here we go, ready, strength to pull. Resist to come back. Maybe we can even drop through the pelvic floor elevator. Resist to pull up and then feel a sense of release in the pelvic floor as the arms extend.
Last three. Two. And one. Now to get home, don't come crashing in, walk it back. And rebelt.
Awesome. I love those riser pull ups for so many reasons but especially right now they really help to create the sense of opening through my wrists, through my elbow, through my shoulder. We're gonna continue to work our four point kneeling position, walking the knees back. So now I'll be taking one hand onto the head rest and my preference is to take my hand to the side, so I can squeeze my fingers in and up to the head rest, just like I would on the foot bar. Versus flat hand.
My opposite hand will grab ahold of the strap. Now if I want more tension, I'll walk my hand up the rope. But I'm actually gonna be pretty happy right here at the strap where the metal component meets the rope. I think you will too. Again what's important is that my hips are directly behind my shoulders, so if you have to walk your knees slightly over to the right or left, then do that now.
Finding your four point position, we'll be doing a second set of circles, this time a little different. I pull the arm up. I go out to the side and into the body. Circle and down. Trying to move my arm without creating any tension in the neck.
Focusing on the back of my arm, my shoulder and my strong back and postural muscles to initiate. Reverse the circles in and around. Now the other benefit of being in this position is the four point kneeling challenge. Two more. One more.
And take a break. Now if you need to modify the position because of your wrists, one thing that I like to do is place my elbow against the shoulder blocks. You can see here that I'm helping to support my body weight. Stay up if you can, modify by coming onto the elbow. Excellent.
Continue to hold on, we're gonna add on. I'm gonna integrate some lower body work here. Now this is advancing the exercise so I'll show you how to start and then I'll show you how to advance it if you choose. Elbows up by the side, neck is long, ribs are drawing in and up. Exhale to extend at the elbow.
Inhale to bend, so this is your starting place and feel free to continue here. If you feel comfortable and you wanna advance and add on, if you're a strong pilates practitioner, then we can exhale to reach the opposite leg long with the arm and inhale to tap it down. (exhaling) The foot's going over the foot bar. And in, two more. And in, one more.
And down, excellent. Take a break if you need it. Head on over to the other side, we've got to even out. Knees are underneath the hips, hand on. So let me show you that modification again, option one, shoulder over wrists, soft bend in the elbow, fingers squeezing, option to rest the elbow down onto the shoulder block.
Makes a huge difference. Abs engaged, so avoiding this position. Avoiding this position and doing your best to find your neutral alignment. For me that means thinking about dropping the tailbone a little bit, circles, exhale, pull. Open and around.
(exhaling) And pull. And pull. Really finding that control during the circle. One more this direction. And reverse, squeeze in.
As I squeeze my arm in, I try to tighten my tummy. Go wide, circle into the body. Three. Two. And one.
And coming in, taking a break if you need to. I encourage you to keep a strong connection with the why behind everything that you do in this class, okay, as I do it, I think about the strong back I'm gonna need later on in my pregnancy as I continue to get larger. I think about the strong back I'm gonna need when I'm breastfeeding or nursing my baby, or the strong upper body and back I'm gonna need to lug all the gear that comes with the baby. So that's motivating me and I'm kinda thinking about having awesome, toned arms too, but, just a little bit. Okay so here we go, second set.
Elbow up, exhale, straighten the arms, so this is your option A. Adding on the opposite leg will lift, not the same, opposite leg lifts. And the knee can either plant or just tap. Foot over the foot bar and in, three more. And in, two more.
And last time. (exhaling) And all the way in. Very nice, comfortably come off and carefully step into your well. That's this section here. Now I haven't changed the resistance, so I still have that one blue on.
I'm gonna stand towards the back of my reformer. The more narrow I am with my feet, the more I'm challenged with my stability. So starting position would be hip distance, and standing wider would be a modification. I'm hip distance, reach forward, grab ahold of your shoulder blocks. Now the further back you can get, the more range of motion you'll be able to feel, so I like to scooter back a little bit once I'm in the position.
Now, rounding the back, flexing the spine, and allowing the carriage to move forward. I'll be using my abdominals to pull the carriage towards me. And my abdominals to control it back out. Three more like this and I'm gonna add a little more complexity. This is standing abdominal work.
I am pressing into my feet. I'm trying to keep my hips over my feet. And I'm trying not to dominate with my arms. Let me show you what it would look like if I just pulled it with my arms. See the difference, trying to pull off my abs.
So adding a little more movement with the spine. My knees will soften, I press down onto my hands and I try to get a little bit of thoracic extension. And then as I exhale, straighten the legs and pull with the abdominals. Inhale, find your length. Exhale, scoop.
Three more, inhale. I'm thinking about my shoulders dropping down toward my thighs. Exhale. Inhale, sit bones widen. One more, inhale.
And exhale. Good, lengthen out. Hold this position. If you'd like to adjust your hands, you can. And exhale, pull the carriage towards you.
Now just pause for a moment. Find your weight a little more into your heels than into your toes, lift your ribs up so you're not over arching through your spine. Arms extend but shoulders don't collapse. Let's pull in eight times. So I'm trying to lean back a little bit here into my heels.
And pull, these are similar to the riser pull ups we did. Except now my body is stationary. And I'm feeling some lower body working too. Last three. Keeping the collar bones wide.
Two. One. And up. Well done, rebuild the spine and lengthen to come all the way up. So don't forget about the importance to stay strong through the abdominal muscles.
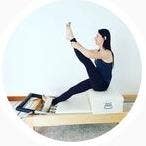
Strong and supple. I'll be leaving my single blue spring on so I haven't changed the springs as of yet. Only for foot work. Here's our ball again, put it right there. You'll come into a seated position, facing towards your risers, and your feet will be onto your head rest.
Now first make sure that you've got some room behind the ball. So it's not at the edge. Taking the feet into a comfortable position to start and grab ahold of your straps. Now just like before, I'll be using the ball as a little support. So we're allowed to lean on it but a little bit, okay.
Keeping the abdominals drawing up, C curve position. Straps are in the hands, feet are heavy. Now if you're feeling that this position, narrow knees in parallel is just not right for you, then I encourage you to play with exercise positions, so this is another one I like. Feet up onto the shoulder blocks, knees wide, allows me to really open up through my hips and I still get the benefit of the exercise. Why don't we do some in the starting position and we'll transition here if you'd like to.
So taking the arms forward, exhale to a T. From a T position, one arm lifts up, the other goes down. Come back to your T. The opposite arm lifts up, come back to your T and bringing the arms forward, so we're getting strength and endurance through the backs of the shoulders. Lift, center, lift, center.
And close. Open the arms to a T. Windmill. Windmill. And close.
One more time, take the arms to a T. Windmill. T, windmill. T, and bring it all the way home, it's a lot of work. Adjust if you need to, we're going to be going backwards, so I moved forward a smidge so the ball's more supportive.
Lift the arms up. Allow the spine to arch back. Nod your chin towards your chest and exhale, come up. For me, moving my thoracic spine is like heaven, it's what I need to do. So if this doesn't feel right for you, this is where I'd like you to go and come back down.
If you feel like extending the spine feels good, you can do it. Nodding the chin. The nice thing is, these straps are helping me, it's not as hard as you think. Arms up, the straps support me as I go back. Nod the chin.
And the straps support me as I come up one more time. Arms up. Waterfall over the ball. Nodding the chin towards the chest and exhale to come up. Good, let's try that other leg position, so this is what I said in the very beginning, I'm in turn out with my legs, my feet are heavy, I have the support from the ball.
It's actually really comfortable, I can hang out here for awhile. That's me just hanging out, okay, so that's really not what you wanna look like. Be up into your C curve position. We only have a few more reps, we can do it. So we practiced our Ts earlier, let's go back there again.
Now last time we did diagonal, we're not doing diagonal anymore. We're gonna go up to the sky, back to the T, and forward. So again, endurance and strength. T, up, down, forward. If you don't like this leg position, go back to the first one we were in.
Up, T, and forward, two more times. (exhales) Up, T, and forward, one more time. T, up. (exhales) And forward, good. If you need to help yourself with your hands, do so, and come all the way up to a seated position.
Hopefully your arms are feeling pretty good. Your core should be as well. Let's change focus a little bit. I'll be adjusting the spring tension to slightly heavier tension, so I was on a blue before and now I'm on a red spring. Now you can feel free to leave your foot bar exactly where it is, where we started mid position.
I'm gonna be moving my foot bar up to high bar position. I like doing elephant and long strength in high bar, especially now that I'm pregnant. I feel like it takes away some of the tension from my wrists, but you can change that for you. Hand, hand, foot, foot. Safely coming onto and off of the reformer.
That's a little more important now that we're pregnant because our center of gravity is a little bit off. Fingers are wrapped. Now for the wrist alignment, the wrist crease should be right towards the top of the bar and the fingers squeezed. So that's the ideal alignment that I'm in right now. But I do see this a lot and this is incorrect because of the compression that it's putting on the wrist.
Now if you have a healthy wrist joint, maybe you can do this position, it doesn't hurt you. But throughout pregnancy we have to be even more conscious of creating this long line, so let's start good habits now. Squeeze the bar and wrist creases open. Rounding the back, now there's two things I have to do to round my spine. One is tighten my upper abdominal muscles, so I'm drawing ribcage up, head down, and widening through my shoulder blades.
The other is dropping my sacrum underneath me and tightening my lower belly, pulling my hips and my pubic bone towards my sternum. Maintaining that position, exhale to pull my feet forward. I tighten the lower belly and try to curl my tail through my legs, okay, so great lower abdominal work here. Inhale, press. Exhale, pull.
This should not feel like upper body. Now the range of motion in this series is not typically very large. Since the accent is the core work and the accent is the pull. However, if you'd like to go a little bit further because you feel that calf stretch is amazing, then go there, okay, so opening up through those calves, really gonna help with potential cramps and tension in the back, in the hips. So if going that extra six inches is gonna feel right for you, I say go for it.
Inhale, press. Pull, one more time. Inhale, press. And pull. Starting from your tail, heels lift, begin to articulate, into your plank position.
This is why our shoulders and our wrists had to be in proper alignment. Maintain your upper body position, point and flex the feet. So again, creating circulation through the calves will help to combat against potential cramping. This is nice work through the abdominals and upper body as well. We'll do two more here.
And one. Starting from the head, scoop, and come all the way home. If you need a break, now would be a good time to pause and take it. Stepping off to one side, one foot staying lifted, the other foot coming onto the floor. Take a moment, take a stretch.
Now this is another reason why I like the bar in high bar position. For me, being in a lunge really helps to open up through tightness through the front of my hip. So the more vertical my spine is, the more I feel that opening. What I don't feel is compression in my low back. However, if you're feeling compression in your low back, either move the bar down a notch or know that in your lunge position, you can actually tilt forward a little bit.
So I would call this a neutral diagonal forward. You're not slouching, but you're just creating a little more length. From our lunge position, we'll squeeze the bar, bring the carriage in, lift the hips up and come back to our round back elephant, single leg. Tap the foot on, square the hips, plant the foot. And go back to your lunge variation.
Foot comes on. And toe ball heel to come down, three more times. Notice how my weight shifts back over my legs. Two. And one.
(exhaling) And go back to your lunge and let's just stay here for a second and maybe stretch, okay. So if that exercise felt good for you, you're able to activate your core, feel how you had to round evenly through your spine, so tailbone and upper back. Then you can continue with me for the next progression. But if you felt that last series was challenging, my suggestion to you is do one more round of it so you can really feel it in your body. So I'm gonna go to the next progression, but you're welcome to repeat the last series we just did.
Back leg lifts up. Now for the next one, I'll be shifting forward. So my shoulders will come over my wrists like they did in the calf raises we did and my lower leg will bend, knee to the side. Like this. And I place my foot down.
And I'm actually resting my knee on my elbow as if I was gonna do an arm balance. Exhale. And inhale. Three more. And down, two more.
And down, last time. And down. Both feet come on. Before we go to the other side, let's do another series. I just really want you to feel how that cardio plank series is connected to your elephant in your long spine.
So fingers are wrapped, spine is round. Focus on the tailbone dropping down and under, the ribs coming up. Inhale, pull. Let the head and neck decompress. You have permission again to let those heels go a little further.
If you feel that calf stretch is like amazing. Like as good as pineapple is. Isn't pineapple so good when you're pregnant? Three more. Two.
One. Roll, shoulders over wrists. Flex and point. So I'm holding my upper body in a strong position. Tailbone heavy.
Resisting. And pressing. So I get both work and length. Two more. And one.
Round the spine, bring the carriage in. Now would be a good time to take a break if you need it, walking the feet over to the other side, I come into a high half toe position and plant my foot down. Good, if you adjusted your foot bar on the other side, go ahead and do that now. Hips are square, tailbone's heavy. Notice where your foot is right now.
Where your foot currently is on the floor is where it should be each time you land. If when you land, your foot starts to migrate back, and you look like this, I'd like you to fix it. Toes towards the front of the reformer. This is your lunge position. From lunge, round the back, place the foot on for a second and square the hips.
Tighten your tummy, shift back over your legs. Toe ball heel, lunge. And take it down. (exhales) What's working to get me up is my abdominals. They're flexing and I'm scooping and that's what's bringing me up, in addition to the springs.
Two more. One more. And down, lower the knee if you'd like, take a break. Find your breath. Let it all open up, life's good.
So if you'd like to repeat that again, now would be the time. Focus on contracting by pulling low belly towards the chest. If you're moving forward, let's go. The sooner we start, the sooner we're done. Squeeze the foot bar.
So what I want you to notice is that there's a shift forward on this one, my shoulders end up over the foot bar. My shoulders end up over my wrists. My leg lifts and it comes to the outside of my elbow. When I'm in the lunge, my shoulders are behind my wrists. So I'm upwards.
And down. And down, three more. Up, hold, and control. One more. And take it down, take a break, take a stretch.
Get some water, hydrate, and we're gonna continue. Now I'll be changing my spring tension. I had a red on if you remember. Now I'm back to a blue. It's kinda where we were for the majority of the class.
I'm gonna leave my foot bar in the up position as well. You could put it down a notch, but this is gonna work nicely. Carefully come to a kneeling position facing towards your foot bar. Throughout pregnancy, as our belly goes forward, our center of gravity shifts, so exercises that may have felt stable like kneeling or standing on the reformer begin to lose their stability. So I'd like you to think of some strategies so you can continue along in your routine.
What I'm gonna have you do is a proposal position, or a lunge position. If you're sensitive in your knee, you'd wanna put something underneath your knee like a thin pad. A thick pad will make your balance more challenging, okay so a thin pad. You can use the shoulder blocks to help you. I split one leg back, so my foot hangs off.
The other leg comes forward so my toes come off and I rise up. Now the great thing about this position during pregnancy or not, just as a stabilization support, is that I no longer have this fear of falling forward. So I'm not gonna fall forward in this position. What is challenging is my lateral balance, so I feel a little wobbly this way, okay. You can do it though.
We're strong, this is strength. We can do it, we're determined right, we're passionate. So reach back, grab your strap. I grab the strap of the leg that's behind me. My opposite hand is on my thigh.
Exhale to reach forward, flip the palm. Now I wanna come into a diagonal forward here, closing my ribs. I bend my elbows so that my thumb is right beside my shoulder. Press into my front heel, this helps me to trigger into these guys here, my glutes, and exhale, superman, single arm. Inhale, resist to come down.
Again, finding that place of strength without tension so I'm not letting my shoulders come up by my ears. (exhaling) This is also a time where I feel width through my sit bones, pressing down through my front heel, I'll do three more. Two. And one. Keeping the arm up and coming back towards a vertical.
Bend the elbow, stay lifted, exhale, press and extend, we'll do five of these. Here we go, two. Three. Keeping the elbow very still in space. Four.
Five. Come through your superman, use the foot bar to help you and hook up the strap. Here's your transition. Hands come on, both feet come forward now. My toes are hanging off, my feet and my toes are gonna be active.
Remember your wrist alignment position, not here. Squeeze using your hands, it's a light spraying so be prepared for that. Press out. Shoulders over wrists. Bending the knees in and exhale, pressing out.
Now what I'm really trying to feel here, again, is disassociation, I'm trying to extend my hip or straighten my legs without changing the position of my back, specifically my low back. Two breathing patterns that might work, one, exhale to pull, inhale to press. Or, exhale to press, inhale to pull. I want you to find what feels best for you. Three more.
Two. And one. Bring the feet and the carriage in. Maybe you wanna round the back. Now whichever leg was back before stays forward, so now my right leg is staying front and my left leg is going back.
And that's how I can transition to the other side. I can use the foot bar to help me as I rise up. Remembering that my challenge, my stability is most challenged laterally, so I'm gonna lean forward a little bit, press into that front heel. Tighten tummy, tighten my seat. Press into my front hand, bring the arm up, flip the palm thumb to shoulder.
Neutral, diagonal, forward. Exhale, push. Inhale, bend. About eight to 10, again, not only are we creating strength but we're finding balance as well, rebalancing left to right. It's so common that because of habitual overuse, we find ourselves being pretty asymmetrical, so here's a chance to create more balance, left to right so we're moving more efficiently.
Less likely to injure ourselves, three more. Two. And one. (exhales) Rise up. Exhale, press.
Keep the elbow pretty stable. Press into your front heel. Last two. Last one. Come through.
Use the foot bar, hook the strap, come on back up, feet forward. This time I'd like your feet and your pelvis to rotate on a slight diagonal so think about the front corner of your foot bar. I'll be having feet and hips towards that left side. Squeeze the foot bar, bring the belly in and up. Find your long position, knees in, knees out.
Remember, use the breath pattern that helps you move with the most efficiency. So you should feel strong, stable. About five to eight repititions, pivot the feet, inhale. And press. Finding that stability, head, neck shoulders, hips.
Three. Two. And one. Coming through center, bringing the feet forward and the carriage forward. Walking the feet back.
If you have a carriage, or excuse me, a foot bar that locks in, you can lean back. If your foot bar doesn't lock in, you can't lean back. Bending one knee. I even like to grab the opposite shoulder block. Bending the knee, grab, twist.
When you're ready to come off, come off carefully. You might be a little bit more wobbly than you think. Because you just had a killer workout, right? So, my theory is that delivering a baby is going to be like running a marathon, and I would train for that marathon. I would train for a long time so that I was prepared to succeed and that's what I'm doing right now with my body in pilates.
I'm trying to create that strength that's gonna help facilitate my labor. It's gonna help keep me strong postpartum as well. But remember to continue to watch these videos and continue this journey with me because it's not all about strength, this is one component of the whole process. So here's an excellent workout, focusing on one element, but there are several others that we will work through together. So join me for my next video.
Thanks for watching.
Prenatal Pilates: Second Trimester Reformer Workouts


Comments

Congratulations!!!!!!!


You need to be a subscriber to post a comment.
Please Log In or Create an Account to start your free trial.
