Description
About This Video
Transcript
Read Full Transcript
Hi, I'm Courtney Miller, and I have a class planned for you today for the prenatal client. I'm almost six months pregnant, it's my first pregnancy, and so far it's been wonderful. I haven't had any major physical changes aside from a growing belly, but I have experienced a lot of, just sort of inward emphasis on how I feel and why I want to exercise and what my goals are. My fitness, my Pilates, is very connected to my emotional state and vice versa, so I've noticed that Pilates has been a really great tool for me to feel more balanced emotionally, and then thus better physically. So I've planned a series of classes to film for you here that are gonna take you through some elements that I've experienced throughout my pregnancy.
I just filmed a strength class, and this class is open. What I mean by open is kind of two-fold. It's important to be open through your body and to have flexibility in your joints throughout pregnancy, but for me, really, the theme here is being open-minded. What I mean by that specifically is not fixed on a specific outcome. I don't know the sex of my baby and I'm not gonna find out, because for me, that's a personal challenge.
I tend to be very goal oriented and sort of knowing what the end is gonna be helps me to get motivated to get there, but I need to realize that I need to kind of lighten up on some things and whether or not I know the end result is not gonna change it. So this class to me is about being open physically, but being open to alternative outcomes than what you think you've imagined for your life emotionally. So maybe that means something to you, maybe it doesn't, but that's sort of the background on this class format. If you're not pregnant, please join along. These are awesome exercises that are gonna help so many populations.
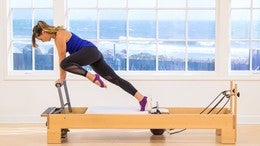
If you're a Pilates instructor, you're working with a prenatal client, I hope that you find these exercises useful to integrate into your training. I have a light spring on, which is one blue spring. The footbar is in the down position, and the only prop we'll be using is the box. Come into a kneeling position with your knees towards the front edge of the carriage. Option to place the hands on to the footbar.
This will be ideal if you're experiencing wrist pain, which is actually quite common throughout pregnancy. In this position, my wrists are aligned so they're right on top of the footbar, my fingers are wrapped, so I'm using the muscles in my hands. My hands are a shoulder width apart. Option B would be to have the hands at the platform, similar alignment, squeezing through the fingers. I'm gonna start here, I might work my way up to this if I feel like I need to.
You can pick the position that best suites you. Now, I have to find a position so that I'm in a true tabletop alignment with my shoulders over my wrists, and my knees under my hips. In order to do that, the carriage will be pushed out a little bit. Now I want to find balance between my upper body and my lower body, and then try to maintain that position. So no moving in the carriage, no shifting in the hips, but just rather holding this position.
Taking one leg back behind you, and lifting that leg up. Now, as the leg lifts, I have to work harder to draw my navel in and up, especially throughout my changing body, which is creating a little bit more of a lordosis than I normally have. I'm thinking about pulling my belly button in and up. I'll inhale, bend the knee in, and exhale, extend at the hip back. Now my leg can lift as high as I can stabilize my pelvis, and lower it back.
(exhaling) I'm trying to keep the carriage steady. If there's a little bit of movement, that's okay. So little adjustments, little movements, that's not a problem. Big movements, macro movements, you'll want to fix that, right, you want to try to move with efficiency and precision. On the next one, the leg will stay out.
Tap the foot and lift the leg. I'm doing about eight to 10 repetitions per variation, and you can change your reps based on how you're feeling day to day; more reps if you're feeling strong, reduce it if you think you need to. Keeping your back leg very straight and engaging through the posterior body. On the next one, I'll hold my leg up. Increasing the challenge, my opposite arm to leg will reach, drawing knee to elbow under the body, flexing the spine, and then lengthening out.
I'm only gonna do five of these. So exhale, (exhaling) and inhale. They're really hard to do. Exhale, so take your time, and carriage doesn't move, two more. (exhaling) And press, last time.
In, (exhaling), press. And take it all the way down. One of the things that makes that so hard is that I have to engage through my hip extensors on my stabilizing leg to keep that carriage pushed back. It wants to come forward, I have to work to keep it where it was. Now, before we go on to the other side, let's go into a plank prep.
So pushing the thighs back, the front of the hips will open a slight posterior pelvis here. Inhale pressing back, exhale pulling forward. Now, core work is important to do throughout your pregnancy, but we want to work the core in an intelligent way. So we always have a why or a reason behind what we do. In this position, I'm working my abdominals three dimensionally, drawing my belly button up towards my spine, creating compression and tension.
This is helping to take stress and load from my lower back. Inhaling to press, (inhaling), exhaling to pull. Last time like this, inhale to press, (inhaling) pull, and come forward. Remember to adjust your hands if you need to. Let's go on to the other leg.
So before I can, I need to find my true tabletop position. Shoulders right over the wrists, knees under the hips. So I'm working my hip extensors to keep my knees pushing back, not letting the carriage get pulled forward. Once I've found a balanced position even between my arms and my legs, I'll extend the opposite leg back and lift it up. Inhale, the knee comes in, exhale, up, squeeze, remembering I can only kick the leg as high as I can stay lifted through my navel and supported through my low back, (exhaling).
You may notice that you feel different from side to side, that's totally normal. Exhale, I'm opening through the front of my hip as I press. I'm trying to keep my hips level and square, and on the next one, the leg stays straight. Tap and lift, tap and lift. So for me when I do this, I have to think about leaning or shifting a little bit towards the leg that's doing the lifting.
It's easier for me to just sit in my hip on my stabilizing side, (exhaling). I'm thinking about my hips being square and my shoulders also being square (exhaling). On the next one we'll hold the leg up, prepare for that challenge, trying to keep the carriage steady as you come in, and exhale (exhaling) out. Five in total (exhaling), rounding the spine knee to elbow, and finding length, two more. (exhaling) Last one, (exhaling).
Take the arm down, take the leg down, a little mini break. Those are tough. We're gonna go back into another plank prep. I'll take my hands up for this, squeeze the footbar, except this time I'll be opening my knees a little bit wider. So my legs are like a diamond, pulling my feet towards my bottom.
So now I've got a smaller base of support, so in this position, my shins are actually helping to support, and now I've taken them away. Inhale to press, (inhaling), exhale to pull, staying open through the front of my hips. Inhale to press out (inhaling), exhale to pull. Definitely harder, so I'm not able to go back quite as far and maintain my alignment, making sure your head stays lifted in line with your spine and your shoulders stay wide behind you (exhaling), one more time. I actually have to think about curling my pubic bone under me towards my chest to avoid going into an anterior pelvis.
Rebuild the spin. Well, that'll get you warmed up. So from here, we'll go into a side kneeling position. So my knees are centered on the carriage, my feet are hanging back and off the carriage. My supporting hand will be on to the carriage.
Now depending on the reformer you have, you might be able to wrap your fingers around. You'll see that my hands are reaching long. That's so that the wooden rail doesn't get in the way of the exercise. I'm gonna grab the strap that's closer to the front of me, not the one that's behind me, and the strap actually goes in the opposite hand. So here I am.
Now, if you want a little bit more range of motion, or you want the exercise to be harder, you'll move your body away from the shoulder blocks. Similarly, if you want it to be a little less heavy, move closer to the shoulder blocks. The hand that has the strap goes under the body and I'm actually gonna allow my body to rotate towards it. So my shoulders are not level. I'm twisting through my thoracic spine.
As I exhale I find my balance and extend through the arm. Inhale, bend the elbow, and twist to go under. Exhale, (exhaling), and this is sort of like a thread the needle-like position. Now, I still have to try to keep energy even through my arms and legs. So I'm trying not to shift back over my feet.
That would be easier (exhaling). Keeping your wrist strong on your working arm (exhaling). Now, on this one, I'm gonna try not to twist. So I have to work my muscles to stabilize me. Five times, press and extend.
One (inhaling and exhaling), two, three (exhaling), head in line with spine, four, (exhaling), and five, coming all the way in, and hooking up your strap. Just step back off your equipment, roll on up. Let's try some standing work. So I'm gonna stand so that my belly button is in line with the shoulder blocks. Depending on your equipment, you might have to move a little further towards the risers or the footbar.
Try it a couple times and you'll find what works for you. I'm in a wide-stance position, my legs are externally rotated, and I wanna come far enough away from the reformer that when I fold my chest forward in a flat back position that I'm in a really comfortable grip. So you might have to play with your positioning and adjust it midway. Flat back, hinge forward, lifting through your tailbone, grab ahold of the shoulder block. I'll be pushing the carriage towards the risers.
So I grab ahold of the shoulder block that's closer to the footbar to begin. The riser hand is out to the side. Try to find even weight through your toes and heels, pressing the carriage forward and lifting your arm up, and resist to come back. So trying to create, or rather, maintain some mobility in the spine is very important throughout pregnancy (exhaling). Now, these are not deep twists.
Instead, what I'm trying to do is rotate through my thoracic spine in a very functional way. So this is the same range of motion I would need to turn and look behind me as I was backing out my vehicle. Two more like this (exhaling), and one more like this (exhaling). Come back to center, roll on up and come a little bit further away from the footbar, just a little. We're gonna do the same series, instead of our pushing, we're gonna pull with our opposite arm.
So hinge forward again. Again, try to find balance between your toes and your heels, hand is onto the shoulder block, opposite arm is out to the side. I'm actually gonna start in my rotated position. From here I'll come through center pull, and inhale, resist to come back. Exhale pull (exhaling), and inhale resist to come back.
Now, you can play with your position on the shoulder block, (exhaling), finding that flat back alignment. Three more (exhaling). Look up at the arm that's reaching, two, (exhaling), (exhaling), one, and come all the way up, awesome. Let's keep the feet as they are and pivot turn, so I'm facing towards the back of the equipment. Grab ahold the strap that's closest to you.
Now, depending on the length of your strap, you may have to adjust your body further forward or further back so that you have appropriate tension. I'm gonna step back a little bit so that my hand is close to my knee to start. You're coming into a lunge position with your hips square, bend into your front knee, pitch forward, pull your abdonimals in. Top hand on your thigh, back heel lifted high. Exhale, draw the arm up and back, inhale, resist to come forward.
So right now, I'm thinking about opening through the front of my body and working through the back of my body. Exhale pull, (exhaling), inhale. Three more, (exhaling), two, (exhaling), and one, keeping your wrists nice and straight, flipping your grip so your palm faces in towards you, hugging your elbow into your side. Exhale, extend, inhale, bend. Think about this series replacing your long box prone work.
Keeps the abs tight, (exhaling) ribs closed. Last two (exhaling), and one (exhaling). Come all the way up. Leaving the legs as they are, pivot turn so you're facing towards your equipment. I'm still in my nice wide second position legs, so toes pointing out to the side, strap is in the hand, arms are open.
As I draw my arms through center in my hug a tree position, I bend my knees. Now, it's a lot of posture work here 'cause I'm standing up. Inhale, open the arms, lift the body. So exhale, pull. I feel my spine, my inner thighs, the fronts of my thighs.
I even feel the muscles working in my feet, and inhale up. If you want more range of motion or you want the weight to be heavier, then stand closer to your footbar. Last two, (exhaling), and on the next one, we're gonna hold the position, interlace the fingers. Now again, a little bit of rotation here, exhale, (exhaling) to the footbar, thinking about moving from the thoracic spine, (inhaling), disassociating the movement in the legs, so legs don't move, and finding length (exhaling). One more like this (exhaling).
Adding a little bit of complexity, so two things together. One is the knee bend, two is the rotation. Bend, rotate, return, and come up. One more slow, bend, rotate, and come up. Here's your tempo.
Twist as you go down. Five in total (exhaling), knees over toes, chest is lifted, thinking about squeezing your heels towards your sit bones. So squeezing your feet in to your midline. Last one (exhaling), and coming all the way. One last position here.
You'll be pivoting and turning. So notice I haven't really changed my feet. I'm just changing the direction of my body. Step back if you'd like reduced tension, step forward if you want more tension. Bend into your front knee, coming into that same lunge position, facing footbar instead of facing risers.
Hand on to the thigh, hand in towards your elbow. Think thumb towards your shoulder actually. Exhale as you push, reach, that's your superman, inhale. Again, we're mimicking the exercises that we do prone, on the long box (exhaling). So all of your same cuing, all of your alignment (exhaling) still applies.
When you lie on the long box to do this work, you don't let your stomach just relax into the box. Instead, you draw your belly button in and back. So same here (exhaling). Last time like this (exhaling), and open it up, good. So let's repeat that whole series on the other side, which is gonna start with the kneeling, so kneeling.
Now the further your knees are away from the shoulder blocks, the more movement you're gonna get. So adjust it for your body, feet are off the back. You'll have to grab the strap with your opposite hand, and it's the strap that's coming further from you. So this is gonna allow this twist to happen. Now find balance, even weight into your hands and into your knees.
Here's your thread the needle position. Exhale, (exhaling), extending the arm, bending the elbow, and rotate under, allowing the spring to just help you with that little bit of thoracic rotation, ringing out the spine just enough to keep the circulation, to keep the flexibility, inhale (inhaling), and exhale (exhaling). So think about the baby facing down, the pelvis facing down, and by down I mean towards the floor and allow your shoulders to rotate. Two more (exhaling), and one more (exhaling). Now, allow the arm to come under, but see if you can stabilize the position of the body, so using those muscles to hold your position, and come back and under.
Lift from your elbow, extend. Can you keep your wrist a little bit straighter? (exhaling) Think about the hand traveling right underneath your belly, up and reach, (exhaling). Two more here, (exhaling). Stabilizing elbow is soft, not locked.
(exhaling) Come all the way in, perfect. Hook up that strap and step back off the equipment, preparing for your standing series. So align your belly button with the shoulder blocks, open the legs wide, external rotation. You'll be hinging forward in a flat back, so try not to round or slouch. If you need to bend your knees, that would be a good modification.
Hinge forward, hand goes onto the shoulder block, opposite arm reaches to the pulleys. Keeping my hips pointing down, I push the carriage forward as I look upwards at my arm, bringing the carriage back underneath. Exhale, (exhaling), and inhale. Exhale, push, look, and inhale. Think about lifting your sit bones higher (exhaling).
And center, three more here (exhaling). Last two, creating space from the ribs to the pelvis, so think about length here, between each vertebrae. (exhaling) And rebuild the spine. Come a little bit further away from your footbar, just a tad. Again, find that hinge forward, hold on to the shoulder block, play with your wrist alignment.
This time, instead of pushing, you're pulling. So you start in your rotation, you exhale, pull, find the flat back. Inhale, up, exhale, pull, (exhaling). Inhale, up, to modify, bend the knees, exhale, pull. Inhale up, last three (exhaling).
Two (exhaling). And one (exhaling). Come up and rebuild the spine. Those are a lot more challenging than they may look, but they're so, so good for you. So your feet don't really move.
They don't move a lot I should say. You'll just pivot from that position. So notice that my inside leg is the one that's closer to the reformer. Then if you want a little more work, and a little more range of motion, you'll move back. I like to start so the strap is taut when my hand is right around knee position.
So here I am in my lunge, back heel is lifted, front knee is bent, hips are squared. Diagonal forward, exhale, push, (exhaling). This is the extension work we would be doing on the long box. Straight arm (exhaling), shoulders level, wrist is straight, so is the elbow, (exhaling). To increase the challenge, deepen your lunge or move back to the footbar.
Last two, (exhaling), and one, (exhaling). Flip your grip so your palm is towards you. Make a fist, lift your elbow. Tricep extensions, wrist is long (exhaling). Three more, (exhaling).
Press your front heel to help activate through your seat on that side, (exhaling) and rise all the way up. Pivot so you face towards the equipment again. If you'd like a little bit more range of motion, step closer to the footbar. Same leg position, wide stance. So my heels are wider than my seat.
Open the arms, bend the knees, hold the position and exhale hug, (exhaling), and inhale open. Exhale hug, (exhaling), and inhale. So this is not just upper body. As I draw the arms in towards my midline, the resistance is pulling me this way. So what I have to do is work the whole opposite side, (exhaling), to stay vertical.
I'm working my inner thighs. I feel the muscles in my feet, (exhaling). Additionally, as I draw my arms in towards my body, it really gives me the sense of wrapping or closing my ribcage, (exhaling), which feels good, it feels like I'm getting more length through here, (exhaling). On the next one, interlace your fingers, and allow those springs to pull you towards the shoulder or towards the pulleys. Now, this is less is more kind of concept, so exhale, little rotation, inhale, center, (exhaling), keeping the arms away from the body, an excellent way to keep strength for your obliques.
(exhaling) Drop the tailbone deep in your plie if you've got it. Three, (exhaling), two, (exhaling), one, and come up. Now let's put those movements together. We'll break it down first. Bend your knees, rotate, come to center, straighten your legs.
As you straighten your legs, guys, squeeze your heels underneath you. It'll help you to turn on those glutes. Bend, twist, unravel, and lift. Putting it together: twist, and up. Try to feel that the upper body can move without the lower body rotating.
Last three, (exhaling), two, as if you're sliding your back down a wall and back up again, one, and up. Open the arms but don't be in a hurry to change the feet. Simply pivot so you're facing towards your footbar. Now I'm gonna move back a little bit. If you want to keep a lot of tension, stay where you are.
Bend into your front knee, back heels lifted, square the hips. Think about your thumb coming towards your shoulder. Lean forward, don't slouch, don't extend. Let's see if we can maintain that neutral alignment as we push forward and bend back. (exhaling) Pressing in to the front heel, (exhaling), staying long through the back leg, (exhaling).
With each forward press of the arm, drawing in and up through the abdonimals. Last three, (exhaling). This is a good balance challenge, too. Two, (exhaling), and last one, (exhaling). Coming all the way up and hooking up your strap, nicely done.
Let's move towards the front of the equipment. Now you can play with your springs here. You could be as heavy as a red, as light as a yellow spring. Adjust the tension so you feel you have the support that you need. So yellow would be very light and more challenging, blue's right in the middle of the road, and red's gonna be a little bit more supportive.
Start by facing towards your equipment. So your knees are a couple of inches or more, about a fist's distance from the footbar. Toes are pointing forward, legs are parallel. Now, if balance is a major issue for you, you can use a balance aid like a pole, but I would like your fit to be hip distance apart. Don't widen your stance.
This is so we have proper distribution of load. So you go straight down through your joints, feel your standing glutes start to activate, and take one foot onto the carriage. Now, I've got right where my toe meets my foot, my metatarsal line, so that it's not gonna slide or go anywhere. Place your hands on your hips to begin, so you can feel where your pelvis is in space. Pressing the leg forward, now from here, we're gonna pivot, so that the hips rotate, the shoulders rotate as well, pivot back.
Feel the femur sit deeper into the hip socket, and bend the knee. Now, I am probably doing this a little bit, it kind of gives you the sense where you want to lean forward, so see if you can keep your shoulders right over you hips, just a little push. Now let the femur sit deeper into the hip socket, and bend the knee. So we go forward, little push. Find your position and come back.
So being able to have a strong pelvis and lower back throughout your pregnancy is super important, but at the same time, you want to be open through your hips, open through your pelvis. So this is a nice balance of strength and mobility. Arms go forward. Now, we are gonna be rotating, but not towards the direction you think. So we press forward, let the hips push forward like we've done before, come back to center.
Now squaring the hips, open the arms, lift and twist, getting a nice little IT stretch, come back to center and bend the knee. Again, try to stay vertical. Push, a little open, let the femur sit deep into the hip socket, and rotate, IT stretch. Back to center and bring it in, one more time. So press forward, navel draws back in opposition, push, femur deep into the hip socket, open, try to stay vertical, come back to center, and bring it in and down, nicely done.
Bring that foot forward, pivot and turn on your standing leg. So if you look down at your feet, your feet should actually be staggered. Your standing foot should be behind your carriage foot. This allows your hips to stay square. Your toes are turned out evenly, hands on pelvis again so we can feel where it is.
Pressing out, and just for a moment, find your balance. Maybe shift over your standing leg a little bit more and see what that feels like, or maybe shift over the carriage leg a little bit more and see what that feels like, and see if you can find that center point where you're using your standing leg to hold you up. Tone the front of your thigh and activate through your tushie on that side, too. Let's add on. Press out with the leg, find length from belly button to sternum.
Laterally flex towards the carriage, come back up, and bring the knee back in, all without leaning. So we just press, lift to laterally flex. Use the obliques to come up to vertical, and bend. So my openness or my length is coming through the side. Two more, press out, lift up, stretch to the side.
I'm trying to keep my bicep by my ear. One more time, press out, and laterally flex, (exhaling), come up, and bring the carriage in. But you're not done yet, and you should be feeling the muscles in your standing foot, this is a good thing. So if you do, good. Pivot and turn, so you're now facing towards the wall in front of you.
Make small little adjustments so that your hips are square. So you may have to adjust your back foot narrow or wide, but hips are square. Now, I'll be bending into my front knee while my back leg stays relatively straight. If you need to bend it a little bit, that's okay. As I bend into my front knee, you see how the carriage goes out, the arms lift overhead, and I come in to that same neutral diagonal forward I was in before.
Then I use my standing leg to come back up and repeat. So a lot of work through my standing seat. Arms go forward and exhale, use your glute on your standing leg to come back up. The lighter your tension, the harder this is gonna be. Press, press down through your heel, (exhaling), feeling that openness through the front of the hip, reach forward, and lift.
On the next one, we're gonna hold it. Reach forward, just the arms to a T and over. Four more, four, (exhaling), neck is long, (exhaling), two, (exhaling), one, (exhaling). Finish by putting the hands down, bringing the carriage in, taking the foot wide, and rebuilding the spine, good. So hopefully we feel different on the right to the left.
That would be a good thing, our Pilates is working. Let's start it again. So I'd like you to be in parallel, hip distance apart, so find that position for you. You do feel a little shift, it's a low transfer over to your stabilizing leg, and your opposite foot comes on. Heel is high, find that position where the foot won't slip, hands to the hips.
Now press out, maybe you do the same thing, lean forward so you know what that feels like, and do your best to find shoulder over hip position. Now I'm pushing, feeling like I'm creating space between my thigh bone and my hip, then I'm allowing the carriage to pull my thigh bone into my hip socket, like the belly of the muscle is drawing back behind me, and bend the knee. Press, it's a little pivot. It's not really about rotation, it's more about what's happening with the femur in the hip socket. Forward, push, stay vertical, center, and in.
One more time, and then we'll add a little more choreography into it. Push, center, and in, good, finding that strength and stability through the pelvis. Arms forward, push forward. It's a little twist, not really about rotating yet. Come back to center, now hold it.
So with your thigh getting pulled backwards, open the arms and twist towards the thigh. Come back to center and bring the carriage in. Push forward, little rotation, but then come back, open the arms, find your balance, back to center, and bend the knee. Remember, your standing leg is definitely working, (exhaling). Little micro corrections are good, so if you feel a little wobbly, that's good.
Those are your muscles responding to the exercise. If you're falling over, then we need to keep working on this. That's okay, it's a video, you can play it over and over and over again. Rotate, and you'll definitely be able to see some improvements. Twist, back to center, and bend it in.
That was great. This food goes forward, standing leg pivots. So if you look at your feet, they're not in line. The carriage foot is forward of your standing leg. Try to lift up through your seat, place your hands onto your hips so that you can feel what's happening in the pelvis.
Now allow your weight to shift over your standing leg too much, and then feel your weight shift over the carriage. So we don't want to do either one of those. Instead, we're gonna really work our posture, shoulders over hips, and then standing leg strong, that's our base, pelvis over that leg, bend the knee. Arms go out, lift up to laterally flex, push down in your standing leg, lengthen up, bend the knee. Press out, lift up, laterally flex, lengthen up.
Use your obliques to come back up. So don't rely on gravity, don't rely on momentum. Lift creates space, open from hip to rib, then pull the ribcage down, and bend the knee. One more time, (exhaling), I'm thinking about dropping my tailbone, bicep by the ear so I get a little pec stretch as well, center, and bring it in. As gracefully as you can, pivot turn.
You'll have to make a few adjustments, that's okay, you got time for it. Maybe place the hands on the hips again. So your back leg will stay relatively straight. It might bend a little where you're in. The straighter your back leg is, the more of a stretch you're gonna get through the front of that hip.
When you bend in to your front knee, your body will pitch forward, your arms will reach up, and it's about length. As you exhale, you come on up using your standing seat. Pressing into your heel will help you activate that. Inhale, (exhaling), exhale, so thinking about opening, and contracting. Inhale, and when it comes to not being attached to a specific outcome like we talked about in the beginning of the class, I think balance work is the best way to practice that.
Some days you'll balance, some days you won't, it's not a big deal. Press, and using the seat to come back up, inhale to go down, (inhaling and exhaling). on the next one we'll hold, arms open to a T, five times. Five, co-contracting abdonimals, four, pulling the belly up and away from that femur, three, two, (exhaling), one, (exhaling). Place the hands down, bring the carriage in, take the foot wide and around.
Rebuild the spine. Now hopefully your hips feel relatively even, great job. We're gonna grab our box and place it on, in the over the footbar position. So if you've never done this before, I'm gonna take you through it. The first thing you have to do is adjust your spring tension 'cause it's really hard to adjust your springs when the box is covering that area.
So I'd like to do this series with a blue. The next thing you have to do is adjust your footbar. Now mine is already in the position to support the box. Here's the important thing: most reformers will work with this box on the footbar just fine, but you have to do this little test. If you can not place your box on securely with the padded part of the footbar on the outside of the box, I wouldn't recommend this.
This is why. This padded part right here is what's stopping the box from going any further that way, so I need that. And the carriage is obviously gonna be doing its thing. I've worked on a lot of different reformers and they all have this capability so far, but there could be one out there that it doesn't work, so feel free to skip this, or to modify, place the box on the floor, and you can continue with us. Great, let's get started, I'm gonna sit on to the reformer.
I'm back facing towards the box, and I'm gonna adjust myself so that my, I would say my mid-thoracic is against the box, but I'll be moving in a second. From here, I'm gonna lift up through my chest and lower my back, my upper back onto the box. I like to have my elbows wide 'cause again, it gives me the sense of opening. So right now, I feel like I'm opening through my chest and I'm getting this awesome stretch through my anterior body, my abdonimals. I'm gonna walk my feet towards my bum a little bit, knowing that the carriage is gonna move underneath me, tuck my tail, lift my hips up.
Inhale, press out, I like to flex my feet, exhale, pull in, (exhaling), and massage the spine down, almost as if you were doing semicircle. So scoop, (exhaling), to come up, press, pull, and I try to go one bone at a time, and hips down. I tuck, (exhaling), to come up, press, pull, and I try, uh, it's hard, to roll down. One more time, scoop to come up, (exhaling), I'm thinking about pulling my bum towards my shoulders, so I'm thinking about contracting to come up, then I find length through the front of my hip, then I control the carriage in and underneath me, and then as my hips lower down, I'm trying to pull my hips towards my feet. Hopefully that makes sense to you.
Okay, this time we're gonna come up, (inhaling), stay up. Let's integrate some cool stuff with the arms. So as the carriage presses out, my arms will open to a T, and exhale as the carriage comes in, (exhaling), my arms will close. So this is just increasing the complexity of the exercise. There's lots of ways to make exercises more challenging, and changing the resistance isn't always the best option.
So here we've got more going on. One more time like this, and exhale, pull, (exhaling), let's roll on down with out using the arms, ah, and release, it's so hard. Exhale, tuck, and come up, inhale, arms goes back as the legs extend, finding the length, exhale, (exhaling), pull, inhale, and exhale, (exhaling), three more. Hands and feet reach away from each other, open through the body, and pull. I'm not trying to lift my hips as high as they could possibly go.
I'm trying more to find a long line, almost like I'm in a plank plumb line relationship here. One more time, inhale, (inhaling). But I am trying to keep my hips very stable and still in space as my arms and legs move. Make sure the carriage is underneath your bottom so that you can come up. Now we're not done, there is one little series here that's not as pleasant as the last one, let's say that, but it is keeping the theme of open, right.
So we're gonna be opening through the front of the shoulders. Now if you have shoulder issues or injuries, what you need to do is not use your arms, and sit up on to the box. So come up to a seated position, 'cause getting up from here could be a little challenging for you. So what I'd like to do is have my hips back towards the box, knees are bent, and depending on how much movement I need, I might want that carriage out from my butt so I can go lower, lower than the carriage. Inhale down, (inhaling), exhale up.
So I'm opening through my chest but working my triceps at the same time. Exhale out, (exhaling). We'll do five more, (exhaling). Four, (exhaling), three, (exhaling), straightening those arms all the way when you come up, two, (exhaling), and (exhaling), one. If you want to, sit on the box.
That's what I meant, you can come down from this position versus coming up from the low position, I hope that was clear. Leave the box on, and I'm leaving my spring tension on too, So it's kind of hard to change the spring tension when the box is on there. Hands go on first, feet come on second. My feet are not gonna be up against the shoulder blocks, almost, but not quite. My feet are a hip distance apart, my fingers are spread with my middle finger pointing straight ahead.
Start in a round back position, breathe in, body wave, that means your head is gonna be the last thing to come up, right knee comes in, (exhaling), left knee comes in, (exhaling), round the spine, and bring the carriage back underneath you. So body wave, keep your chin tucked in until the very end, pull, pull, and scoop. Two more times. Flex, use your abdonimals to push the carriage out, eccentric work through your core, pull, (exhaling), pull, (exhaling). One more time, press out, (exhaling), shoulders are wide behind you, pull, pull, (exhaling), and come on in, good.
Take the hands forward and wide on the box. You need this section of the box to be available for you for the next exercise. Press the carriage out like you've learned already. The knee comes in and the foot comes on. Now if that's feeling not right for you, please skip this.
It's a nice hip stretch because it actually allows you to feel this sinking sensation, right. Sometimes on the yoga mat, we can only go so far as the mat will allow, but I have to still stay lifted through my abdonimals. Hands can stay on, option to extend the chest, option to fold forward, it's up to you. Now, you could also bend that knee to modify. So this is gonna take away the intensity a little bit, this is gonna increase the intensity, being up, maybe extending the spine is gonna increase even more.
Hands go on, and bring it in and under. I think it's delicious, so let's do it again. Press out, okay. So both sides may not feel even, it might be harder to get one leg up. Notice that the foot is flexed on that front leg, back leg is straight, and you see what I do with my back foot, I'm in plantar flexion, I'm gonna push the carriage away from me.
Hips are square, you can stay lifted, you can go down, you can bring the back knee in. This is gonna decrease the intensity, back leg up is gonna increase the intensity, no arms, harder still, and then adding the extension, yeah. Hands go on, feet go on, bring it all the way in, and carefully come off. That was great, hopefully your hips feel good, mine do. Taking the box now onto the rails.
Now what I usually do is I get rid of my straps first, that way the ropes are very lose in this position. You want to make sure that you have equal access of box on both sides, and I'd like to have it against the pulleys. I'm five six, that works for me. If you're more petite, you might want to move the box in a little bit. I will be increasing my tension here.
I'm gonna be putting on a green spring, which is a little bit heavier than a single spring. I like my headrest up because it gives me a little bit more pull, Taking the feet up onto the shoulder blocks. So when I teach these exercises in classes or in workshops, there's always reasons why people's feet can't stay here. You might be thinking of your own right now, but the main reason that your feet are gonna slip off is because you're not pushing down. So you have to push down into your heels and try to activate through your posterior body, okay, just push down.
Start by sitting tall, use the box, hinge back. Not a lot, just enough that you start to feel that connection through the front body. Exhale pull, heels to seat, inhale, extend. Now if you're having problems keeping the carriage in position, don't extend all the way. It's that last inch that you're gonna lose it, (exhaling).
Inhale forward, exhale pull, (exhaling). Stay wide through your collarbones. Two more and then we're gonna be adding on. (exhaling) And one, (exhaling) good. Sit up nice and tall, take breaths in between if you need to.
Adding a little bit of upper body flavor, you can have one hand still on to the box if you'd like. I'm gonna reach both of mine forward and hinge back like we did before. As the box comes to me, because I'm activating my hamstrings, my arm will lift up. As the box moves away from me, I circle around. We're gonna stay on one side.
Pull, (exhaling), lift. Another great way to work the core and fire into that back body and work the brain, (exhaling), without having to do a lot of supine abdominal hands in straps, (exhaling). One more time, reach up, and, (exhaling), come on up. Make your adjustments, let's see how we do on the other side. So I tilt back.
As the box comes to me, my arm lifts. As it goes away, I circle (exhaling). I definitely feel a difference from side to side. One side feels a little smarter than the other, and circle around. I'm trying to lean back and I'm trying not to slouch, (exhaling).
Three more, up, and circle, two more, up, and circle, one more, up, and circle, and come all the way up. Take the feet to the center. Make sure there's enough of your tushie on the box that you're not gonna slip off. Hinge forward, take a stretch, let the shoulders relax. Rebuild the spine, and we have a second set of our tricep dips.
It's so important to have strong arms, but this is also opening up through the front of our shoulders. So hands go on again. The feet can be on to the headrest or the feet could be onto the shoulder blocks, or depending on your positioning, the carriage. So find what feels best for you. Try to lift the hips a little bit higher in this one and shift your weight back over your arms more.
Inhale bend, (inhaling), exhale straighten. Inhale, (exhaling), exhale. Coming to fully straight arms, (exhaling), keeping belly pulled in and back, (exhaling), and collarbones wide, (exhaling). Two more, (exhaling), last one, (exhaling), take a seat on to the box. Take the feet into a comfortable position, and one more time, flex forward, (exhaling), and roll on up, nicely done.
We're gonna continue to use this box, placing it on top of the carriage in long box position, standing front, facing the box, not unlike where we were very recently. Feet hip distance apart, knees a few inches away from the footbar is ideal. Find that vertical alignment, arms up, flex the spine, hands go on. On a breath in, press the carriage out, lifting the tailbone high. Now I still have my one red spring on, or my green spring on, so I'm a little bit heavier, and I'm really working my arms here.
Exhale, flex the spine, (exhaling), and just come back to your round back position. So using your core muscles to press out, see if you can find a neutral alignment, and scooping to come back in. We're gonna do one more like this, and then I'm gonna do some upper body work. Exhale press to come forward. Think of your downward facing dog.
Sometimes I bend my knees a little bit. If you see that, it's so that I can get slightly more anterior in my pelvis. I feel more of a stretch in my hamstrings, and exhale, (exhaling), to come up. Let's add, inhale, (inhaling), exhale push, (exhaling), now I want to maintain the position of my spine and my legs bending the elbows, they go slightly wide. Don't overdo it, just the width of the wooden rails is perfect.
Press out, in to bend, exhale press, (exhaling), in to bend, exhale press. Your challenge here is to go to fully straight arms without lifting your shoulders up into your ears, three more, (exhaling), two, (exhaling), belly in and up, one, rebuild the spine, good. And to finish, let's reduce the tension. I'm going down to a blue, and we're gonna go into a very similar rotation that we did towards the beginning of class. I like to flex forward from an arms up position.
It's much easier to press out now, taking one hand to the center of the box. There's your free hand, start with your thread the needle, push the box away from you, go into your level shoulders, arm to a T, and lift the chest. Push the box away, (exhaling), come out to the level position, a little lift. One more time. I'm actually grabbing ahold of the wooden rail and I'm using it just to help facilitate the stretch just a little bit more.
Opening through my pecs, come to a T, lift, taking both hands on, rebuilding, pressing forward, (exhaling), hand to the center, I've got my opposite hand now. So now you can see, I'm not cheating, I'm stretching. There's no cheating when you're stretching. Chest is low, hips are high, full twist. Come to a T, up, thread the needle.
Try to keep your pelvis over your feet, come to a T, up, one more time. So here I feel an opening through my chest on my straight arm, I feel a stretch through both sides of my abdominal wall, and if I really want to go there, I can even get a little bit more into my hamstrings. Come back to your T, push up. Take both hands on, around, (exhaling). Rebuild the spine, and come all the way up, awesome job.
So hopefully you feel more open, both physically and emotionally, I do. Thank you for joining me for this class and for joining me along this journey. I'm gonna be filming a series of classes for Pilates Anytime and I hope to see you back again, and you'll be able to see this growing belly. If you are pregnant and following along with me, congratulations guys, such an awesome, awesome time. I just hope that you know and you feel that you can be strong, you can be open, you can be flexible, you can be balanced, you can be everything.
Enjoy are ride, and I will see you guys back here soon.
Prenatal Pilates: Second Trimester Reformer Workouts


Comments


Fun creative challenge for all...glad you are enjoying your journey


Thank you and congratulation.


You need to be a subscriber to post a comment.
Please Log In or Create an Account to start your free trial.
