Description
About This Video
Transcript
Read Full Transcript
Hi everyone, I have a short class for us today. And if you have been sitting at your desk all day long and you only have a short amount of time, this might be really, really good for you to get your shoulders open to get your back muscles exercised. Cause if you've, you know, rounding over and things, you're not working your back this way. So this is an upright class. We're using the wall, you'll need a few props. This is a roller. You'll need a magic circle or magic circle ring, a hand towel, and a very light set of hand weights. Okay. So we're really focusing on axially longation, which is upright posture, open shoulders, and a lot of strengthening work for right in.
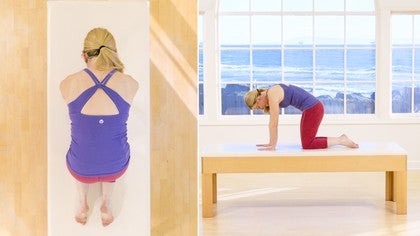
See all my straps on my shirt. I did that on purpose to focus on all of the musculature in between your shoulder blades and your upper back. Okay. So we'll get started. And for teachers that are watching, this is just great to add into classes and maybe it's a, an ending for one of your regular math classes to get people up and off the floor more often. Okay. So we need to start with the roller against the wall. You're about a foot or so away from it with your feet ear in parallel and I want you to reach, make sure that your um, your whole entire spine is on the roller.
So I've got a long shirt on but my tailbone is right at the bottom end. And then of course your whole spine is on there. Now when I mean whole spine is the length of the spine, what I don't want us to do is flatten your lumbar spine and push it back. Please don't do that because this is a natural curve that we want to be strong and resilient and to be there in our, in our alignment. Okay. And certainly not pushing the back of the neck flat, so full length, but we have those beautiful curves. So we have our lumbar curve.
You should be able to get your hand behind you. Now thoracic is thin rib cage. That part of our spine is on the roller and you can see it right, right in there and that bra line zone or mid back. And then that cervical spine also has a hollow spot. And then let's just real quick about the head. Um, my school is touching the roller. You might not be that person and that is O K if your head is here, that's okay.
Your goal over time is to get your skull back against the ruler because you will have gained openness, you'll have gained mobility in your upper back, strengthen your upper back mobility in your shoulders, your chest and things like that. What we don't want you to do, okay, is forced your head back by doing this with your neck. That's really a posture. We were just never going to advocate here. Okay. Or any good movement practice. So there you are, you've got that. And so you'll see my head there. If your head starts to drift off, just acknowledge that, know it, and then you know, just start to drift it back. Okay. So what I want us to do first, everybody is just get there, bend your knees just a little bit so that you're not your legs out.
And you know, jamming those knees back, you can do a kind of a little Tai Chi ask idea with just soft knees. Because what I really want us to do is take our hands, you know me with the breathing onto the side of your ribs and let's do five or six breath cycles together. And we're looking for volume in this rib cage when we breathe. So it's the first one. Inhale and exhale without losing the height of your spy. So breathing into your sides, into your back, and even up into your upper ribs here.
Three more formal breaths. Exhale. And you can start to on the exhale, feel a little effort if you want. I'm going to move my hands here now. Stomach to say grow more stomach to lumbar spine. Okay, two more. But again, as you exhale, and I have my hand now back here, I don't want you to lose this curve. So can you engage your abdominals front to back, but keep this curve here.
Okay, so this is a nice reference and last one. Okay, do that on every breath right now. All right, so everybody take your arms forward of you. They can be shoulder height if you can, no higher than this right now, and we're going to move our shoulder blades forward off the roller it, use it as a stretch. So maybe there's someone right here in front of you that you are reaching to and you want to hug your shoulder blades are really pulled away from each other on your back, should feel pretty good. Now do the opposite of that real slowly. This first one, glide your shoulder blades back and kiss the roller.
There's a little that's going on between the shoulder blades towards the spine. Okay. And reaching forward. So we're going to find a little flow. That's an inhale. Exhale, reaching back for more. Inhale, reach for Rick gliding. Pay attention to if one shoulder moves faster than the other one. Often we have that.
See if you can really get them to move at the same time at the same rate. Okay. Axial elongation really means tall spine, up, up, up, taking some compression force out and decompressing. So we're really standing as tall as we can. I think that was as many as I wanted to do. Okay. Now just find a place right between the two, not too far forward or back.
And then very slowly start to open your arms out. If you're tight in your chest muscles or your arm muscles, you'll, you could feel tingling in your fingers. It's not a bad thing to feel that, but sometimes uncomfortable and unfamiliar. So don't hang out too long. I was one of those people for a really long time. I could barely get there and then my fingers would tingle.
So those are your nerves running through your shoulders, arms, tissues, muscles, things. Okay. They need movement too. Ah, so what we're hoping, I'm going to see if we can get in six repetitions, is that maybe those fingernails could get the wall, but not by forcing. This is all about just slow controlled movement. Stay tall. Now, if you're feeling a little limitation or tight or Oh, I can't get there, uh, your rib cage might be fooling you and wanting to push forward. That's a false sense of achievement in this exercise. So this part of your spine, please keep it on.
The ruler is focusing on your length of your arm muscles, the mobility of your shoulders, the mobility of your tissue, and see if you can get to the wall. Okay. If you're tired already, please rest in your shoulders three more times. Try a breath in. That might help. Exhale, do more an exhale. Let's do one more and we'll hold our hands wherever we go. I'm going to get my fingernails to that wall and to see if you can hold and hold and reach a little further out on the wall and then arms forward and lower. I'm sure you're all feeling that right now. Just wiggle. Wiggle your shoulders, okay to soften or give your mid back muscles a little break and a re a kind of a stretch. Keep those knees softly bent.
I want everyone just to take their head and your neck and do flection, so it's rounding the neck forward. Oh, that feels so good in all of the place I just used in contracted. Now I, I'd like to go a little farther forward so that my shoulders now are just naturally starting to round. That's okay. It's also a stretch again for that upper back, but we're not going to be there long. I want you to roll yourself back up and just replace your head. Okay? I'll do one more of those.
Nice juicy stretches for that upper back. So just let your neck bend forward. Again, it's that kind of organic rounding of your shoulders. It's okay. Bend those knees just a little bit. So you're addressing some stretch in your upper back. All right, and then re articulate back up and you know if your head was off the roller at the beginning, chances are your skull is starting to come back a little bit more smoothly now at this point. All right, great guys, we're going to add on. So your magic circle is nearby, I hope. If not, just get down, grab your, your ring. Okay, so we're challenging our organization against the ruler. Just checkpoints.
Again, you're not going to smash your lumbar, your rib cage, spines against the roller. Your cervical is, has got that hollow hands on the outside of the ring. Raise your ring right in front of your chest. Your wrist and fingers are long. I want you to inhale here and exhale, squeeze the ring any amount. Inhale, release. Let's do eight of these. Exhale. So shoulder blades are in a neutral position.
They're not too far forward and they're not too far back. When you contract your arms and your stomach muscles keep the organization of your alignment axial, your ribs aren't thrusting forward, your abdominals are into your body, but you're again, you're not smashing your lumbar spine. Here's your last one. That's eight. Okay. Now bend your elbows and let the elbows point wide. If that feels okay in your shoulders. Some of you I know for certain that's not going to feel good. I just know it.
It's okay if you're this person, trust me, it's fine. We're going to move it in and then reach the ring straight in front of your chest without going too far. So again, the shoulder blades stay really level on your back. Breathing in and breathing out. So if you need to aim your elbows lower to the floor, that's fine. For those of us that can go a little higher.
This is our goal that the elbows would be level with our shoulders. Okay. Inhale and exhale. Inhale, I have a light press with my hands on the pads. One more time in and extend. Lower your arms. Okay.
Next we'll be archiving the arms from down here through the middle higher. And how high you go is really dependent on your connection of your back against the roller. Okay, so again, no ribcage, spine should lurch off that thing and we'll do eight little squeezes. Here we go. And one, two, three, four, five, six, seven, eight to come down to three, four, shoulder blade, steady on your back. Meaning they don't come forward. They don't pinch back. Five, six, seven, eight and lower. Two, three, four, five, six, two more sets, just a little faster. Three, four, five, six, seven, eight and down to four. Five, six and one, two, three, four and five. Six, seven and eight and one, two, three, four, five, six, seven and eight. And just rest for a moment. Okay.
I'm going to just do as you're resting, you can also do this forward reflection. Again, I'm going to plug a few people that are really incredible to watch and some of them have been filming classes and workshops and tutorials on this website. Go watch Kara Reeser. Go watch Pat Guyton. Some of my favorite teachers. Watch uh, Karen Clippinger and watch Leslie Powell. Okay. Amazing stuff about shoulder girdle orientation because you might've been going through this sequence and thinking, what should my shoulders be doing?
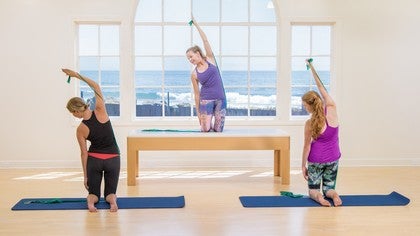
Should they be up? Should they be down? Those questions will be answered in those tutorials in little bits. Right now I'm going to keep us moving. Okay? I think you'll be happy. I'm watching that. That material, you'll learn so much. Okay. Ring goes away for now, probably for good hand weights come in and just going to hold. I'm like this, these, it's called sparklers and we're doing little circles now with the arms and I want you to energetically reach these hand weights across the room.
So the same thing. How high can you reach your arms up, making these little circular movements without your ribs leaving the roller and then reverse the direction and come down. Okay, so similar to the pathway we'll do eight up and a down and one, two, three. You're reaching energy around across the room. Seven and eight and three and four. Same thing. Ask yourself about the shoulders. Let them just move how they want to move. Five, six, seven.
I'd rather you think about how tall you can be in your spine. Five 60 have two more of these. Everybody a little faster. One, three, four across the room with the weights and one to four. That's a great upper body work and one, two, three, four, five, six, seven, eight and down to four and five, six and seven and eight. That's all we need with the weight. So you'll put those away. Okay. Now I want you to come off the roller and just feel what you feel in your back.
It should feel really, um, of, you should have a, an amazing amount of awareness, awareness right in here. Okay. Probably all the way down and up to be quite honest. Turn your roller horizontally. Now we're going to work a little more specific in how the shoulder blade moves just briefly. Okay? I'm going to save it for those longer classes from those other people, but right here as I'm touching my shoulder blade and the bottom tip of it is really right near this part of my shirt. And again, right there, that curve.
Okay. And I'm pretty fair skin, so it's a nice contrast. And Karen's my shirt, but that's your, the scapula, the bottom of the scapula. So when we roll the roller up, which is what you're going to do is step your feet apart, your elbows are bent, your forearms are pressing the roller. I want you to actually use the bottom tip of that shoulder blade and arch it. Imagine it arking towards your underarm and up along your elbow toward your elbow. Okay? That's known as upward rotation. Okay? And then just re bend your elbows to lower down, but you don't pinch him back. Really, they just settle down.
We're going to go again, lightly. Press the forearms on the roller. The bottom tip of your shoulder blade is moving its way to your armpit and up towards your elbows
I do want you to press your forearms against it.
You let it pour down your back a little bit more. Your neck gets longer, the top of your shoulders melts down. Maybe you could roll that roller half an inch higher. I think you did it. I don't even, I can't even see you, but I think you did it. Okay. Everybody bend your elbows and then that's all I wanted to do with that, facing that way. That's a lot. And again, just take a kind of a stance for a minute and just feel what you feel in your upper back and across your shoulders.
I'm imagining you're feeling some good stuff. Okay, we are facing the wall again. I'm going to do some pushups. So if you're like me, sometimes going down to the floor, doing pushups isn't in your wheelhouse. If you've never done a pushup on the ground, never fear you have. This is your ground. Okay? So I want you to have your hands about the width of your shoulder frame and put the weight of the on the heel of your hand, nice and firm on your wall and the base of your wrist right at your armpit.
That's your alignment. Okay? For now. Now let's give some love to our hand. So everybody put your finger, pinky finger on the wall, spread your Palm and put your ring finger on the wall. Spread your Palm and put your middle finger, spread your Palm and put your index finger and spread your Palm and put your thumb gonna. Feel that that is such great work for your hands. If you've been keyboarding all day, you really need this. Okay? Now here's what we're doing. We're bending the elbows any amount.
I'm going to start small so you can see that. And then as I push away, I'm using all that area in my upper back where my straps are on my shirt, between the shoulder blades, all the place we've been working, middle back, middle, upper back. Okay. So lowering the elbows to the wall, any amount. I'm going to go for it. I'm going to get my forearms all the way. And as you push back and we going to keep your shoulders organized low on the back of your ribs and your ribs don't fall forward, you're still organized as pickup the tempo a little bit. You will absolutely feel your arms getting worked out.
I'm not counting because I'd like to just go to where I'm fatigued, if that's, if you're already fatigued, please stop. I will count us down for, or else I could be here a while. Three, two, and one. And then just lower your hands for a second. Yep. All through here. Um, am I right? The place that we want to feel more tone. Okay. I love these. These are little wall jumps. Okay, great for um, strengthening your wrist. Really good for strengthening the rest. Okay. Spreading the hand. Again, bend any amount you have to push off the wall. Push woo land, fingertips, Palm elbow, push away. Fingertips, Palm elbows. We're doing 10 of these four. And when you land, you have to kind of put the brakes on.
Go slow slowly so that you control that landing. We've got four more. Hold your tummy in. Three shoulders are low on your back. And one you may have to build up to that many repetitions. If that kind of thing is new for you and you might have felt it in your wrist. Again, build up to it. Great little wall workout pushups and the jumps.
And you'll have some tone in your arms like, like crazy. Okay. Now guys, we're gonna do two more things. I told you it was a short and sweet class. I want you to pick up your hand towel. Okay? A great shoulder rotation exercise that's coming. Pretty intense. It's full range. So, uh, take a look at it. I want you to stay on very close to the wall, outside foot in front of the other foot. And I have my back leg heel off the floor and my knees are just slightly bent.
Okay? So I'm pretty close to the wall like that. Not leaning on it, but I'm really close. Take your hand towel to the wall, shoulder level Palm on it. So you're actually internally rotating your humerus, your upper arm bone. But you were being able to do that without upper back slouching because you've worked so hard on getting the upper back, uh, strong and your posture open. Okay? So here's the deal. We're gonna sweep. I'm going to clean the wall. Don't tell anyone, you'll probably get hired to, to clean. How high can you sweep up? Let's do a couple, maybe three times. Just that part. Okay.
If any pain exists or you feel anything icky, just don't do it. Something else going on with your shoulder and that's another class, okay? But for those of us that things are feeling great and okay, pause where your arm is high. All right. Now I want us to think about the chest, thoracic spine. Again, ribs, all this that we were had, uh, facing the wall.
Start with the ruler. Start to turn that part of you toward the wall and you're going to notice the arm goes back any amount. I enjoy this. I'm going to go ahead and look to the backhand. I'd like to take that hand all the way down. If you're feeling uneasy in your balance, use this hand for balance here. Okay, what goes one way needs to return. So it's the arm, but now at some point when it's about as high as it goes, start to return your chest, spine, thoracic spine.
As it began, we'll do three or four more. Let's breathe. I'm going to inhale arm up, turn my chest, spine, thoracic spine and sweet. In turn, the thoracic spine and arm, thoracic spine, arm. You get it. And thoracic spine. One more round. Axial elongation up, up, up. Get taller, get taller, no ribs pushing forward all the way. One more round. How'd that go? Did it feel as good for you as me? I think it did.
It's around outside, foot forward, back, leg straight. Excuse me. The other way around. Front leg, straight back, knee bent, get close. Shoulder is set, meaning it's not protracted too far forward. All the checkpoints. So we did three sweeping up down in line with your shoulder.
So you have good rib cage stability. You prove that to yourself with that roller work. Third one. All right, that's your arm. Turn your chest spine in front of you to the wall and continuing your arm coming behind you. Any amount return. So many of you might be wondering what should be happening in the hips.
They should be stay facing forward. You know what? If they turn a little bit, I don't know, it's not the end of the world, but do try to keep both hipbones facing the front direction. We've got three more sweeps. I want you to stay on taller in your chest, spine. Gonna make that arm gesture much easier. Just buying up. You're not on the computer anymore. Open.
Think about how many things you'd be able to do better with better shoulder range. Okay, last one, everybody.
So get close to the wall. Lift your inside knee, tabletop basically. So your knee is at 90 degrees and your femur is straight forward in front of your hip if you can. This hand comes here. If you need to take this leg lower, that's fine. A lot of what this is about is the stability and strength in this leg and of course your axial elongation. So what's this leg doing?
It's pushing against the wall. We're going to hold us, I'm not counting, I don't have a clock in front of me. It's probably going to be about 30 seconds and we'll do two rounds. Okay. Not leaning back, maybe biasing your weight forward a slight bit. How's that tummy? Is it in? Is your chest spine up? Okay. You could certainly add a little flair. Play with it.
You could do all kinds of things here. All right. By now you're probably feeling some fatigue here. Am I right? Probably. So let's change legs. Just a quick turn. Inside lane comes up, pelvis is right above the heel. The sit bone. Anyway, right above that heel, the ribs are right over this pelvis. Neck is right over the rib cage and the inside leg is pressing the wall. This hip is trying to press toward the wall and your hips are level and you're breathing. Fantastic balance. Exercise.
You could take your other arm reaching up to the ceiling. It's about that ax. You'll link right up.
I can't tell standing tall. Everybody gesture. You can do hand on top of your head. It can go behind.
It's not a collapse. It's a strong intentional roll forward to touch your toes if you can. So we've been the neck first. It's as if your back skin slides up that wall, your low back slides up the wall and you're going to stretch all of those muscles that you just worked in. This class should feel pretty delicious. If you can get all the way down to touch the floor. Wonderful.
You can do fingertips. You can do flat hands. Do what you need to do. Oh, just rotate that head a little bit. Okay. I'm going to roll up just one time and I want to start very slowly and think it coming from the low back. Right here at the tail and it slides down that wall. The pelvis slides down the wall.
I'm starting to reach my low back, back for the wall, low back, back rib cage back. Start to build that spinal column up. Rib cages back. Shoulders are back. You know what? I lied. I'm going to do one more cause I feel so good. Here we go. Not quite as much talking, so we'll go forward.
Slide.
I have a feeling you might be a little sore in your muscles here. It's a good thing. It's because you worked them to get stronger and taller. Okay, thanks a lot and I'll see you next time. Bye bye.
Pilates with Amy Havens: Beginner Mat Workouts

Mention
 |
Amy Havens (Teacher) |
 |
Patricia M |
 |
Ellen P |
 |
Allison O |
 |
Maura R |
 |
Maria P |
 |
Lisa Press |
 |
Susana P |
|
|
Deana |
|
|
Cynthia G |
|
|
Helen R |
 |
Barbara L |
 |
Melissa W |
 |
Jennifer A |
|
|
Deborah B |
 |
Jeanne Missey Osgood |
 |
MKV |
|
|
Isadora B |
 |
Keryn E |
 |
Alessandro Avetti |
 |
Skridge |
|
|
Cigdem A |
|
|
Liz |
 |
Kyla F |
|
|
Patrizia B |
 |
Lisa F |
|
|
Lisa P |
|
|
Deirdre Adkins |
|
|
Lissa D |
 |
Jackie H |
 |
ANNE-FRANCE TERNOIS |
 |
Kerry H |
|
|
Dianne H |
|
|
Marcia H |
|
|
Vidya M |
 |
Giglia M |
|
|
Melissa F |
 |
Alex R |
|
|
Daniela C |
 |
Kate V |
|
|
Miranda W |
|
|
Viera W |
Comments


You need to be a subscriber to post a comment.
Please Log In or Create an Account to start your free trial.
