Description
About This Video
Transcript
Read Full Transcript
Hi, thanks for joining us. We're back in the studio today with Tucker for our fourth session. And Tucker and I are working on some very specific things. You may know that if you've been following along with us, and if you don't know that, then we'll speak about it as we go along today in our reformer workout. So Tucker, what I would like for you to do is just to turn and face the ocean.
And I want for you to stand nice and tall and just have an inhale and then exhale and with the exhale, get ready for moving your body. Let's inhale again, filling up the rib cage. And as the exhale starts to happen, bring your head forward, soften through the knees and lift through the center of your body. Keep your arms heavy. You can bend your knees a little more than you are.
The head stays heavy and inhale. And as you exhale, lift through the center of your body, and we've spoken about laying thinning up and around that rib, broken rib situation that we got going on with our friend Tucker here, but we've decided exhale will bring the chin into the chest. If there's a sense of going up and around it, there's not much discomfort. Is that true Tucker? That's true.
Good. She says that's true. So I'm right again, inhale and exhale. I love to be right. Fun fact about me.
A little bit more pelvis Tucker. That's better. Good. And standing tall. And I'm gonna put my hands here for you to breathe in, to spread them out and bring your head downward.
Then we'll do one more. Allow the knees to soften. So I measure with my hands the ASIS and the PSIS, and I'm looking for those bones to be fairly level in space. I mean, they'll move through space. So they're not level all the time.
Here's, there's a posterior rotation, but then as she comes up into standing and finds her neutral alignment, lift your spine a little more. So arch your back more, that's right. So I'm finding ASIS, PSIS and I'm convinced that she's in neutral. Please lay on the mat, Tucker. So we're gonna go pretty simple here, and we're gonna just do a fundamental warmup.
So I want you to just bring your heels down onto the frame and then do like that kind of a prehensile organization of your toes. So I've checked in with Tucker's shoulder, which has been injured, and she says it's feeling pretty good, which is excellent. So what I want you to do is I want you to take an inhale and I want you to pull your abdominals in and expand through the rib cage. And I just want you to exhale for no movement first. I'll squeeze my fingers towards one another.
That's it. She's still got all those skills. Inhale, widen more and more and more and more and more. And now as you exhale, I want you to draw and underneath your belly, and I want you to just flatten your spine into the mat. And I want you to inhale and re rotate all the way back into neutral, and then start exhaling, go.
Pull the abdominals. And then this hip is hiking. And inhale coming back into that neutral spine, we'll just do one more Tucker. I'm watching again, the ASIS, the line of the ASIS going straight across. And I'm watching for the depth of contraction which I'm happy with.
I'm watching for the ribs to move on the inhale. Let's do a full pelvic curl, Tucker. Exhale, flatten the spine, and then begin lifting the pelvis off. And I want you to send your knees forwards towards me. Inhale.
And now as you exhale, start from your throat and being again, laying your spine back down, elongating through your spine. As you come down into the mat, releasing eventually all the way down into that neutral spinal alignment, inhale. Start the exhale, feel that initial movements, all abs. And then as soon as the pelvis lifts, you have to start standing into your feet, feeling the backs of the legs. I want you to feel that you're pulling your heels back towards your fingers.
And as you exhale, coming down, pulling the pelvis out away from the rib cage to elongate through that lumbar spinal area and returning down. So it just gave her a little feedback there. Let's do two more, exhale to lift. How does that feel on your torso? Great.
And again, exhale to come down. Here, I'm pulling her slightly towards me just to give her a different sensation of elongating, kind of slowing her down and giving her a little feedback. And I'm guessing a little stretch. Let's do one more please. Lifting.
Nice, and coming back down. Beautiful Tucker. Very nice. You wouldn't think that Tucker has been moving and hasn't had any time to practice. (laughing) Just threw you under the best set.
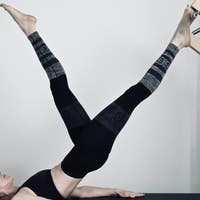
Can you hold the hooks for me? So we're gonna go into the spine twist. So what I want you to do is I want you to stabilize through your torso. You don't need to tuck your pelvis. You're gonna lift one leg.
Now bring it a little closer to you. There, yeah. Now pick up the one. Good. So now what we're looking for is a spine twist.
So we're gonna inhale this way, pull your belly in. So that you're already pulling your belly in. And you just need to think about deepening as you send your ribs down into the mat, followed by your pelvis. Yeah, a little bit laterally flexed on your right. That's better.
Inhale as you reach over. That's nice. Start your breath. Use the breath to find the muscles off the trunk and use those two things to bring you back into the middle, inhale as you go across. Exhale as you come up, center, keep that sitting bone reaching for me.
Thank you. So she's just doing a little lateral flexion on that side only. But I'm not gonna let that happen. We're just gonna bring her awareness around it. So that's what I like to do.
I like to point it out so that she knows what's happening. Thank you, Tucker. That was better. It's happening a little bit. That's nicer.
And exhale to center. One more to the back. Keep the knees side by side. Very good. How's that feel on your shoulder?
Fine. So let's bring the feet down. You can keep them together and do the same thing where you have your heels on the frame and you do like prehensile with your toes. Please reach around the shoulder blocks to bring your hands behind your head and then lay your head down. So there's, maybe not the most ideal position for this.
I might use a mat in a different role, but right now we're gonna do it this way. So you're gonna inhale. And then as you exhale, I want you to curl. So I'm gonna create a little support for you and then I get you to be straight. And then I want you to snore as you're back flat.
So you got it biased towards a little bit of posterior rotation. I want you to hold right there and inhale. And then as you exhale, I want you to feel both sides of your waist working and your low belly working as you lay your body back down. Inhale. And reach up.
You're just doing a little left rotation. That's better. And inhale. And exhale. The belly is pulling in.
So there's contraction even if I pull my hand down, even as the body's coming down. So if you didn't know what we've been working on, I will tell you. Tucker and I are working on finding the deep muscles, the transverse muscles. That's better. Pull my hand down.
That's right. That's right. Keep doing it. Good. Let's do two more.
I like that. Nice. So, the first time I helped her, I'm not so much helping her now, but she's finding what I want her to find. I see, yeah, yeah, yeah. Good job.
So I'm watching for, is the fabric, to look like there's dropping, like muscular dropping away. So this fabric will drop towards her body. Bring your clothing with you. Good job. Thank you.
Tucker we're gonna lift up. This'll be the last one. Okay, good. Go ahead and bring your arms down next to your body, please. So normally I would finish that with the chest lift with rotation.
Can you bring your knees into your body. I'm gonna adjust the bar, just give yourself a stretch. Normally I would finish with a chest lift with rotation but because of that floating, broken bottom rib of Tucker's that fluxion with rotation is not really comfortable for her and it's not really great for what's going on in her body. So we're gonna take it away. But we are gonna do some footwork.
So we're gonna bring the feet right there. Take your arms down next to you. You happy? Yeah. So we're gonna drop that sitting bone.
I want you to inhale. And as you exhale, you're gonna push out without tucking the pelvis this time. Reach all the way out and then do me a favor and just make sure you're really honest about that spinal shape and then make it not happen from the thoracic spine and then bend your, sorry, bend your knees and come back in. Step into your feet. Feel the backs of your legs engaged before anything else happens.
Thank you for that. And then if it's helpful for you, Tucker, if you want, you can put your hands over your pelvis to feel if there's contraction. So remember that idea, go again, you can keep moving, you're doing beautifully, you remember that idea of not just pulling down, but also like trying to thread the fingers towards each other too. So there's like a knitting. I don't know.
Knitting is the right word. The knitting together of the fingers, was it what was in my brain? Good, great. Keep the back of the right side of the pelvis down. Thank you.
We'll do three more. So we all have a little pelvic rotation. And so it's a good thing to look for, the line of the bones. Very nice. We're doing one more.
So do we just go right into our footwork, warming up the body. She's doing a beautiful job. I'd like for you to please, how's the spring? A little light. Does it feel a little light, we're on three reds and a blue.
You get to stay with that. Maybe you're just extra strong today. So let's do that again. Inhale and prepare. Feel the backs of the legs.
Thank you. Pause there for just a moment. I want you to push into your big toes. I want you to feel here that the heels are coming slightly apart from one another, just like that. So for you, it's gonna feel like you're doing a little bit of internal rotation in your hip.
And then I want you to stand on my hand without putting force on me and bend your knees. So in other words, keep the feet where they are. And back of the legs, please. I'm watching for that, contraction is happening. And bend.
Nice work. And just creating a rhythm that feels good to you, but without, well give yourself enough time, I guess is what I wanted to say, to find all the pieces, the breadth piece, the deep core piece, the softening through the ribs piece. So you have your little checklist of things to think about. Now this hip is lifting a little too much, this right one there. Good.
And push the left one, I mean. Good. And bend. Tucker, see if you can feel a sensation of using the backs of your legs to bend your knees as well. Does that feel different at all to you?
Good. Let's do one more. So a nice way to think about that is to think of dragging the heels towards the back of the leg. I liked that more. I like that more.
So bring your heels together. I don't know how I could see that you aren't doing that. I just feel like maybe there wasn't, I could see there wasn't like a connection back there as you were coming in, is my best description. Go ahead when you're ready. Rapping through the outsides of the leg.
Thank you. You're standing more on your right foot than you are on your left foot. I can feel that more than I can see it. And bend. Step into both feet.
Thank you. Reach out. And bend. Your head is a little to the right of center. Your head is a little to the right of center.
That's better. It's probably your bun. One thing that I know to be true about Pilates, that has nothing to do with choreography is there's not really a great hair deal, then go, that works all the time. Good. Let's do four more.
You're doing really brilliantly Tucker. Thank you for standing in both feet. How's that work in the center of your body feeling, integrated? I think. Looks like it from here.
Does that little clicking that's happened in this ankle bother you? You can feel it, but it doesn't. Try stepping into your big toe a little bit. Didn't do anything. Didn't fix it.
That's okay. It was like a little tendon clicking happening in there. Please move your feet out to the outsides of the bar. Just drop this guy down. Alright.
Think of squeezing your legs towards one another. Not moving them so much as just gliding them. That's better. And then go. Thank you.
Yeah, she's good. Doing a good job. And bend. Use the backs of your legs to come in and stretch out. Nice work.
Well, Tucker, I have to say, even though you haven't had a chance to maybe practice as much as you want, the lessons that you have been practicing and learning, there's the muscle memory around there, which is fantastic news. This is lifting. Really nice. I've listened with my hands, which is what I'm doing, stand on this foot more. And what I mean by that is I feel for pressure.
So again, things I might not be able to visually see as much, I can feel. In case you're curious about what my hands are doing. Thank you. Please move to your toes. I think you could come in a little.
Yeah, that's fine. Well go ahead and reach out. So here's where I want your feet. And bend. Left leg pressure, inner thigh contraction, center body contraction.
And reach out. And bend. Softening the ribs. Thank you. So just so we're clear, you keep moving please.
I'm just gonna talk. When I'm telling you to soften your ribs, Tucker, what I don't mean is hold them down or lock them down. What I mean instead is just feel that your mid back extensors, aren't trying to arch off the mat to get your pelvis to stay where it is. I actually want you to expand through them as you're inhaling. So I don't want you to lock them down in place.
I just want you to feel that the mid back is really anchored into the carriage. We'll do two more only. Thank you. And one more. Very good.
And bend. So we're gonna take the feet back into the middle, on the toes. You're gonna push out. You're gonna take your feet under the bar. Soften the back of the ribs, lift through the heels.
So you're doing full, sorry, my eye is itching, full articulation of the feet and all the way down please. Keep your quads engaged and left. Keep the quads engage is a good cue to not over lock the knees, go again. Find a rhythm that feels nice to you. And then pull from the front of the shin to come under into that maximum stretch.
Pull it from the front of the shin. Good. Ribs. Thank you. Back at the right pelvis on the mat.
Thank you. Good. Last two. And into prancing, please Tucker bend one, push off that bent knee foot. So once, both feet, what is what I want to say, are active.
It's a nice place to have your hands because you can feel if there's any rocking or rotation in the pelvis. Get a full all the way under the bar. Stretch with that flexed foot. Your right knee is going a little wide. Two more on each side.
Lift both feet, bend both knees, bring the carriage in. So I'm just gonna adjust the springs. I'll take it to, do you want two reds in the blue, Tucker, or three? Two reds in the blue. So let's keep the right foot on the bar.
And then lift this foot up. Okay, good. So we feel that the pelvis is anchored and straight across. It's almost like, to get that pelvis down, what I just kind of felt when you found that, it almost felt like your femur bone was dropping back into your hip joint. So maybe that's a good place to think about and initiate from.
And begin. And bend. Good. And do that using the back of the leg to bend your knee. Good.
How's that feel? Just two more. Very nice Tucker. Please come all the way back in. By my counting prowess we did eight.
So between your brain and my brain, let's see if we can keep it to the same number. Good. Go. Ooh! Maybe I'll let go, but let's keep that leg right there. That one wanted to come with me.
Maybe it was my fault. Stop for a second. So you want to feel it's for that back left hip to be really anchored. (Tucker speaks faintly) So trying to like find the femur thing on that side, which was pulling your pelvis up. Okay, okay.
So sometimes like a cue to change one movement isn't necessarily the best idea for the all the times. Nice work. I think there's three more to make eight. What do you? (laughing) We can't even keep track with our two brains.
You can let your toes relax a little. (Tucker speaks faintly) Just stand on my hand with them. Are you thinking with your toes? (laughing) One more. You're doing a good job with your pelvis though, which is good news.
Very nice. I want you to move on to this toes. Lift that leg. I'm happy. Bring that to here.
A little more, there. And go. Keep your heel here. With me. Thank you.
So what I'm gonna do, Tucker is I'm just gonna touch, I'm gonna keep my hand here just so that you can feel where you are in space. So I'm not holding you. I just want you to know that if you feel your foot lifting away from my hand, it's 'cause it is. Well, I like that energetic work that you're doing in the back of your leg. We'll do three more.
I feel that your pelvis is very level. So from this angle, I can see the height of the pelvis on both sides and that orientation of the sitting bones in relationship to each other. That's what I'm looking for. One more. Beautiful.
Switch sides please. Go ahead, reaching out. That one's drifting again. As you bend and keep the left inner thigh squeezing towards the right inner thigh. So that leg was just drifting out a little bit.
Internally, rotate a little, there. Oh! That was her mark cued. I know that she was leaving my hand, those words. So again, I'm not holding her still. I'm just being here for her.
Good. Drop the back of the left side of the pelvis again. Thank you. (Tucker speaks faintly) Mm-hmm. A little bit.
What Tucker told me just now is that she feels that that heel wants to lift more than the other one did, but she's doing a nice job of, push on your big toe. Thank you. She's doing a nice job of knowing that and also doing what I'm asking of her. I think two more Tucker. It does on the left up more.
That was good. One more. That's great. Please bring this foot down onto the bar and rest. I'm just gonna measure this 'cause I haven't yet.
Take them in your hands. So what we're gonna do is we're gonna revisit the last time we worked on the reformer. So I want you to keep your feet where they are, but push with your arms a little bit. Little more. Little more.
Feel the rib cage resting on the mat. Lift one leg. Lift the other leg. Good. Knees are together.
Inhale. I'll get out of your way. When it's time, I want you to press your arms straight down. Keep your head down for now. And then I want you to pull your abdominals in as your arms lift up.
And before you push down with your arms, I want you to soften the ribs. I want you to find your stomach muscles, and then I want you to move your arms from that place. Good, it's pulled. Thank you. So I'm just feeling for push, like outward push resistance.
And what I want Tucker to do, go around me. Get that, there it is. That's right. Am I in the way? Squeeze me, that's right Tucker.
Feel how it happens if you let the air all the way out. Nice. Turn the palms of your hands to face your legs. Take your arms out to the side. Breathe into your arms with your ribs.
Keep pulling down on me here. And exhale. Pull back. Deep and deep and deep and deep and deep. And inhale.
Wide open ribs, wide open arms. Start here. Thank you my love. And squeeze back in and inhale. And exhale.
So to this is from our arm supine series, but we're using it as ab work. Do you feel your abs working? She says yes. Sometimes the simple are movements of more straightforward things are easier to find more depth. This is the last one Tuck, I mean, Tucker.
I like to say Tuck, but it becomes confusing when we're speaking about Pilates. Lift your arms up. Put your feet down for just a second. I want you to scoot a couple of inches away from the shoulder blocks. So what I want you to do is I want, we're gonna do just the 100 prep.
I want you to find your shoulder stabilizers, but I don't want you to pinch your shoulders back. I just want you to feel that you're standing in your hands from underneath of your shoulder blades. 'Cause if you pinch back, it's gonna be harder to get that mid back down. When you're ready, lift your legs again. Take and inhale.
Now initiate from your sternum. Start curling up. We did this earlier in the chest lift. Reach past your hips towards the foot bar. Use your arms a little more to find a little more hype.
Yeah, that was great. Now lower back down. As you exhale, initiate by dropping the sternum, pulling the abdominals in, lifting the chest, reaching forwards and inhale. Now lift your arms first this time. And now bring your head and chest down.
Let's do three more. Keep pushing down with your stomach and your arms and your arms. And reach up. Are you okay? Yup.
And two. Thank you. I like it. She's really, really finding a good set up. Squeeze me.
Thank you. And go back. Good. One more time. I'm seeing the waist.
Lift the head and chest. Tailbone soft. That's it. Is your back still flat? So you know the most important thing, right?
So I asked her to drop her tailbone and then she lost her imprint in her spine. So she was doing the right thing I was asking for more than her body wanted to give me in that moment. And because I've told her information about what's the most important thing, she was doing the right thing after all. Could you please put your feet into the straps? So we're just following the BASI block system here.
Working our way through. So just a little bit of basic hip work today. Put your hands over your pelvis, soften through the ribs. That's a nice place for your shoulder to be to, I think with the wide elbows. Externally rotate.
And so that's something that doesn't happen just from the feet and the knees, right? It happens all the way up in the hip and now bend your knees. As you bend your knees, I want you to press your heels into one another. Pause there. Drop the back of the left hip onto the carriage a little more, that's perfect and push out.
So these are very persnickety corrections. Bend. And you need a very, and press out. You need a student with a lot of awareness to be able to make those kind of, bend, those really detailed, simple cues. And reach out.
Nice work. And bend. And reach out. Good. And one more.
Finding all the pieces, finding the breath. So let's take it into a circle. Go down, go out, come up, together. Now here, your tailbone can stay very much down. Push down.
Out. Up. I want you to feel the backs of your legs engaged to move the carriage. And down. Out.
Up. I think your right leg is working a little harder again than the left. Thank you. We all have that one side. So just let the left side get a chance.
Thanks. Good. I'm gonna look from a different place. You keep going, two more. Last one.
Tucker, your left leg is going a little wider than your right. Let's go into the reverse. Let's open. Stop there. Well just lift your head and look at your legs.
You see, so take the right leg wider or the left leg in, that's better. And now press both legs down evenly and externally rotating that right hip. And come together. And lift up. It's worth it.
Sometimes I would argue to re, that's better, reorient and look from different places. That's better. Good. Pelvis in, neutral. I can feel like the shelf of that in the ASIS as your legs come up and your tail is dropping down.
Let's do two more. And one more. Good. Now we're gonna go into opening. So what I want you to feel here is that your legs go straight out.
It can go as wide as you wish. And now squeeze, left leg squeezes too. Good. And go straight out. Keep this pelvis back.
What I think is happening is I think because your right leg wants to work more, I think it's kind of tipping you in that direction a little bit. It's just a story. But let's see if you work on finding the back of the left pelvis, so it will help the left leg. I think that was better. Let's do three more there.
Out. Ribs softening, big breathings. Squeeze tight together. Two more. Good work.
One more time. Tucker, how do you feel about doing the short spine? So what I want you to do is start with your knees bent and your feet flexed. So this is a lot of, there's a lot of like little choreography pieces that I'll try to be clear about. I want you to take your legs out in front of you, just like a frog.
And when you do, I want you to point your feet. Now maintain that positioning in the legs and start bringing your legs over the top of your body. And what I want you to do is I want you to stay heavy with your pelvis, but I want you to continue to come in before actively lifting until you feel the carriage come to a stop. Then, keeping the carriage on the stop, roll up and back, and just feel that you're stepping into the straps a little bit to keep the carriage still. And bend your knees.
Widen them a little. Feet are still appointed. We're gonna start rolling away from the feet. I'm gonna allow the knees to open slightly. Now in order to keep the carriage still which is the goal here, we wanna start dropping this, the carriage stays still, drop the thigh bones to make that happen.
And then once you go as far as you can go without the carriage moving, a great deal, I want you to flex your feet. Flex your feet. Now bring that shape across the top. So it's like a hinge and you finished back in your frog. That was very nice.
How'd it feel? I found lovely and stretchy. Lovely and stretchy, she says. Push out. And start folding.
Coming all the way to a stop. That's better. Roll up. And so stand in the straps enough to know that you're keeping the carriage still, but what you want not do is you don't wanna push up toward the ceiling. You just wanna go backwards and that will help you to stay still.
And then bend your knees. And you wanna push on the straps a little bit, this like into my fingers. So you can feel the backs of your legs working a little bit there, and then go down. And letting the knees open a little wider. So it basically an upside down frog.
Dropping the thigh bones towards the body, yeah, Tucker, slow, go. You wanna stretch? So I'm gonna put my arms here, my hand here, and I'm just gonna lightly push or actually very, it's a bigger push than it might seem. Flex your feet. Bring that shape over the top.
She does that perfectly. The knees didn't change at all. It was great. Can you please do one more? Push out.
Come all the way in. We'll make them better and better every time. So now you know the trick to not moving the carriage is to not go towards the ceiling, but instead to go back over the top of the window, that's behind you. You wanna keep your stomach pulled in all the time. You're gonna bend your knees as you inhale, keep stepping into the straps to keep the tension on the straps.
And then come down. Dropping the thigh bones down, close to the outsides of the ribs. How's that feel in your rib? I feel no pimping. No pumping.
Awesome. Get it a little stretch. Very good Tucker. Flex your feet and come across. Nice.
And through. Great. Let's take your feet out of there. And just hang the straps up and you can help yourself up. I'd like to do the kneeling lunge.
Tucker is a runner, so she needs good stretching. So come up onto your knees. Do you want any padding to go underneath your knee? Or you gonna be okay? Maybe some padding.
Maybe some padding. We're gonna get some padding. So we've got a pad. This kneeling lunge isn't always super comfortable for the knee that's on the bottom. So if you have a pad, it's nice to offer that to your student.
So what I'd like for you to do Tucker, please is to put your left knee on the pad. Just like that. Your left foot is gonna go up against the shoulder block. You can bring your right leg up with you. There's no rules around that.
And then you could step your right foot up onto that foot bar please. Take it to the right a little, it's not quite in there, it's quite lined up with the hip. And then I want you to get this foot as much as you can up against that shoulder block. So you might feel a little stretch in your foot as well. Next step.
We're gonna let your chest come up and back. And now we're gonna get you to do just a little backward press with that left thigh. It doesn't take long before the stretch is happening. Anyway, I'll just have you breathe. Lifting the ribs up off of the pelvis, doing full breathe.
She's got a little more extension 'cause I pushed her. Oops! Tucker, now take this pelvis and bring it straight back. What it's gonna feel like you need to do in your brain is it's gonna feel like this sitting bone has to come towards this ankle bone. That's right. Very nice.
Go straight as you can. I don't mind if you straighten all the way. Yeah, you're good. So what I want you to do is lean a little to the right and flatten out your back and lower your waist a little. Here, is it a big stretch?
It's a big stretch. Again, I just measured the pelvic bones. Bend your right knee. As you're bending your right knee and your back is lifting up in you're coming in, I want you to keep squeezing the back of this leg to help you work your way back into that stretch as you're coming through. And then once you find your hip flexor stretch again, we'll do a few more breaths.
Trying as best you can to drop that sitting bone down towards the bed. Extending the spine all the time. One more time, press that left leg towards, straight. And again, you're gonna think about this right sitting bone dropping towards the left inner ankle bone while the left side of the pelvis lifts up and back a little bit to keep the pelvis squared. And then I want you to, this here, and then I want you to get a little longer in your back, there's a big stretch for her, which I think is good.
It's good to have big stretches. Tucker, now you're gonna bend your front knee. And then lift your chest. You're gonna keep actively working back here. You're gonna bring yourself back in.
Okie dokie, you ready to switch? We'll bring the carriage and I'll bring this across. Go ahead. So I'm still choosing things for Tucker that are extension focused for the most part. So she's not digging into that rib flection situation.
Oh, we got a tighter side happening here, lifting up. Good. And then just push back with that right thigh a little bit. And breathe. So you can bring this hip towards me a little.
Are you okay? And then start going with the left leg. (Tucker speaks faintly) The heel doesn't have to be lifted. Tucker asked me if the heel is lifted. And it also doesn't have to be flexed.
It's kind of like a neutral foot like your foot work. But if you say, wanted a bigger stretch, you could flex your foot, but I'm not asking you or, I was suggesting that that's important to me. I think you're doing a good job as you are. And then bend your knee. I'm very empathetic to this young woman here.
'Cause I am also a runner and this is also a difficult exercise for me. So I know what it feels like. Squeeze here, lean into the left leg, breathe. I'm just gently kind of helping her find the, where the pelvis needs to be. Go ahead and push out.
Yeah, that looks great. How do you feel? Thank you. I helped her. She told me.
Stretch out here. Is it easier to set this time? Mm-hmm. Go ahead and come in. So bring that.
I'm gonna take this off out, away. And tell me what it feels like to have both knees on the carriage. It's okay. You're fine. So we're gonna do the down stretch.
So I want you to put your hands on the foot bar. And I want you to wiggle your feet up against those shoulder blocks nice and tight. And then open up your knees a little more than they are. Thank you. So now to get into position Tucker, what you're gonna think about is you're gonna, we've got on one spring for the last two exercises, we're gonna bring the pelvis forward.
And I want you to engage here. So keep going. Keep going. Now squeeze here. More.
Lift your chest up and back. And now once you're in this position, you wanna think about two places in your body, back here and in here. Okay, here we go. You're gonna push with your arms. I'm feeling across the pelvic area for abdominal contraction.
So I want you to squeeze where my hand is and I want you to lift it. Keep lifting, keep lifting. Think up and back, stomach in. All the way. Good.
How's the spring? Push out. Is it too hard? Do you need a little more support? You're okay.
She says we can do this. Here we go. Pulling in here. Squeeze your pelvic bones towards one another in your brain. That will help you find that.
That's it. That's it. That's it. That's it. Let's do it again.
Out. Nice. Yeah, that helped you, huh? The pelvic bone squeezing cue was helpful. Yes.
Yes. Are you breathing? Kinda. One more. Out.
And back in. Now what I want you to do Tucker, is I want you to sit towards your feet. Just there. All right, so we're gonna do the knee stretch. We're just gonna do the flat back knee stretch so you don't have to go to too much flection in this session.
So I want your tailbone lifting up a little. Thank you. And now you're gonna push out with your legs and I want you to pull your legs back in. I'm gonna hold my hands right here. I want you to stay still there.
That's it. And back. Pause for a second. Then we're gonna reverse the breath and I'm gonna have you sit a little. So inhale to push the carriage.
Exhale to pull the carriage. Inhale to push the carriage. That's enough. Exhale to pull the carriage. Inhale to push, enough.
Exhale to pull, pull, pull. In, in, in, inhale, push. Exhale, pull, pull, pull. She's doing great. One more.
Where my hand is. So again, I'm measuring where the pelvic bones are. I'm talking to her with my fingers. She's not getting away with anything. Tucker, I want you to stand up on your feet.
I'm gonna give her a red and a blue here just to give some stability. Put your heels up against the shoulder blocks. And then what I want you to feel here is that you're standing into your feet. So now use your abdominals to flex the hip and pull the carriage towards the stop or actively. So that's action asking for action without anything really happening.
So she's working as she's setting up. Drop your head. Take your whole body down a little. Now take your, are you okay? Your shoulders look amazing.
Take your feet out from underneath you, so they reach back. Now stop there. Get a little longer through this section of your back. I like it now. That's where we're gonna hold your back, Tucker.
And if the carriage comes in, it does. And if it doesn't, it doesn't. I want you to lift your navel towards your spine without flexing your spine and pull your legs towards me. Inhale to push out. Exhale.
That's it. Good. Inhale. So I just encouraged her back extensors to work a little bit by showing them how, with some hands on cuing, how you feel? Good. Good.
You could practice, so you could try lifting your toes as the legs come underneath you, you'll get more stretch that way if you want. Or you could decide just to keep really waded through your heel, spread out through the sitting bones here. And I'm just gonna do one check of one thing. Yeah, I'm satisfied and I'm excited. Okay, Tucker, that's great.
And it's enough. You can bend your knees and come down. And then I want you to sit down on the mat and face the back of the reformer. And reach forward for the straps please. Going back to one red spring.
We're gonna do the seated arm series. We'll start with chest expansion. My favorite place to teach is here. So what I want you to do is I want you to bring your arms out to the outsides of the carriage. Stay there for just a second.
If you need to bend your knees, Tucker, I won't be sad. But I want you to lift your back a little more. So that's fine. So now what I want you to do is I want you to push your arms back. And I want you to lift your sternum and take your arms down and forward.
So the place where we are wanting to bring our awareness is not pinching the shoulders together, but finding that muscular tissue right in between the scapula and kind of in that V shape coming down the center of the back and coming down the sides of the back. And what I like to think about personally is I like to feel that I take my arms down and as I do that I lift my spine. Yeah, that changed it. Nice. Let's do three more.
How's the spring tension? Two more. You're using your stomach? One more. She's doing really, really beautiful job.
So let's take the arms out in front. Continue to hold your spine in that place. Lower your elbows just slightly. You're there. Do it like that.
Bend. And straighten. And bend, lean forward a little. That's it. And straighten.
And bend, yes Tucker. And out. And bend. So if you can see where my hand is in the front, you'll actually be able to see it shift position. You see how deep she's pulling in.
That makes me feel extremely excited. Me too., Tucker too, she says. She's extremely excited. We both are. Lift here.
One more. That's awesome. Please put the straps over your elbows. Also, I'd like for you to just let me know if there's any discomfort in your shoulder. So bring your arms up in front of you.
You're leaning back at this moment. So what I want you to do just for today or for this moment in time, drop your right shoulder a little. Take your arms out to the sides. Now as you do that, I want you to think elbows forward, thumbs back, and then back out in front of you. So that elbows forward, thumbs back is an external humeral rotation idea and it will just help to have a better position.
Pull your elbows away from each other at the same time. Great job. Left and right with the elbows. Elbows forward, thumbs back. No leaning stomach in.
Is that too many things? Pull in here. Good. Inhale now. Exhale now.
Elbows forward, thumbs back. That's good. One more. Drop this guy. I think that's enough.
How'd that feel? Excellent, she says. Turn around. Straps are behind you. Can I bend my knees?
You can bend your knees, but what I want you to do as well is I want you to scoot way back into the shoulder blocks so you feel that your pelvis is on the shoulder blocks. And then think about using those shoulder blocks to kind of align the pelvis in a really upright place. Like use them for help and bend your knees if you need. I don't mind. Yeah, I know.
Come forward with your arms. Come out with your arms. Stop there. And now as you exhale, bring your arms forward, lift your spine, and open. Keep the right scapula kind of on the outside of the body a little more.
And forward. So what you have to watch for is that your scapula isn't sliding back, bringing the head of the humerus back with it. You have to keep it out to the outside. That's better. Lift this arm a little higher and pull.
How's that feel on your shoulder? (Tucker speaks faintly) So she's, when she does the adjustments that we're speaking of, she's not feeling discomfort. But when it was gliding, was there? Let's just do one more for today. I don't wanna push it too much.
And then the last exercise, let's try for the salute. So take the hands out near the temples. Now here what you're gonna wanna think about Tucker, is the scapula going this way, kind of bringing the elbows around the front. How's that feel? Okay, here we go.
Take the arms forward. If it hurts, I don't wanna do it. Elbows wide. Hands like magnets against the temple and scapular drops back as the arms reach out. And bend.
And scapula stays connected as the arms reach out. And bend. Lift a little more, right there. And three. Nice work my love.
Two. Last time. So I'm gonna keep the reps small for today so we make sure that we're not pushing into anything we don't need to push into. We'll see how that feels. And next time we'll see if we can do more.
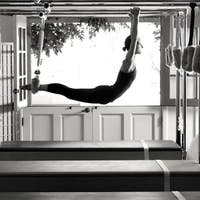
So I'm gonna take those. I want you to step up off the reformer. So we're gonna go through the side over, which is actually quite a difficult exercise, but because it's simple, straightforward, I'm gonna put it in this workout. So would you please go on the box. You know this side over, right Tucker?
Yes. So do you know which side is your better side? This side. I like to start with mine, not better side. Just then I can feel really successful when I do my better side second.
That's mine. We may not do the full thing today, Tucker. What we're gonna do here is we're gonna have you bring that foot up onto the box with you, and put your hand down, your right hand down. And so I think what we're gonna start with here today is we're just gonna get you into the shape because we we're gonna get you into the shape. When you're ready, I want you to lift that heel into the strap a little.
I'm watching to see if she's going forward or back of your pelvis. When you're ready, put your right hand behind your head. Holding. If you would like to, you can put your left hand behind your head, if you would like to, I want you to hold for five breaths. Pulling in.
Reaching out. Pull my hands together. Nice. Right in here. One more.
So it look like she's doing nothing, but I assure you she is doing many, many things. Put your hand down and then put your elbow down, Tucker. And then take this arm and reach it over your head and bring it around like that. Can I push? And what I want you to think of as I give you a little bit of pressure is I want you to really expand and stretch those ribs.
To get up, I think the best thing to do is to use your hands to help you. So I like to teach that as a prep before we go into the full sides, to teach the stability factor for the next portion of the exercise. So that's great. Tucker, you've done it. Let's change sides.
So I want you to bias towards lifting your heel up into strap. Bend over and put your left hand down. Take this arm up. Just straight up for now. I'm gonna make you a straight line.
So when you're ready, your left hand comes behind your head. If you'd like. If you keep your scapula out here, it'll be easy on your neck. So we did five breaths, you're a little rotated. She's right.
It's easier for her on this side, is it? Yeah, not easy, but easier. Easier to find. Easier to deepen around. Two more breaths.
One more. Bend and reach your left hand down. Put your left elbow down. You probably wanna keep that arm a little in front of you as it comes up overhead. Is that okay?
Mm-hmm. Here we go. So I have one hand on her and the between her iliac crest and her greater trochanter, on her hip, One hand just on her scapular and I'm leaning. Help yourself up. Take your foot out of the strap.
Get down. I get down? Yup. So the last thing we're gonna do is an exercise called the breasts stroke prep. And what I really like to do is I like to teach it without spring.
And the reason I like to teach it without spring is because I feel that it encourages and demands a lot of upper back awareness. And that's one of the goals for Tucker in my brain to help her manage, support through her upper back and stabilizing her shoulder. So Tucker, what you're gonna do is you're gonna lay on the box. Your hands are gonna be on the foot bar. Right now there's spring on.
So don't worry. So we'll just do one with the spring. And using a red spring, I'm just gonna have a look from here. So what I want you to do, so I want you to lift a little bit, right, not here, more there. There, good.
Now as you push out on the spring, I want you to, don't, so what she did right then, and I'm gonna tell her how to do it differently, was she, there's dolphins. (laughs) What she did is that she started pushing with her hands. But I want her to find connection to her back, which is why I like to teach this with no students, that's better. Now you can start to stretch your arms, straight. And what will happen here as the arms go straight is we'll get a little upward rotation of the scapula.
And then as you bend the elbows open wide. Let's do that one more time. That's it. What I like is this sensation of trying to pull the bar apart. So nice, pause there.
You're gonna do exactly the same arm thing. But now you have to find that control. It's a different sensation completely. Push out, use your left arm. And now this is where it's magical.
It's not on the out, it's on the end. But don't lift the bar. So you pull on the bar, but you don't pick it up or pull it up. What do you think? Feels good, huh?
So she's really talking to her upper back here and then glide the scapula down again and reach out. Very nice. So it's actually, she's working a little harder here than she was when she was pushing weight. Scapula wide. I've dropped down on the left side a little, there.
Pull that bar apart. But it's a completely different sensation. And if you've never tried it, you might try it. It feels pretty good. One more.
Out. Good. And back. What I'd like for you to do now is, I'm just gonna hold this still, so you're safe, step off. Stand just as you are facing the ocean.
I'm gonna come around. I'm just gonna do that. I don't know. I can't see them. We're looking for the dolphins now.
So inhale. And now as you exhale going down. So just bookmarking the beginning and bookmarking the end. Inhaling and exhaling. Are you okay? Yes.
We'll just do one more. Don't lean back. Stand on your left leg a little. Good. And inhale.
And exhale. Look at you, working so hard. Nice job with your pelvis. Really, really good. And then remember that as you come all the way up to standing, you wanna let that tailbone stick out a little.
Very nice. Beautiful. Well done, my friend.
The Teacher's Corner: Mentor with Meri


Comments


You need to be a subscriber to post a comment.
Please Log In or Create an Account to start your free trial.
