Description
About This Video
Transcript
Read Full Transcript
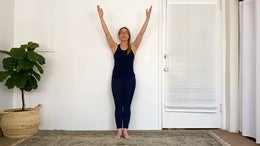
Hi, everyone. Welcome back for another class with me in my home in my den. It's the first day of fall. So welcome to our fall equinox. This is just me talking.
It's just a nice transition, you know, balance of life and light being half the day. Nice and light and half the day dark. So it's dark in Santa Barbara. I can tell you that. Getting a lot of fog out here in marine layer, but ready to get you moving.
And again, thank you for being here from wherever you are around the world. Just immense gratitude every time. So this is a continuation from the previous wall workout I did at the beginning of our stay at home and shelter in place kind of time. And I wanted to refresh a few of the ideas. We won't spend a whole lotta time talking.
I did talk a little bit more in the first one for explanation reasons. But go back and watch that one if you need to. We'll do some of the same movements, but of course, add on to that. But what I want everyone to do. Get yourself right back against your wall.
Hope you know that that's where you'll be most of the class. And let's stand away from the wall. Measure about at least one of your own foot lengths. Maybe two of your foot distances. Okay. And then let's go ahead first and just stand in parallel.
Knees straight but not locked or hyperextended. So you've got the sense of your quadriceps and your adductors and hamstrings, everything pulling up. Even your calves, of course, and arches of your feet. And then just stand there for a moment. So we'll take our checkpoints.
Love working with the wall for its vertical nature. And it doesn't really allow us to cheat. It actually gives a lotta feedback and teaches quite a bit about where you are with your alignment, connection, and of course the infamous box. I didn't talk about it in the first one, but if you haven't heard that reference before, the box is the torso. So we have a pelvis that has three landmarks.
We always talk about hip, hip, pubic bone in the front. On the back, we have back of hip, back of hip, tailbone. A lot of our tailbones, most everybody's, well, many people, it curls into your body. It doesn't stick out like an animal has a tail that sticks way out. Some of you have a prominent tail.
Most of us, the tail curls into our kind of body and the skin down in there. We reference tailbone. Today let's think about the tailbone referencing down to the earth, okay? To your feet. In the direction of.
Out of you like an ejectable tail, as some of us talk about. Down, okay? That's that. Shoulder, shoulder, rib cage. So we've got.
And then also in the front, in the back. So we've got all these bony landmarks we talk about, but if you think about draw a line from hip over to hip, up to shoulder, over to shoulder and down, you can see that it's almost a rectangle. You know, depending on how long your torso is. And ideally. It's ideal.
We're looking for all of those points to be in harmony. You know, you can see maybe something that's not quite harmonious in the structure of the four points being balanced. No one is perfect. So please keep that in mind. We're working toward as symmetrical as we can.
All right? So let's start this way. After you've got yourself organized there. Think about the back. We're gonna feel the back of our body.
The sacrum. So back of pelvis. Press it into the wall. You have to make some effort, your feet on the floor. It might help you push yourself back.
The back of your rib cage. Kind of base a bra line. Shoulders, easy does it. When you press your shoulders back, this should stay there. And most of us can get the back of our skull on the wall.
If you can't, I don't want you to get the back of your skull on the wall and lift your chin. That's not quite what we're after. Okay. Know that most likely, once we start working the torso muscles, your head'll get back. Okay? Lastly, for now, arms.
What are they gonna do? I want you to put your arms long by the sides of you. Palms can be open or closed. Your choice there. And press the wall.
So my feet, I'm gonna go through all those again. Feet pressing forward. Sacrum pressing the wall. Mid ribs pressing wall. Shoulders pressing wall.
Back of skull. Okay, stay there. And just, you should feel some effort coming on in your torso, your stomach muscles, the back of your shoulders. Of course, the side of your armpits and lats. Okay?
Notice that I didn't say press your lower back against the wall. Please keep its curve and the neck curve. Let's take some breathing. Inhaling, wide ribs. And exhale.
Just feel the air go out. So as we take these breaths, this is an exercise. Maintain all of those landmarks on your wall, right? The ribs especially. (Amy sighs) Let's take five total.
So three more breaths. So I'm thinking of standing tall on my wall. I'm thinking wide ribs and really anchored feet Feeling some good connection into your body. Okay? Are you still pressing your arms? Have you let go of that work?
This is like the floor. So press down on the floor. Press back with your shoulders. Okay? Now lift your heels up, everybody. Pivot your legs so your heels come toward one another.
You've got your Pilates stance. You can look if you need to and keep your heels raised for just a moment. Have your landmarks left the wall? Hopefully not. Press them back if you did.
We're up in gravity so it is a little more challenging to keep the connections back on that wall. Remember. Let's bend our knees. We're gonna kinda play with this for a second. So as you bend your knees, aiming your knees out over your second toes.
Second and third. Keep your heels pressed. I've only gone down a little bit and I'd like you to just kind of pause for a moment and think about what's gonna happen. We'll be straightening and bending the knees. In fact, I'll just do that now with my hands here.
I want you to concentrate on this part of your box staying level. Okay? Notice Or notice. Or one hip rotates forward or back off the wall. We're trying to feel that not happen. Here we go.
Straighten up. Kind of standing taller and then bending down. So my hands are gonna be right here on my pelvis for my landmarks. Okay. And as you bend and straighten, keep your sacrum pressed back on the wall.
You're sliding up. Like you would be on the reformer. Your ribs also staying on the wall. The back of your shoulders on the wall. And we think about this as our pelvis and trunk sliding down, sliding up.
Trying to maintain the box. Okay. And up. Let's just take two more like this. Down. And check the rib cage.
A lot of us will lose this part of the torso connection on the wall. Okay. Now stay up. Pivot to parallel. Lower your heels for a moment, but lift them again.
And here we go. I'm just have a little lift of my heels off the floor. And we can lower. And lift. Trying to keep that box square.
Now, what if the arms were down here like they would be on the reformer, right? And down. And up. Four more here. Tracking those knees parallel.
Work to keep that box symmetrical. Shoulders are back. Sacrum ribs, back of head, are in contact with your wall. Okay. I'm gonna have us go one more down and stay down.
Stay right here for a moment. Now, if you're a knee person and this is not feeling great to be even this low, you don't have to be this low. Or you can step your feet a little further or just wait. The rest of us, let's go down a little bit further. I bet we can.
I want you to go down low enough that you feel some real load in your quadriceps. Your thighs might shake a little. That's fine. Check your box. Check your connections.
Now from here, lower your heels. Lift your heels. Lower your heels. Lift your heels. Eight times.
Yup. Rolling down to the heel. Rolling up onto the metatarsals. Four more. Down. Think of that stomach now.
Can you pull it inward upward? In an up. Hmm. My low back now just made a little contact on the wall. That's all right.
It's not that I tucked my pelvis. I actually just exercise my stomach. My abdominal. Stay here. Lifted heels. Rise up and lower all the way down.
Okay. Step wider now, everybody. If you were on the reformer, it would be heels up on the corners of your foot bar. Not too turned out, but just enough. Let's do one more set of bend and straighten.
Keeping your box relatively or perfectly or as ideal as you can aligned. You're sliding down sacrum and ribs and head against the wall. Back of shoulders back against the wall. And straighten. Let's think about our feet.
What are they doing? They're pressing into the floor. Imagine the floor is your reformer foot bar. Just notice all those times when your landmarks maybe deviate. Just come back.
Let your mind-body connection come back. Stay down here. Same thing. Let's lift and lower the heels. We'll do eight.
Try to keep that box symmetrical. Notice if you want to lift a hip or hike a hip up or rotate one side forward. See if you can keep this really integrated and pulled back against the wall. I am making a huge effort from here to pull my hips back against the wall. Are you?
Hopefully. Three more, up and down. How about those arms? Are they still pressing the wall? Now, one more.
Heels up. Let's do some little pulses here. Down and up. Just little, very little. I'm gonna reference our tailbone.
It's not curled in. You're not tucking. You're dropping it straight down. Remember, in reference toward the right earth. Down, down, down.
Last one, hold. Lower your heels. Straighten your knees. Okay. Walk your feet back in.
Let's come feet in line with hips. Take a deep breath. Leave the wall. Meaning let your head, leave the wall. Just your head and your neck and your upper spine.
I want you to keep your arms pressed back. Keep the back of your ribs pressed back and your sacrum pressed back. And roll back up to the wall with the back of shoulders and your head. Excuse me. Let's do that again. So I want you to flex your cervical spine.
Nothing else leaves the wall though. I want your back staying back. The back of your sacrum staying back. Now, some of you might be thinking and feeling, hey, when I do that movement, my lumbar moves toward the wall. Please let that happen right now.
Let that lumbar meet the wall. And roll back up and notice your lumbar will probably leave the wall. Okay? Three more like that. Breathe in tall. So when we move some parts of the upper spine, the lower spine will respond.
That's just how our body is put together. So see if you can flex a little further. Think you're getting ready for the hundred. On the mat, our back will be flat on the floor, wouldn't it? So right now, what do you need to do to get your back flatter against the wall?
You may need to pull the stomach in more. You may need to flex your spine forward more. Here we go. Standing up. And two more. Inhale. Here we go.
Exhale. Slide. Now I'm gonna ask you to slide your hands down the wall a little bit. Just like we on the floor. Slide your hands toward your feet. But on the wall.
Keeping your shoulders back and then rolling up. Really trying to maintain that box, everybody. One more time, exhale and round. Okay. Where I want you to go. You're looking down at your legs.
Hopefully no one's locking their knees. Please lift your heels and pull them into the midline. Keep your heels slightly elevated and press together. Notice the work in your legs. Can you flex your spine even more?
Okay. But hold on. You're not done yet. Press your sacrum back. Lift your stomach in and up. Pull it in and press your ribs back more.
Okay? Stay with me. Now the arms get to leave the wall. Reach them forward in front of your legs. Okay? We're going to do the hundred. Here we go.
Five and five. In. X, two, three, four, five. Count on your own. I'll be cuing. So look down at those feet.
You're not white knuckling your toes. You've got energy in the arches of your feet that are lifted high. Your muscles are pulled up from your feet to your seat. Your arms are reaching in front of you, trying to keep those shoulders square, hips square. What's going on in your back?
Is your sacrum pulled back? Your lumbar back. The back of your ribs. Yes. You've got flexion. of the spine. Keep breathing.
Two more cycles. Make that stomach in. Pull it in. Pull it in. Keep your back back. Hard to do this talking.
One, two, four, five, exhale. Three, four, five. Hold it, hold it, hold it. Stay there. Reach your arms more. Pull your stomach back.
Feel that opposition. Arms forward, stomach back. One more effort. Arms forward, stomach back. Okay, everyone, rest.
Ah, put your heels down. Hopefully that feels good. You've just done some abdominal work. Okay. Pivot to parallel.
We're gonna do a standing roll down. Stay where you're at. You're right against the wall. Let's start all over. So head back.
Is anyone's head back now? That it wasn't at the beginning. Shoulders back. Level the pelvis. You've got your nice box here.
Inhale. Let the head go forward. So the same idea as we just did. You're gonna pass through that shape you did in the hundred and then continue reaching your hands toward your feet. Now, notice what's happening behind you.
Your sacrum and your pelvis is sliding up the wall. Can anyone touch their toes? Most of us probably can. Don't worry if you cannot. If you can touch their toes, stay there with me.
Pull your stomach in and up. And also as if you're trying to pull your hips up the wall as your stomach goes in, okay? I want everyone to bend their knees from here. Notice where your sit bones are. They're dragging down the wall and your tailbone is gonna roll down the wall.
We're doing a roll up with bent knees. Tailbone references down to the earth. Pointed down. Roll your spine up the wall. Get your landmarks, get yourself set.
And then at the very top, if you'd like to straighten your knees you can. Two more times. Breathing in. Slow and conscious. Peel off the wall.
This is the floor. The wall is the floor. So think about how you perform your roll up on the ground. Let the wall help you. You're reaching your torso towards your legs.
Your pelvis is sliding a little bit. Touch your toes if you can. Now, if you don't want to bend your knees this last couple times, you don't have to on the way up. Let's go. Roll up. Pull your stomach up.
Behind you, your sacrum is starting to round down a wall, but it's pressing back against the wall. There goes your lumbar, your ribs, your shoulder blades, your head. One more. Breathing in. And peeling off. Round.
Being as symmetrical. Going right down the center of your body. And I know on the mat, our legs would be fully together. I wanted to do it this way. It's okay.
You can do together if that's your pattern or even Pilates V. Okay, stomach in. You're not just hanging on your legs. You're bending your spine and roll all the way up, everybody. Massage, roll lift.
Once you come up, pause for a moment, reconnect. Okay. So as we're standing. Right now I want all of us to pull the stomach in so much that you might now be touching your wall. Okay?
We're doing it as an exercise to pull this in. Keep it there for me, press your shoulders back. Let's do the chest expansion exercise. Turning the neck. Turning it the other way.
And look back to center. Okay. We'll add some arms. But here's what's gonna happen. Arms just reach a little bit forward. Your ribs shouldn't have come off the wall.
So keep that connection. Let's press the arms back, shoulders back. Check your ribs. They shouldn't have left the wall. Turn your head, neck and shoulders.
Really see something. Focus on that collarbone part of your box staying square. Turn to the other side. Look to the front. Arms will lift up.
We'll do it two more times. Inhale, chest expansion. Hold ribs in. With muscles, turn your head to one shoulder. Opposite shoulder stays back.
That's what's so beautiful about the wall. You can really feel the effort of pulling that, anchoring that back. Look to the front. Return your arms. Okay. And last one.
Press. Use those muscles. Hold your shoulders back. What about your ribs? How about your sacrum? Check points.
Turn your head and turn your head. And look center and up. Okay. Really good. Just shake your knees just a little bit, everybody. Walk out several inches away from your wall.
I want you to bend your knees and I kind of aim myself for almost 90/90 here. Okay. So my pelvis is getting fairly low. But, again, if you just kinda moderate how this feels on your knees. Also press and weight into your heels. Gonna charge up your quadriceps and your hips and just stay here for a minute.
Okay? Hands on your thighs. Let's do some pelvic curl. Reference your tailbone. Right now it's pointing down to the ground, right? Curl it now.
Curl it and let the low back press into the wall. It should feel really good. Think pelvic curl as you do on a regular mat, right? Our thighs reach out of our knees. Our shinbones bones actually are pulling back a little bit.
Now it's gonna be a little weird. I'm looking at you like this. Press your shoulders back. That's all right. Breathe in. As we roll down, keep those shoulders back.
Massage. Come to neutral. We'll do two more. Inhale. You could also do arms like this. Curl up. You could also put it back on the wall.
Get creative. Do what you need to do with your arms. Want you to feel that you're making an effort to keep the box square. And unroll. One more time, inhale.
And leave the wall from the sit bone and tail. Curl. Pelvis is level, meaning you're not twisting. You can really see if you have one hip rotated. Change it if you need to.
And unroll. And once you get to the wall, press up to stand. Okay. Walk away for a second. Just shake your legs out. How are you feeling?
Hope this is helping a little bit. I didn't get that deep on the first class. But I am doing it now. Okay. I'm gonna have us stand again about two of our own foot distances away from the wall. Back into where we were.
Just kind of recalibrate. Okay. This is a hard one. Be ready. It's a good one. Really good teacher exercise.
Teaching you about your pelvis and its stuff, okay? You might learn something about yourself. So here's the deal. I want everybody to just take one leg. Bending the knee and putting the foot against the wall.
Without thinking too much. Okay. And step it down. Alternate sides. You will discover some things. I'm repeating this several times and you just keep repeating with me and I'm talking about it.
What is likely to happen is what we all know is a hip hike, which looks like this. Then the foot goes back on the wall. Let's try to not do it. Okay? So the top of your pelvis has to stay level in that part of the box. The standing leg becomes extremely important.
You have to really push down on that leg to help you get the other one up. So we don't lift the hip up. We press the leg down to lift the other one up. There's some opposition, right? Let's keep going.
This leg presses down. This foot comes to the wall. And lower. We do three more. Yep.
Now with the feet on the floor, try this last round with your feet together to start. See if it makes it easier for you to get your foot up. I think some of you went, yeah, it did. Well, it's okay if it did. It's okay if it didn't.
If you liked it better with your feet apart, make it yours. But what I want us to do is one more. Notice what we're working on, guys, is keeping the hips level. That part of the box level. Okay?
So here we are. We've got one foot on the wall. Check your landmarks. Your head, your shoulders, your ribs, and your sacrum. Okay.
Now bend your standing knee. Track that standing knee straight forward over your second toes. Stay with me. Stay with me. Hinge off of the wall.
Bring your torso forward a couple of inches. We're trying to bring the torso forward. Keeping your box. Keeping your hip steady. Okay. Torso goes back.
We'll do two more total. Ready? The foot on the wall, I really want you to push it against the wall. As the other foot is pressing down to the floor. This is really getting some deep connection in your hip extensors.
Hopefully. Maybe a little on hip flexor here, of course, but okay. One more time. And then hinging back. And then we have to take that foot down.
Restraighten both knees for a moment and we'll do the other side, of course. So second foot comes to the wall. Without hiking your hip, if possible. If it did or if it moved, adjust it. You're learning.
I know mine does. I did adjust it a little bit. Bending the standing knee just a titch. And pause for a moment. What happened in your landmarks?
Head, shoulders, pelvis. This foot on the wall's really pushing the wall. The other foot you're standing on, heel is in the floor. Okay. Hinging forward. All right.
We really want the torso to come centered over those legs. I don't want you to drift sideways with your trunk. So you're going right in this lane. You can even have your arms be kind of like the swimming pool ropes that. Right, so you don't wanna go over there or over there.
Over and up. Okay. Everybody lower your arms. Take that foot down and then come up to standing. Anchor your heels together. Let's do one standing roll down in a Pilates stance.
Take your arms forward, breathe. And then round forward. But remember, you're leaving the wall with consciousness. Stomach is pulling up as we're bending forward. We're about to sit down on the ground and we're gonna go into a spine stretch forward, okay?
So everybody just come on down. So I'm gonna turn around to face the wall just so you can. We're gonna use the wall for a pretty significant reason. Facing it and then we'll face forward. Okay.
So you probably don't even have to look at me. I'll do my very best to cue clearly. So I'm facing my wall. My feet are flat up against the wall. Take a moment to look up, see your feet.
Yep. Your legs are just a little bit wider than your hips. And all 10 toes are face up. Arms are reaching forward. Shoulders are square. So even just here, you're trying to organize that box.
Lift your stomach and up. Breathe in. Okay. We're going to do that rounding forward. So your neck and cervical spine flexes. You're rounding forward.
Your fingers are about to touch that wall. What I want you to focus. Let the fingers touch. This is pretty small. Keep your sit bones sitting down.
Your tailbone anchoring into the ground. Not behind you, not forward of you. Right down. Okay. Now keep bending forward. Flatten your hands to the wall.
Flatten your hands if you can. Most of you can. Check it. Hold there. Make sure your tailbone isn't sticking out or too curled in.
It's straight down to the ground. Okay, everybody use those strong arms. Push the wall forward. Push your heels forward. Pull your stomach back.
Walk your hands a little farther down. Keep all of that connection. Keep that connection. Can you get your hands all the way down the wall. Maybe fingertips right where the wall and the floor meet.
I have my fingertips there and I'm pushing the floor away and pulling my stomach deeply back. Hold there, ask yourself. Wow, that really feels like more stomach work today than my normal spine stretch forward. Try to keep that. Lift your hands up.
Drag your fingernails on your wall. Roll up to sitting tall. Roll up to sitting tall. And then what we're gonna do is try to take that into the regular spine stretch forward. So I'm about to turn around to see you again, okay?
Get your back against your wall. Same connections. Now your back feels it, right? And pretend your feet are right up against your wall. Your toes are up.
Take a breath. Arms are here. So here we go. Flexing that head off the wall, that neck. Your pelvis doesn't move.
If anything, you press your hips back into it but not so much that you're tucking, right? Your sit bones are still down. Your tail is still down. I'm reaching my fingernails down the wall like I did. I've got my hands down and I'm trying to press my hands into the floor.
Just like I did facing the wall. Press. Feel that stomach. Now lift your arms so that they're the height of your shoulders, everybody. Roll back up to sitting tall.
Don't move that sacrum. Don't move those shoulders. Let's breathe in. I'll do one more time. Yeah?
Do you feel different in this spine stretch forward? Then I'm teaching you something. Round. It's so easy just to kind of flop over the legs in spine stretch forward. But that's something different.
That's a hip flexor exercise, right? This is spine bending. And the abdominals in the front, of course, are the muscles that flex our spine. So you should really be feeling that. And then roll back up to sitting tall.
Okay. And rest. Let's check out saw real quick. I'm gonna turn back around to the face to wall. Similar connection. Let's take those feet against the wall.
Okay. So sometimes in saw what we hear is a cue. I've said it. Keep your hips square. Well, how do you know?
Sometimes you need the feet to be grounded in order to feel if something's off in your pelvis. Arms up. Choose a side to rotate your trunk to. I don't have a preference because you do both sides. Turn your trunk toward one side.
Are your feet still pressing the wall? That's what I want you to feel. Perform the same spine stretch forward you just did a moment ago. Front hand is reaching toward your front ankle. Back arm is pressing back and up.
Okay? Stay here. Feet pressing wall. Sit bones on floor, tailbone on floor. How does that feel for you? If it feels okay, turn and look at that back arm and pull it up.
I want you to pull that stomach in. Pull it in and reach a little farther. Pull it in. And let's roll up to sitting tall and then return to facing the wall, okay? Other side.
Keep your legs anchored. Keep your sits bones anchored. Roll forward. Round. Do that spine stretch forward. Reaching front hand to opposite ankle.
Okay. Check those landmarks. Be honest with yourself. Can you press both heels evenly into the floor? Press both heels evenly. Reach a little farther and roll up to sitting.
We'll do one more. Little faster. Let's inhale. Exhale, reach. Keep the landmarks.
Keep your sits bones square in that box. Roll yourself up. One more facing the wall. And then we'll turn around and do the real one with our back against the wall. And roll up.
Okay. Yeah. Here we go. Turn around. We'll do four, two reps each side. Okay. It's gonna feel really different. I think because it's your sacrum now staying against wall.
Here we go. And of course our arm can't move behind us. Turn your trunk round toward the front leg. Keep the opposite pelvis back. That's your square.
That's your square. That's your box. Isn't it different? Roll up and center. Other side.
So it's your trunk that rotates. As you're reaching toward this front foot, imagine your heel's against the wall but your hip's pulling back. Try to get that opposite hip against the wall. Is it rotating forward? Try to rotate it back and up.
One more each side. Don't even worry about your arms. Obviously that's not part of the. Concept right now is to keep the back of this hip back. That part of your box square.
Should be really nice stretch in your lower back. Other side and twist. Okay. Opposite hip back. What can you do? How far do you go or not go?
It's pretty interesting. Okay. And then voila. Okay. Continuing on to feel some side body muscles. I'm going to take a side-lying position, head this way.
You know, we always say on side lying, reach your top leg so long. Well, let's do it. Let's reach the top leg so long. I'm bearing weight on my elbow, getting myself in my side position. Okay. Now stack your leg, stack your hip.
So right here, it's fairly easy because both feet are pushing against the wall. Okay? Bottom foot counts too. That one needs to push as well as the top leg. So really lift your underside up. Okay.
Take your top leg now up. You're parallel. You're abducting. Only as high as you can keep your heel pressing the wall. And then slide back down.
Inhale, slide up. The bottom leg matters. I want you to keep energy through the bottom leg as well. Three more, guys. We're doing a total of five.
Leg goes up. So if I had a quarter or a dollar bill or bigger underneath my heel, I'm keeping contact with it. Sliding it up the wall. You could do it with a wash cloth or towel. It's a really great exercise to do that way.
Take your leg up and hold it. Can you press that leg a little more into the wall? Yes, you can. Bring it down. Okay. Take both legs slightly forward in that banana. Same thing.
Five times here. It's a little harder to keep reaching the leg, but let's work on it. Take it up and take it down. Try to keep the bottom of your foot against the wall. Shoulders and this part of your box square.
Three. I'm in parallel and two. Bottom waistline very long and stretched. And last one and take it down. Okay.
Externally rotate that leg. Here we go. Leg up. Doesn't go very far. And leg down. Work from the hip.
Externally rotate. Try to reach the femur toward your foot. And lower down. You have to really stretch the bottom waist up. Three more.
Leg up, leg down. Not even the foot so much turning out as the upper leg. And lower. And last one. And this time I want everybody to hold it there.
Hold it. I know your neck is probably getting a little exercise. This is some of our lateral muscle connection as well. Okay, and then lower everything down. Good. You guys.
One more facing this side. Get into a little clam position, please. Knees in front of you. Meaning straight out in front of you. Soles of feet right on the floor.
You're kind of in a 90/90 on the ground. Okay. And now clam. Open and close your top leg. Your feet will move a little bit, but I want you to think about the femur doing the rotation. Okay. And we're gonna reference the sit bones and the tail are pointing toward your feet.
Down to the earth. In this case, it's the wall. So the hip rotation is probably a smaller range of movement but hopefully more specific. Again, that's what the wall can help us work with. That specificity, the detail.
One more time, press your leg up. Okay. Just hold it there. Little turnout. And let's just hold and hold and rest. So small, but mighty little moves.
Okay. That's enough there. I have another hip exercise standing. So I don't wanna burn you out too much. Okay. So other side. We started with both legs straight.
Soles of feet on the floor in a good side body setup. Okay. Crown of head has some energy up toward the ceiling. Okay. So we're elevating the leg. Trying to keep both sit bones and tail reaching toward the heels. And then lower.
And slide the leg up. Notice you have to keep your bottom waistline also very stretched toward your feet. Okay? Your hips are not hiking to perform this leg movement. Last two. Your leg is moving.
Pelvis is staying steady. There's your last one. And then down. Legs come forward a little bit. You'll do five more.
You may need to scoot into the wall. Here we go. Parallel abduction of the leg. And lower. Again, you can practice this other times.
This is a great thing to do with literally putting something underneath your heel like a washcloth and sliding that up. You have to keep reaching it to the wall, right? Your foot to the wall, your foot to the ground. Reach out. Hopefully feeling a little more specificity in your hip muscles here.
Yay. Okay. That was that one. And now externally rotate five times. Up we go. Remember, not just turning your foot.
It's your femur. It's your hip. Up and down. Stomach in, guys. Up and down.
These aren't real sexy exercises, I realize, but hey. This is, you know, it's intense. Sometimes you have to slow the car down. Get that intensity. Okay, one more time.
Up and down. All right. And then we come in and we do that clam. Okay. Yeah.
Whoops. So feet against wall. Knee straight in front of hips. Get a good side position. Your box is square underneath there. Shoulder, shoulder, hip and hip.
And then open and close. And open and close. And open. So the bottom shoulder, the one I'm lying on. I had to kinda tuck it down underneath me to try to get more square in my shoulders.
Yeah. And then the pelvis is square here. So hopefully your rectangle, your box, is pretty darn symmetrical. Okay. It's hard to do these things. If you had a mirror in front of you, you'd really be able to see yourself. But sometimes you get to learn about feeling your way through.
Last time. Hold. And just press and check and feel. Beautiful. And then we can relax. Okay. Now stay with me.
We're gonna come around and lie on our back and place your feet up the wall. We're gonna do a little more spinal articulation here. The first wall class I did, we did a lot of ab work, right? You know, chest lift and rotation. That was really nice.
Let's do some spinal articulation. Okay. So heels right in line with knees. You've got a good 90/90 here. Take a deep breath through your nose. And let's do some bridging.
Now the tailbone, where's it gonna go? It's gonna reference it back of the knees. I'm actually reaching my tail toward the wall and up the wall. Just like we did standing. You're reaching your thighs forward.
Press your feet firm into the floor. I want you to bring your arms in everybody, closer to you. So feel for a moment. You've got yourself standing on the wall. Should feel pretty good.
Shoulders back. That part of your box is square. Lift the hip points of your box up to the ceiling. Or even better, to the wall behind you. Breathe and let's unroll.
Oh yeah. Okay? Rolling that box down down evenly. Let's take two more. Breathe.
And (sighs). Yup. Inhale and exhale coming down. It feels really nice going right down the center of your spine. We're gonna do one more to get up in the center of our spine. Then we'll start to change the orientation of box points at the pelvis.
Okay. So here we are up. Choose one pelvis. I'm actually gonna choose my right side. That just makes sense. And I'm gonna take the back of that right hip back.
Roll down that side of your spine. So for me, I moved my right hip back and I'm rolling down the right side of my spine. Rotate it on purpose. Just get down to the back of that pelvis and hold. So your opposite hip.
This happens to be my left one. Is really up off of the floor in rotation. Now we wanna rotate that side of the box on purpose. It's not height. It's rotated.
Press your foot against the wall. Hopefully you're feeling a really good aha in your oblique muscles. We have to roll up. Roll up the right side of your spine. At the top, center the pelvis.
Of course we have to do the other side. So now I'm gonna take my left hip and rotate it back. Roll down your spine. Keep the right hip rotated forward. Get down to that left lower back.
Pause when you get there. Has your shoulder part of your box moved? Move it back. Rotate the right hip forward. Roll up your spine.
Okay. I think that was probably pretty nice for everybody. Let's go one more time around, breathe. Rotate one hip back, one hip forward. Roll down your spine. So that's kind of what should be happening in your corkscrew exercise.
We're just doing it this way today. You can work on these concepts in your own practice with full corkscrew. But we're just doing it with feet on the wall. Other hip rotated forward. One goes back.
Roll down that spine. Feel those obliques working. Down and we roll back up. Okay, we're not done. Get those hips up.
I'm gonna use my hands behind my pelvis for just a moment and then extend one leg forward. So shoulder bridge, right? I'm gonna take my leg off the wall. It's coming toward you, flexing my foot. Now I'm not hiking this hip.
Not hiking. Take your foot, point it to the wall. You don't have to use your hands underneath your hips. You can put them down like we would in mat. Here we go.
Flex and point. Touch the wall. Three more. Flex and point. How's that other foot? Pushing onto the wall and point. One more. Flex and point.
Step that foot in. Hopefully your hips are pretty square. Your box is square. Other side, point to the wall. Flex your foot, bring it towards you.
Hopefully no hiking, right? And then we go one and toward you. Really push the other foot on the wall and your arms down and back on the ground. Just like they were on the wall at the chest expansion. And flex.
One more. Point. And flex. And then take that foot back onto the wall, everybody. Breathe in. Hips are high.
Unroll your spine. Keep your shoulders back, that part of your box square. Roll it down. Get your box square at the bottom. And hopefully that gave you some information about whether or not you hike or not.
I'm gonna come up now. Okay? Woo. Come on up to standing. So we've got a couple of things more to do up standing. Because I said we weren't done with the hips.
This is really nice, I think. And difficult. It also has a lot to do with whether or not you hike your hip. I'm gonna pivot and turn this way, okay? Yeah. I'll pivot this way.
So I'm standing to the side here. My inside shoulder is facing the wall and touching it. I'd like to, we'll do shoulders and hips. So take this inside arm. You've probably seen me do this before.
And you're internally rotated in the arm. So my palm is on the wall but I don't have my whole shoulder forward. I've just got my arm up in internal rotation. Okay. Now I want you to stagger your feet. Inside foot goes back.
Outside hip comes forward, right? You still haven't hiked your hip. You're nice and square. Now this arm, slide up the wall. Let your torso rotate a little bit to get the arm to come behind you.
Palm is still on the wall. Okay? It's a wonderful chest stretch. This shoulder has left its box on purpose. We've rotated a little bit up here to allow for the trunk rotation.
Okay? Now let's take this arm and return it all the way. And notice you can square your shoulders. This is what happens when we walk, everybody. We do want to allow our shoulders, ribs, and pelvis to move a little bit.
So there's a time when we want the box to stay stable. Let's do two more. And a time where we don't need that box to be so symmetrical. Rotation in this manner is one of them. The shoulders and hips have to rotate away from one another.
Okay. One more time. Yeah. And now this time as you're here, turn it all the way toward me or toward the front of your room and feel that, okay? Right. So now this part of the box is opening away. You can even take this arm to reach.
That feels pretty nice. But this part of your box reaches forward. Now hold that. And just feel that nice sense of rotation. Good.
And then let's relax and do the other side. Okay. Feeling some good side body muscles today. So shoulders are square. You start nice and symmetrical.
Inside arm comes palm face flat 'cause you're internally rotated. Stagger your feet. Outside foot comes forward, inside foot back. Okay. Remember, you start as square as you can in the shoulders.
But here we go. We're moving that part of the box on purpose. Allow the torso to move. Yeah, and it's a nice chest stretch there on the front of that left. For me is my left pelvis or chest.
And then arms come back in. Okay. And again. Arm comes up, rotate. You've gotta stay lifted. Lifted and twist.
And return. A lotta good creative ways to use this wall. Now, how would you do this on the floor? You'd figure it out. You'd play.
It'd be very, very fun. All these kind of floor things done in standing. Here's your last time. This is mainly talking about moving the shoulders and hips. Okay. Now from here, come back to the start and we're gonna exaggerate and open toward the front, but the pelvis toward that front.
And if you wanted to take your arm up, you could. And just study, how's that twist feeling, right? We didn't do seated twist on the floor but this is kinda that sense of turning that torso but not moving the pelvis. Okay? Lower your arms. I'm gonna stay facing this way.
Again to stand with your shoulder against the wall. Okay. This is a great hip exercise. Also for not hiking. Take your inside leg up. Lift that arm outta the way.
So it's just gonna lift here. This knee that's against the wall. I really want you to press the side of that knee against the wall. This hip against you, pull this in. You're square.
You can actually hold both arms up. Pull the stomach in. Standing straight and tall. The leg that's against the wall, I'm actually pressing out. This hip I'm pulling in.
Trying not to hike. If you had a mirror, this would be really telling. It's fantastic to do. Hold and hold and hold. And test yourself.
(sighs) A little bit longer. Unlocking your knees so we're not locking on that standing leg. Good job, everybody. Okay. And lower everything down. Should have gotten this hip a little bit in the party, right?
Turn around. Shoulder against the wall. Lift the inside leg up. You're gonna put that knee at 90/90. Not the hip lifting.
Inside arm can lift. Outside arm can lift. Standing tall so here I am on this standing leg. Pushing into the wall with both pelvises, really. So this pelvis is kind of moving toward the midline.
Holding. The other leg is trying to press the wall. Any of us that have knee problems, gonna let you in on a little secret. I learned this from a physical therapist friend of mine. It really helped my knees.
And a lot of you know I have got knee stuff so. It has a lot to do with, you know, needing to be stronger in the hip. So, hey. All right, keep pressing. About 10 more seconds.
They made me do that for a minute every time I saw them. Which is actually a great exercise to do. Okay. And then lower. Perfect. You guys. We're almost done.
I want you to take your hands, circle them around. Wouldn't be a class with me without some weight bearing on your hands. Step away from your wall. You can do a Pilates stance. Always need to do some pushups.
We can do wall pushups. So hands are against your wall. Nice and open. Lift up. Now this is really nice about the wall. You're pressing in.
You're lowering your forearms to the wall. Just stay there for a moment, right? You're not gonna hike your hips to get away from the wall. You're not gonna lead with your hips to get away from the wall. You're gonna use your triceps and your rear shoulders.
And then bending down again. So those shoulders square, the box square. (Amy sighs) Gotta keep your stomach pulled in. I'm gonna have us do eight to 10 of these little wall pushups. Feel free to go faster if you'd like.
Don't need to go fast. I've got a little sense of my hands dragging down the wall, even though they're not moving. (Amy sighs) Four more. So the rib cage hasn't leaned forward, has it? You're not letting her ribs dump out.
If you had a plank of wood on your back, it would be the same. Your head would be back. Your ribs would be back. Your sacrum would be back. Last two.
And last one. And lift. Okay, last thing we're going to do. Come around, shake your hands out. We need to do that wonderful ending.
Sometimes the very traditional ending at the wall. Stand in your Pilates stance. Wrap, and everyone start like we did. We're gonna stand with our head. How's your head and upper back?
Should feel pretty darn good. Ready? Take a breath. Let your cervical spine leave the wall. Round your body forward. Let your arms reach forward.
Almost like they're gonna go do that hundred, but they're not. Keep rounding forward but keep your sacrum pulled back now. Stay there. Roll up almost all the way. You're gonna roll so your lumbar gets the wall and the base of your shoulder blades touches the wall.
And just do some really easy little circles. Just let those arms go and then reverse your circles. Keep your sacrum back and your low back back. And the shoulders are just rounded, heavily forward. Okay, beautiful.
Let the arms rest. Roll the rest of your spine up. Still keeping that sacrum back. And then to finish, pick one foot to step backward with and then come off the wall and then just finish. How'd you do?
How does that feel? I know it's always a little different with me because my background is varied. I've got classical roots but I've got a lot of influence from lots of teachers. And, of course, my own creativity and my own thinking that goes into classes. So I hope you got some out on this.
I hope you got some great ideas. Make them your own now. Right? That's what teachers do. And that's what movers do. Thanks for joining us.
Now we've starting to burn the fog off. So thanks for helping me. Have a great week. And I know so many of are here every morning. We've got this amazing fall lineup of teachers.
Kira Lamb, Sarah Bertucelli, Amy Havens, Kristi Cooper, Karen Sanzo. So come play with us. Come move with us. And we're all so grateful that you're here. Have a great week everybody, and I'll see you next time. Bye.
Pilates with Amy Havens: Move with Amy


Comments


You need to be a subscriber to post a comment.
Please Log In or Create an Account to start your free trial.
