Description
About This Video
Transcript
Read Full Transcript
Good morning, everybody. Unless it's not morning where you are. I'm Mariska. And today we are going to do a pilates-ish workout using yoga blocks. So, mine are cork, which means they have a little bit of weight to them, which may be a mistake.
Later on, we'll sort of figure out if I've made the right decision or not for myself. I also anticipate that this class might have a blooper too. And because I haven't made the blooper reel in a while, I'm just going to be excited about that. So, just so we're on the same page. When we're talking about the yoga blocks, I'm going to call this flat.
This will be like medium height, and this will be like tall. And hopefully I'll remember that that's what I've chosen to call them. And then when we put it like between your hands, I would say like, this is the long way. And this is the short way. And there's no point at which we're gonna do the flat way, but I'll try to also make sure that, you know, I'll turn to the camera so you can see it.
So we've got two yoga blocks to start with, but we don't need them both right at the beginning. I would say put one, so it's reachable to you, sort of to the side of your mat. And then we start seated upright. I'm going to start with bent knees, because why not? And I'm going to hold on to the block between my wrist long ways.
And it almost like you would use like a magic circle. And we're gonna start seated upright, and then we're going to exhale to round back. Make sure you take your shoulders with you. And let's just go down to your low back touches and then lift yourself back up all the way to the top. Exhale to round back.
Low back touches, and then lift yourself back up. Because my legs seemingly want to go straight, I'm just going to kind of let them do that. So, legs are straight, I'm going to roll all the way down, arms lift up toward the ceiling, head and chest lift. And they're going to round forward, still holding onto the block between your wrists, not with your fingers. Roll back down.
Let the block lift right above your face. Try not to drop it on your face and then we're going to roll up, and reach forward. We'll do one more like that. Round back. Kind of follow where the block is going. It lifts, and you roll to come all the way up.
This next one, we're going to roll down and we're gonna do the hundred. And so, our goal when we're doing the hundred is not to push your abs forward, it's to draw them down. And so what I'm gonna do is I'm gonna take one block, rest it on my abs and to make a little bit harder, I'm going to take a second block, also rest it on your abs. You can either start with your knees bent in towards you or your legs down to ground, arms lift up towards the ceiling, head and chest lifts. Float your legs up.
Try to balance blocks. Begin to pump your arms. Inhale, and exhale. (Mariska exhaling loudly) And they're wobbling, but I'm gonna try really hard not to drop them. (Mariska exhaling loudly) Halfway there. (Mariska exhaling loudly) And then I'll lower down.
I'm gonna take one block, place it to the side, and I'm gonna lower all the way down. And I'm gonna call this long way. I'm going to bend my legs. I'm going to start with my right leg just because my right leg is more with it than my left. I mean, I take the block, so one end is going underneath my ankle, the other end is going to touch my thigh.
So basically, I want to be able to hold onto it, hopefully without dropping it. Bring my hands behind my head, head and chest lifts, now lower the butt down. Exhale, lift. Lower head and chest lower foot, exhale, lift. Inhale down.
Exhale lift. Inhale down. Exhale lift. Inhale down. Exhale lift.
We're going to add a twist. Inhale down. Exhale lift. Lower, and lift. Lower.
Oops. It wants to slip. And lift. Lower. And lift. Last one. Lower. And lift.
Lower down and take the block. This is my less good hamstrings. So just, wish me luck. I'm wishing you luck, inside. You're going to lower your leg, lift.
Lower, and lift. And it really wants to, to turn down. Lower. And lift. Lower.
So I know if I lower it all the way down to the side, I'm going to drop it, and which is, would be embarrassing because this is the beginning of the workout. Lower. Lift, twist. Lower. Lift twist. Three more. Lower. Lift twist. So if at some point you drop it, you just keep going.
Lower. Lift and twist. You're going to take the block, I'm just going to hold onto it, sort of at the tops of my legs, rock back, and forward, and sort of a rolling like a ball action to come all the way up to a seated position. So this one's kind of fun. So I'm going to do this. I'm to call it long way up. I've tried it tall way and it really did not work out for me.
So what I want to do is I want to be able to place it to where both ankles can sort of rest on it. It does take a little maneuvering to get into it. Still ankles on. The other one is going to go base of your shoulder blades, and then you're going to push down, so that you're hovering up. So it's almost like you're in your hundred position, but you're floating.
You're gonna take your right arm by your ear and then reach it back down. Left arm by your ear and back down. Right arm. Or you can even take your left hand to the floor 'cause we have a little bit more room to move and you're trying not to twist from side to side. Reaching arm.
Reach the other arm. Last four. Two. Three, and four. Let your hips lower down.
We're going to do a kind of like mini, world's smallest teaser to roll up. So my block is tipping a little bit, but when I come back, it should untip. So I'm going to lean back, try to find the other block again, lift back up. Kind of just hover your arms. You're going to bend one knee in, place that foot down.
If you need to balance with your one hand, you can. Place the other down. So bend in, and down. I need a one fingertip spot on the other leg. Bend in, and down, and bend in, and down.
Lower your hips. Round yourself to come all the way forward. You're going to take your feet, so that you can take the block in between your legs. Give yourself a little bit of a stretch forward. And then we're going to reach for the other block that you had behind you.
We're going to hold it this long way between your wrists sitting up tall, exhale to round back a little bit. Twist to the left, back to center. Sit up tall. Round back. Twist right, center, and lift.
Round back, twist, center, and lift. Round back, twist, center, and lift. Round back. Twist. Now we're going to hold on with your left hands, on twisting to the left.
You're going to open to the left, back to center, grab it with the right, lift back up. Round back, twist. Keep twisting by reaching your right arm around, back to center, lift up. Round back, twist first, open your left arm more. Come back to center, twist center, lift up. Round back, twist right.
Open your right arm. Come back to center, lift up. Last two. Twist left, keep going. Back to center.
Center and lift up, and reach back. Twist right, reach to the right, back to center and lift back up. I'm going to place in both blocks down. So, you can have two blocks kind of stacked on top of each other. We're going to drop back to your forearms, take both legs, so that they're over to the right.
Make sure you can really press into your elbows. We're going to lift your legs up, and over to the left. Up, and over to the right. Up, over to the left. Up, to the right.
Up, to the left. I'm going to come back up and I'm going to turn them. So now they're, we're going to call tall way and we're going to have both of them up. If you want to make it harder, you separate them a little bit more. So I'm going to separate them, maybe almost a block distance away from each other.
And you can either be on your forearms or you can be on kind of straight arms. I think I'm gonna stay on forearms, and you're going to do same thing. You're going over the blocks and down. Over the blocks and down. Up and down, up and down. Four more. One.
Two, three. And four. Oh, tipped it that time. Go ahead and separate your legs to round yourself up. You can separate the blocks and I have it this way. Right between my ankles.
I'm going to sit up, arms forward, exhale to retort. I want the heel of my hand to touch the front, front being the side of the block. I guess it's the back of the block. Sitting up tall. Exhale to round forward, and lift to come back up.
Exhale to round forward, and lift to come back up. So I'm using this as, a guide. So I'm not trying to get a hamstring stretch here. I'm trying to get into my abs when I'm coming forward. Now we're going to reach for it. So your heels are down.
You're going to push with one arm, twist back with the other arm slightly and back to center. Twist the other way, and center. So it's a little rotation. Ideally it is sort of your shoulders moving around like a center point, which should feel good. Rotate around, and back to center. Rotate around, and back to center.
Rotate. We'll do one more each side. Twist, and center, and twist, and center. I'm going to let one of the blocks go. The other block, I'm going to have it down, so I can kind of hold it in between my legs. I'm going to take up towards the ceiling.
I do a circle around, up stop. Left around, and up, right around, and up, left, and up, and right, and up. I'm going to bend my knees to grab hold of the block. Place it on top of my thighs. Use that to pull my knees in towards my chest.
So you want to have a good grip on the block. Inhale arms and legs away from each other, holding the block, bend to come in, rest the block on your shins. Inhale away, exhale to come and grab the block. Inhale, and exhale, inhale, and exhale, inhale, and exhale, inhale, and exhale. We'll do one more round. (Mariska exhaling loudly) And we'll come all the way down from there.
Go ahead and just reach your arms overhead, and then try to push your arms to elevate your shoulders by your ears, and then walk your legs in a little bit. We're just going to do a twist. So your legs are going to go to one side, but make sure your shoulder blades stay on the floor and then come back. And then we'll twist towards the other side, and come back. And you don't need to have, your legs get to the floor 'cause your goal is to keep your shoulder blades on the floor.
So going side to side, and side to side. Let's go ahead and we're gonna take the block and you're going to place it like right at your crotch. So it's going really close. So you want it to be on your pubic bone. Arms are going to be by your side. Hands are by your side.
From here, you're going to press into your feet, peel your back away from the mat, and then lower back down. I'm going to adjust this, just because I want you to be able to see something. So I want this to be completely flat. Meaning it's kind of in line with the tufts of my thighs. Press into your feet, lift your hips up.
Now, what I want you to do at this top point, is find a little external rotation in your thighs, which should make the block go up more and then slowly lower back down. Press, lift. Find that external rotation to make the block lift up and then, slowly, lower back down. Again press and lift. Pushing into external rotation.
Like just kind of, think about taking your thigh bones and moving them externally. And then you'll lower back down. They can kind of come back to neutral. Exhale to lift up, and then pushing into the walk and externally rotating at the same time to get the block to lift up a little bit. And lower back down.
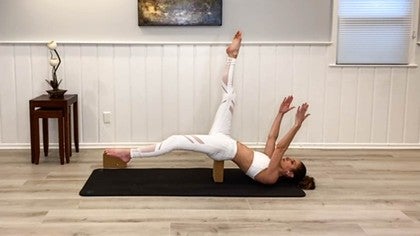
Also you should feel your inner thighs. We'll do one more like this, pressing down, pushing in, get the block to lift up. And then we slowly lower back down. You're gonna take the block and we're gonna place it underneath your right foot. So your right foot is on the block.
Your left foot is not on a block. So obviously this could make your hips go uneven, which we want to challenge them to not do. So you're going to press into both feet, lift up into a bridge and you want your left pelvis, and right pelvis, pelvi, to be on the same plane. And then you'll lower back down, bone by bone. Again, pressing into your feet, lifting your hips up, and then slowly lay your spine back down to the mat.
Again, pressing down, lifting up, and then lower back down. And because you are really doing a little bit more work in the right leg, or at least I am, based on just trying to keep things even, I'm feeling my right side work more. You could have your left side work more, just like cuing, really push in to your left and be light into your right, but I'm being a little heavier into the right. And then lower back down. Now this next one, we'll come up and stay up.
So you lift up. Hip bones on the same level. You're gonna take your left leg, lift it up, lower it down, tap your toes to the floor. Lift it up, tap down, lift up, tap down. We're doing eight. Four, five, six, seven, and eight. Leave your leg up, lower down and you're trying to keep your hips level.
Push to lift back up. We're doing four. Lower down two, push to lift back up, lower down three, push lift back up, lower down four, and push to lift back up. We're gonna take the block and just slide it over. Or if you have the heavy cork blocks, you can flip them.
And then try to get yourself situated with the block underneath your left foot. So from here, pressing into both feet to lift up and then slowly lower back down, keeping your pelvis level. Press to lift, and slowly lower back down. Press to lift, and lower. Press to lift. Really think energy through your left leg.
Right leg is just moving because of how you're pushing into your left. Push to lift, and lower back down. Next one we're staying. Push to lift and stay. Hip bone stay at the same level, and take your right leg up and down.
We're doing eight. Two, three, four. And always check back in, especially on this side. 'Cause I feel like I always drop my right side. Six, seven.
Hold it up. You've got four down and up. Down, and up. Two, and up. Three, and up. And, four, and up.
Butt down, lower it back down. You're just going to grab the block, bring it towards your hands with your feet. And then again, we're going to hold onto it on your shins and we'll lift up, and just sort of a rolling like a ball from here. So you kind of get the momentum to come up and then we'll lower down, with your feet on the floor. It took a little more time than I had, than I had personally anticipated.
We're going to keep your feet on the floor. We've got just the one yoga block, holding on that kind of long ways. Round back some. So you want to have the block like basically at your knees and we're going to rotate towards the left, and back to center. Towards the right and back to center.
Left, and center. Right, and center. Left, and right, left, and right. Now, take your arms, bend them in. It's going to be the same thing.
Go left, and right, and left, and right. Last eight. Two, three, four, five, six, seven, and eight. Go ahead and come up, give yourself a little stretch, sitting all the way upright. And then we're gonna take this block, and we're going to balance it on your shins.
As you lean back, lift your shins up and we're just going to hold, sort of like you're in your teaser. You can take the block, lift it up, extend your legs. Try not to fall over, bend your knees, rest it on your legs. Lift and just hold, reach your arms and your legs, bend, and rest, and then grab hold of the block. And you're gonna grab hold of the other blocks.
So now I have two blocks. Right by your hips, sort of the medium height, top position, which is going to be our position for most of the stuff that we're going to do with your hands on. So from here, what I want you to do is take your blocks back, so they're a little bit behind your hips. And I just want to come scoot back a little bit, just so that I make sure I'm on the mat. You're gonna press down, pushing into my right foot with my left knee bent.
And then I'm going to slide my left, or sorry, my right leg back, and sort of sit in almost like a 10 minute stretch and I'm going to push forward with my right. So I'm bending my right knee to extend my left leg and then pull forward. Reach, try not to take my mat with me, but I'm not succeeding. Pull back. Reach, lift your chest, lift your hips, and pull back.
Reach, and pull back. Now sit down for one second, and just to take my mat flat. And on this one, I'm going to try to keep both legs down. Sort of like back support, so I have to do a little tricep press to lift up. And then I'm going to extend my hips.
Extend my shoulders, try not to tip the blocks over, and we'll just hold. And then lower your hips. And again, I have to do a little tricep bend because of the height. We'll do that one more time. I'm going to lift up, extend.
And I'm just gonna take a leg and just bend it up, reach it down. Bend it up, reach it down. Bend it up, reach it down. Bend it up, reach it down. Come all the way to a seated position.
We'll do a little bit of a stretch forward. So on this one we're gonna do, if you could sit in a Lotus position, which is sort of the yoga version of criss-cross applesauce, I guess you could call it. You take one leg and you're going to fold it in. And if you can fold the other leg on top of it, this is the easiest way to do this exercise. It is part of, I don't know, the Ashtanga series. I think.
If you could just sit regular cross, like you might not get airborne, but that is also okay. So you're gonna take the blocks, again by your side. I think I might go a little wider than the mat. I'm going to push down, and then lift up. And I'm just holding, and trying to fold my legs in towards me, and then lower back down.
So we're now going to go lower with your hands, so that the blocks are flat. So you have less, less help to get up. My blocks are gonna be a little crooked, 'cause I'm going to kind of have them half on my mat and half off. And then again, press down, lift up, and then lower back down. Take your legs and untangle them.
And you're going to take the blocks. We're going to bring the blocks, so that they're forward, again in this sort of up position, that's not the tallest position. Go ahead and have your hands on the blocks, and you're going to bring them back, so that they're kind of right in line with your knees. Take the heel of your hand, and you're going to push down and you're going to round your spine and lift your knees up. So we push, and lower back down.
And push, and lower back down. And maybe you can take both legs and hover them. I cannot. But what I'm working on is really, the press of the shoulders and the pulling in of the abs. We'll do another three.
Push down, lift up, push down, lift up, and then last one, like this, push down, and come all the way up. Go ahead and lower down. Shake out your wrists, if you need to do that, and then we'll take the blocks and move them forward. So now they're flat, but they're like the long way, so that your hands can easily rest on them. So we're going to try to do, is a little bit of a march with your hands, where we have your hands down and then you're going to move your shoulders to move your hands to step your hands on and off the blocks.
So we're going to start with your hands on the blocks and your legs in a plank. Weight in your right hand, left hand goes down. Weight in your left hand, right hand goes down. Lift up by taking your shoulder up, and then shoulder up. So we're not trying necessarily to bend your pelvis.
We're trying to move from only your shoulders. I'm trying to alternate which side lowers down. In between. And there I bent my elbow, which is cheating. Just clearly, because that side's a little bit harder.
Then drop to my knees, not 'cause we're done, just 'cause I need a break. You can do that again on your toes or you can drop down to your knees. And if you want to, you can do it with an elbow bend and then it's more like a pushup, rather than a protraction or retraction of your shoulder. Lower, lower, lift, lift, lower, lower, lift lift. Lower, lower, lift lift.
Last one. Lower, lower, lift, lift. Drop down to your knees. Just rest your hands on the blocks and take yourself into a little bit of a child's pose. And breathe.
And then go ahead, we're going to come up. We're gonna take the blocks. And first thing we're going to do, is, have, you only need one block for this. So you take one block to the side and, then the other block is going to go underneath your knee. So, right block, not that there's a right one.
Right knee, underneath the block. And then you'll bring your hands to the floor. So here we're like kind of tilted to the side with our left hip. What you want to do is level off your hips by pushing into your right knee, and then lower your head back down and your knee back down. So level it off, lower it back down.
So in a perfect world, when you're level, you would be able to balance a tray of martinis on your lower back. And I say martinis, because if you ever waited tables and ever had to carry drinks, martinis were definitely not my favorite, because whoever invented those glasses, definitely meant for you to spill half of it. So now the next time you feel like you're level, we're gonna take your left leg back. You'll lower down, lift it up. Down, lift it up, down, lift it up, down and up.
For eight. Two, three, four, five, six, seven, on the eighth one, keep your leg up. We're going to do little circles in each direction. Two, three, four, five, six, seven, eight. Switch for eight.
Two, three, four, five, six, seven, and eight. Lower down. You're going to kind of tip your knee back to the ground and you're going to come and take the same block that your right knee was on, and you're going to place it out to the left. If you want it to be easy, easy, you're going to go flat. If you want it to be harder, you're going to go to this position, if you want it to be hardest, you're going to go to this position.
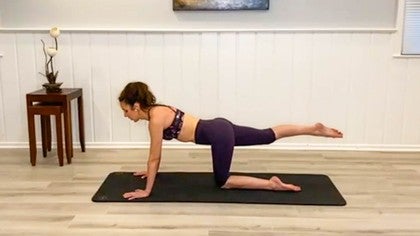
I'm kind of in the go big or go home right now. So I'm going to put it in this position. You're going to come back to your quadrat pad and you're gonna extend your left leg back. You're going to lift up, try to clear the block, and back to center. And I'm a little bit far, so I'm just going to scoot over.
So you lift, clear it, and back. Lift, and back. And I kind of have to look at it or at least get it in my peripheral vision. Lift, and back. We'll do four more.
Up around, and back. Up around, and back. Up around, and back. And last one. Up and over, and back. And then we'll take that same block, and we're gonna repeat on the second side.
So now it's your left, your left knees walk. Goes under your left knee. Hands come down to the floor, and you're going to level off your pelvis and drop your right side down. Level it up, and drop down. Push to level, and drop, push to level, and drop.
Let's do four more. Two, three, and four. Extend your legs, you're still trying to keep really pushed into your left hip so that you're not kind of dipping into the side. You're gonna lift your right leg up, and down, up two, three, four, five, six, seven, on the eight, keep it up, circle it eight. Two, three, four, five, six, seven, eight.
Switch at eight. Two, three, four, five, six, seven, and eight. Lower your knee. We're gonna take the block and we're going to bring it, kind of out to the side at an angle. I'm just gonna get this one out of the way. Let me take a quick sip of water.
Because that was not the easiest thing to do. It's less easy when you're thirsty. Okay. So I want to make sure that the block is close enough, that I can feel like I need to get over it. And we're gonna go for eight. One, two, three, four, five, six.
That was really close. I'm slipping over. Seven, and eight. It tilted and it tipped and it made some noise, but it didn't actually fall. So I feel like that was a victory. We're going to take the same blocks that we had, and now we're going to, let's have a little interlude of not using your arms for a second.
So we're going to take the blocks. I would say, let's go to the upright position and I'm not good at this. So I will lean back a little bit. If you have like really loose hamstrings or you have really strong hip flexors, I would say, try to sit up a little bit more. But your goal is that the blocks are going to be something you're going to go over and land in between.
So they need to be wide enough that you have room for that. So you're gonna go over, tap the middle, up. Over, tap the middle, and up. So your goal is to be a little bit precise in your movement. Up and over, and back.
Up and over, and back. Up and over, and back. Up and over, and back. Up and over, and back. Up and over, and back.
Take a little break by sitting up. Now, and this next one's gonna be harder because what we're gonna try to do, is lift up, tap and back down. So you have to touch it without knocking it over. Up top, and down. Up top, and down.
Up top. Up top. Up top. And then if you can sit more upright, then try to. I could sit more upright on my right, but not on my left.
Last four. Two, three and four. And then we'll come all the way up. I'm gonna take these same blocks, move them so that they are, ultimately, you want them to be about shoulder distance apart. So we're going to work on, is an exercise called the plunge.
And a plunge is something, which is basically a plank, where your shoulders extend over your wrists. We do this when we were doing long stretch on the reformer, if you are a reformer person. And I think a lot of times people have this fear of like, when your shoulders are really going over your wrists, that you're going to face plant. And I think this is a good way to sort of work on getting used to that feeling. So we're first kind of step back to where, we're maybe in kind of a plank, but maybe can lean a little bit over.
And this should not be too hard on your wrists, based on the ability to have your hands, your fingertips go to the side. So your wrists can be more neutral, than if your hands were flat to the floor. That gets, sometimes a little bit tough on people's wrists. So I'm keeping my feet in the same position, but I've moved my hands back. So then the next time I come up, I'm going to be more forward of my wrists with my shoulders.
And then I'll come back down. See if I can walk it back. It was like, three and three quarter inches, and then I'll come back up. And again, really trying to get that forward, shoulders over wrists, and then drop down. I think I'm getting close to my max, but we'll see.
Your max is when you can't drop your hips down to be in a straight line anymore. So hands are down, hips come up and then we go forward, and just hold. And you really should feel the front of your shoulders on that. So, a little less abs to me than like regular plank and a little bit more forward part of your shoulders. So let's say we wanted to work on our snake and twist.
This is actually a really good way, especially if you have clients or your own personal self, who's nervous about doing this exercise. So what I'm going to do, is I'm going to call this my shoulder rest. I'm going to call this the carriage. And so I'm gonna have my shoulder rest, forward, not super far to the left of where my, hand would be, like on the carriage. So, left hand forward, right hand back, right foot back, left foot tucks under, lift your hips up.
So I actually tried to square off my hips here almost like I'm doing a down dog. And when I come forward, I'm going to drop kind of through this space. Lift up, and, forward. Kind of undulate up, and then forward. Drop your chest, drop your hip, and then lift up.
From here, we're going to come back down about halfway. Twist to the left. Untwist, back to center. Down about halfway, twist, look over your shoulder. Untwist, back to center.
Last one, twist, rotate it around, and back to center. Little bonus. Rotate. See if you can lift your arm, and then come back around and push back. Left hand was being really wobbly there.
So I came out of my twists, I didn't fall over. Now, we're going to take your carriage and we're going to basically flip it to the other side. So you have your right hand on what is, will be your shoulder rest. Your left hand is on the carriage. You're going to take your left foot on the equivalent of the foot bar, right foot tucks under.
Lift it up. We're going to come forward, and then extend down. Undulate back, and extend through. Come back. And extend through.
Next one, you get the twist. We're going to go halfway or so. Rotate it around, de-rotate and up. Down, twist it around. De-rotate and up, down.
Twist, and up, and then bonus. See if you can lift your arm and then come back. You can drop your knee. We have both hands down, and we'll go ahead and shake that off. And then we're gonna take the block.
This is the best exercise that you don't know exists. If you haven't played around with it. In terms of getting people to do deep neck flection, I'm going to take the block, place it at the front edge of your mat. You're gonna rest your elbows on the block. This is really a place where having a lighter block would do you more favors, but we have what we have.
So you're going to have your eyebrows right on the block. Hands can come down by your side. Now your goal is to take your chin, move it back, till the top of the block lifts up and then release. Tip it up, and release. Tip, and release.
Tip, and release. Tip, and release. Two more. Tip, and release. This last one, just tip and hold. And then release down. Hands down, press yourself up.
You're going to take the two blocks. Both of them flat ways. 'Cause you're going to create a pivot to lie down on with your pelvis. So you want like right at your ass. If you need this to be padded, you can throw your mat over it. You're going to come to, lying down, to kind of find the sweet spot. And I'm going to start with my elbows bent.
I'm going to lift up. When I come down, I'm going to be able to lift my legs up. And then you find where your sweet spot is. Lift up, and lower down. I will say I played around with this for a good, like seven minutes the other day, trying to figure out if you could balance.
And I've decided that my upper body length to my lower length ratio does not make it possible for me to come to like a balanced position. In my mind, I was like you're going to balance and it just never ever happened. So we're just going to use it as sort of a swan dive. Now we're going to be in our neutral position. So you're on your forearms.
We're going to take your legs, open them out, squeeze them in. Open out, squeeze them in, open out, and in, out, and in, out, and in. For eight. Two, three, four, five, six, seven, and eight. Hands down, press yourself up. We're gonna take the blocks back to where we had them when we were doing our plunges.
Grab a sip of water, if you need a sip of water. If not, you can enjoy me grabbing a sip of water and thinking about how you wish you also had water. And place this aside. Now in my mind, these blocks are now parallette. Parallette is a way to do a pushup, where you can get more range of motion.
Also to take it out of your wrist, by being able to put your wrist into a more neutral position. So, holding onto the blocks, I'm going to step back into a plank. Now my goal, is that when I bend my elbows, I'm going to go a little bit forward, and then press back and up. Go down, and press back, down, and press back. Only two more like this. Down, and press back, and down, and press back.
I'm going to drop to my knees because my goal, again, is that I can go lower, a bigger range of motion. So on my knees, I'll go down so that my chin touches, push to lift. Down, push lift. We're doing five total. Three. Four.
And, five. And then you can take a moment, do a quick press back, to child's pose. And you're going to do a little bit of sideline work, and we're going to use our block as a pillow, which is really nice. I actually use it for a ton of clients. We're gonna take our block and put it, you can put it on the highest point, but I don't want to.
So I'm going to put it on the long angle points, not flat, but like sort of the medium position. So come to lying on your side, and you want to have your head resting on the block, and your shoulders, so one's tucked under, and then the other shoulder is going to be stacked. Look at this block, and it looks a little aggressively closer. Move it down a bit. You want the block again to be something that you can aim to go over.
So you're going to take your leg up. We'll go over the block, and press back. Over, and press back. Over, and back. Over, and back.
Over, and back. We'll do four more. One, and two, and three, and four. Now on this next one, we're gonna go down, touch the floor. Lift up forward, touch the floor and up. Back, down up, forward, down, up.
Back, down, up, forward, down, up. Back, down, up, forward, down up. We'll do four more. Two. Three.
And on this last one, keep your leg forward. We're going to do eight lifts. One, two, three, four, five, six, seven, and eight. And then we'll go all the way back, finding length through your top leg, reach your top arm. And you're going to take your top leg and reach it back some, and then take your top arm.
We can go forward a little bit and then, kind of work against that stretch. So I'm getting a little bit of a twist in my torso by rotating a little towards the ground, and then back. Rotate a little towards the ground, and back. And last one. And back. Make my way up. I'm just going to take my block pillow over to the other side.
I'm going to move my leg block down. So it's not harder than I want it to be. So I want it to be about that hard. I'm going to come down to lying on my left side. So the block is my pillow.
I'm going to make sure that my shoulders are stacked. One on top of the other. I feel like this is closer, than the other supports. And then make sure that you are resting on your hip, with a little space between your waist. You're going to lift your leg up, swing it forward and back eight times.
Two, three, four, five, six, seven, and eight. We're going to go down, up, forward, down, up. So you're doing five. Two, three, four, and five. And now in this next one, we're going to leave your leg forward.
We're going to do eight lifts. One, two, three, four, five, six, seven, and eight. Did not enjoy that. Go ahead and reach your arm overhead. You're going to reach your leg back.
Might do a slight rotations forward. So you want to feel this stretch, sort of all along your obliques. And then you return a little bit. Find that stretch, and return. Find the stretch, and return. Last one.
Find the stretch and return. Go ahead, you're going to make your way up, we're going to take one block. So only one block, and we're going to have this one block underneath your sacrum. So first we're going to start on this medium position. We're going to end on the high position, if that feels okay to you.
So lying down on your back, you're going to lift up, place the block and you can go flatter. If you feel like it needs to be flatter, you could even use two blocks. I feel like one block feels like less, like it's going to tip. So you can also even hold onto the block. So we're on the block.
This actually feels really nice. This will be one of the exercises we do to sort of end things off, but bring both legs up, extend both legs up towards the ceiling. You're going to lower your legs down, out around and up. Down, and up. Down, and up.
Down, and up. And switch. Out around, down, and lift. Out around, down, and lift. And I'm kind of limiting how low I'm going.
'Cause I don't want the block to tip. Even I'm holding onto it. Down around, and lift. We're going to take one leg up, one leg down, and then switch, and switch, and switch, and switch, and switch. Lowering my feet down actually, 'cause I lost my earbud slash microphone.
So putting that back. Perfect opportunity to come up to the higher position. So the higher position, might be a really aggressive kind of pelvic bridge stretch. We're going to take both legs and lift them up. So from there, we're going to take one leg up, one leg down, and then switch.
And we can always hold onto the block, if it feels like it's tipping. So switch, and switch, and switch, and switch. So one, both legs up. We're going to do sort of an elevated bird dog. So you're gonna take your right arm, reach it back, as your left leg extends and lowers, and then bring it back in.
Left arm goes as your right leg, extends. And bring it back in. Right arm, left leg. I always have trouble not moving both arms together, it's really a mental exercise, as much as it is a physical one. Possibly more so, 'cause we're also trying not to fall over.
And extend. And back to center. Extend, and back to center. Extend, and back to center. We're gonna take your arms up and your legs down.
We're just kind of stretch there. And if this feels too aggressive, you can go down to like the lower position. This actually feels like super good to me. So from there, I'm going to like push into my feet a little bit, just so I can take the block and remove the block from where it is. From there, I'm just going to rock myself up to a seated position.
I'm going to take both blocks, in this sort of medium height position to the front of my mat. I'm going to walk myself back. And I want to use this as a way to stretch my triceps. I'm going to have my triceps or elbows resting, and I kind of walk back, hands to my upper back and I'm just going to drop down in between the blocks. And breathe.
And see if maybe you can go a little bit deeper into it. I might need to kind of shimmy my legs back, which also feel like they're stuck on this mat, which is nice that it has some grip, but not always nice if you can't slide when you want to. And then I'll make my way up out of that. I'm gonna take one block, just one, and lift it up, so it's kind of high. You're going to take one hand onto that block, and then I'm going to reach through.
So I'm sort of doing a thread the needle, where I have one arm that's high. And then again, try not to tip it over, and just twisting, to reach all the way through to the other side. Take a couple of breaths. And then maneuver your way out of that. So then you have the other hand.
So it's kind of on the top of my wrist, twisting through to where I can rest down on my left shoulder, left ear, and just a couple of breaths. See if you can maybe find a little bit more of a twist. And I'm doing that by trying to actually stretch my left hand more through to the wall. And then go ahead. You're gonna make your way up. We're gonna take one block, sit cross legged, and then you're gonna take the block, and you want it to be like at the base of your shoulder blades. And I'm going at this height.
You can go to the flatter height or if you're really bendy in your thoracic spine. First of all, tell me how you did it, because I have been working on that forever and haven't gotten there. But you want to be able to feel that you're getting a really nice stretch in your upper back. I just had my hands behind my head, and I'm kind of leaning back into it. You could also do this in that weird position, where you're sitting between your knees, which is sort of more the yoga way to do this exercise.
I broke my leg and ever since then, my leg doesn't like doing that exercise, which is a shame because I always really liked it. Take a couple of breaths and even reach your arms. Maybe do some circles with your arms, lifting your head up. Inhaling back, circling around, inhaling back, circling around. I'm going back. Putting my hands around on my head.
'Cause that was my favorite. And I'm just going to do a little bit of side bending. So I'm moving laterally towards the right, hand digs the right part of the block and like kind of under my shoulder blades a little bit more, and I'll come back to center. It's like I'm making all these weird faces today. And go towards the left, and back to center.
Going towards the right, and back to center, and going towards the left, and then one more in the center. And just kind of reach back. Try to open your elbows out more. I'm like, is my head anywhere near the floor? I can't tell. I feel like maybe. Yes. That's there. Exciting.
Take a couple more big, deep breaths here. And then from there just carefully, slowly make your way all the way up. But you can take any last stretches that you want to take. If you feel like we missed something that you wanted to work on. I hope you enjoyed the blocks.
I like the blocks. I think it's a good way to work in some different exercises and to network and to kind of play around with some exercises like snake twist or doing like the plunges, that are maybe a little bit more intimidating. Definitely more intimidating on the reformer than they are on the floor. But you can kind of use it as a stepping stone. I hope to see you next week.
And until then, state air conditioned, because it is really hot outside here. Take care.
Pilates-Ish with Mariska: On the Mat
Mention
 |
Mariska Breland (Teacher) |
 |
Cheryl F |
|
|
Yuka S |
 |
Marissa |
 |
Kat D. |
 |
Praveena C |
 |
Allison O |
 |
Rachel L |
 |
Laurence F |
 |
Maureen M |
 |
Joni N |
 |
Doris K |
 |
Michelle G |
|
|
Jos S |
|
|
Kelly A |
|
|
Kathy D |
|
|
Elyse D |
 |
Lina S |
 |
Hilary F |
 |
Jennifer E |
 |
Gary M |
|
|
Kristen G |
 |
Beverly L |
Comments


You need to be a subscriber to post a comment.
Please Log In or Create an Account to start your free trial.
