Description
For more insight and information on this exercise, be sure to read The Saw Up Close from Benjamin's blog.
About This Video
Transcript
Read Full Transcript
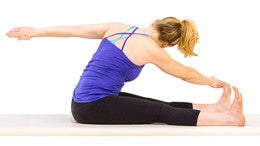
Hi, I'm Benjamin Degenhart. I'm here with Aaron and Candace, thanks for joining me. We'll be talking about the saw exercise today. The saw a wonderful mat exercise. Um, very hard to do. Um, we need like all of them, right? Um, it's, it's one of the few rotational exercises in the series and it has, um, the challenge of crossing the midline and bending the spine not only into rotation but also into a forward bend. So sometimes, um, it gets a little tricky to perform the exercise fully because of tightnesses in the back and the hips sitting like that can be stressful. Um, so we'll take a moment to break it down a little bit. Um, we're working with math that have, um, moon boxes next to them. Um, if you don't have those who work with the floor mat, um, we do want the legs a little bit wider than the Magis Four. Nice stable base of support. So the first order of business really is to just sit up straight.
One of the hardest things in life, right? Um, the feet are out on those boxes. The feet of flex back, the toast pulled back towards the knees for some nice energy through the legs, so the stretch already begins here from the backs of the heels all the way into the seat, we'll add to that the arms they stretch away with that same amount of energy that you just put into pressing your heels out. We'll just go through the exercise once before we start talking about why we even do it in the first place. This is what it looks like. We're going to take a twist to your right side here, bringing the center of your chest over the right leg. From there, reaching the left hand forward towards the opposite leg. If you can, crossing the foot to solve the baby toe. The other arm reaches back in opposition and then you come right back through center lifting of the spine, back up right to the central.
Let's take it to the left side. You twist and you round forward. You exhale the air here to really wring out the lungs and then you'll lift yourself back up and back to center and then release your arms down. We'll do more and more times. Um, let's just talk about the purpose of this exercise for a second. So other than just finding that stretch through the legs and the ability to sit up straight, we're trying to look for that big stretch that comes through the back, which is something that you need in your everyday life when you pick something up and you start to introduce way to your torso, right? So this is a great way to make sure that you're less prone to injury yourself in your everyday life among many other things, right?
So we'll explore that portion of it. Bring your arms back out to this side. We'll do the exercise again, make sure that you feed state even on the boxes, and we'll just take a twist to start. We're not rounding forward this time. So think about your spine, just like a corkscrew, lifting you up and around. Now stay here at the end. Notice what parts of your spine haven't quite twisted yet, where your back feels tied. Give it an inhale. Try to lift out of that and twist it a little more and then slowly come back to center. So we'll just break it down like that for a second.
Let's do the other side, which may feel different or take it to the left side. Think that as you go around the spine, lift higher and higher and higher. Now stay here again. Notice where you've got stuck. Inhale yourself out of that stuckness. Twist more and slowly come back through center. All right, beautiful. We'll take it to the right again in one motion.
Twist to the right goal to where you just left off. Reach the arms apart. Chin over, chest round over your leg and go into your full Sar motion here. Nice. Let's stay in that stretch for a second. So what we see is that from your left shoulder down to your right hip, your whole body is getting a stretch. Slowly come back through center. Let's take it to the other side with twist to the left as far as you can, right and goes forward. Left arm goes back, Chin over, chest.
Now we try to maintain that roundness through the backs of the chest. It doesn't come to rest of the thigh. You lift yourself away from it, slowly come back through center and then let the arms come down. No, that's painfully slow. Of course, we'll drill a little bit quicker to shake out your legs for a second. Now these two have no problem sitting up straight with their legs out straight. If you are tight in your hamstrings, usually what we do is bend the knees up. The only problem with that is that probably you're not really getting that stretch. Even over time.
You're not working on getting more length through the body, so a great thing to do is actually do take one of those boxes and sit on top of it so that the legs can still be out straight. We don't need to do that for these two, but if you're at home and you find yourself being very tight, maybe grab a second med, roll it up and sit on top of it. All right, now here's the breath. Final portion of the exercise. It's very important to include, bring your arms out to the side. We want to take an inhale as we twist to the right. Exhale round over your leg and make sure that you give yourself enough time to fully exhale and as long as you exhaling your stretching and reaching and opposing, and then inhale, lift through center. Take it to the other side.
Xcel round down and bring out your lungs until they're completely empty. Make sure that you feed, stay flex to keep the hips posing down into the mat. Inhale back through center. Let's do one more each way over to the right. X around, down. These ladies don't give me much to correct. It's beautiful. Nice to tad and back. One more time to the left.
Twist and reach. Now as you round down, make sure that your shoulders maintain the same distance from the ground as you come down so you're not spiraling too far into the leg. You're not overshooting the rotation of your spine. Come back through center. I'm sweet child. Why? To the side and because we never find ourselves like that in our everyday life, that stay here for a second. Reach your arms up and out of your shoulders for just a moment.
Next in the series would be the swan dive where the arms are out here, right? So let's, let's hold them there for one more breath. Push the heels out and away from you. Pull the toes back, look at that lane and then relax it down. So that's how we do the saw on the mat. There are standing variations of the size well that are really fun to explore because seeing what this could lead to in the standing work, um, might inform the way you do it on the mat as well.
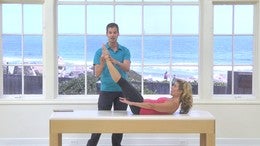
So let's get up and let's explore the standing variations of the saw. All right, so we're taking the sata standing now. It really is about the same exact purpose, which is to find that diagonal stretch to the back of your body and maintain a sense of lift. So we're not just slouching down, I'm like we're picking up something heavy from the ground, but maintain that nice lift through the spine, some core work and a full body stretch. And it's going to be somewhat magnified by the fact that we're standing up, which uses more muscle. Uh, one of the nice things we just discussed that a lot of people have trouble. I'm on the floor sitting up straight out of the hips. The hips tend to get really tight.
So this is a great place to practice the salt without having that problem. And the sauce is pretty much the same. We were going to take a position. Why do then your hips, let's start with our right arm up and the left arm down. So just like in the final expression of your floor saw, we stretch the arms apart in away from each other. Now in one motion we're going to twist and bend down over our left leg.
So go ahead and bend your spine. Let that move your arms. And in the final expression, feel like your arms. Pull away from each other, your right arm down, your left arm up, and then slowly come all the way back to center with that same arm still up. And we'll switch at the top switch. And again twist and round down. Make sure that from your hip down to your shoulder, you get a nice even stretch. If you can think about it, pull the opposite hip back so you get a deeper stretch and come back up.
Left arm lifts and we'll do one more each way. Right arm up and stretch up and over. So notice how your hips start to follow the twist. And just like on the mat we would want to sit on both hips, right support the right of back a little bit. You've got a can as nice. And then lift your right arm up. We'll switch one more time.
Yet the top left arm comes up and stretch up and over field both heels grounded into the floor. Feel that stretch come all the way down the left side of your torso. Lift yourself all the way back up to center. And then I've got, I'll come down, feels quite lovely right now. We can take that up a notch and go into the archival standing twist, beautiful exercise, a painter learn, but it's really absolutely worth it. Um, we're going to take the feed into a turnout position and again, it's, it's a progression of the sauce. So we're using the same skill.
We're just challenging it a little bit more. Um, bring your arms out to the side just for balance. We'll just start by learning the twist so that we're mechanically set up for success here. Lift your heels up just in so that you can start to pivot on your legs. Let's turn over our right shoulder first. So you take a twist, you let your feet spiral along with you until you face 180 degrees back. Notice how your front leg is pushing against your back leg.
Your back leg stays straight. You land on the outside of your back foot. Slowly rotate back through center and come all the way around. Let's try that once for the other side. So your heels lift up. You take a twist over your left shoulder until you face the exact opposite direction flat and your left foot. I know balance is a challenge in this exercise too, and then twist so much that the rifle lands on its outside and just stay upright for right now. Very good.
And you see that the same stretch goes through the back of the body and then come back through center. Very nice. You're ready to take it up a notch. We'll add the sauce stretch to it now by reaching down to the ankle, heels lift, take a twist over your right shoulder. Go for your left ankle, the one that's behind you. Round up and over. Pause there for a second if you can and see again that big stretch coming through the back of the body all the way down into the heel and come back up. Come through center. Reach your arms out to the side, lift the heels back up just enough so we can start pivoting over to the left twist and reach it down. Now, one of the things that will be shown in this exercise is whether your size behave the same way. One side might go really well. The other not so much, right? Come all the way back up to center and we'll just do it one more time. Come back and as don't run away, we have one more repetition.
Stretch your arms out to the side. We'll go a little quicker. Now allow yourself to fall right up. Go over to the right and reach. Try to grab that ankle, exhale all the AOD and come back to the center. You got to take it one more time, left side over your left shoulder. Exhale as you round over, grab the foot and then come all the way back up through center and let your arms come down by your side. And very nice work. Now, um, one more thing I want to address before we leave the saw behind. Um, there was a question about the shoulder rotation as we go into our stretch.
So let's just go back to doing the sauce, standing and look at the shoulder rotation, right? We often think that as we stretch up and over the back shoulder has to rotate inwards or extremely far outwards. I would say it's somewhere in between. The most important part again is that your arm stretch away from each other. So let's explore that for a second. Reach your right arm up, your left arm down. Just think that that is the most important portion of where your arms are going to go. They stretch away from each other. The spine lifts in between you.
Stay vertical that stretch it down towards our left foot. Focus on your right arm and how it stretches up and make sure that it has enough space to reach up without any construction. And typically that puts your shoulder in the right place. It looks good and switch it all the way up at the top. Switch your arms, their left arm goes up, and then you take it up and over and yes, it will be your right arm on this side and I stretch the arms away from each other even here. Excellent. Good. And then come all the way back to the top and let that, I'm just come all the way down. Nice.
And those are your three variations of the saw. You have one on the mat, you have one standing, and then we take it into a full twist. Purpose of the exercise. Stretch the entire back of your body in opposition to your legs. It's a full body stretch. It's a great rotational exercise that helps you to fully expel the air on that exit. We often talk about wringing out your lungs.
You physically do that to your body here. Great exercise. Thank you guys for helping me keep working.
Exercise Breakdowns & Tips: Exercise Breakdown Tutorials


Comments


of teaching it in standing. I always try to communicate that
the arms are reaching in opposition. But restrictions in the
shoulders often makes it difficult for students to sense the
pull of the back arm. Doing the exercise standing is a
wonderful way to find this oppositional energy through the arms!!

Thank you for explaining.


Thank you for taking the time to put this together Benjamin !


 ... not sure about my students. They probably think I make em' work too hard :)


You need to be a subscriber to post a comment.
Please Log In or Create an Account to start your free trial.
