Description
About This Video
Transcript
Read Full Transcript
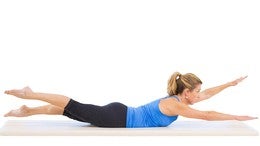
Hello, I'm Rebecca Rotstein and today we're going to demonstrate for you how to perform back extension. Casey is here with me today and she's going to be my model and I'm going to inform you right from the start that I specifically chose her because I did not want somebody who is a pilates instructor and I didn't want somebody who already knew what I was going to perform. So Casey, I would like you to begin by having your forehead down on the ground. Actually, it's not really the ground, it's the mat in this instance. So the first thing that I'd like to outline here is how to avoid the over working or the strain that often occurs in the lower back. So without even telling you what I'd like you to do, Casey, I want you to just straighten your elbows and lift your head and chest.
So do you notice how most of the movement occurred in that lower back? It's like a valley that occurs and lower back down. This is what I see happening in most people, instructors included. So in order to reduce some of that work and load from occurring in the lower back, I'm going to make her work a little bit more in the upper back. This is important also because most people tend to be weaker in the upper back.
So as we either get older or as we just go on through the day sitting at a desk, we tend to slouch and curve through our upper back. That's the area that we really should be targeting in back extension. So here are the steps that I want you to try out first ground through your pubic bone. Your pubic bone is the bony projection right here between your hips, so it's above the genitals. So you're going to first ground that by gently pressing that down into the mat. The next part is I want you to extend your elbows and send the energy out through your fingertips.
Let your hands rise an inch off the mat and at the same time start to lift through the crown of your head. Now she's going to think about length rather than height, and that's going to get all the proper recruitment firing through her muscles instead of letting her overuse that lower back and lower back down. Now what you may have noticed with Casey is that she'd really flattened out her cervical spine, also known as the neck region. We don't want that. We want to retain the natural curve through the, through the neck and through the whole spine. But what we also want to avoid is the opposite of what she didn't do or what the opposite of what she did, which is hyper extending the neck. So in other words, Casey, if you were to lift your head and look straight out in front of you, notice how she's cranking through the back of the neck.
The cue that I often will give is to unwrinkled the back of the neck, so by and wrinkling that space. Then she's looked downward, but I don't want her to look so far downward that she totally flattens out her neck. So she's allowing her gaze to sweep up just a little bit and back down. So we've just addressed what's going on through the spine. But what I also want us to take note of is what's happening through the shoulders, because they have to be a participant as well. So you may have noticed it as Casey was rising, she still had a bit of a rounded shoulder.
So this is why I gave her the initial cue, which was first let's review. Press down through the pubic bone. Now don't over, don't overuse your glutes, but you're going to have a little bit of contraction. And I'm okay with that. It also depends on the stability of your back. My back doesn't have that much stability to begin with, so I do need to get a little bit of glute activation for protection. But after you've grounded the pubic bone, the next part is to lift through the hands and automatically that starts to kick in through the shoulders. This is the famous rotator cuff area, and at the same time as lifting the hands, that's when she can also lift the head.
So she lifts the hands and the head simultaneously. I'm doing it in steps for you here, but ideally it'll happen in one piece and lower the head and lower the hands. So let's try this in our two steps. Sequence ground, the pubic bone one, lift the hands and the head at the same time. So notice how it's almost like the seam of her shirt here starts to squeeze together just a little bit. That's beautiful. Now she's, I'm going to have you drop down just a little bit, Casey, and I want you to rise from the upper back area just a little bit more. Can you say yes or no? Can you feel that now more in the upper back region, good and lower. Back Down.
I told her to say yes or no so that she didn't move her neck. But that's okay. We're going to try it once more. The other aspect now that I want to bring into the picture here is people will often think of pulling their shoulders down their back. And for those of you who know my work, you know that I'm not a fan of this. I'm not trying to just have her crank through her lats.
I want her to feel the entire shoulder complex coming together. So rather than just pulling downwards, let's have, let's actually look and see what would happen. Casey, pull straight down, pull your shoulders down. Now if you can see that actually has changed the orientation of her shoulder blade. It's not my goal, it's not my intention. So lower back down and instead we're going to use just the simple queuing that I gave her before. One, press the pubic bone to own, to lift the hands and lift through the head at the same time and see how there's a nice flat outline or silhouette here of her shoulder blade. You don't see it protruding like you did when she pulled her shoulder blades down her back. Now lower your ribs just a little bit.
Casey dropped down a little bit here and instead think of rising from your heart just a little bit. Yes. And then we got even more activation through that mid upper back area. This is important. Lower back down to relax for a second. This is important again, so that we start to strengthen the areas that are typically weak of the back. And also as we get older, it becomes more important.
And as we're sitting for longer periods of time, not only just it computers, but also looking at our phones, also looking at iPads, et Cetera, we start to weaken that area of the back, and it's really important for us to maintain strength through there. So these type of foundation exercise will be useful for all sorts of PyLadies exercises. Anything where you're on your stomach, including the swimming exercise, including say, pulling straps on the reformer, we can go on and on with all of our prone exercises, but it's also useful just for daily life. So thank you. And that again was an example of a healthy way to perform back extension.
Tips for Teachers: Keep It Fresh! Exercise Tutorials


Comments


As a Pilates for Buff Bones Instructor, I so appreciate hearing your precise anatomical details. At age 64, it allows me to internalize Pilates exercise more comfortably.
You need to be a subscriber to post a comment.
Please Log In or Create an Account to start your free trial.
