Description
About This Video
Transcript
Read Full Transcript
Hello everyone. I am back again to talk about one of my favorite topics and that's the equipment. So what we're going to do in this short tutorial is take a look first at the Cadillac and I want you to gain perhaps a little more insight into how the springs are used, how adjustments could be made, what the historical equipment was like, and what the new modern, innovative change to Quitman is like and how you're going to adjust it to suit your needs and also gain a little bit of a deeper understanding of how angles and forces and all sorts of things work within a [inaudible] workout on Polonius equipment. Let's take a look at this equipment. So typically on a Cadillac we call this the canopy. It's the metal piece that goes overhead, kind of like on the canopy bed.
I think most of you know most of the parts of the Cadillac, the push through bars, springs, the push through bar, the trapeze table and the open end, which actually these days, most of the time is perhaps more closed because a lot of Cadillacs now have a cross beam that has hooks in it so you can adjust for your springs, but typically, um, on a historical Cadillac you had two legs springs perhaps to push through bars, springs of course your trap ps and then the roll down bars, springs which actually were used later for arms springs and in some cases some studios used the leg springs for the arm springs. What I'm going to do now is ask my lovely assistant Ruth outwork to come in and we're going to take a look at actually how the springs work and what certain exercises may look like with the springs in different positions. Come on Ruth, lie down, lie down on your back, knees bent. We're going to bring your head back a little bit here on stump. All Soup. I have a couple of things I have to say and let me come around on this side so we can take a look. So this Cadillac has two sets of leg springs on it.
There's a purple and this is a balanced body piece and a yellow. The purple is the heavier and the yellow is the lighter. I've been around in a number of studios throughout the country in the United States that don't understand that sometimes there's two differences of leg springs. And uh, a number of studios I've seen have actually just used the yellow springs. Um, they're significantly lighter than, for example, if you were on a grots Cadillac or one of a more historical, smaller style Cadillac, um, there was only one weight of leg springs in the very beginning and one way to attach them, which were some eye hooks just here on the side. So what I'm gonna do is I'm gonna lower the cross beam down to more or less the place that you would find the typical. I hook on your Cadillac and if you take a look here, I'm going to put the purple springs onto Ruth's feet.
And I just want you to take a quick look at where the angle is that the spring comes from. When the legs are extended perpendicular and it's almost directly behind the feet, a little bit lower. So if she's going to push her arms back here so she doesn't go sliding too far in, if she pulls the springs down and brings them back up, you see how the range of motion is for the pool. There would be a big difference if she was using the yellow springs cause they're considerably lighter. But hang on one second before we go too much further.
Let's put the crossbar up mimicking if you had the springs higher. So you can take a look at the angle of the equipment and what happens. And I've been in a few places where the springs are this high. So look at what occurs if I put these same springs back on her. Now we have the angle from way up here.
So typically how the springs work, as she pulls her legs out, the springs are going to start to get tighter. That's usually the case. Some springs are set up differently. It's significantly more difficult, isn't it? She's nodding her head. Yes. See, so this is what could happen. Okay. This is what can happen. It's considerably heavier, ruthless, petite, so you need to really take a close look at where am I setting things up. That's very important. Okay. The next thing that we're going to do is I've changed out the foot loops to go into the yellow springs and on this particular piece of equipment I also have moved them in closer together, so they're just about a foot apart.
Again, that's gonna make a difference too. If someone's petite and small and the springs are closer together, it's a lot easier most of the time to do the exercises than it is. If you had the springs wide here and then think again, if you had only the attachments on the canopy itself, that's wider yet, so the force of that spring is different. Not only are you pulling the spring and generating force by moving forward, but your thighs also have to add duct a little bit in order to make sure that your legs don't separate apart. Because if they were set up on the outside of the canopy, there would be much more pull. That way.
If you have the spring set up on the outside, on the canopy itself because you didn't have a cross piece, then the thing is the person working, we'll have to not only pull the springs and lengthen them out and generate force that way they will also have to add duct through their inner thighs and there may be too much pressure on their knees, which would cause them to open. So let me put this spring on Ruth, which is a yellow spring attached closer together. So still light spring. She's going to push your hands back and just pull the legs out and lift them back up. Significantly easier. Yes, so it's significantly easier. Again, look at the force now stop one second. I'm going to lower this down. So look where she is here.
Look if we bring it down about the regular height, it's totally different. So in the case of bone, in the case of the yellow springs, the thing to think about is that they also become easier to use. So that's going to cause a different reaction in the body. It might be great if you have someone who's petite, but people who are stronger, I wouldn't give a man the yellow springs, it's just not going to generate enough force for them. So let me take her out of these springs here and put her feet down.
So something else to think about. A lot of times the handles were attached to additional leg springs or springs themselves at the end of the Cadillac. So we could do some arm work. Again, the Purple Springs, if you use these for arms springs are extraordinarily heavy. The yellow springs might be okay or they might be too light, but also in this case, what they might be is too long. So typically it's a better rule of thumb if you want to do some arm work to take the roll down bar springs and use them.
So what I usually do is just take the roll down bar off, put it away, and I grabbed the handles and I put them on the roll down bars, springs because they're shorter and a little bit lighter and I test them out. I'm going to hand one to Ruth to see and see here. This angle's not really good for her to do. So this is something you can do yourself when you're working with clients or if you're at home on your own Cadillac. Try everything before you do any of the workouts here on PyLadies anytime. Just to know if there's a way that you can readjust the equipment to make things easier for you or to make it more difficult if you need more challenge. So let me show you what I'm going to do here.
I'll take these springs off. I'm going to put them on the inside and the adjustable bar here that goes across the end. I'm going to make a lot of noise while I do this so that they can give me horrible feedback. Right. Okay, so we've got one here, we've got one here. Take a look at this angle. Go ahead Ruth and just pull down. How does that feel? Okay, so as I want to add more resistance, what I can simply do is ask her to stop for a moment. I can lift this up.
There's a little hole here where some of the attachment heads had been and I'm going to hold it in right there and I'm going to give her more resistance. Another easy thing to think of for more resistance is if we were to move her closer, it takes resistance away. If we move her further away, it's going to add resistance to what she's doing
That's a decision that you need to make yourself based upon the people you're working with or your own body. And sometimes every day we feel a little bit different. So we may have to adjust our body on a daily basis to make sure we get the most of our workout. Has a little bit of a note for a sidebar here, uh, for teachers. If you're working with a client and you're trying to adjust how you're using the springs and you're trying to determine if it's too heavy or too light, remember you got to take a close look at your client and see what their body's doing and then you need to do the other thing that Eve gentry was very famous for doing. And that is asking your client or asking yourself, how does it feel? How does it feel to do that exercise? Does it feel too heavy? Does it feel challenging?
But you want to take it on? Or does it hurt? And every day it may feel very different on yourself, your own body and your clients. So as you're using the Cadillac and you decide to start to, uh, take advantage of doing some of the more advanced exercises and hanging from the canopy, remember it's very important to make sure you've maintained your equipment and all the screws are tight. It's also very important to have a high ceiling like we do here at plot is anytime. So if you were to do an inversion and flip over and your legs were straight up, you're not taking down the ceiling tiles with you. Okay, next up we're going to take a good look at the reformer and learn a few more tips on how you can use it. I am back with the reformer.
We're going to take a look at the balanced body REIVault foot bar reformer and just review a few things here, uh, of how they work on this reformer and how things may work on your home reformers or your studio reformers. Let's take a look at how this reformer is set up. We have a foot loop attached to the rope system. This rope system has cleats that allows it to be adjusted in most do have some form of an adjustment for ropes. Remember, once you adjust the reformer, if you try to adjust it too many more times, you may end up with one rope longer than the other and you may end up having a lot of frustrated moments or clients who can't figure out why the reformer is not set up correctly. But just to refresh here, typically on the more historic equipment, there was a loop that was leather, part of the leather strapping and then another hook and the handle. So once the loop was set up, typically around the shoulder block and the straps were tightened from there, then the handle came out further.
So as that handle lifts up and you're holding it, it can go right above your head. Something to think about. This one with only one loop can also be used a, this loop for exercises like short spine and. B. Some people will use it now for their handle. That's fine. Keep in mind, historically the handle was out a little more. The difference it makes to have the loop attached to the rope and shorter is that it actually generates a little bit more pull on the springs because now when someone lifts their arms, they immediately get tension in the slightest movement of their arms.
We're going to go and take a look at the end of the reformer now to give you another idea, so my loops were measured around the shoulder blocks. I'm going to move them out to the handle holders and watch what happens when I move this up. Okay, you start to notice that now there's less rope for us to use, so now it's all the way at the top. You have to make sure it's nice and tightened. Matt, every reformer has this feature to it, but this balanced body doesn't as do a lot of reformers these days though actually. But look what happens now, if I try to put this loop on, I can't get it on. The only way for me to get it on is to actually pull the reformer away from the ends, so now the springs have tension on them. Once this happens, it's a very different situation. I've seen a number of studios actually set their equipment up this way.
The look what happens, that one's off, and I go to lift this one up. I go to take it off and there's a little bang. Now, if this was pulled out even further, there's going to be a bigger bang and somebody might get hurt. Keep these things in mind. Watch if you're gonna use your riser so that it's at the very top. It's a very different exercise. Please keep that in mind.
What I suggest doing is try to decide where you want to use your riser. Do you want it up? If you want it up, try as many exercises as you can with the riser up to see what they feel like. If you want the riser down, that's fine too. Word of advice. Don't decide for some exercises you wanted up. And for some you want it down cause you're going to be going up, down, up, down, and you're gonna ruin your transitions and your workout will just not flow the way that we want it to flow, right?
We're going to take a quick look at the end, at the foot bar, it's heights, how it can adjust and how it may look when you get on the reformer or feel. Uh, this lip bar is great. It's got a number of positions of course down, it's got a little dairy, whoops, low bar position, which is here. It has a mid bar position, which is here. As you notice, as the foot bar comes up, the foot bar angle starts to change and brings it in closer to the reformer carriage. And here's the highest position, the one that I can't get it. Okay, here we go. Look at this. Now this bar is almost at 90 degrees and it's much closer in. So if I'm on the carriage, the measure at my hip joint is going to be probably past 90 and not appropriate for me to be doing exercises like footwork, um, simply because it might be just too much of an angle for me to maintain the pelvis where it needs to be. So keep in mind, um, also these days the reformers have a lot of nifty ways to adjust.
If someone's shorter or taller, and that's the gear bar. This one has a great gear bar that pulls up and then pushes out so the whole bar itself moves. This is going from its first position to a second position. Again, if you were to have the foot bar lower, you can see the relationship now of the end of the carriage to the top of the foot bar. If I take it out, again, this isn't third position, this starts to get increasingly further away. If I'm really tall, have really long legs, this would be fine. But also note what happens back here. Hm?
This becomes a much longer. I know it sounds a little simple or seems a little simple, but keep that in mind because if you forget and leave your foot bar position way out, all the exercises are going to feel very different. And yet again, this foot bar can go out two more times. So this is way far away from the end of that of where the foot bar is in the end of the reformer itself. Take a look at this. You can try exercises in these positions, but unless you're six, seven more than likely doing footwork, this is too far away.
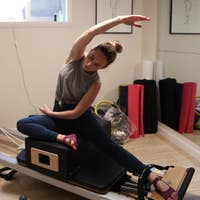
Here we are with the equipment set up with the foot bar on this particular piece of equipment and its highest position and Ruth is on her heels. Take a look at the angle. Basically her knees are almost in her mouth. That's not really a great place for most clients to be unless they're an elite athlete and they really want to have a little extra challenge. So this is the highest position with the gear bar and its closest position.
I'm going to lower at one so you get an idea of the angle here. Now we're just about 90 degrees being at 90 degrees here. I'm going to ask her to push the carriage out and bring the carriage back in so you can see the movement, but also pay attention to the height here
So you would have to make a determination if you have some knee issues, perhaps might want to put the carriage out that far or adjust the foot bar. In this case, it's the foot bar. Now liquid happens in the lowest foot bar position. And we'd basically take this out. One
Let's take a look here and see what happens if we move the foot bar up. So we're going to lift and we're going to go all the way up
Take this information and just remember it. Don't think that making a simple change on an exercise is necessarily so simple. When you have many things to think about. You've got the reformer itself, you've got risers or not. You've got the foot bar in many different positions.
Or if it's a more historical piece of equipment, a low position in a high position, use it to your best advantage and make it be your partner for your workout.

Tips for Teachers: Keep It Fresh! Exercise Tutorials


Comments


You need to be a subscriber to post a comment.
Please Log In or Create an Account to start your free trial.
