Tutorial #3373
Rotation and Counter Rotation
Description
About This Video
Transcript
Read Full Transcript
Hi, I'm Tim and I'm Michael and welcome to rotation and counter rotation of the spine. In order to do rotation in the spine, the first and most important thing that you have to do is have elongation of the spine. And if you are sort of in the dark as to what elongation of the spine is, I suggest that you watch our video before this that explains the concept of elongation. Um, from spiral dynamics. We're also using spiral dynamics concepts today to to cover rotation and rotation is a really big topic and there's a lot to cover. And this short tutorial, which hopefully is 15 to 20 minutes, could take hours or all day to explain all the rotation. But today what we're going to try and do is just give you a little bit of an idea that hopefully it will help explain for you and your clients the whole concept of rotation with elongation that we talked about in our first video of the spine with the two poles being the head in the pelvis.
So it's not only the fossette joints, it's also that spinus processes. This shape of these things at the back of the spine are different as well. And the angle of that is different as well. And that is also going to allow more or less rotation in that specific area of the spine. Now, besides the joint, as we know, the shape rs spine has been traveling a lot, so the shape is a little funky, but it's primarily also the rotation center of rotation within the further Bray. Where that is, it also allows more or less rotation.
So an easy way to, to visualize that. If you think of this as the body of one of the further brace. Okay. And when in the Thoreau, in the lumbar spine, this center of rotation is more posterior. It's more in the back of the spine and closer the fossette joints. So what happens is when the center of rotation is not in the middle, but more towards the end as it rotates, this first Bray actually moves, right?
You can visualize that in this position in the thoracic spine, the center of rotation is more in the middle. So when it rotates, it kind of like rotates around itself, which then does not bump into anything if so, to speak and allows you more of a rotation. Okay? So the spine is beautifully designed to work together. So the limited range of motion of rotation in the [inaudible] in the lumbar spine, it is only about two degrees per joint. It slowly increases as it goes up.
So the whole spine rotates as a whole in a way, but certain parts rotate more than others. Now in a functional way. The pelvis and the thoracic spine rotate again against each other. So when you walk, the pelvis goes one way and the thoracic spine goes another way. There's always this counter rotation happening in the most functional way, so the ribs follow either the pelvis or they follow the head.
Now imply these and oftentimes nothing. Infill holidays. A lot of times we use, for example, do despite twists on on the short box. For example, you sit on your reformer. A lot of times the Q gets into stabilize the hips and move the thoracic spine of move the upper body and that cue of stabilizing and then move. The other part has a tendency to really lock something and when people lock, they create stability through compression like what we call compression. If the client can get the sensation of you want to turn around quickly that when he rotates, he doesn't just lock and rotate.
But if he can get this sensation of this side moving down and back and this side moving up and forward as he rotates, it creates more of a dynamic stability, which is a lot more functional for the spine and for the body. Okay. So, um, as we go, we'll talk, um, we'll move the thoracic spine by itself. They'll move the pelvis by itself and then we'll put it all
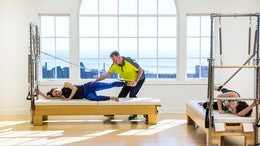
And the reason we're doing this exercise is a lot of people walk around in life without anything in the thoracic spine moving. So what we want to give them is the sensation of what it starts to move. So you want the theraband tight and what you want to do is just starting off slow and small is to get them to move. So like tones said, we're breaking down the movement here to give them the experience of what it feels like. So I as the teacher am facilitating the movement of their thoracic area, their ribs, their sternum, to give them the feeling of what that feels like, to have that movement in the rib cage.
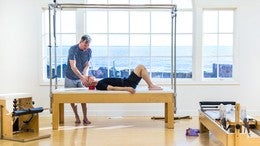
Then once they've had that experience, we can go over to the wall and I'll show you another exercise that you can then try and see if you can do it yourself. So here we are at the wall and as promised an exercise for the thoracic area. We've had the experience the first time through. What I've done is placed the ball behind his back so it can help support. He's got the thera-band wrapped around, like I had it on his thoracic area standing, but now I'm going to ask him to do it.
So now he pushes slightly against the ball and he's just going to rotate. What you don't want to see is showgirl Las Vegas, which is where it's all moving that way, or boxing or you punching the arms or just simply straight holding the theraband and he's just moving the thoracic spine. He's moving the rib cage, so rib cage shifting back and forth. So I think we'll head over to the Cadillac. What do you think? I think we should grab the theraband and let's go.
So what we did was Michael is lying on his side with his legs and 90 90 degree angle and we are placing the theraband on an angle so you lies on it and then we wrap it around his sits bones and he is holding onto it, locking it on the floor. So if it's nice and tight, when he releases the hip, it pulls the band, pulls the hip inward. And what he is now going to do is that pelvis back down and slightly under to create that length and then release it. And then he goes down into that what we call or spiral dynamic calls an outward spiral. Now when that gets a little tricky, another way to think of it is when he's in this position, the sitz bone is kind of like up. So what he thinks is the top sits bone, the ring back and down towards the bottom sits bone and then he slowly lets it ride back up and then he presses it slowly back down.
So that's one way to address the bottom ball of
So I'm just going to have my finger here and tell him to push down with my on my finger with it.
Now we're going to slightly change the top position. So he's going to move. Okay. Let's move a little bit more forward on them. On the Mat. Yeah. So you have a sun space to [inaudible] and we're going to move the bottom shoulder slightly forward. So it's almost inline with the knees.
So his body is slightly tipping forward. The bottom arm is now right in front of him and the other arm is on top of it, which is obviously not the same length because that shoulder is forward. So what he's going to do, he's going to do that same idea of the in first tic-tac that we just did of moving that ribcage forward. But this time he's going to lift his head and arm up. So he's going to create a contraction. Then in this contraction, he's going to rotate, trying to stay up for as long as he can, and then he's going to lower back down in this lower down below the head.
In this position, you want to make sure that the hand is never lower than the shoulder, right? So then he's going to curl back up. He's going to stay up as he rotates back, and then he's going to relax down. So he's going to move forward. He lifts the arm and head up.
He stays in that contraction as he goes, as far as he can to relax down. Then he crunches back up. He activates the obliques and he stays up for as long as he can to them relax at the bottom. So from here we're going to go into what we call the standing balance on one leg. So he's going to stand and placing one leg on the box. The bottom leg is parallel and then inside here what is going to do is an active version or a more active version than from the hip motion that we did with a theraband earlier.
So he's going to let this hip relax. Then he's going to press this leg into the floor and that makes that same rotation in the hip. So you release this so the pelvis goes back, it goes down, it goes under and and basically rotates the pelvis right on top of the femur and reach any rotates at pelvis right on top. And then relax one more time. You're gonna press now when they really on top of that femur and if they want to rotate the upper body ever so slightly, he should be able to take that leg right off without any problems because everything has been online. So we have that again, that counter rotation of the pelvis and the sternum that creates that dynamic stability. Okay. Another way, another way to do that.
Pelvis motion is sitting. When we started earlier, we showed you how important is to have the double action. Even when you do the spine twist on the box, for example, on your reformer or even when you do the stomach massage with the rotation or something like that, to give people something to push against for them to get the sensation, it can be helpful to use a ball. So what he's going to do is set sit on top of the ball. I'm gonna move this to the side. There we go.
So from here the ball is going to push him up a little bit, right? So you want to really deflated ball and he can place his hand on top of his hip and the other hand on top of his sternum. So what he's going to do, he's going to use that hip and use that hand to press back and down into the ball. And then with his sternum, he pushes his hand forward into the rotation. So you have again, have that active dynamic motion on both ends of the spine. So the pelvis goes back and down and he moves forward with the rib cage. So we again, you looking for that dynamic stability, that dynamic active counter rotation.
So the next exercise would be the saw.
So way to do that is to have the inward spiral. So the ball rolls in this hip inward spirals as he comes in, and then an outward spiral. So inward spiral, outward spiral, and to work on the spirals if to feel it more. Or you can put this hand down in the mat in front and you can just work on the inward spiral. The ball rolls in, the hip comes in, in and out. And then of course you can go to the other side. So the camera gets the angle from that side. From here, the hip is spiraling in and it's spiraling out so it spirals in and the arm comes in, spirals out.
And you want that to spiral in and out. Oh, last time.
So what the first thing he's going to do is just rotate as much as he can. We can focus on trying to move that ball underneath you and then come back to the center. So that's the first part. Then you rotate this way to curb my way to rotate. Now that rotation, just like the saw will have the tendency to lift this hip up. So now we're going to try to stay up with the upper body and just move the pelvis back and move the pelvis towards the heel.
So he gets that same feeling that we just did in the Sa only this is much harder and then he rotates back. Do you want to do the other side? Oh, I would love to do the other side. Well then he gets the other side [inaudible] and go up. He asked for it and move inch. You then have the head eating alon over the hit of arrived press. So it's the same action as the SA, only in the mud.
More active way. Let's do the threatened needle. Oh, let's do throw the knee, the thought thread, the needle. You'll be in a quadrant head position
So you're going to lie down on your back, legs up. Now what we're going to do is his arms and if it was in a class it would be out to the side. But for right now and for you can see I'm going to have them just bring them up over his head so you can see the pelvis. What I want is an inward of the right
Oh there's a box there. And from here you think of lifting that left pelvic half, it spirals in coming into the navel and that's what takes the legs over and bring it back in. And the next side bringing it in. So now the spirals are there as opposed to what most people do or a lot of people, not everybody don't want to say everybody is, they just use the leverage of the legs this way to go side to side instead of actually using the core and the rectus abdominis.
So the last exercise we're going to cover right now is going up front and we're going to show you two different ways, the more traditional classical version, if you want to call it that way, and how we have changed it or modified it or evolve it, whatever you want to call it for our clients. So the more classical way of the going upfront is to press the pedal down, to stand up and to keep the box as we call it, the shoulders and the hips. Absolutely square as you go up.
The more functional way would be with rotation because when you step up, for example, onto a spare pair of steps on, on your, on a bus staircase or a bus, when you lift the leg up, it's going to move inward and upward. So we're going to allow that to happen. So now what I'm going to ask Michael to do is to move the hips back and down to get it on top of the pell, on top of the Femur to come up. So it's very similar to go back and down and under. So it's very similar to what we did when we were standing.
When the hip was relaxed and it went down to push up. Now we using that push to come up to make it even more functional. We can incorporate the rotation of the thoracic spine as well. So yeah, when he is here, this hip is up as we talked about the pelvis and the thoracic spine rotate against each other so the hip is forward. Then the hip goes backwards.
As the thoracic spine moves forward and we have that counter rotation and come back down. Now we can continue to step. If he wants to, he can bring that back and takes his foot off to bring this side forward for that counter rotation. Then bring the leg back and reach. So the pelvis goes backwards as the ribcage comes forward and he has that counter rotation of the pelvis and the thoracic spine and then he comes back to bring it down. We have one more time. He goes up and he live, he has a counter rotation really moving that hip back, standing strong on that femur. He brings it down, he steps off carefully, he controls the pedal and brings it back up. So we hope that it gave you some ideas of the rotation and the counter rotation and how you can incorporate that into your pilot's work. Thanks.
Comments


You need to be a subscriber to post a comment.
Please Log In or Create an Account to start your free trial.
