Description
Fun Fact: If you look at the ocean at 22:33, you can see a shark breaching!
About This Video
Transcript
Read Full Transcript
I'm Kathy Ross Nash. You're a [inaudible] anytime and we're going to have a little tutorial on the short box. The short box is utilized in most reformer workouts and can be seen in my foundational reformer workout. You will see the box used in a couple of different ways and you can personally change your workout and utilize these options that I'm going to offer you today. I want to tell you not only what the options are, but why and when you should use them or could use them.
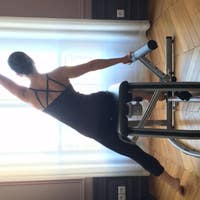
So the first thing is when you are setting up for your short box, you want to make sure that you take your foot bar down and you can put your spring setting on two or three. A lot of times in the beginning, I'll keep it on three Springs, especially if somebody is a larger person. So let's put it on three Springs today. Okay? And then, and we're going to make sure you're in first year, you can be in second gear, but I like it in first gear. So the first thing that we're going to look at is the short box on the long box. This is how I like to introduce the short box. There's a plethora of reasons why. One is my knees are beginning bent.
And why is that important? If we look at most of the work, let's say as simple as the roll back bar, we begin with it bent so we can get the isolation of the pelvis moving back without the involvement of the legs. When our knees are bent here on the short box, we can once again utilize that same isolation without going into our legs and our hip flexors. So that's one reason. Another reason is I also can use the strap here and I'm getting a lot of information. How many times when you're working with somebody, their feet move around, they rotate in and out, right? Well here I have more points of stability. So I have my legs at my 90 degree angle so I can really feel the connection from the center of my, my leg all the way down to my heel.
My heel is connected to the frame. So now there's another point of stability as well as the ball of my foot. Well, I have big feet so they really reach there, but the ball of my foot, so I can really control the alignment from my hip, my knee, my ankle to the center of my foot, cause I have something to push on. The other thing that it does is it really starts to incorporate a two way stretch without the student or yourself really realizing it's happening. When you have something to push against, you can move away from it.
Think about when you're teaching somebody mat, right? And you're teaching them the single leg or AA pull and you put your feet, your hands on their feet and have them push. They can really understand that they're their stomach away, they're reaching their legs and they're getting more length in their bodies. So you get that here. The other thing which is really important that we sometimes forget about is that going backwards is scary for most students. Think about it, you're asking your client to go backwards where there's nothing behind them.
Any same personal say, ah, makes me nervous. Right? So now I know that there's something behind me. It's also a lot safer. So if I'm teaching somebody their short box and they go back here and they lose control, they're not going to go too far and go into their back. I can also support them more easily with this much behind them.
So I like to begin on my short box with the long box. Okay. A lot of times while I'm here, I'll also introduce one or two of the exercises of series of five so that they really start connecting into their powerhouse at this level. So another position is where you put your short box in front of your shoulder blocks. I'll utilize this position for shorter people so that they don't have to stress. Okay.
Sometimes I'll even use it for somebody that I want to keep their knees soft. So if you have that person that likes to grip in their quads, the second they extend their leg, you can put it here and they can use their feet and push into their heels and keep their knees soft. Then the next position, the position that is traditionally done and that is over the back in between the shoulder blocks in the hooks. Okay. In this position the legs can be long and now you're teaching them how to push through with their own imagination but you can harken back to when they actually were able to make physical contact so that they can imprint that and utilize it here. The straighter leg now is going to be a little more difficult for the isolation of the movement of the pelvis, but you've already developed it in a safe environment. If someone is taller, there's a couple things that I'll do.
One is you can move it back. Okay. Make sure you move it back so it's protected by the shoulder blocks cause you don't want the box to slide as they push out. You can always change the gear position if you need to for length as well, but definitely be careful when you do that and make sure that you put block spacers on both sides. A lot of times people put it on one side, which isn't good for your carriage because the carriage is going to come in and keep hitting on one side. You want to make sure that you have blocks on both sides to keep the gear safely in so that the spring doesn't disengage. Another thing is I have in my studio and they make um, a second long box. It's a shorter box.
It's still the same length, but it's a little shorter. And I'm just going to utilize this box to show you, and I will use this for larger, tall people so they can get the same experience instead of going into another gear. So if I have a guide that's like six something, you know, sometimes they get a football player, you get a basketball player and they're really tall, right? And then the poor person has to, has nothing behind them or you have to move them somewhere else. Well, if you have that second box, you don't have to. And then they get, the thighs are longer so they get the thigh support that they need as well. So these are a couple different options that you have for positioning the short box to help create a safe, effective workout for your students where they're all getting the same tactile feedback and the information in a very safe manner. So now that we've discussed the positions of the box, we're going to discuss some arm position options.
RN position options are very important. You can change a full intent of a workout or a movement by changing the arm position. You'll see that people fight all the time. Oh, it's done here, it's done here, it's done here, it's done here. Whatever you want to utilize the best position that will get your student to execute the purpose of the exercise. If I have somebody and their arms tend to fly out, I want to give them something so they have the musculature to pull it into, pull their arms into place. If I have somebody who brings their arms in and closes their chest, I want to facilitate them to open their arms.
So here's a couple of little variations. I'm going to put a lot of tools on the bed that you can utilize.
I think that for a lot of today's material, they're really good because a lot of today's material is a lot slicker than the old cheap nylon Lycra that I used to use from Copysea that all the dancers had that not only didn't breathe but it didn't move or slide. So that's one reason why I think that the pads are good today. So most of the time what you're going to do, if you use a pad, you're going to place it down, have it one hands with, from the back, why one hands with it is the width of your sacrum and you want your low back always supported. So if your student sits on here and they don't have enough room for their leg length to get one hands with, move your box, make sure that they can safely go back with their low back supported and protected. Okay. So when you get onto your short box, notice that there's two straps and two sets of hooks. This is important. I've seen that where people just have one set of hooks and two straps kind of defeats the purpose.
You want to have those two sets of hooks and two straps in case one strap or hook breaks. This way you don't lose your clients. We don't want to lose them. So lock and load your legs, flex your feet, press out to utilize the strap, push through the heel and draw the inner thighs together when you sit on your box. So the first toy we're going to play with is the pole. I use this pole when I'm introducing a foundational student to the work. What it does is this position allows me to see whether their box is square or not. It also gives me a tool for them to push up into so that they start once again, like we learned with our feet to push against the frame they learned to push against their hands, which once again closes the chain and helps teach them to create length in their body. And that's what we want. We want length in their body, so I will use this pole for them.
Most of the time I have a longer pole in my studio that's a couple inches longer than this. I also have shorter polls. I of all different lengths because there's students that have all different needs. I'll use the longer pole when I first am working with somebody because what it does is it draws their shoulder blades down back and together. Okay, so if you look at my arms and they're here, you can see that my scapula is separate, right? If I open my arms to here, you see I can create that second powerhouse and my shoulder blades draw together. When I am first teaching somebody, I want them to have as much support as possible, so I'll give them a longer pole so that they aren't worried about where their shoulders and what their shoulders are doing and they get a little more stability and help as they progress forward. Then they know what they're supposed to be feeling and I'm going to challenge it and give them a little shorter pole.
Now let's go into some toys. So first of all, we have our lovely magic circle. I will use this for people who go out with their arms. Okay? Your magic circle helps to draw towards the midline. It is the gift of the gods to us because so many people don't have an idea where their center is. And you know Joe talked about the column of strength, creating one long column of the body. Like the Greek pillars.
Yeah, you want to make your body a Greek pillar or a Greek goddess statue. So when you press the magic circle, it helps draw everything to the midline. This can not only be used like this, it can also be used like this for the person who needs to engage out here. Okay? This will engage in, this will engage out. So you have your magic circle.
The other thing that you have are weights. You can use weighted balls. I used to always do my workout with a five pound weighted ball with Romana. She loved to torture me. So what are these weights do? Yes, they make it more difficulty, but they difficult. But they give you more information when you're doing [inaudible].
Sometimes to understand what you're doing, you need to make the picture larger. How do we do that? We can do that with movement or adding resistance. So if I have my side to decide and I want to make it more difficult and give more information about the movement in a side bend and I'm here as I go side to side, this gives me more information on how to utilize the stabilizing muscles on the side that is supporting my underside so that when I get to do my side bend on the mat, I have an understanding of what muscularity that takes. Or when I go to do my star on the reformer, I know how that's supposed to feel. So we can use weights to increase the difficulty of an exercise and to inform us and prepare us for exercises that are to come that um, you'll be utilizing that movement for. Then there are hand positions.
So let's discuss when I go side to side, we've already discussed the pole option, the magic circle option. There are hand position options that you can use. So if I have a student, most of the times I'll place my hand here. Why? So they can lengthen their neck against it. But do you ever have that student that when you do this they jut their head forward? Okay. So for them, I take my hands here and I have them press back into their head and they will do their short box with their hands here. It actually really connects the front and back body very well.
Cause from here my scapula is firing, my hands are pressing, my head is pressing and I get a beautiful two-way stretch. Okay. Then what else we can do is you can use a push or a pull. So if I'm going to use a pole, I'm going to grab my wrist lift up and pull on that side. I'll use that for somebody who sings over the side, they'll go to side bend and they go like this, right? So to stop that, grab the wrist lift upright and pull that wrist over to get length on that side.
If I need to get strength on that side, I'll have them push into their hand. So from here, this will act. When I push this fist into this hand, it will activate this side as well, so you push and now I'm getting more stability on that side push and I can even reverse that if I want to get more length on this side and stability on this side, I'm going to go like this, push and push and I feel both sides of my body actively supporting me. Another variation that I like to do is the mermaid arm. That really prepares you for the next level of work to come in the mermaid arm, you lift and you have the arm pressed against the ear. It's imperative to have the arm pressed against the ear because it really opens up this vertebral right here. Okay? You can actually feel this space happen when you press it against the ear.
So we get side body length on this side, so I'll do it towards you. I press this hand onto the box. I glue this onto my box and I use this for the person who moves into the bend who translates the ribs that way. There's a couple of techniques that I use to combat that. You'll see a lot of times what people will do is instead of moving away, they actually move into the space they were and give themselves the illusion that they're actually making length. So you're going to lift up pressure arm here, press your hand against here and slide over, pressing this arm, reaching press, reach, press reach, press, reach. Come up, reaching out and relax. Okay.
Another one I'll do for the side bend is I'll press my hands down and lift up so I get length. You ever have the students that sink over and they want to sink? Press them down, lift them up, give them that feeling of what it feels like to have the spine elongated as they work. You can even lift one arm up, press down and reach over, lift up, press down, glue, reach all the way over. So look for different options. Now when they rotate, rotating tends to be a mess, doesn't it? Of course you have your bar, your pole, you can hold your hands in this position. I love to start this way so that they can see whether or not they're twisting with their arms and have them keep the center of the bar. Sometimes it helps to put a little piece of tape, Ms. Anderson that they can find the midline and rotate around just with their arms and seeing that their boxes square from the pole.
You also can do fingertip to elbow which will prevent them from twisting with their arms. You can also have your hands up on the shoulders and lift and twist this way so they really feel that the rotation is coming from the waistline through the ribcage into the shoulders and neck and not from the arms going around the body. A couple of my favorites are fist and wrist. Press your fist here. Keep it in the midline. This is great for the person who likes to translate those ribs or doesn't activate that side of the body. Press into the hand, keep it midline and you're going to rotate your shoulders, your ribs, your waist and come back. Waist, ribs and shoulder. Now if I want to create more length, I hold that wrist. This is for somebody who goes like this, right?
And they're going to have them pull, reach out, pull, reach out, pull, reach out and come back, pull, pull, pull, pull, forgot. I'm going your side bend, we'll revisit this. Another one for rib translator is to hold their rib. I call this the KT because I had a student that fabulous student but would always translate her ribs and none of the other options worked for her. It just didn't work. Nothing's magic. You know, you have to try things with different students. So I had her hold her ribcage so it couldn't go in that direction. Pull on her rib cage and take her ribs with her.
Hold your ribs, pull on your rib cage and take your ribs with you. Don't afraid to experiment. Try the different options, see how they feel in your body, and you'll have a greater understanding of the way to utilize them. Now we're going to discuss the tree. The tree is an exercise that we've lost. The purpose of it. Yeah, we don't want to sink back. Why do we do the tree? To stretch our backs to sit upright.
So the first way I teach it is an exercise called the TV exercise. And this can be done with the box in the long way as well. That's where I usually start it. So it's, I teach the TV exercise, which is lift, don't shift first boxes, square, shoulders over hips, pull the stomach in. And this is really, really difficult. We're going to start down here without shifting. You're going to lift the knee up and hold for five, four, three, two, one and bring it down. And repeat that.
It's called the T V exercises, cause Ramana told us that we should go home and when we're watching TV practices exercises. So apparently we were doing PyLadies 24 seven okay. Then from there, from the simple lift, you have lift, extend, bend and down, and you're going to increase the timing of it. Maybe two counts to begin, maybe then move to four counts and build up to eight counts. From the long position you're going to move it into the shorter position. Why is this more difficult? It's close to my knees already lifted so I'm already closer to that single leg.
Pull. Rolling like a ball position. Yeah, from there. Simple lift. Not using your hands. Press down in those hands to keep that spine straight and then go through all the variations of your lift and shift. Now the next thing that I'm going to do is I am going to use my fuzzy. So the fuzzy is a great tool for tight people to introduce them to the tree.
You're going to cause they, you don't want it to be about the leg stretching and bending. You want it to be about the back. So have them hold the strap, measure it. I'm a big tall type man and stretch, sit up, tall, stretch. And then it doesn't become about the height of the leg. It becomes about the lift of the back. And as they progress we get rid of that one and we go to this one.
Make sure that they don't hold the metal and you're going to place your foot on the strap, lift your back upright and stretch and lower and stretch and lower. And then one day you say goodbye to that and you begin in your other hand positions. So these are just a couple of options for you to try and play with. What's the reformer videos and try these options to see what suits you have a lot of fun.

The Teacher's Corner: Teaching Tools


Comments


You need to be a subscriber to post a comment.
Please Log In or Create an Account to start your free trial.
