Description
About This Video
Transcript
Read Full Transcript
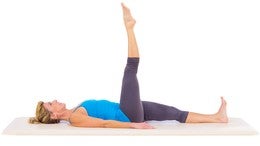
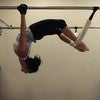
Hi, my name is Brad Howard, and today I will be reviewing the single leg or the one leg circle. So in return to life it was called the one leg circle, but Ramana, my teacher always referred to it as the single leg circle. And my body today is Ted Soy Yoshida. And I'm going to give two different variations. One is going to be a little bit more of a basic variation.
Another one is a little bit more advanced. The events when it's a little bit more similar to the one that you would see in return to life. And what happened was a lot of the exercises that Joseph plots did Romana felt like they were a little bit too advanced for the general public. So she would simplify it and give them a bridging step to get to do the more advanced version of it. So we're going to go over both. And then we will also do a couple of variations to help with clients who need help with the exercise. So Tetsu I'm going to have you start by lying down.
Great. So just to review quickly, the more basic variation I'm going to have you bring your left leg up. Great. More basic variation, nice rotated leg. It would be across the body, straight up like a letter d. Then as the client is getting a little bit more advanced, they can start to make it a little bit more of a circle moving in the range that they can control. And then as they get much more advanced, the leg will come all the way over letting the hip come up. This leg will circle down, the leg will open as far as they can control maintaining the pelvis and the leg would then come back to starting position, which would be at our 90 degrees.
So you can rest for a second. So with the um, all the mat exercises, I like to divide the exercises in three different parts of the body. So legs would be lower extremity from the head to the tailbone. That would be the trunk. And then the arms would be the upper extremity. And I like to see what in the exercise is stable. And what is mobile? Um, with pilates, it's all about control so as you know the original name of plots was control [inaudible] and we always want to make sure that the body controls whatever is moving, so in this exercise the leg is circling but we don't want the leg to be controlling the body. We want the body to be controlling the leg so we always only move in the control that we can maintain them so he are upper extremity arms would be stable so there's no movement that's going to happen.
There had to tell trunk that will also be stable. No movement is allowed to happen and then with the lower extremity, one side is stable, one side is mobile, so anytime that there's only one body part that's moving, we know it's a pure stability exercise and that's what we're going to focus on right now. As we get to the more advanced version, there is going to be some movement in the trunk and so we will have mobility of air, but as the leg circles down and open to center, then we're going to focus on stability. Okay. Another thing I like to mention is when you're first learning this exercise, a lot of times what Romana would do, she'd had the client use the strap and then the client would also use the dowels. And so if the client was flexible enough, they would have their arms fully extended. A the one thing that Romana studio the Mat, the high, Matt had a little bit of a hump on one of the mats, so anyone who was very stiff or rounded in their shoulders, we would actually put them just forward of the hump, which is almost like a small barrow attached to the Mat. That way the dowels were a little bit higher, so that way was in pulling on their shoulders too much. Okay, so he's going to start by bringing his right leg into the chest.
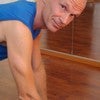
He's going to extend the right leg straight up to the ceiling. And in this position I'm going to have a nice rotated leg. Now I'm going to think of having the body nice and stable. He would then go across the body, circle down and come straight up and again across the body down and come straight up. Once he's perfected that in mastered that, I would then have the arms come right down by the side and then I'd have nine points of pressure into the mat. Hands would be two points. Shoulders would be two more, which would be before head, stomach six, hips eight. And then this standing leg here would be the ninth points.
So all nine points are going to be pressed into the mat, anchoring into the mat, like ship anchors or tree roots rooting into the ground. And then the same thing cross the body. And what remodel used to like to say is as you go across, you bring the leg up to the nose, then you bring it a little bit more to the opposite shoulder. You circled down and then you draw letter d go straight up. So Capital d across the body circled down, up in, stop, cross the body down, up and stopped.
So we would do five this direction and the stop was always very important because that's your isometric contraction. And then reversing, go straight down across the body and stop. So straight down. And as he goes across, he's going to try actually to maintain the rotation, maintain this point, anchoring into the mat. He's going to get as much to his opposite shoulder as possible. Then to the nose and then center here. All right, let's actually go a couple on the other side. So you're going to bring the leg down and bring the other leg in and up.
And then nice rotation of the leg, extension through that leg. And then this one, we're going to make it a little bit more of a circle. So here again, it goes to the nose, to the opposite shoulder as much as he can. Maintaining that right hip, anchoring into the mat, he's going to circle down, is going to go as far as he can control without any sort of extension in the back. Then from there, he's going to open the leg to his control, angering the right hip down there, and then come back to center. And now the nose to the shoulder across, down, up, and yes, center and across, around and center. We're going to do two more.
Right now I'm doing a nice even timing. So when we first would instruct the client, we always do a very even timing as the client gets a little bit more control. We started an add an accent, so it would be a nice impactive accent where the accent is on the end of the movement of phrase. He would go across the body, circled down, around, up and stop and across, round up in stop. One more time across, around up in stop and bend the knee. And our goal is to have no sort of, I call it Elvis' pelvis happening. Okay. Keeping it rated g. All right. So what we're gonna do is we're now going to move on to the more advanced version. Same way we would start by holding onto the dowels.
Yup. Nice broad chest wrap through the ribs. Nice and stable in the pelvis. Now I'm going to have you bring one leg straight up to the ceiling. Great. And then here he brings the leg across the body, up to the shoulder. Then the hip is allowed to come off as he starts to bring the leg across.
This leg is nice and strong and straight. He circles the leg down. If he's strong enough, he can brush heel to heel. Then from there he's going to start to open the leg as wide as she can, maintaining the stability in the pelvis and then stop and now across, around and stop and now across, around and stop. Now we can also add the accent here. Go across the body, open around and stop across. Open around and stop and then let's try five with the arms down and then also not using the strap anymore, so he's going to open this.
Why does he can controlling the pelvis. Then from here he lets the hip come up as he goes across. Now when he returns, he's going to do a nice sequential sequencing of the spine by first pulling the rib cage down, then pulling the lower backhoe bleak down. Then from there the pelvis will come down. All right, and now open to where you can control anchoring the opposite side. Go across and pull ribcage, lower back, pelvis open across rib cage, lower back pelvis to return twice more open and across ribcage, lower back pelvis, anchor that opposite hip down as you open across rib cage, lower back pelvis to come back to center last time, open and across and pull rib cage, lower back pelvis and then you can bend the knee into the chest.
Transition Wise, when I'm working with beginners, I would bring the knee in and then I would extend the leg up. When you're working with an advanced client, you would just chance mission by scissoring the legs, making sure you have the control. Now a lot of times when I'm working with people with this exercise, they complain of a little bit of a pop or a snap that's happening in their hip. And that's very common and what that is called as a hip snap. And what happens is that there's a tendon that gets caught in a little bony Devitt. It gets caught there and it pops out and it's just as a little bit uncomfortable. Maybe I'm not the worst thing that's gonna happen, but over time it can create some sort of inflammation.
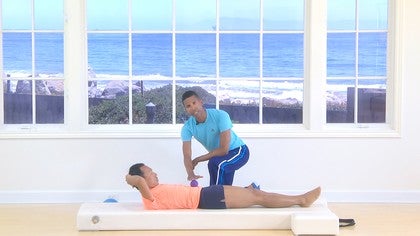
So it's not desirable for it to happen. So when that does happen, what I tell them to do is to either rotate the leg a little bit more outward or rotate the leg slightly inward. So what it really depends on the angle of their rotation that they have in their leg. And if you do focus on maybe trying to angle it out a little bit more or maybe angle it in a little bit more, it will generally take that hip snap away. Um, how a lot of times where I need to scaffold this exercise and start to build building blocks for them to be able to do even the pure simple exercise. One thing I like to do is I like to give them a ball and I'm going to have you bring your right knee into the chest. And what I would do is, um, first actually I would, I like to do is I like to give them a little bit of a, a massage. And I had them just go across and up, crossing up just to move some of that snow, veal fluid around in the hip. And then eventually, right now I had his both hands here.
Eventually I would have one hand on the knee, one hand on the ankle, like so, and this will enforce that hand position that we have in the single leg or the one leg stretch. Okay, now I'm going to have him find his nine points of pressure into the mat. Hands, shoulders, head, stomach, hips, and standing leg. He's going to lift this knee, he's going to hug this here. And then what this does is it focuses on working on the femur instead of working from the foot. So a lot of times when I have a client who is doing the single leg circle, you start to see their foot whinging and what they do is they start to lead with their toe. And then actually you know what you want to do is you want to lead with more with the inner thigh, also with the inner thigh, with the heel.
And so this focus, it says to be a little bit more onto the upper part of the leg, which is then our PR principle of centering. So he's going to go across the body, circled down and stop. So right now I'm doing the letter D. I couldn't make it a little bit more circular if I like across, circle down and stop and now on your own, across, circled down, stop, hold there. There's variation. It's also very good for people who have knee issues.
It's also very good for people who don't have that flexibility in their hamstring muscle and they can't get their leg to a full extension once again across the body, down, up, and stop in one more time, across, down, up and stop. Once they've mastered this, why don't we do the other variation on the other side? [inaudible] you're going to bring this knee in. I would actually do it with this light rotation of the leg. So right now I just showed that previously I just showed it as a parallel leg. Then eventually I'm going to turn the leg out and then I'm going to do it more with the rotated leg. Now the knee, I always say imagine that there's an eyeball that's right on your knee here and that eyeball should always be looking outward. So I don't want the need to go inward.
Always the eyeball is working outward so we don't get any sort of a can can type up a movement there. So he's going to anchor his pelvis, he's going to bring the inner thigh across down in center, stop across, down in center stuff. So here we're working on that across and this is for those people who can't maintain their external rotation. You'll see them, they'll circle, they'll keep it rotated and they rotate it inward and then they find their way back to rotation. But that's a lot of unwanted movements. So this is a very good way to help them find the feeling of what it feels like to maintain the rotation across, down, up, and stop and across, down, up, and stop. And let's do some reverse. Go down, cross. Lucy's always leading with that inner thigh across, down and up and across. Yes.
And one more time down, across and up. Great. And now I'm going to take this. I'm going to have you bring your right sole of the foot flat on the mat and then let's actually, we'll still work with that left leg. Bring the left leg up into the ceiling. Okay. So this is a variation that I would do also for the people who have very tight hamstrings by putting the sole of the foot flat on the mat.
A little allows them to have a little bit less pooled on their pelvis from their hamstring and maybe still they don't have that full extension yet. They might have a slight bend if they do have a slight bend in their knee. I don't actually focus on the external rotation. I actually would do a little bit more of a parallel leg because it's harder for them to keep the external rotation with a bent knee. Uh, but let's say that you can do a full extension leg up, like rotated and go across, down, up, stop and across, down, up, and stop. Okay. And you can bend that knee.
Another thing that I like to do is we talked about how the exercise was all about stability. And so whenever I see any type of movement, that's a good indicator to me that something is going on that I don't want. So for the client though, sometimes they can't feel it. So then you have to use tools to help them feel it and then eventually take those tools away and then they'll be able to do the exercise autonomous autonomously. So one thing I like to do is I like to put the ball on their belly button. And then what you can do is first have them bring the hands behind the base of the head roll head, neck and shoulders up. Looking at your abdominals.
Now what you're going to do is you're going to have this ball sync and then let it release and then sink and let it release. One more time sync. So then they can feel what it feels like to have the navels sunk and then they can see what the ball does when it's not pulling. The stomach is not pulling in. And also when it's relaxed or when it is pulling in. So you're going to lie down and then what you're going to do is you're going to bring one knee into the chest, one leg up, and you're going to rotate the leg.
And our goal here is to not let the ball rise, but another goal is to not let the ball roll to one side or the other side. And a lot of times when you have the client do this, the ball will roll and you'll notice it always rolls to the same side and that's a good indication of where the rotation is in their pelvis. So keep that leg rotated, keep that ball nice and balance. I gave you a purple ball so you can imagine it's a nice glass of red wine filled to the rim. Nice heavy pour. You're going to bring the leg across the body and opening your controls.
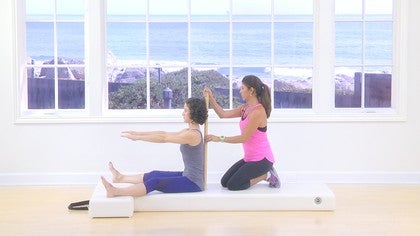
Stop and across. This takes a lot of abdominal control and it teaches them how to get that control in that stability. And one more time and cross and up and bend the knee. And another thing I like to do, uh, not only are we working on trying not to let the body rotate, we're also trying not to let have the body have any sort of, uh, hyper flection or extension. And we're also working on trying to not have any, uh, lateral flection of the pelvis. So sometimes what I like to do is give them a bar and then I put the bar across their waist and I tell them it's like a tight rope bar.
So if someone's has to walk on the tight rope, they have to hold the bar and that's their indication of whether they're square or not. And I like to put that bar across their waist here. And then here they can see if there's any sort of tilting happening or there's any sort of rising happening in the pelvis. And this is also very good for your clients who have the scoliosis. So bring the hands behind the base of the head, roll the head, neck and shoulders up, looking at the abdominals. And I always bring their head up first because this way they can seal it, see it. Then I would bring their head down and they can feel it.
So let's start with the head up. You can either bring the leg straight up or you can bring the knee into the chest. Your choice, and this is going to be an exercise in itself. You're going to extend the leg up into the air and his goal is to maintain the stability of this bar. So right now the bar is a little bit lifted on his right side, the side. So what I would say is bring your right Sitz bone further. Yep. There we go.
And then you can see that the bar evens out and now go across the body down and come up. Keep pulling your sitz bone into my finger. [inaudible] there we go. And across. So maybe the movement is a little bit smaller, but it's more controlled and you know, it doesn't have to be big. A lot of times less is more. It's all about the control. And now reverse go down and across, down, up and across. And he's really using those obliques to stabilize this.
Right now I'm giving him a little bit of manual help, but eventually as I take my hand away, he starts to remember what that feeling feels like and he can recreated by himself and then bring your head down. And I would do then the same thing with the head down and that way he can feel it cause he's already kind of seen it already. It's kind of already felt it. Then he can make his own corrections. And so going back to that idea of starting small like Ramana did, she felt like sometimes people couldn't control that very large movement. So she would take it down a little bit, give them a smaller movement that they can control and then work up to a bigger movement.
It actually reminds me of one of my teachers who I used to train with one of my dance teachers when I was a dancer. We all wanted to do a type of dance, which was called release technique and we weren't getting that in our class. So then we all were asking her, can we do release technique? Can we do release technique? And she said, well, before you can release technique, you have to have technique. And so it's the same type of thing here. Before you can do a large range of motion, you have to work a little bit more on the smaller range of motion to get to the large range of motion. So this was the single leg circle or the one leg circle.
The Pilates Essentials: Exercise Breakdown Tutorials
Mention
 |
Brett Howard (Teacher) |
 |
Liya O |
 |
Lise B |
|
|
Sabine Nilsson |
 |
Trish K |
 |
Marta A |
 |
Alison Lloyd |
 |
Ira R |
 |
Kim W |
 |
Candace |
 |
Anne P. |
 |
Annie M |
 |
Rebecca C |
|
|
Yoly N |
 |
Mikhail D |
|
|
Sharon B |
 |
Heikki L |
 |
Niurka C |
|
|
Mat Work |
Comments


You need to be a subscriber to post a comment.
Please Log In or Create an Account to start your free trial.
