Description
About This Video
Transcript
Read Full Transcript
Good afternoon everybody. Today what we're going to do is do some therapeutics for shoulder and shoulder girdle first and then a math class. This area is troublesome for most everybody, whether we actually or we are just normal people. I'm with some kind of shoulder, elbow, wrist injury or neck problems. It's good.
Good to reset the shoulder girdle correctly on the rib cage and get the bones properly aligned in the sockets because the nature of us civilized creatures is to roll forward. We s we are now, everyone is in front of the computer in front of the cell phone, so the vertical plane of the body gets lost and certain muscles get overstretched and other muscles don't get opened up enough. Very common for the arm bone to start to roll forward. The moment the shoulder girdle and shoulders are rolling forward and I would say most people shoulders are not sitting properly on the ribcage anymore, young and old. Then the back muscles are not holding properly and things like rotator cuff injuries and other such conditions can start to come in. So we will do some things to stimulate the muscles first.
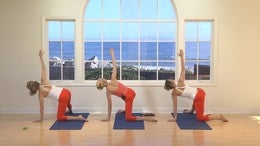
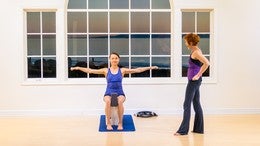
Stretch the area and once you feel kind of the power of your own body, we'll just go into some nice athletic mat work, which is always fun to do. So to start with, let's have all of you facing, you know what Mikey, you will turn sideways to the camera just so everybody can see you. Funny position, we curl the fingers up and the thumb is out. This is just to stabilize the line of the fingers into the wrist so that doesn't get involved. And let's have everybody take the hand right to the side.
And actually just for a moment, bring the hand down. Now, right here as you're standing, squeeze your shoulder blades together. Watch it. That when you squeeze, you're not necessarily moving the rib cage. Rib Cage is totally separate from the shoulder blades. Squeeze your shoulder blades together. Check that the shoulders are down. You're not gripping the trapezius muscles and take the hands out to the side and check that the hands are exactly to the side. Elbows locked. Hand is strong.
My cat is planted. My directions to the fingers are like this. In fact, you could. Why don't you turn to face me so you can see what's going on. And keeping the shoulder blade squeezing strongly together. Start circling the hands. So you're doing these little tiny circles and quite fast. Check that the hands are in line with the shoulders, low, high or mica.
Little bit with the right hand, a higher guider. That's it. Keep circling. But keep checking that those shoulder blades are squeezing together. They are going to start to get tired and they will want to relax. Don't keep them squeezing. And if you're doing this at home, if can look at yourself in the mirror. And if you notice that one shoulder is higher than the other, drop the hands down till they are even and gradually get them to come up till they are shoulder height. Keep checking shoulder blades are tight.
Don't grip the stomach and don't tuck the bottom guy down just to relax down there. Make that upper back and rest. Take a breather. Hard to do. And now same thing. Pinch a shoulder blade, arms out to the side. Now turn the palms up, lock your elbows, make sure the wrist side exactly straight. Pinch the shoulder blades together. And now the circle is going backwards. Keep pinching the shoulder blades together. Squeeze them tight and keep circling.
Sending those thumbs back and down from the shoulders. Lock the elbows and keep the body vertical and keep squeezing the shoulder. Your shoulder blade squeezing my keep circling. Keeps circling. That's it. You want that pink in? Much more. Pinch Micah. Yes. Much more. You want that pinching. Yes. Now see what you can do. So those shoulderblades tend to want to go apart and rest the arms down.
Very, very good. Now same hand position right by the knuckles. Shoulders are down. Let the elbows float towards each other and out again wide and towards each other. Head is vertical, okay, and out. So if you can, you try to aim the elbow opposite your throat or even your chin without the shoulders coming up. So you're just working the hinge of the joint and if it's pulling anywhere, that's fine.
We want to stretch out and loosen up the shoulder joints and pull in and out and pull and out. Add, pull and out and Paul and out and Paul [inaudible] and out. And one more time and Paul [inaudible] and out and bring your hands down and rest. Next exercises to start to work the arms into the laps. Let's have you each take a block.
You will be holding your block. I'll turn sideways the width of the block. See if you can bring your elbows together so the shoulder blades are y. Now we're not crunching the sh, we're not squeezing shoulder blade lifted up so the elbows are opposite the shoulders. The shoulders will start to come from here and then lift those arms up right over your head. The block can be flat and take your head back and look at the block and let the shoulders come way up. Way, way, way up.
And squeeze the block. Let the shoulders come up to your ear. So you, yes, you create this length. And unless you have trouble with your neck, you can have your head white back there looking up and squeeze. [inaudible] try to lock those elbows. Micah, if you can. Yes, really work very hard. This is going to fatigue your upper body. This is for handstand, so you get power into the shoulders. Really squeeze tight, lift up those rigs and try to press a block together and towards the ceilings. Very Long, very lifted, nice length all the way from the waist. You feel it into the head. Michael, can you take your head right back? Press up even more. Now bring your head straight and bring the block down.
Bring the elbows together together. Together. Together. Together, together, together together. Very good. Bring the arms down. Okay. Let's have you coming down to the maps. Um, I think you two ladies will be facing each other. Um, this is what you going to do. We're not starting to work into the rotational aspect of the shoulder joint to strengthen it because most people, most time the bone starts to curl inward. If I was to take guided as an example guide at that time you lie down on the floor, on your stomach, on your stomach, you're going to be like this and the block is going to be under your arms, upper arms.
Ideally here if you can, if you can't it will be higher up with some people just having it on and your head is down. Now, same hand position with the fingers and you want the hand right above the shoulders and then you want to externally rotate from the shoulder so the thumb is going out and this is the funny part, you will take the big toe joint and let it drop inwards so your lower back and your buttocks are relaxed. The only place that you are working a lot is right in the shoulder joint, making it work, trying to allow the upper back and the lower back to relax and release. So you just hold that. That's it. Work the rotation, work the stretch into the elbows, let the waist drop the stomach, drop the head is soft. Lengthen through the elbows as much as you can and you keep trying to spiral those thumbs away from each other, from the shoulders. It's not from the wrist, it's not from the elbow. It's a shoulders working very hard to start getting that external rotation set into the body again and keep relaxing the chest down, relaxing the waist down, relaxing the butt, buttocks, relaxing the belly so it's all in the shoulders.
Widening the shoulders just a little tiny bit more. Mike, I'm going to do one thing for you and try and get you even more straight.
You're not going to do the same thing at a 45 degree angle out. We're doing three angles straight out and straight to the side so you take them a little bit further out. Same position, right? Thumbs arms and the same position, same external rotation happening from the shoulders and the chest and the head is dropping down. Yes. So in time this, don't try to push it but there's still tension in the rib cage for you. That is will gradually unravel and keep working the rotation into the shoulders. So the eventually the whole rib cage drops.
So as a shoulder finds a way to be set into the side body rather than the front bike. It takes time though to change the program around, but this starts to get this high part of the arm bone really working again and then rest and let's have you, when you feel ready, you may move the arms right out to the side and I think let's have it quite high up for you. I'm Jennifer meaning sort under the upper arm, quite high up on there for you to Micah. We wanted here more close up to the shoulder. So really the, if you can up into the upper arm, more basic form of this exercise can be done standing against the wall. So you're just here. That won't be so extreme and opening up into the shoulder. It starts to get all these muscles to work. It wakes up the back muscles very powerfully.
Sometimes the first time you do it, you just feel exhausted. After you do it a few times, you start to feel this ability in the upper back to have a lot of intelligence and um, you may notice that you're standing more vertical after why? Because those muscles have just been jump-started a whole hold the shoulders wide shoal, the rib cage wide, Jennifer, very good. You already upper back is starting to let go and shift that. Excellent. Keep working that rotation as much as you can.
Very good. And then sit, relax and sit into child's pose just for a minute just to stretch everything out. Now next one is another form of a stretch to counter balancing. Even out the trunk and the relationship of the these two hip joint and shoulder joints or hinge joints. So they are supposed to work a lot and they often they get very locked in tight or one is very different from the other and the whole trunk starts to compensate. So we're looking to restore the ability of the trunk to have intelligence with movement cause we're not like, it's not symmetrical. So what you'll do, Jennifer, let's use you as the model.
You will lie down and one will be under the arm and one will be under the sigh going backwards and everything else. So what this does is it's, and the pelvis is long. And how is that feel? And for people that are, are you okay with this? This is, I wish I had, well I don't have a higher block right now, but that's the ideal and help any of you who need it. And you'll get no both arms above your head and both arms.
Now everything's relaxed. So you're not trying to kind of, and you're letting basically, what are we doing? We're encouraging this hinge to start to be restored and this area of the spine to sink and settle. So the natural curve just above the sacred starts to kick in. Yes. You know what, Michael, we going to need to bring you lower because it's throwing you into twist right now. We want this even weight of the pelvis even. Let's have that plague slightly turned in for right now.
So the joint just hangs.
I'm going to turn this sideways. See if we, how does that feel, Vida and make you try to feel yourself settling into both sides of the pelvis without pushing. We want the joint. What we're looking to do, let's see if I can show it with someone like guider. This is the joy. Just relax your leg for a minute. So we want this joint to start a hint. Often the hip flexor gets very grippy better and it starts to hold and then even when the leg goes back, it's not hinting from the hip, it's kind of torquing the pelvis. So we're trying to release all of that. Let the hip flexor let go. It's not part of its job is to, is extension of the leg backwards and let the pelvis rehang properly.
So the joints are freedom of movement. Nice. All of you. Let's have you changed sides so we'll have to adjust. So as much as possible, you want the arm going straight and the leg going straight, not off on an angle to the trunk. So the bar, the natural curves of the spine will start to sink in. You're not gripping, you're not holding a mica. I'm going to adjust you a little bit here. First. Let yourself sink
I'm actually lowering your bit so that this cause in time, palms just gently facing each other. So in time we get, yes, this is a better angle. We're looking to get the that to start to wake up for you. This is good. Now, same thing with the leg. Just relaxing. Give me the weight of the leg. Much better. Are you okay? Nothing's pressing into bony things. So, okay, looking good.
Jennifer, how are you with your hip? Good. Yes. Okay.
This looks better. Now we're getting the joint to hinge. Before it was kind of twisting into the pelvis, Julie, we need all of that coming into play. Much better. Much better. What's happening in your, in your back now.
She's too mobile. Now start pressing the rest of you and keep this opening, right? That's it. So we are starting and you can bend this knee and roll onto your side. Yes. So we're stretching the whole side.
That's it. So we're opening this away and you can use, so Micah, you're gonna start rolling onto your right side. This arm is bending. Start Rolling to the right for you. Keep the palm flat and you can bend this knee to help you. Lever meaning bend the leg two to push the hip up to. The idea is that you're going to row as much as you bend this foot in front of you to balance you and you PR slide this hand that you're stretching out away from you and make sure that the shoulder blade is coming into.
Just hold this stretch opening up Pec minor and some people can roll all the way onto the side. This is not a marathon. This is finding your own body and yet getting into this area, I have to be careful not to hit my own Mike, but you want to get into this area and open it and eventually it should be opening without the ribs coming up. But because the shoulder is purely opening now, if you want to work more deeply, everybody whose hand is stretched out behind them, place the palm of the hand on the floor and start to walk the hand up over your head. So you creep it up and you keep pushing with the opposite hand. So guided the hand is gonna work up and you can press. So any place along the road that you're lifting that hand up, you can stop.
This is a one to get these exercises. If you spend time, it's really for you to get into your own body and clean up the mess. So the restriction that's there. So sometimes spending two minutes in a spot that's tight may not be tight for somebody else, but well worth it for you to visit on your own steam when you're ready. So Micah, can you walk the hands all the way up? Aha. And if it's too much you pause
I think for you guys that you know, we'll keep the hand down and I think you can come way more onto the side way more. So eventually that two, you really working into that joint venture. You are shoulder on shoulder and hip hop hip and you can walk the hand all the way down to your buttock. But watch that shoulder joint that it doesn't roll in but stays out. So the front of the rib cage is pressing away from the arm. So you really opening up around the joint?
Yes. Okay. Roll back on your stomachs and let's do the other side to stay right where you are taking the opposite hands. Everyone will get to see your backs. So Jennifer, I want you, you're different case. I want to know, keep the shoulder away from the floor. Yes, lifted up and then start twisting away. Keep that shoulder lifting from the floor for a bit. That's it. So we get this, you're very hyper mobile, but there's little things that need to be that's looking better. Very nice.
So the pros sometimes have the harder time because they've spent so much energy and education to achieve abilities and sometimes along the way a little part got missed.
So eventually your right on your side body and then you start to walk the hence down again. You. We have three different examples of range of movement that they're ready to explore right now. Probably even though they're all pretty flexible here, they're finding places that have a big gap in range and they want to visit it for a little bit. A very good idea. So even going all the way down towards the buttock. That's good. Mike can keep pushing your opposite shoulder over so you're rolling even more onto your back. Okay, good.
And then roll back onto your stomach and not have all of you. We'll all do a twist. So sit into your heels for a minute. Just stretch yourselves out, just kind of to even out. And this next one is just a work, a spiral or a twist into this trunk. I'd like all of you to be facing.
You'd be lying if your head is going this way. You're on your right side. If your head is going that way on your left side. So let's have you like exactly a new site with your legs bent up at a 90 degree angle in front of you. So you want the knees exactly opposite the hips, the feet exactly under the knee. So you have this beautiful 90 degree angle and you want your shoulders exactly one on top of the other. And in your case, do not let the shoulders roll for two.
It's very easy for us to roll the shoulders forward. We actually want to be right on top of the bone of the shoulder when we in this kind of 90 degree angle grid, a guide a bring your shoulders, uh, further back on the mats and use the mat as your base. Um, you're a little bit on a diagonal. So yes, yes. So we, this is just to help me see your squares. So taking geometrics geometric alignment. No, no, no, you're fine. I just wanted the knees exactly opposite the hips. Exactly on the shoulder joint. Now take the top arm up to the ceiling and then roll the whole rib cage and chest out. But don't let your hips and stack.
So some [inaudible] or your knee. Some people like to put the hand here, but you're going to roll out and this whole, and eventually the hand you turn your head and look in the direction of the hand and breathe into your lower floating ribs. So someone like Jennifer has very loose shoulders, but down here, this tightness. So I want you to feel and search for the twist here and in a well balanced trunk, eventually the whole shoulder blade will go to the floor, notches, the tip of the shoulder. Don't force it, Jennifer, relax into it. Remember in your case, you don't want the movement because you'll get there with the shoulder. We need the ribs to start to move.
So there's the shoulders as a solution to a tightness right in the lower floating Ribeira say you want to really kind of get that area
And then roll over to the other side so you repeat it so you don't have your back to the camera. Everybody can see your backs. Check before you open up that, just pause here. So we're all open up together. Want to double check the angles. So feet sticking bottom out a little bit for right now. Make sure you right on top of the shoulder. You're like, that's it. Yes.
So it's going to feel like the shoulder is being pulled the back because you want to be lying right on top of the tip of the arm bone not on Uhm, and then lift the top arm up to the ceiling. Look at the hand with your eyes and start taking it all the way out so you let the twist happens. So Guide or be careful. The knees are sliding. Yes. So the twist happens completely in the trunk, not in the hips. And You keep allowing the rib cage to relax, allowing the floating rig check that you breathing into the back floating rib sets. That whole diaphragm, lower rib cage area tends to be get frozen and locked up from any of us athletes. I would say a lot of dances, a lot of gymnasts, a lot of yoga people. They get very open here.
But there's actually a tension that builds up right in here. So we need to, and the arches coming too high. We want relax and elongate that part of the spine and allow the breathing to happen naturally. And then the whole rib cage shift shoulder girdle sits more evenly on the side of the body. Bring the hand back up and close it down. And then let's have you all and now we'll um, lie on your backs.
The ladies will have your head away from each other because we'll start now the official mat class, but one other pelvic placement that we'll do first, I'll just move these out of the way. I'd like you all on your backs. Thank you so much Micah. Everybody on your backs. And it's just hold the right knee up, holding it with our hands and hold behind the knee. Hold behind the knee. And again, I want this very odd 90 degree angle. So this is one last thing just to set the pelvis.
A knee is just above the hip. The bottom leg is not lined up with the midline but lined up with the hip. So it's going straight down. And if you can actually not turned out and now without anything changing, just flexes for the app and then circle from the foot going out, down and forwarding. And so you're going to start circling this ankle without anything changing and you want to check that you completely grounded both sides.
So the trunk is long and the ankle joint is just moving around because sometimes again, if we pro night we turn out and we externally rotate. Sometimes one part of the leg gets overworked and another part is underworked. So we want to kind of wake up everything in the body and then you reverse it the other way. This can be quite surprising. I want the foot exactly at this 90 degree angle and I want both sides of the rib cage evenly down.
So you were rolling towards the leg and you want the knee opposite the hip and the foot in line with the knee and the knee facing the ceiling. So feels very weird sometimes just mathematically lining up our joints on this grid, but it's extremely therapeutic. And now a few times flexing and pointing. I can see how I keep having to check this place. Nice, Micah. Very good. Same for you guys. [inaudible] you want the leg shin? Exactly.
Perpendicular. Oh, okay. And then bring the knee to your chest just for a minute. I do anything you need to do to adjust if you want to. And then other leg, same thing. So the feet are going straight out from the hip. The knee of the straight leg is going straight to the ceiling.
So it's going to probably feel internally rotated because I hip flexors are so tight. And then start circling the ankle.
So you especially for you the outer part of the circle and then flex some point little bit lower down Michael with that heel. Very good. And then bend both knees and pull that knee in first. Just stretch it then bring both knees in and I knew you two ladies are rather slim. I want you to do a few rolling like a ball. All three of you just checking if it's to a hardest surface, if you need extra padding. Um, so just roll back and forth a few times. Rolling. I cabal and double check if you're okay because yes. Okay.
Okay. How about you, Micah? Do you need more padding? Sometimes people can have bulging discs and then you don't want that. Okay, so now we are officially starting our mat workout arms long in front of you. Roll yourselves down onto the mat. Feel that body nice and long that had the leg stretched out long from the crown of your head to your heels. See if you can create lengths. Feel the length in the stomach, the length in the back. Nice broad shoulders.
Jennifer, relax a floating ribs. Don't shove the front ribs down, feel the back ribs widening and then either float, you're coming into hundreds. Lift or bend the knees in and lengthen them out. Equity of a hundred shape you want if the legs up and start the pump breathing into three, four, five. Exhale. Three, four, five, two, four, five. Exhale, Jennifer, keep going and squeeze the shoulder blades a little bit back. Yes. So for you, you want to engage that back part and soften the sternum and down. Deep exhalation and exhale. One more time. Inhale.
Head and feet touch at the same time. Lift the arms to the ceiling slightly. Bury the armpits towards the Mat and float the arms over your head. So how long can you be without inflating the ribs up and roll up? Lift your arms, head and chest up and scoop forward.
Pulling back in the waist. Arms, shoulder width, exactly. And roll back. So don't let the arms go wide. Micah, keep them closer together. Shoulder blades back, Jennifer, and again, lift up and dive the head down. Arms are long and roll back and arms over your head. Now pause here everybody take the arms back and just for fun slightly.
Squeeze those shoulder blades together just slightly to engage the back muscle. [inaudible] see if you can have your hands going straight up from the shoulders. If it's hard here, you can have them higher. Now keep them at that angle. Lift your head up and roll up without bring the hands forward. Make that trunk lift you.
Keep the hands even and roll back. So as you go back the arms are going to go up. Keep those, show that, that's it, that's it. So you never bring the arms forward. They stay put and again lift your head and chest, make the trunk lift you. The heads are pressing backwards or ahh and forward and roll back. Engaging that back support, especially for Jennifer. Very good there Micah and one more time. Roll up and stretched forward. That set and roll back.
Placing your hands flat on the Mat by your thighs for rollover. So Micah, why didn't you come forward? Come on back on the mat because all of you move back some right here. Press a shoulders and the triceps into the mat and feel as though like from the shoulder to the hand pressure down. Float the legs up to the ceiling for roll up and over. Bottom up and feed.
Float to the floor above your head. Flex and push the heels away open. Keep pressing into the shoulders on the mat. Bring the legs together and again, lift up and press over heels. Push away open. Press away. Flow the shoulders down to the mat as you roll the spine away. One more time.
Lifting up and over. Press press, shoulders down. See if drop the back into the mat. Heels come together, reverse and open up and press the heels away. Heels together away. Roll down. Keep the shoulders on the mat is fine. Unravels from there again, up and over. Press together. Press roll down. Do not let your cat touch me. You have to keep going. One more time.
Press together. Press. Stay here with the feet long over your head. Reach over with your hands. Hold your ankles, armpits to the mat and slowly roll down. Soften the knees to get to the thighs. Aren't working hard. Unravel your spine really to get all the kinks out, all the kinks out, all the kinks are. Press your hands on the mat. Broad shoulders into the mat. Float the legs all the way down.
Lift your right leg up for single leg circles and anchor the right hip into the mat and circle around. Nothing moves in your trunk. Circle to circle three. Keep those hips square and five rivers one and two and three. Keep this very quiet. You really want to flow and five, float the leg down. Float the other leg up and try not to grip the leg muscles too much.
Don't talk Jennifer Arra. Keep this long. Keep this soft and circle again. One and two and three, four and five reverses. Circle wants to try to keep that body very quiet so it's only the leg floating through the socket and four and five. Now slowly float the leg down and try to keep the body long.
Arms over your head. Roll yourselves up to a sitting position and set yourselves up for rolling like a ball, holding your ankles. See if you can lift the feet off the mat and get the head as close in as you can without over collapsing and the chest roll to the shoulders and come back up to Jennifer four chain. Squeeze the shoulder blade. Yes, and again and up and three and up ad four and [inaudible]. One more time and five. Now hands to your head and elbows wide, not touching the out the knees. Why?
To slight pinch in the shoulder blades and back and forth again, keeping the knees as close to you as you [inaudible] can and two and up and three and up and four and up. One more time and five and [inaudible]. Keep the feet in the air. Arms long in front of you. See if you can roll down onto the mat with the legs off the Mat. Bring the knees to the chest. Good Jennifer.
Widen those shoulders. Everybody drop. You're going to sing like stretches, but I want the head and chest down for a minute. Anchor this wide part of the back into the mat a little bit. So when you come up it will lift but it's not going to Drake forward right now. So see if you can soften the sternum to lift your head and chest up better. Jennifer, just like that. Good. Now single aid stretches one leg out.
Pull one of the gap pull. So the hands of there just to help. Three and four and five and six and seven and eight. Both knees in double leg stretches. Reach the arms and legs away. Reach big circle and in and even further back with the hands, trying to touch the mat and two legs even lower if you can in three and four in and four and in guidance. State up five and in one more time.
Don't go up and down with the trunk. Just keep it steady. So the hands are going way back. Last one. One more time. Sorry guys ladies and then drop your head down to the mat. Scissors. We'll be with the head down just to get a sense of the trunk. Arms along by your sides. If both legs to the ceiling. No hands.
Anchor those arms down. Shoulders down, right leg forward, left leg, back and double. Pouts scissor, double pulse. Two, two. Now keep going. Two, two very long. Trunk, no floppy trunk. Just hips. Four, four, five, five, five, five and last one and last one. Hands behind your head. Elbows are wide as you lift your head and chest up. Squeeze the shoulder blades together. Lift up, elbows wide, elbows wide, elbows wide and lower the legs. Bring them up and lower.
This is looking better here and two and lower and three and lower and four and lower and five and twist to the right twist and whole no hip movement. Hold, hold, hold, center switch and twist to the left. Hold, hold, hold, switch and twist. So from the waist down, no movement, switch and twist. So it's all that rib cage twisting. We worked on before.
One more time and twist the roof. Floating ribs, twist and twist. Very good. Bend the knees in. Give the legs a hug, drop your head down. Long legs. Roll up to sitting. Position for spine. Stretch forward. Roll yourselves up. Open the legs out. Just position yourself, right. Nice long arms. And even though you're rolling into flection, I would like the shoulders to anchor.
Imagine the points of the shoulder blades going slightly back and down. So you do not get narrow between the collarbones. Drop your head and start around forward staying wide. So this floats in and you use a front trunk. And as you come up, get the sacred to go forward there. But keep the ribs in.
Don't pop your ribs, get them back, move your rib cage back and go forward again around and lift. So floating ribs go way back. And as you come up, you line your diaphragm up, square with the floor, not towards guidance. Diaphragm to the floor. Shoulders are back. And again, drop your head and round, round, round. And as you come up, think of, especially Jennifer, that you're slightly in front of the sit bones. That's a little bit better. Don't pop those rips forward. Keep them on. That's looking better. And one more time. Rolling down. Nice work, rural, rural and roll back up.
Stacking up that lower spine. So you're sitting high in the sit bones. Now sculpt the navel and lean back a little bit and float your legs up for open leg. Rocco. The ankles hold in front of Mike if you can with the hands. Yes. And here we go. Your roll back to the shoulders and come up in balance and roll back.
Try not to arch and extend the back, but keep it constant. So guide a hole that shape like a little China doll and up and back and up. Let go over your legs. Just fingertips touch the shinbones or ankles and roll back and up so you can't readjust and no holding. Just touching and back and up and back and up.
Legs together and again. Roll back and up. Roll back and up. So it's all from the center. Roll back and up. One more time and roll back. Grab your shinbones with your hands and sandwich yourself into your legs so the legs are straight.
Get your stomach and your head and your chest as close in to your legs. Try to have your head touch your shins. If you can. Tight, tight, tight, tight, tight, tight, tight, tight, tight, and walked out your legs too flat for corkscrew. You know what Jennifer moved down to on the mat. You're off the mat. Yes. Gajda you would walk down keeping the legs just like that. You walked down the lights and walk. Walk. Yes. Arms along.
Now you'll do court school all the way from shoulder. Stand on that. You have a reason not to do it. So float all the way up under your shoulders, shoulders, and you'll roll down to the right. Roll down to the right, left and lift. Way Up there. Push down with the shoulders and reverse. Left, right and lift and again, roll to the right, left, Angele, lift and other side and left, right and moon lift. One more time to the right, left and lift and to the left, right and lift way up and then rolled down. Tried to keep your feet now over your hips as you roll down. That's it, Mike.
Long, long, long, and float the legs all the way to the floor. Okay, we'll come up and come right into saw. I wasn't planning on it. It was going to start to change it, but that's okay. Now everybody, when you're in foresaw, squeeze your shoulder eights together. Here. That's it. I want this bone down. No, you were fine with the width. K and now roll. Not the hand. No. Did you see how you readjusted? We don't want that, so it's not you. So Mobile.
We want to find that one little place. It's not working and I want you to anchor into here. Everybody twist to the right twist. Now reach down towards your little toe, shoulders, state, even to the floor. One, two, three.
Come back up and squeeze those shoulder blades together and palms are down and reverse it. Twists. Now both shoulders are even to the floor. Stretch, stretch, stretch, come back up and squeeze those shoulder blades together. Twist to the first side, twist and even to the floor. Rounding one, two, three and come back up and press up other side twists. Then stretch one, two, three, come back up and lift. One more time. Twist and stretch. One, two, three, come back up and lift.
Other side twist in stretch. One, two, three. Come back up and lift legs together. Hands Together. Roll down on your back, onto your stomach, arms over your head for the equivalent of like you were going to do swimming. We're going to revisit what you did with the blocks of the arms along and exactly shoulder height width. Now let the waist area relax and lift your right arm and your left leg up in the air and move from the shoulder as much as you can in the joints. The waist is down.
Soften the limbs and soften the back that you want to. Loosen the joint and lower down other side. Float the joints up, keeping them lined up exactly in a straight line. Relax you back. Find that pelvis and lower down [inaudible] and again, first side. This side is good. Now you're centered in yourself, fine and down other side. This is your quick side. I don't care how high you go, I don't want you to torques and down.
One more time for side. Make sure you are coming from under the armpit and down and last side. Oh No, no, no. You'll come down everybody else's up there. Lift. That's better and down. Now Bend your knees, grab your ankles for bow.
Let's have you hold below the ankle joint. Flex your feet and first of all keep your head down. And if the size as high up as you can and pull the feet away from your body, let the waist drop to guide our head stays down. Lower down. Again, pull your feet to your part and keeping that sense of openness so the knees come down. Jennifer, you want to pull the feet to the bottom, but not to grip the hip flexors. You need to explore this art. Lift up against size. A Long Paul away. Better Micah, yes, and down. Now.
Third time you'll lift up as high as you can head and shoulders up. Let the waist completely bow out. How high can you get flexed feet guider and now rock forward and back. Forward and back. Forward and back. Forward and back and forward and back. Beautiful. Why?
Down on your bat stomachs and set yourselves up for Swan. Dive suppressor up. Lift up as high as you can go. Your back is nice and loose. Make sure those hip flexors are long and released and we'll go for swan dive. Here we go. And forward and up. Forward and up.
Forward and up and forward and up. Relax it into your heels again. Nice stretch.
So you're more of a ve. It will block. So instead of having the hands here, I want them exactly by your ear so your arms are nice and long. Actually we'll have to lift up into your arch first suppressant to your back and lift up. Jennifer. Get those shoulderblades. Yes, lift up in the the a trip. Um, the lats. I want you to feel the rib cage lifting you. Here we go. And dive forward. Forward and up. Forward and up. Forward better and last and upset into your heels.
Stretch yourself out. Everybody lie out on your right side for sidekicks.
Bring the legs on a diagonal in front. Lift the top leg up, hip height and a few forward and back kicks. So you swing to the front. Double pulse to the front, front, front, back, back, forward, forward, back, back, forward, forward. I'd like the ribs down here for you on the Mat. Yes, forward, forward, back, back, forward, forward, back, back, hip on hip, leg on leg and sidekicks to the ceiling. Swing up and down. You're okay with that and yeah. Yes. Slight external rotation, but nothing moving here to get it in the socket and swing and down and swing and roll to the other side. Same thing. Support your head.
I would like the ribs touching the mat to the bottom ribs. Touching the mat a little bit different angle. Lift the top leg, exactly. Hip Height, so not too high. A little bit lower down. Guide up. Very good and swing forward. Forward, back, back, swing, swing, back, back. Keep the leg in line with the hip guy. Dates to high, closer to the floor.
Forward [inaudible] toes exactly in front, not above. And one more time. Back, back leg on leg for the side kicks. I don't want you tucked and swing the leg up and down and up and down. Very good. And up and down and up and down and up and down on your backs.
Arms over your head for teaser and everybody come up and touch your toes. Touch the toes, reach by your ears and lower down. Tried to have your hands and feet touch at the same time. Touch and come up again. Make a V and roll back. Hands over your head. Last one, come up, make a V low.
Lift the legs three times lower app arms here Mike. If you can two and three. Bend the knees for seal. Grab inside, clap three times, clap, clap, clap back, clap, clap, clap. Top Cap, back and balance. Clap, clap, clap, clap, clap, clap. And then if you can stand up, everybody come to standing. Turn around to face the other side.
So you're going to turn around and face this way. Arms along, standing at the back part of your mat. Roll down to the floor and walk out to push up position and stop right there. So slightly different pushup position today. The hands will be a little bit wider than the shoulders and you want the trunk exactly in line with the shoulders. Everybody squeeze your shoulder blades together. Different muscle groups.
Squeeze those shoulder blades together even more so the shoulders, that's it. You get those Rombouts now keep them pinching and just three pushups. Whatever you can do, even if it's two inches, keep the shoulder blades back. Keep them pinching and three good walk back towards your feet. No hips, Micah, no floppy hips.
One more time at ladies can roll up better. So you work. It's more arm work than leg will grow all the way up. Lift the arms up, feel that internal lift, float the arms down to your sides. Broad shoulders. Take a big breath in and breathe out and thank you very, very much.
Move Within Your Range: Shoulder Mobility


Comments


Your intro to this class is superb. At the moment I do not have yoga blocks. I tried to improvise last night but then gave up, what can you recommend that is around the house...books, tupperware bowls?? thank you, Judy
Aaaah, the art of creativity!

I loved the introduction to the class. Shoulders felt so open and relaxed post class. Cueing and instruction wonderful. Thankyou
You need to be a subscriber to post a comment.
Please Log In or Create an Account to start your free trial.
