Description
About This Video
Transcript
Read Full Transcript
Hello, I'm Madeline black and here is part two of Madeline's movements. Uh, if you're interested and haven't seen part one, you may want to take a view and practice doing the more agility turning on local muscles. Kind of warm up, uh, prior to doing this one or just jump right into this one. So we're going to start where we left off on part one, which was standing here. And we're going to go into what I call a skydiver position. It's a squat. You can go easy at first. Feel the weight on your feet, heels, big toe a little toe. Feel your sit bones wide.
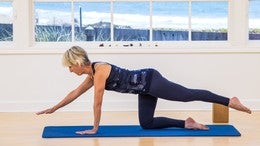
Now the arms kind of reach your arms down, open the chest, feel your neck long. Take a breath in. You're going to exhale, keeping your hands to the floor. And we're going to step back into a plank position. Peel that position for a moment and we're going to press back with the heels. And then we're just going to lift the heel on one side and press back with the other.
And we're going to switch and switch your heels pushing back reach so you'll feel your hip hiking a little bit. Please do not move your rib cage. It's a very small action. You'll feel your obliques working and you're getting your ankles into flection. And then we come back to center and we're going to slowly lower ourselves down to the mat. We're going to slide the arms out, then we're going to do a little swimming. You're going to lift the right arm up, left leg up, but you're gonna push down firmly with the left arm and right leg and then come back down. So it's very slow motion cause I want you to feel the floor push down into the floor. That's what brings your body in your spine up.
And we do it one more time. Reach and reach. [inaudible] good. I'm going to bring the hands back. You didn't Tuck your toes on your push back. Walk back a little bit. You can bend your knees if you're feeling a little tight and you can walk through or jump. We're gonna go heels out, toes out, back to our sky diver. Deep Squat wide. Sit bones stand into your feet. Push into the floor, standing up.
That's the sequence. Let's do it three times without stopping. Okay. Skydiver to the floor. Come into a good plank. Reaching the heels back and reach and reach. Feel the obliques working. Don't do such a big movement that rib cage has been thrown off.
Should feel good and lower yourself down. Stretch the arms out. Slow motion pushing into the floor, swimming and pushed him. Lengthen
Widen the sit bones. Long Squat. Stand up again. Squat to the floor. Plank. Lower yourself down. Stretch the arms out. Swimming.
Circle the arms around, clasp your fingers. You're going to stretch the hands. Back. Neck is long. We're going to lift both legs and just breathe here for a moment. A frozen moment of double leg stretch and then release. Tuck your toes under. Push back
I mean toes out. Deep Squat and stand up again. Squat down so you're going a little faster. Each time. Plank, heel reaches the obliques. Keep breathing good and lower down. Slide the hands out and left and keep pushing into the floor.
Turn the head the other way. Drop the elbows down. Stretch here. Bring the hands back. Tuck your toes under, come back and jump through heels. Toes think you're getting the hang of it now and stand up. All right, now we're gonna take it to lunch so we go back. Skydiver, back to our plank.
This time we're going to lift. Circle, lengthen. Arms down. Push back. Now step forward on the right foot. We're going to turn the back leg out. Stand into the foot skydiver arms here. Now take a moment straight back leg. Reach that front knee forward. Sink your pelvis down, lift the pelvis up and we're going to hold here and do what I call pelvic floor flicking.
So what I want you to do quickly is fast as you can to flick the front of your pelvic floor 10 times. One, two, three, four, five, six, seven, eight, nine, 10 and then go back down. Back to the plank. This time we're going to lower down. Stretch the arms out again. Circling arms, reach back. Talk your hands under. Come back. We have to do the other side. Step the left foot forward. Turn your right foot out. Push into the floor, adjust your stance if you have to. Pelvic floor flicking. One, two, three, four, five, six, seven, eight, nine, 10 and back to the plank.
Hips back and we jumped through again. Heels, toes, skydiver, left. Okay, one more time. Back to the squat. Sit bones wide, we go back down again. Plank, lower down, reaching out, length and back. You can do it all in one move. Hands Down, back, right foot. Forward. Step. The left foot turned out. Stand onto the floor. Feel your arms and back. Pelvic floor flicking. One, two, three, four, five, six, seven, eight, nine, 10 plank. Lower down. Reach out. Extend long and under. Reach back, left foot forward. Turn the right foot on, standing up.
Adjust your stance. If it feels too why? Because you'd have to have good ground here. And here we go. 10 Times. One, two, three, four, five, six, seven, eight, nine, 10. Now we're going to vary off the sequence. Come back into the plank. This time we're going to go to a side plank. Move your right hand to the middle of the Mat. Turn your right foot out and place the other foot on top and hold.
Keep the ribs lifting. Then take the top foot and bend the knee here. Place it on the Mat. That might be easier for you than holding. And then reach here. The length reached to the ceiling. Push down into the mat. And now you're going to sit down with your hip. So this is a good side stretch here. And then bend your knees, you're going to hold your shin. And we're going to do a nice mermaid stretch.
Can rotate down. UNTWIST, come back. And we're gonna go into plank again, side plank, other side, and see if you can stack your feet. Hold the position, place the front foot and the mat arm up. You can hold here a little longer than we're going to sit back down. Get that nice side stretch.
Bend the knees and bring the arm up. Nice side stretch. Add a twist.
Like you're standing long. Imagine you're a pencil and then you're going to lift both legs up, then hold and back down. Make sure both feet are the same length. So one leg is not longer than the other. And down and lift down and lift and down.
We're gonna do one more and lift and down. Now we're going to roll onto our stomach
And when the lift both legs up and hold and down. Try to keep the weight into the hip, but not too much pressure because you should be using your leg muscles to lift the legs as opposed to pushing your hip into the floor. So this is one instance where you want the work in the legs
Going to push back and we're going to sit for a moment and get a lower bed of arrest. Okay, now stretch forward for child's pose and again you can do what we did in part one, which feels very nice, is to push with the hand and let the hip drop. It was a lot of work on the obliques and the back muscles so they can tend to get tight with all that holding of planks. So we want to just keep that nice and simple and reach and then we're going to come and sit on the end of the mat.
Bring the feet under and want to go into a series of bridges. So align yourself. The best that you know to do bridge, feel both feet into the mat and I'd like you to do is push your feet down into the mat first. Then start thinking about reaching your knees over your toes and then rotate the pelvis back into the mat and then reach the knees. Now here's a chance to really stretch out the front of the quads and the hip flexors and get now push down with your heels and your back. You're resting on your shoulder blades and then you just roll down.
We'll do three in the middle. We're just kind of warming up for the bridges here. Push down with your feet, reach those knees over the toes, stand firmly into your feet, lifting the pelvis up as much as you can without lifting the back or the ribs. They're just hanging and then ruling back down. Okay, last one, easy one, and make sure you can really feel those hamstrings and glutes cause you're going to need them for the next set. All right, and roll it down. All right, so we're going to take the right leg and we're just going to cross it over the left knee.
Now place your hands on the top of your pelvis here at the Iliac crest is the name, but right here and then you'll notice that the leg that's spent is the hip bone that wants to drop. So you have to press down into the standing leg and lift this ilium up. Your hands are going to stay here. Now you can use your elbows a little bit if you need stability, but it's definitely more difficult to have your elbows off. So maybe we'll try one with elbows down.
So you're going to reach that knee over the toes. Now this is the hip, the right hip. You want to push it up as much as you can. Push it up length in that knee over the left knee, over your foot, and then roll down slowly. Keep this hip up. Keep pushing this bone up, the right one up, up, up, up. You'll start to feel more obliques there as you're coming back down and again and reach. Now try without your elbows down. It makes more work in the leg. Push up. Push this hip bone up and then roll it down. Try to keep it up. Roll it down, roll it down, roll it down and settle down.
Last one, and again, stand in your foot. Reach your knee, get that hip up. Push down firmly in the left leg, elbows up. Roll it down. Feel the spine, lengthen the neck. I'm always checking in with all those parts. Excellent. Let's do the other side. It's crossed the foot and here we go. Stand on the right foot.
Reach the knee over the toes. Press the aliums up now. So usually a little harder on the left side to keep that one lifted in general for most of us. So keep working that hip. I'm pushing up into your hand. You're actively doing that. And curl reach, push up, push up, press into that right foot, rolling it down. Last one and stand firm and that right foot and try to push that left ilium up and roll it down a little wavering is okay. I mean means your body's really trying to find the muscles to really kind of support that position. Okay, and place your feet down.
Now we're going to do a little rotational bridge so it'll come up. Same way as before. Stand on your feet, reach your knees, rest on your shoulders. Lift the top of your pelvis as much as you can and now you're going to reach to the right knee and send your pelvis facing left. Notice I'm not rotating in the ribs. And then retreat your left knee and feel both hipbones up again.
Now reach to the left knee if feel the rotation in the pelvis facing right now. Reach to the right knee and feel the pelvis facing the center. Reach your right knee, face the pelvis to the left, reach your left knee. Feel both pelvic bones up, reach your left knee and centers. Do a few more. It's as great for the hip joint rotate and center. Reach to the left knee and rotate and reach with both knees.
Good. And then we're going to roll it down. Okay, now we're going to bring the legs up and extend the legs up and we're going to flex the feet and let's take the hands and place them behind your head. This way now don't have your elbows resting on the floor because that kind of changes the orientation of your shoulder blade. So I'd like you to lift the elbows just a slight bit off the floor so that your armpit is actually facing the ceiling. So my elbows down, you'll see my arm pits facing side. So only lift your elbows that you feel your armpits are actually facing the ceiling and then you're going to push your head back into your hands.
So I can't lift. I'm going to try to lift my head and I can cause I'm resisting just a little bit and not too hard. And then we're going to hold that and you can keep your head down pushing back and you're going to sway your legs to the right. Your right leg actually gets longer and your left foot is sliding down to your ankle bone. And then slide your left foot up and you're back to the center. Slide your right leg down your left leg to the ankle bone and then pushed through the legs to your back. Ends sliding to the right.
Left leg is getting short. Call me back up. Sliding to the left leg is getting short and come back. Let's do one more reaching and reaching and come up. Now this time we're gonna lift the head up a slight bit, right, and push back with your hands firmly into your hands. And we're going to tip again, but this time your feet are going to stay the same length and I'm going to look in the opposite direction.
So now I have more weight on the right side of my pelvis and then I'm bringing both ribs and pelvis back to the mat and I'm still keeping some pressure of my head back into my hands and legs are staying the same length. Now my pelvis is facing left, I'm looking right and then I'm drawing everything back together and little rolling here and back together. And again, back together. Do One more side reach and center and one more reach and center. If you're okay with your head, keep it where it is. Then the knees hold your shins. You can take a breath in here.
I'm gonna do double leg stretch and exhale and pull it all in. Inhale, inhale here and readjust your upper back. Check in with your neck. Exhale,
Single leg stretch. Now pause here. I want you to try this for me. Take the straight leg, which is the left leg, and pull it into yourself. Pull it in, and then lift the opposite Shin up into your hand. So you're actively pulling the leg in and you're pushing the Shin Up. And then switch. Push the Shin Up. Pull the leg in and curl. Now I'm going to try and do that all in one move.
But for those of you who like myself, I like to kind of massage out my spine after something like that. And we're going to do three rollover. So inhale, I'm going to start from here. Exhale, I'm going to breathe out. It's hard to talk and do that. Now think of reaching the sip ons to the ceiling and dropping your legs down. Sip Ons to the ceiling. I'm getting a real good length through there.
I feel a fashional stretch actually. And then roll it down slowly. Slow, slow, slow, slow, slow. That's the massage part and you can add the little circle and again in rolling up, I'd like to pause here and lift my sit bones towards the ceiling. Drop my legs, sit bonds to the ceiling. Drop my legs and roll down nice and slow and add the little circle one more. And Sip ons to the ceiling. Dropping the legs. Sit bones to the ceiling. Dropping the legs.
Mention
 |
Madeline Black (Teacher) |
 |
Andrea Lima |
 |
Cynthia G |
 |
Kandie A |
|
|
Jean-Antoine |
|
|
Cigdem A |
 |
Rachel |
|
|
Bonnie Baranowski |
|
|
Anne-Marie G |
 |
Tehila M |
 |
Sharon T |
 |
Theresa F |
|
|
Ash |
 |
Lori H |
|
|
Sharon C |
 |
CADM |
|
|
Lori |
 |
sandyjgrant |
Comments


You need to be a subscriber to post a comment.
Please Log In or Create an Account to start your free trial.
