Description
About This Video
Transcript
Read Full Transcript
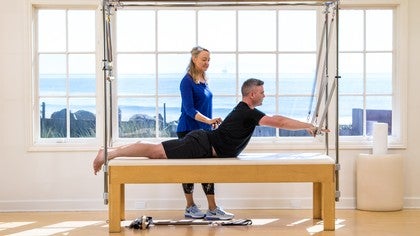
Hi, I'm Sally Anderson and I would like to take you through a Cadillac workout, working to balance out or readdress our tech postures. So the posture that we find coming up constantly these days without constant work on iPhones, laptops, technology. So I have Andrew with me today who's going to work through the program. We'll start with a little decompression of the shoulder joint. So I'll ask you Andrew to hold onto the top of the Cadillac.
Now this is the first way I would have somebody work into this exercise is by nearly on the Cadillac and gradually taking their weight off. So with the knees still on the Cadillac is just going to drop his weight. And because he's taller, this probably won't look as difficult for him, but drop his weight into the hang from the Cadillac so that the shoulder starts to decompress. And then if that's not strong enough, the legs will come off the front of the Cadillac. Good. And then he'll be able to hang. And what I want is this release of the shoulder joint. So again, decompressing the shoulder joint to prepare us for what we're going to move into. Now if Andrew can just pull up and come out of that for a moment, the other way that's for somebody Andrew's size or taller.
The other way to get into this exercise quite easily is simply to just from standing take hold of the top of the Cadillac and allow the weight to drop into that. So then he's just taking his way out of the legs. I want you to really feel that not the lumbar spine is feeling too much traction, but the you get the sensation of the lats and tissues around the shoulder just releasing and stretching. It might feel a little tingly. Just go gently. And that's probably enough for today. Over time. Build up to a minute, but over a period of time cause it's a really good exercise. I call brekkie aiding the shoulder. So brekkie aiding is like when a monkey hangs in, it releases the shoulder joint so it gives you a really good health of the shoulder. If you can build up a little bit of that decompression. Good.
We're moving straight on to the baby arc on the Cadillac. If Andrew will lie with his back on the, on the arc. We're going to start with the shoulder rolling. So we'll start on your side and then we'll go to your back. Good. This top arm I want lengthened along the top of the body. Good.
So wherever you're set up beyond the front of your baby arc, so you want room for your shoulder blades to roll onto the top of the arch. Head is relaxed. Let that really feel weighty onto your underneath arm. Top leg, straight bottom leg bent, and your top arm will create the circle. So the circle takes you around and starts to move the shoulder with the head hanging. Keep your arm reaching in a big circle all the way back and it brings your hip shoulder back to your stacked position. That's one we'll do three more.
Let the head hang. Drive the movement with the top arm. Let the head release all the way back and let it roll back onto the underneath arm. Two more for you. Exhale as you come around and try and open that scapula onto the top of the arc. Then bring it back to center. All the while letting the head just hang. So allow the neck to roll and mobilize.
As the shoulder opens up and roll back, I just want to do two in the opposite direction. The top arm leads back, head hangs. He reaching with the arm around and rolled back, adjusts down to the side of the body. One more. Exhaling as you come around in hell, this deck back up onto your side and hold good everyone onto the other side, so you'll turn over and come right to the front of that arc again. Underneath arms stretched out, palm up, head hanging. Just make sure your ribs up up a little more onto the arch, so we want the ribs to get mobilized on here. The top arm leads you inhale. Then exhale as you open the shoulder blade back to the arch.
Inhale and using that top arm to drive the circle. Deep. Exhale and around two more. This direction. As this becomes more familiar to your body, you can add a little hand weight, which will just give you a little more low to open the shoulder. So go gently and gradually add weight and reversing. So the arm comes around. Exhale as you open the ribs. Inhale, bring the arm through and just one more exhale and come around the arm finishes at the side. Good. Now if he'll roll onto your back with your shoulder blades just on the downward slope of the baby arch arms reaching forward, I'm going to roll you back over the arc, wrapping the upper body around the arch, taking the head back and allowing it to sink back onto the arc arms.
Come back to where they find the roller. Just use the roller as a support while we do arm slides. So bending the elbows wide, allow the roller to sliding. Exhale, draw the ribs down, shoulders down, and stretch the arms away. So we're looking at getting some mobilization in the shoulder, joint connection through ribcage to the pelvis, but staying in the thoracic arch in bend. Exhale, extend, and two more. Inhale to bend.
Exhale, slide the arm bones down into the rib cage. Last one and extend good steak stented there. Keep your head hanging and bring the hands in behind your head. We'll take the roller away and use the hands to bring your head and shoulders up to sitting all the way off the barrel for me. Good. So the baby arc is now going away. Rollers away. All right, now we're going to spin around and supine with your head under the roll up bar.
So hanging from the top, I have the two yellow springs with the roll up bar. Hold the bar right at the outside ends for me. Good. Now legs can be extended or bent, whatever it feels better in your back. But with Andrew, I think we'll have extended today, so legs long. Now before we start working with the rollout bar, just allow the humeral heads to drop down.
So it's like sinking the weight of the arm bones down to the bed. So it's just a little drop with the breath. Inhale, exhale. Let the shoulders drop one more and let them drop and hold that position. Now I want you to feel the connection of the humeral head into the bed without expanding the ribs. Your next exhale will pull the elbows wide to exhale and reach the oboes wide.
The roll up our pulls to the chest. As you inhale, drop the humeral heads down into the bed one more time and exhale, pull wide. Try and think. Drawing across the upper back out to the elbows. In Helsinki, the shoulders in exhale, pull wide. Now the exhale, how does naturally gives you a little abdominal activation. Beautiful. Don't force it. Just allow the ribs to soften down and wide. As the elbows go out. Inhale the shoulders dropped down to more and nice deep exhale to get the breadth across the chest. Inhale, sink for shoulders and last one good.
And then place the roll up Barb back and slide down the bed with the knees bent to take hold of the top loaded bar. So I have two springs on here, which I want for the assistance and also in some of the exercises for the resistance. So I'll keep you posted with that and you will shuffle in a little bit closer and lie onto your back. So I want you on your back with your hips under the roll up bar. You toes might be off the end. That's fine. If you work through the heels on this, I'm actually even happier, but flat feet, it does depend on the length of your torso.
You'll have quite a bend in the knees, but that also is fine. We're going to do a little preparation with the shoulders following on from the roll up. That same action of just gliding the humeral head back towards the bed in hell, let it release. And now we've got the roller, the top loaded bar with the springs. Drawing that up. Exhale, pull down. Inhale, allow it a little more release. Exhale, pull down. So this is really just identifying where you want to be connected, activating the back of the shoulder and setting a good shoulder girdle position. We'll do one more and hold that position. Good. So now you've connected through the back of the shoulders.
We're going into a pelvic curl or bridging. So exhale there, curly abdominals in. Press the hips up to the roll up bar in this position. You should find the back of your shoulders. Find the breadth and you'll get a good connection with this spring resistance you in place. Exhale rolls you down. We'll do six. Breathe in at the bottom. Exhale as you curl up. Stay at the top for the breath in spreading the shoulders, connecting the back.
Exhale, articulate the spine to bring you all the way down. Now take a little longer with the inhale at the bottom to send the pelvis long. Then exhale, scoop and curl rolling up. Lead the pelvis to the top loaded bar and exhale articulates the spine all the way down while you hold the back of those shoulders. Nice. Exhale.
Send the knees over your toes and really think about pressing up through glutes and there's your heel glute connection. It's how rolls you back down. We'll do one more in Hal at the bottom, lengthens the pelvis. Exhale scoops and curls. You back up. Good. Find the shoulders in the inhale at the top. Then exhale, articulate all the way back down. Good. Getting to the bottom. Now just take a moment here in one more breath to really let the pelvis settle.
Good. I want it nice and soft into the bed, weighted into the bed. We're going into a chest lift, allowing the push through. Buddy. Help lift you so eggs, hell to drop the sternum in and roll the chin to the chest. Chest comes through the bar draws you up. Now I'm allowing the shoulders to come up and release a little exhale.
Draw the tummy in. Lay the spine back out. Find your shoulder connection to the bed. I want three more. Making sure the pelvis is kept nice and long. Issue tuberosities reaching towards the heels and exhale, abdominals. Lay the spine back out.
Find that connection from the front of the body to the back. Now let the push through bar draw you up. Bring the shoulders up. They can come out of their stabilized position and get a little higher than exhale. Pelvis is staying long as you come back down. One more. X. How deep in the tummy. Very nice job here. I'm sure you're doing just as good a job there and pelvis, long abs.
Lay you back down. Good. Stay in this position. Take your left hand to your right hand and still keep the pelvis long and square. So Asi is are even, but we're going into a little rotation. So a hula and let the bar take you up and focus on the opposite hip. Staying down as you come. A little higher than normal. Exhale, draw the ABS in. Bring you back down. Good and exhale. Coming up.
Could stabilize pelvis, thighs, stay stable as you come down. The head doesn't have to come all the way to the bed. So that'll be your range. One more good initiated from the belly in hell. Keep that pelvis long. Exhale, lay it back down. Now come back to center with the arms wide and change to the other side.
So right hand just across. So they're matching each other, they're not crossing over. I'd want them one each other and exhale, rotating up, keeping the opposite hip down, keeping the feet pressing into the bed and the pelvis really easy. And we've got two more here. Very nice. Use of the breath and soften that hell bone a little bit more into the bed. Last one and back down to the center. Good. Spread your hands wide on the bar again, we're still in abdominals here. One last chest lift. Exhale coming up, bringing the sternum in. Nice deep connection of the abdominals, both knees at the same time. Bring them into your chest, into hip flection. And I want them to be quite deep in him flection.
So feel like you dropped the tailbone in length and the thighs down and out in with the knees. So tutor actions from here, the single leg stretch please. So one leg goes out, reaches away and change. Exhale, exhale. Good. So now I want to see the abdominals drawer in and we can have a little bit more shoulder connection here now. So think about externally rotating the upper arms, finding your hold at the back of the shoulders. And I'll have one more each side. Exhale on each good. Both knees back in here. I'd like a squeeze of the heels.
A very tiny squeeze. Three fingers between the knees. I want four double leg stretch, just the legs. Exhale, reach away, but control it from the center in hell. Draw the knees in and exhale deep and abdominals. Good. Last two. I think those ads are working now. And exhale, draw back in place both feet back down onto the bed and sitting up.
You can bring the push through bar to your whole position. Excellent. So now I want you lying on your tummy with your head up under the push through bar please. So Andrew will find a position where you're slightly further forward. So shoulders up under the push through bar here. And this is really going to be an exercise dependent on your shoulder range and your torso length. You will need to feel this and find it a little for yourself.
I want left hand under the forward so that arm is going to assist you. We're going to take the right hand up to the air and connect with the bar, turning the hand out so you turn the palm in the other direction, the way and good. So you may have just had to figure that out at home to now start with the bar high and don't pull down too quickly. So it's gonna be quite a lot of work through the front of the shoulder here. I want you to rotate that shoulder forward and pull the bar down where it will go comfortably for you.
Then allow the arm to wrap out as it comes up and the Ba, the push through bowel will help bring it up. Start from the shoulder and just find your range as you take it down and up. Now you can use the underneath arm, the hand under your forward to assist you up with the body if you need to. So allow that just to move you up into rotation. If that helps you find your range and we'll do one more.
So the trickiest thing about this is going to be finding the direction of your hand at the beginning, but once you've done it once, it's all downhill then. Good. All right. Now I will have you moved back on the Cadillac a little. So I like feet off the end of the Cadillac, but again, it depends on your torso length and your shoulder range. So we're going to do swan. I like the two springs, I like it to assist the arm movement or the shoulder movement, but take it down to one spring if you're smaller or if you feel like that's too much, pull. Phew. So I will start Andrew with two springs, hands onto the bar and just take a nice long stretch away. So again, allow the shoulders to decompress by pressing the bar away.
I know that Andrew won't let go of the bar because he's also a pilates teacher and knows that he won't do that. But just make sure that wherever you're doing your workout, do not let go of the bar particular in this exercise, so keep a good grip, but I want you to start by bringing the elbows wide and the bar back over your head. Let's just do one, two there and then press back forward. Good. Two more. Just the arms pulling wide
Now I'm just going to slow this down for you. I want you to follow the bar with your head. As it comes up, you're coming into neck, upper back extension. Now the return phase is abdominals pulling up as the bar pulls through and then articulate the spine coming down. So then the arms come first. The head starts to pick up. So that I'd want nick extension first as the arms keep coming through, through, through, through, through into extension so that see that nice spinal extension.
Now the abdominals worked the hardest to pull the bar through colliding and then articulate all the way down. The last thing is the head. So starting with the arms and as the bar comes to the top of the head, the head follows through, leading you into it. Spinal extension. Good. Now it's abdominals while lifting the abdominals as you pull the bar through. And then I want to slow down this return phase. Go from the base of the ribs all the way through the head is the last one down to more. M s first head follows, extend, and now dominoes lift, lift, lift. Beautiful. And then articulate the spine down.
Last thing is the head one more. Keeping a really good grip on your push through bar as you work and into extension. Shoulders a wide and abdominals drawer up spine lays back down. Excellent. Now I'll take the push through bar for Andrew, but put your push through, backbar back very gently and sit back into rest position for me. Good. So just taking a moment to stretch out the low back and then I want you to come up to standing.
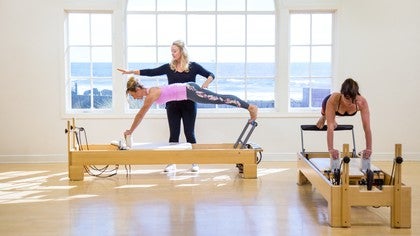
So we're going into leg and foot work, standing on the Cadillac, holding or pressing through the push through bar. So we'll start by setting up where the arms are at full extension with the palms or the base of the palms on the push through bar when you're in your upright posture. So I want to check that head is over. Shoulders is over, pelvis is over, ankles and a few maybe landmarks on the way through, but that's essentially where you want to be upright. Now with the fingertips long, basically the palms on the push through bar, just try three presses from the base of the shoulder into the push through bottle would be very small and just press one inch to connect that shoulder girdle and last one in abdominals. Pull in while the shoulders press and bring it back up. Now we're starting with leg and foot work with that same movement, so we'll be parallel through the feet.
Make sure your feet are directly facing forward. Just come forward a little Andrew. Yup. Just to see that and keeping the upright position of the torso. As you bend your knees, take that pressure into the bar through the base of the shoulders and stretch up. Good. I'll have exhale to bend in. Hell, grow taller. You could have the breath the other way if that works for you. Whatever's preferable for you to get the connection through the center of the body connection through the shoulders and a nice easy gliding movement through the hips and other joints. So allow the tailbone to stay a little bit out the back.
Yes. Or give me that tail, that upright position of the pelvis rather than talking, we'll have three more. Cool. So I'm yes, looking for mid-low traps, engaged base of the shoulder joints engaged. And I want to see that upright position. Keep your head on your neck. So keep the back of the neck in its normal extension. Last one. And then we're going to arches.
Now I want you to keep your feet where they are, but poorly in steps up as you would do for arches on the reformer. So feel like your toes are spread, that the insteps are pulling up and it will connect you to your hip extensors right up high and your abdominals. Beautifully done. Now bend with the inhale and stretch with the exhale. Good. So you again, you can change that breathing. I've given you exhale to be able to hold the position as you lengthen. This is number four and we'll do formal nice. Always working on the lift of the upper back.
The shoulders connected back the head and eye line. Straight ahead.
Beilein held whole on this one. So we have very the breathing, but as you know you breathe the way it makes you connect the best. We have formal exhale in her and maintain the survival extension as not normal curve and good. I can see some nice work here. I'm sure you're working just as hard.
Good. Now elbows bent and just allow the bar to be in its resting position. With the elbows bent, find your open in front of the shoulders so we won't pick on a little stretch there. Upright in the torso, feet turned out. So you're a little bit of external rotation of the legs. Now you'll be doing your, let's start with the tricep extensions just to set the shoulders and the bussers. Stretch the arms good. And then bend them and take a little bit more opening and pressed a stretch and then open the shoulders one more.
And then I want you to hold that one there. It's a holding that press on. We're going into our leg and foot work, bending wide and taking the bar with you. Exactly. So good. So we're really opening the shoulders and those pressors should have drawn you very wide. Keep working for the width across the shoulder girdle, the drawer up through the abdominals and the external rotation of the knees over the toes. So you want to direct the knee caps to about the second, third toe.
Rise onto the balls of the feet in your wide position. Maintain that position of the shoulders and the pressure into the bar and why you go. Bending the knees, taking the bar with you and pull up and shoulders wide. Head Up. We'll do formal exhaling as we bend. Inhale as you grow taller.
So we're gonna use this as a little bit of a balancing act for the leg to find your positioning. So Ben, the right leg up first, let's start with that. Put the instep onto the bar and then just hold that position and try and translate the bar to straight so that we'll show you where you want your weights. As long as you're in the middle of the bar, you can find that positioning through your feet. The foot should drive up into the hip and allow that to be connected so that you're getting, what you'll be getting is your spiral of the upper thigh and the foot into its aligned position. All right, so then lining up the foot to keep the pressure equal on the bar. It's trickier than it sounds. Press just a little way, not too far. And then on the way up, hinge the hip.
Allow the roll bar to bring the leg back up and see femoral head back into the hip joint. Her formal good connection. Good. So you want to find the hip extensors to give you a little press hold. Inhale, hinge the hip and little press hold. Good. And don't forget about the arms are actively pressing in onto the top poles of the catty.
Nicely done. So the other leg again, right in the middle of the bar onto the instep. Good. Allow that to just set the hip down and under and then find the positioning of the bar from the foot alignment. And then we've got exhale. Press from the hip extensors while you grow taller, pressing with the arms and up. Good. Nice. So feel the hip extensors give you a little bit of a press. Don't aim for too much.
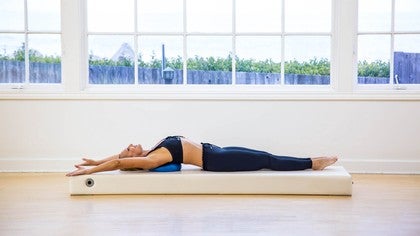
Bend the knee in and down. Good. Release the hands down. We're going to change our position. So if I can have you come down onto your tummies face down, you can be facing either end. We'll come straight down with arms beside the torso. So reaching back as though you're about to do basic back extension or dark, whatever you call the exercise. And we will start with that. So again, I want you to start through the crown of the head to pick up the head, pick up the shoulders, reach the arms back and I want the hands to come to about the top of the thigh and then back down. Good. We'll take an inhale for two more of these.
Starting through the crown of the head, reaching out, shoulders pick up. And the shoulders. Then pick up the hands. Good, nice. Abdominals up underneath. Good. One more and then we're staying in this position. So find that position. Here's where we're staying for the hundred. A prone hundred so the baiting happens through the arms, up two, three, four, five. Inhale, two, three, four, five.
Exhale, two, three, four, five. Good. Andrew's going to count for me. Now with the prone hundred, I'd want the work happening through the shoulder girdle, back of the arms, but still think of it as an abdominal exercise. Your ex house drawing the abdominals up under the spine. The inhale is maintaining and giving you more length. So I want length through the whole back of the body.
We can emphasize your neck extension just a little more so I line forward slightly so that we had this nice long spinal extension. Shoulders pulling back, doing the work. What number are we up to? Eight. Two more sets and exhale, two, three, four, five in health, stretching the elbows, lasts it deep. Exhale, pull the tummy up. Inhale
Just briefly before you turn over onto your back with your head at the spring end and we'll put the leg springs on.
So starting with little frogs pressing away, but I want the connection through the arms into the torso and the hip extensors pressing away. Inhale as you hinge the hips, exhale as you press through the frog. Good feet just softly flexed or flat foot so that your emphasis is through the heel, through the hip extensors. And you can be fully pushed away or braced away with the arms if you'd prefer. But this nice bent elbow connection down into the shoulder girdle oftentimes gives you a lot more ability to hold that shoulder position. Whatever feels good for you.
Reverse that movement. Exhale around. Inhale up the center. Find the control from the abdominals, the hinges, or disassociation in the hip joint, and a lovely connection all the way through the body.
Connection of the arms, and just open the legs for a stretch wide. So start in your open position. Take two breaths. Breathing in, breathe out, abdominals and pelvis. Just allow themselves to sink into the bed a little more and very nice. Good. This inhale, exhale. We'll bring the legs around together, pulling on the springs, closing the heels towards each other, and connect in how control that movement opened back to the full range. Exhale, Rachael, way, heels connect. Very nice job, Andrew. I hope it's feeling as good for you as this looks here and open. Nice. So the maximum amount of length that you can get in the tour.
So reach away pressing into the straps. We'll have two more and exhale, connect the heels when you come to the long line. Inhale open and very nice. Stay there. With the heels connected. I want one more exercise here. Bend the knees back in on a little four-point frog.
I think there's many a variation of these. I want feet in a v position, flat foot position, and roll the heels to the bed. So you're going to roll through the hip joint, keeping the abdominals in. Then stretch your feet out along the bed. Would circle and back around together at the top of the circle and pull back in. So in one roll to stretch three circle four and pull in one and abdominals.
Draw back as the heels slide out
Rural stretch and circle. Good. Bend the knees back in. And we're coming feet out of the springs. So one foot out at a time. Back onto the bed and sitting up. We're going to face the other end exactly where you're seated. So you just need to sit, put your feet against the Poles and we're back to the push through bus.
So you can see if you left your push back through bus set and worked within that range, that's fine. You're all ready to go again. Now we're doing push through combination, so push through forward with a variation, adding a side reach, adding a soar. So the first part of this is to rest the heels right up against the tower poles. Good yet a nice lift through the back, but the shoulders are easy and they're wide from here. It's the pelvis that draws under. As you curl back into the first position, I want to see that round back connection with the heels to the Poles.
Now up and over through the abdominals. And once your shoulders are above your hips, now I want you to extend out sending the tailbone behind you. Get a flat back, not too much neck, more leg length, and then curl back from there. So it's a little variation on the flexed. Push through and then reach up, pressing the bar away from the base of the spine all the way up. But keep that connection now the little more pace and scoot back.
And now lengthen forward with the sternum head and send the tailbone back and scoot back under heels into the pole and stack the spine. Press forward. Keep the ribs connected. So I want to see the sternum and the sacred coming together across the body as you push up. One more scoop from the belly and start to curl. Then send the tailbone back as you send the sternum forward and the ribs are lengthening and scoot back.
So the same scoop back. Press under curl lengthen. Keep a good grip on that bar. Now Kobeck and go into the side reach. So release the right arm, reach all the way around, connect the feet into the poles as you reach back and then scoot back. Bring the hand through to the soar, reaching for the top of your toes or the outside of the pole and then back to the center and up a little more pace and scoop.
Curl and lengthen. Scoop back, left hand reaches. Now the important part here is the anchor through the feet and the pelvis and scoot back. Take your soul. Can't get good. Help these days and scoot back and we'll do one more each side and maybe we can just repeat. So scoop and lengthen. Curl back, release the right hand around, comes all the way.
Maintaining the connection of the other arm and back to your soul. And Center. Good. Bring that out now to the lift and from the center curl and lengthen and curl. Release the left hand around, anchoring through the legs. They don't change and the sore from the scoop and press through.
Back to the middle and sitting tall. Good. Come back to your upright position. Good. Find that nice tall position. We're going into bridge pris with the preparation first tee. So to begin with, we scoop under good drawing in from the legs to your shoulders around on the bed. So this is position one now like we did at the beginning with the pelvic curl roll up, your legs will be wider and there'll be adjusting to the poles. So press the pelvis as far as you can with the shoulders opening.
Scoop back down and about as you get to the pelvis down the legs press you back up to sitting and one more scoop it under the beds. Get sticky. But you know that's the hard work of a pious person. And up you go. Dealing with the sweat and scoop it down, sitting tall, using the legs and up. Now we'll take that into the full bridge press. So scooping under the same movement, pulling through, and I want you to make sure you get to the shoulders down and use the articulation of the spine depress up.
Continue through with the pelvis into extension. Now as you come down, as you graze the top of the head, Tuck the chin, get to the shoulders, uncurl legs, press you back up. We'll do one or two more and scoop under. Use the scoop of the pelvis, lift through the pelvis to articulate and lengthen up. Keeping connected to the bar with the shoulder girdle. Tuck the chin, come to the shoulders and outlets. Have one last one and scoot back. Curl pelvis leads.
Let the neck go and then come down. Just avoid the top of their head and go to the shoulders. Curling back through. Nicely done. Good. If you'll spin your legs to sit on the side of the Cadillac, I have side over and a little rotation for us. So the hand closest to the push through bar will hold the push through bar and take it down. Just bring hand back to just forward of the center.
I want the bar to start down. So this other arm is out to a t position, body's upright, and I really want to see the neck and lunar more lift through the base of the skull there. Now three movements going over to the side. The side arm lift up opens the ribs as you go into your lateral flection. But what I want to see here is I'm going to look for the line up through the spine and bring that back stacking tall comes to the side and two more. Lift Tall, take it over and coming back up and amount one more in hell, grow taller. Exhale, take it over, opening up the ribcage, anchoring through that sitting bone, and then come back and hold legs in together and take the rotation staying stacked above your pelvis.
So what I want is that you're still sitting on the issue of tuberosity, that you're moving away from then spine up and over. So you may not even get to the push through [inaudible] the second hand. That's okay. And then stack back up into the lumber. And then de rotate good. And exhale, rotate and up and over.
Then exhale over and you're looking for the neck, shoulder, pelvic alignment and bringing it back.
As you rotate in how grow taller as you come around, you may not get to the bar, doesn't matter. As you exhale, spine stretch. You may just get it
I would like you to move your chest off the edge of the bed down to below the shoulder blade so you'll go all the way forward. And we're going to do a version or a variation of the flying eagles. So once you're down there, load the chest and reach the arms back to grasp with the handles. Good. And then your hands will stay just on the outside the Poles. So you are turned with the palms in shoulders will be turned out, head will be dropped. So just take a moment there to let the shoulders stretch.
I want the whole back of the body doing the work to stabilize so I'm not strapping him down. But you can have a little assist if your taking a client through this. Now leading through the head, the body will reach forward out to the sides and they come around as the body lifts, the arms will circle forward. Good. Three little presses, one and two and three reach the arms up, then dive down between your arms as they rotate back in and up. Good. And again, reach the arms around as your head. Shoulders come up, hold and press two, three reach the arms up and dive between them back to the Poles with your hands. One mole and bring it around.
And one, two, three good. Lift up and dive back around. Could release one hand at a time and place the arm down onto the floor. Good. Sitting back onto your heels. We'll take a slightly longer at rest position. So bring your body forward enough that your hands reached the poles in this rest position. So shuffle forward with your knees. Good.
And sitting back with the heels. I want you to bring the left hand to the right pole. Good. Now aiming to drop the hips down. Breathe into the left side, spreading the ribs and one more breath and release. Back to center. Good change sides. Right hand comes across to the left and square of the pelvis so that you're giving a set position to the pelvis and then stretching through the right side.
Breathing into those ribs. Exhale, one more breath and let that go. Good. Hands back to the center and stacking up into a seated position we have with just one or two more things to go. So now we're bringing the trapeze on. So set just slightly out from the end of the bed. We're going to use the strap. I want you to stand most of the way forward.
So probably about two hands Benz back with the hands onto the bar, connecting again. And I will have the right leg back into the strap to begin with. So holding that position of the strap, trying just keep the trapeze still for the moment. Find the posture. Find The upright position of the upper back head. Now three bend and stretches of this back leg.
So just bend the knee and then stretch. Trying to find the hinge at the base of the glutes and two more and stretch. Good. So we're setting up that activation and hold this last one extended. Now we're going our lunge bend back, stretching that leg behind you, keeping the front knee over the ankle as you go back. And then exhale, pull applauding for using the shoulders to lift you into an upright position to mull and stretch all the way back. I want all long opening of the hip and press through the standing hip extensors to bring you up. And if through the shoulders and last one.
Hold that last one. Go into the lunge. Knee stays over the ankle. Leg stretches back and they live from the front of the body using the arms, using the shoulders to stretch and inhale, lengthen. Exhale, drawing up. One last one.
Hold that position, stepped back down with your first foot, second foot and very nice. Good to take the trapeze down. Just tall enough to reach that and turn around. We have one last standing exercise, Andrew, if you push that to the end only. So it's out of the way. Taking hold of the straps, springs and chest expansion. So from your standing position here. Again, just find the upright posture and I want the hands right next to the body and forward. Now I want inhale to pull back hold now, right in tight to the body with your arms, shoulders, pull back, sternum lifts, and then turn the head center and forward. So our paces in hell, pull back. Look all the way over one shoulder, all the way over the other shoulder, back to the center. And exhale. Good.
Inhale, lift the sternum. I line up and find that survival curve and ex health forward. One more. And drawing in. Look, open the shoulders center and forward to more. Stretch the elbows right back and look, look, center and release the breath. And last one nice and open in the chest. Pull back and look, look, center, deep. Exhale and finished.
Standing Upright with a nice posture. Come on down, standing off the side of the bed. Thank you everybody. And I hope you feel very upright, very open. Everybody, everything is moving and thank you.
Back Care: Tech Posture
Mention
 |
Sally Anderson (Teacher) |
 |
Frances C |
 |
Danita R |
|
|
Joy B |
 |
Sabrina Swayder |
|
|
Lee J |
 |
Antonio G |
 |
Z A |
|
|
Marcelle M |
 |
Brenda C |
|
|
Janel G |
 |
Elizabeth D |
 |
Jennifer S |
 |
Anne P. |
Comments


You need to be a subscriber to post a comment.
Please Log In or Create an Account to start your free trial.
