Description
About This Video
Transcript
Read Full Transcript
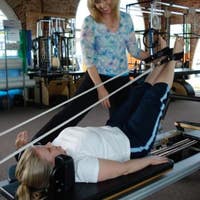
Hi, I'm Sally Anderson and I'm taking you through a reformer workout today with the help of these lovely ladies from down under in Australia, Lanette and Victoria. So Lanette is the director of Pilates ITC and Victoria is part of our faculty. They're going to demonstrate for me today. So this program is going to address tech posture and also be a program that Pilates teachers can do. So the type of issues that we're coming up with these days with tech posture and that forward slump, everyone over their technology, but also that impact of gravity, I am finding more and more is the same for Pilates teachers.
We spend our day forward-flexing over clients and build it a kind of a laxity and a loading through the spine from the sacrum all the way through to, particularly, suboccipitales in and up into the skull, but all the way through the spine. So we're loading up those sacroiliac joints, thoracolumbar joints, cervicothoracic joints, where all those points of loading are getting more loaded. And it is something that we're living with as Pilates teachers. So we need to address it, know that it's there, and have some strategies, and some workouts to do it. So hopefully this will be one of the workouts that can help you keep your posture fighting fit and strong, and keep those extensors working.
I would like to start with a Caterpillar. So the girls are going to go forward onto the mat. So the warmup is all done on the mat than we'll move on to the reformer. If you lie prone, hands under your forehead, and I want the feet just in line with your ischial tuberosity. So not right together and not too far apart.
Preferably the legs parallel and, to start with, the Caterpillar has become a little bit of a joy and a success for me at the moment. I'm really enjoying working with it. It's the bringing of the sacrum more the pelvis up into extension off the mat here. So let's just start by finding your tailbone. So get a sense of where your absolute base of the coccyx is, the tailbone, and feel like there's a string from that point right up to the ceiling.
I want you to feel that the base of the tailbone draws up that string towards the ceiling, bringing your hips up off the mat. So allow them to go into extension. And then as you lower the hips down into the mat, allow the front of the hip joint to open. So you enforce it but just allow it to spread into the mat. We'll do three more, so find that coccyx up the string all the way to the ceiling, drawing you up off the mat and then allowing the hip joints to open as you come down, good, now add to that, the sitting bones, allow them to draw apart as the coccyx goes up that string, and allow the pelvis to open, and go into extension.
And then all the way down, letting the hips open. So you don't have to have a big range. Allow that to be your pelvis going into extension without loading the lumbar, so you're not hinging into the lumbar, but we're pulling the pelvis up, and then opening the hips down. So that sense of creating an anterior tilt through the pelvis from that prone position, will then become the Caterpillar when we work supine, or in any other range as well. So last one, allow the hips to open down.
And hopefully you felt that nice drawing up, activation of lumbar, into sacrum, and we should've fired some multifidus there. Alright, so turn over on your mat. You're going to lie supine with the knees bent up. Feet hip-width apart, so we're going into our pelvic curl, spinal articulation, so set the feet. Make sure they're nice and even.
Arms beside you, and we'll start with a breath in, filling up the breath into your pelvis. Then, breath out, draw the abdominals deep, roll up in your pelvic curl. Good, so then, we're into the bridge position at the top. Stay there, feel breath in, and as you exhale, initiate from the sternum, allow the ribcage just to lower into the mat, all the way down to where the pelvis is long along the mat. We'll do three more like this before we add.
Breathing in at the bottom, find that nice deep inhale, exhale, roll up. Good, stay at the top, engage the back of the shoulders, the upper arms, find that activated, and exhale, lengthen all the way down, articulating the spine back into the mat, very nice, long pelvis into the mat. Inhale, exhale, through all through. Good, and now allow knees to go over toes, shoulders to create a shoulder-stand position. So you activate the back of the shoulders, long exhale for the duration of the movement as you roll back down, good, one more and then we're going to add our Caterpillar.
Exhale, initiates the abdominals, rolls you up, finds the shoulders, stand, good, arms are active, feet are active, and then exhale, roll away. Finding the mat with the ribcage, mid back, low back, pelvis's down, good, we're gonna roll straight back up. So another pelvic curl, takes us to the top where we're going to add our Caterpillar. At the top here, think of that same movement from the coccyx going up, and over a big basketball, back to the top to your bridge, and then exhale, roll down. So you should feel like you can identify low-abdominals in that Caterpillar, and that it's working from the front of the body, we'll have three more.
At the top, lengthen the pubic bone, up and over, which means the tailbone is going up and over a big ball, back to the bridge, exhale, roll down. Good, last two, don't forget to keep the arms nice and active, if the feet are pressing into the floor, you'll have a nice sense of hip extensors really helping you elevate the pelvis, keeping you connected as those hips hinge. Come back, exhale all the way back down, one more. The breathing's good here, I hope you're getting a nice, deep breath into the pelvis. I want you to really feel like you fill up the pelvis with air when you inhale.
And then for the movement coming back down, exhale for the duration of that movement. And once you're down onto the mat, take a moment to bring your feet together, knees together, arms just off the mat. We're going to do a little mobilization. Knees, going across to the right-hand side. So allow both knees to stay together and just move across, exhale, abdominals bringing you back.
To the left, inhale across, exhale brings you back. Now inhale across, as you exhale initiate from the ribs, or the sternum, to start the movement back, brings the abdominals, brings the knees, good, and across. We'll have one more each side, I'm going to keep it fairly flowing, we'll slow down when we need to. We've got one more with the knees. And back to center, good, hold that position.
Make sure the heels, feet, are flat on the floor. And you'll bring your arms up. Use your hands to hold your elbows, in that nice, forward position like would be a genie arm. Now, hover your head, shoulders, just off the mat, 1 centimeter, it's not too high, hold the work from the upper abdominals, and we're having a nice pacey rotation, you're going across to the side, and center, across. Now I want you to think of just loosening tissue.
So try and get the upper arm to the floor. To the floor, all the way, good. Allow the pelvis to move a little as it needs to but don't force it, good, four more. Four, three, two, one, and come back to the center, good. Place the arms down beside you.
Separate the feet ever so slightly. Now I want to pick up our pelvis up that 1 centimeter off the floor now, we're going to do a little hover. Now in that hover, I want you to get the sense of the Caterpillar again. So just a little lengthen of the coccyx. Almost reaching to the mat, hold that position.
We're gonna bring Vic down just a little, good. So it really is only a centimeter to an inch off the floor. Now we're going to do a little leg lift, let's start with our right leg. Just float that right leg in, and I want it to be more like an injured paw, not a big lift. So you're going to come to where the thigh is vertical and the heel is just flopping into the tailbone.
Exhale, take that leg back down to where it came from. Other side, so we're just holding the hover as we do a leg lift, and place it back down, good. Find your shoulder stand, that'll support the upper body. Float the right leg, and back down. Now you want to maintain the pelvis ASIS absolutely even, feel the sense of co-contraction, front and back of the pelvis as you lift that leg.
So I want that sense of the sacrum drawing up. Your knot inflection is in that start of a Caterpillar. We're gonna do four more, I know, it's harder than it looks, right? As you get that float, feel like the breath co-contracts, back of the pelvis, front of the pelvis, and we will be giving a little force closure to the sacroiliac joints, really nice for Pilates teachers. This can be, if you feel like your SIJ give you a little trouble during classes, hit the floor, do a little few of these between your clients.
Good, last set, and last leg lift. We'll place that one back down, take the pelvis back down to the floor. Now hug your knees to your chest without allowing the back to flex, so I want the pelvis still long, drawing your knees in, working on that hip flexion. So while you just hold there for a moment, that hover and leg lift, you could also do with feet on the Wunda Chair pedal, holding it down, just a light spring, and it really adds to how you will find deep abdominals, and multifidus, deep into the body, activating. Really does do beautiful things for you.
Alright, so now bring your head, shoulders, up, and chest, lift, keeping your knees in. And holding that position, deep in the chest lift, we're going into our single leg stretch. Keep the pelvis long, and with the right leg, reach. And one, and change, we're doing 10, good. Now keep that co-contraction in front of the back of the pelvis while your hip flexion, and hit that long leg reaches away, last two.
Good, hold it there, we're going into scissors, or hamstring pulls, so take the low leg, take it up to the ceiling, and hold the back of your calf. Low leg stretches out along the mat. And I want it to touch the mat so you find those extensors. We're going to do three each side. Pull the leg into, and into, good, pelvis is long, that's where our focus is, send those tailbone out, send the sitting bones along the mat, last two.
And, I think I may have counted badly. Finish that set, good, bend the knees back in. Hands behind your head, and we'll do crisscross. Alright, five each side, and go across to your first side. Then change, good, and change, now we're keeping the pelvis stable, sense of control from front and back of the pelvis, deep knee into hip flexion, and the other leg, it reaches away, with your rotation, not too much to think of, right?
Last set, good, and when you're finished, come back to center, lay the head, shoulders, back down. Stretch your legs along the mat, and we're turning over onto our tummies again. So, last exercise in the warmup here but quite important, I want you, again, to have feet in line with your sitting bones, not right together, not too far apart, good. Hands under your, yes, hands back beside you. We're doing basic back extension.
Starting with the basic back extension, just set a pattern. So I want to start with breast bone breathing. The lovely depth lessens breast bone breathing. Breathing into the upper thoracic, between the scapular, and then breathe out, send the head out, crown of the head comes through first. Picks up the shoulders, picks up the hands, and we're find that head, neck, shoulder, thoracic extension.
Take that back down, and maintain that inhale, filling up between the breast bone and the thoracic, and then exhale, it's like the head comes out, little tortoise head coming out of it's shell. Good, so I really want that pattern through the upper back first, and then take that back down. We'll do two more before we add. As you exhale send the head out long, engage the neck extensors, shoulder extensors, thoracic, it doesn't need to be a big movement. I want it to be very specific about the pattern here.
Again, if you saw my programming tutorial, or if you decide to watch it, it's the preparation. We want release, the front of the body, activate the upper back, good, and come down, now we'll add. So at the back, your toes tuck under. But allow the thighs to be heavy in the mat, they're not doing anything just yet. So your thighs are heavy, toes are tucked under into dorsiflexion, and we're going to start with the upper body again.
So basic back extension, breathe in, breathe out, send the head out, shoulders, pick up, engage all that upper back. Hold, now we send the heels back but the, so that lifts the thighs, but I want the head of the femur to come into the pelvis, and open you through the front of the hips, so we're looking at hip extension. Bring all that back down together, good, and again. Upper body first, good, then send the heels back while the femoral heads go into the mat, opens up the front of that hip joint, and bring it all back down. Now we're gonna put all of that together at once.
So upper body and hip extension together. Woo-hoo, here we go, so, yes, the heels reach back, the femurs go in, the upper back engages, beautiful. So stay there for me, and just have a sense of how beautiful that position of the hip joint is in extension, and the upper back, that's what I want you to find when we go into our back work. And come back down, we've got one more. Then we're ready to hit those reformers.
Good, you'll be all prepped and ready to roll, good. And bring that back down, very nice. Sit back on your heels, take a little breath into rest position, or child's pose. And then, we will come onto the reformer for leg and foot work. So now we're getting onto the reformers.
As you're setting yourself up on the reformer, bring a magic circle, and a set of hand weights, not too heavy, so ideally around, we've got 2 pounds. But 2 pounds are a little under if you've got those. So, set them next to the reformer. And we'll pick them up when we need them. We're starting with leg and footwork.
If you would put on your leg and footwork springs, which we're going to use three red, and one blue. So I like a little bit of load, and this really does fire up the base of the pelvis, and the legs. So three red, and one blue, but feel free to change that a little if you need to. We're starting with heels on the foot bar. So with the heels there, I want you to extend out into your first leg and footwork position.
So, stretch the legs, stay there, just pick up the pelvis and then place it back down, good, and settle that there, good. Now we're going to have, exhale as you come back in. I'll have 10 in this position, inhale, lengthen. Exhale, pull, inhale, lengthen, exhale, pull. Good, so you're going to 8 more, finding that draw back in through the back of the legs as you bring the carriage back, good, inhale as you go.
Exhale, bring that back, good, nice, so keeping the pelvis nice and settled as well. So we want that sense of co-contraction, holding the pelvis neutral that we set up in the mat work. Good, last one, and now we're moving to arches. So bring the feet down together, wrap them around the bar, heels come under, knees can be slightly soft. They don't need to be jammed together.
And away we go, inhale, stretch. Exhale, heels pull under the bar as you come. Inhale, and wrap the forefoot. And wrap the heel under as you come. So those heels under are a real point of connection for the hip extensors, inhale, and pull, good.
I think we have five more. We'll call it five, four, and (inhales) good. And last two, and one, we're ready for V position. So toes onto the foot bar, find the metatarsal heads on the bar. Knees inside the frame of the carriage, away we go.
Inhale, stretch, exhale, pull back in. Inhale, stretch, good, keep that little bit of plantar flexion through the heels, a little higher than the toes, so we want that court shoe position, so you can feel like you're standing in your court shoes, boys, good. (inhales) And back, four more, good, three, nice, two, and hold the last one, then we're going to take the back into the bar. Sorry, take the feet parallel, we're going out for calf raises. So stretch out to straight legs. Good, and heels come under all the way, and rise.
And all the way, and rise. Now you can use an exhale or an inhale on the rise here. I'm happy for you to follow through with what feels best. Just keep the breath flowing, keep the movement flowing, and allow the full range, I want the heels all the way under then all the way up, nice high court shoe position here. Then all the way, I think, Blossom refers that to Birkenstocks.
So we'll say Birkenstocks to high heels, three more. Good, very nice, last one, rise up, bend back in, and now we're taking our heels out wide on the foot bar. But not too wide with the knees. Just make it an easy wide position. We're going back to our warmup, our little hover.
So pick the pelvis up to where you're that 1 centimeter, or 1 inch off the bed, hold the hover, and we're out and in for 10. Again, I don't mind if you change the breathing if you prefer exhale on the way out here. You breathe so that you can work the movement. Pelvis neutral, that nice little pull up across the sacrum and sacroiliac joints, keep it nice and low, so I don't want it high. (inhales) And hinge, find that hinge in the hips as you go out, as you come back in. (inhales) Don't get too high, let that drop, two more for me. Good, and there's your shoulder stand from the pelvic curls as well.
Bring that all the way back in, lower the pelvis back down, we're going to bring the feet into the center, on the arches but slightly apart this time. So, arch position, back to your hover, the pelvis will be that tiny, tiny, bit off. Now float your right leg into injured paw, the little leg lift that we had on the mat. So, vertical thigh, you're going to hold that there. And extend the first leg out.
So we're going all the way, keeping the pelvis just in a hover, not picking up. And we'll do five, that's two back in. And good, nice, so hold that vertical position of the thigh, don't tuck it into you, that'll give you more work around the pelvis, more co-contraction front and back of the pelvis. And last one, good, bring it back in, we'll change sides. Got us on an extra one, good.
Now, both my ladies here, yes, Lan, just drop a little. Make sure you're only a little off the mat. I know, it's tempting to go higher. And press it out, put, and you'll see here, we're looking for that open hip joint position that we had from the back extension, hip extension on the mat as well. So now we're doing this with a little bit of challenge from the extra hover position.
Good, are we up to last one? (inhales) Beautiful, bring that back, both feet back onto the bar, and settle the pelvis back down. Come onto the balls of the feet again. We've got one last exercise here with both feet going out for some raises or prancers. So extend the legs, I just want six each side. All the way through your range, two, three, four, good, just breathe easy as you go, breathing through the movement.
When you've done 12, bring the bed back in for me. And, home you come, very nice, okay. Now things get crazy, we're putting our magical circle into our legs for the hundred, but first you're going to take the springs down to one red and one blue. So I've got the girls here, I'll stay, you girls stay there and I'll set you up. And yes, you can take your magic circle.
I suggest putting the magic circle in between the ankles before you put hands in straps. So put the circle in just above the ankle bones. Rest your feet, and then we'll put hands in straps. So the looks on these girls' faces here is probably what you're thinking at the moment too, "Oh, joy," good, so you've got the circle in. One and a half springs, now hold the bed with the hands in straps as you bring the knees into you.
Give a little squeeze on the circle, and then as you press into hundred position, the legs come out, keeping that squeeze on the circle. Away you go, good, and hundreds, and breathe in, two, three, four, five, and out. Two, three, four, five, good, try and just keep an even drawing in on the circle, softening through the front of the hips, allowing the circle, the inner thighs, to take as much of the work as possible. Deepening the chest lift, now pump that air. Deeper, two, three, four, five, and empty that exhale all the way out. (exhales) And (exhales) good, let's just do three more breath cycles.
If you need to bend your knees in to take a little pressure off anywhere, do so, just keep the connection of the inner thighs, keep the breath moving. We'll be getting nice and warmed up. Circulation of blood and oxygen everywhere. Good, shall we do one more breath cycle? (laughs) I know the girls want to, you want to. (exhales) (inhales) Very nice, hold that position, deepen the chest lift. Draw the knees back into you, and then you can come down with the upper body, take the circle out, which is easier for me to do here.
You take your circle out, put it beside the reformer. Thanks, Vic, good. And then your arms are straight back to the ceiling, knees bent in deep for coordination. Now I want the arms to stay long for coordination. We're not doing triceps, so arms are extended.
Find the humeral head back into the shoulder joint on the bed. Knees in deep, just two or three fingers between the knees. So I want you to bring that a little closer together. Alright, we're going out with extension and the upper body, stretches away, one, now hold that position. I want you to just above the foot bar, open, close.
Draw the knees back in, and the body comes down. Arms following through, and away we go. Exhale, out, and squeeze, deepen the knees, bring it back home, and squeeze it out, squeeze, good. And it's the breath, so let the breath exhale. And, good, deepen the knees, not too wide.
Try and give me just a little narrower knee position. Deepen it to the forehead, and bring it back down, I'll have two more, and press, and squeeze, nice, deepen abdominals, and last one. And, excellent, put your feet onto the foot bar. Change your springs to two red springs for me. Or two one springs, I want a little bit of good load into the legs while we put our feet in straps.
So you, two red springs, now, I'll just set you up with feet and straps first, Vic, just bring your feet back down, the way I like to do this is holding your strap, stretch out with the legs from the foot bar, good, place one foot into the first strap. Good, now you've got tension on that one, holding it bent, place the other foot back in, good. Heels together, so now we're safely in there without losing the bed. I know there's much more tricky ways of doing it, which Vic was going to do, but, anyway, that's a good, safe way of getting feet into straps. We'll start with little frogs, so find the weight of the two red springs into your hamstrings, and press away.
Good, bend back in, and I want it all the way into your hip flexion, but feeling like the pelvis is long. And exhale, press, and hinge it back in, and exhale, press. Good, now, I want a full ten, the little frog sets up that nice release through the hip joint, work of the hip extensor stabilization through the torso, and we have a little open chain exercise going on here. So really nice exercise that I like to find (inhales) or give enough repetitions too to really allow that hip work. So I think we have about three more, yes?
Good, and after the lasts, so we'll go one more little frog, leave the legs out long, now straight leg slightly up to the ceiling, to where your hamstrings are just edging into their stretch. And we're into circles, down the center first, and around. Think of the hip movement, and press. It doesn't need to be too big, it needs to be nice, even circle in the hip joint, so don't aim for a major movement, these girls have a lot of range of movement. Please feel okay to have less.
And (laughs) good, I'll have two more, just not going over 90, too far, again, there's a lot of range of movement here. Good, and now back to the top, hold, we're reversing. Legs come around, make sure the tailbone sacrum is down as you come up, legs are doing the work so stay standing on that sacrum, four more. Three, good, and keep that work of co-contraction, abdominals, and back drawing together to hold the torso. Is this our last one? Good.
Open the legs out wide, just stay there for a moment, take a couple of breaths, letting the weight of the legs just increase your range there. But stay standing on the sacrum. So I don't want the pelvis to scoop up. I want it to be nice and long. Now, try not to feel tempted to pull out of that, come straight into your pulling on the straps around to where the heels touch, there's your adductors.
You're welcome, inhale, open, (inhales) and exhale, close, always keeping that sense of the pelvis being very stable on the mat. (inhales) Good, and three, I know, you don't need the same range that this one here has, but it's a lovely movement she's showing you, good, two more, both girls. And, (exhaling) good, I'll have one last one. Good, and then bend your knees back in, take hold of the straps, and take one foot out at a time. We're coming feet out of the straps and hooking them back onto your strap holders, keep the head rest up, bring the bed all the way back in, and we're going to semicircle with the high bar. Now I like to keep the two red springs.
But if that, if you, you might be smaller, you might want to go down to one and a half, or one spring. Absolutely fine, you change your spring now. Actually, I might take Lan down to one and a half because she is a bit smaller. (laughs) She's small but she's mighty, she'll manage it anyways. So, V position on the bar. You're going to take hold of the head rest, shoulder rest, and push the bed away.
So set the setting up for your extended position through the arms, good, so. I would like you to start up for the moment. We're going to just find our position. Fully extended arms, knees going over toes, and bringing the bed in as far as you can. Now we'll start in a specific direction but to begin with, I just want to find your position down.
Take the roll down like you would from a pelvic curl, from the upper body trying to keep the bed at the stopper as you do it. So you find the articulation through the ribcage, all the way down, now find that little Caterpillar for me. So the coccyx is trying to greet the springs. So I want that when you're down in the springs. So there's your starting position, set up from a nice, controlled articulation.
We will come back up to push out. So keep the bed as close in as you can as you roll through, and knees come over toes, extend out with the bed, hold that position. Now a little control here, go through the sternum, uncurl, find that same wraparound, the carriage that you had, find your Caterpillar into the springs. Pull it back in, good, and get a little more pace as you go now. Roll the knees up and over, extend out, go from the sternum, ribcage, wraps to the bed, wraps around, Caterpillar, find your springs.
Pull it back in, two more, and roll. And extend, good, exhale as you roll back down through here. Inhale, draw this back, finding your springs. If you can, if it's a work-in-progress, that's perfectly fine, that's good. We're all a work in progress, good.
And on this last one, pull it back in. Stay at the stopper, still try and bring that bed in as far as you can, and then we reverse. Come back for a second, I want you to really find the hip extensors to start that reverse. So that you push from hamstrings, engage them isometrically, and then exhale, press out with those hamstrings, good. Now peel up, keeping the bed out there.
All the way to your shoulder stand. Bring it all the way back in, knees over toes, and roll it down, again. We're going to try and keep that carriage right into the stopper, find your springs, pressing out hamstrings. Roll it up, and bring it home, knees over toes. And, two more, press hamstrings, good, roll it up.
We have one more. And exhale, roll, keep that bed in at the stopper if you can, find the spring, press it out. Lift it up, Vic's definitely found her spring, bring it all the way home, now stay there. I want you just to send the knees over toes but drop your heels, so feel like you can let the heels go. But the knees come in, take a little more stretch, one more breath there as you get your stretch out from the front of the hips, and then you can exhale, roll that back down and slide in on the carriage to come out of that exercise.
Good, so we're coming up to a kneeling position. Now we're going to work a little triceps and quadruped-style body work. So one and a half springs for this one for most people. Again, down to one red spring if you're smaller or you want a little bit lighter. I don't want you to compensate, I want you to be able to find your good patterning.
So one spring, one and a half, which is what we're going to try today, or I do like to take it up to two so you get really nice load into the upper body. Alright, so set up firstly, with heels right up against the shoulder rest, so I want to see that connection of heels to the shoulder rest, or as close as you can get depending on your dorsiflexion. You're going to press the bed out, so the carriage goes out to you're in a long, flat back position. Knees back a little under the hips, good. Then just connect hamstrings to the pelvis.
So I want this held, co-contract front and back, head is in a long line going to go over the bar, as you bend the elbows down to the floor coming over. So take the bed all the way to the stopper, and elbows should be tucked right in, heres your nice triceps. Now, they press down to push you back out. Elbows down, body goes out, and inhale as you come in over the bar. And exhale, press that away, good.
Inhale over the bar, exhale away, nice, I want a full 10. This should be four, and press, good, now keep that sense of connection through the back, pulling up through the front, elbows tucked in. (inhales) Good, this should be six, and just baring in mind that nice, let the neck extensors still be involved. Don't drop the head too far forward. So eye line can be forward over the bar. And back, we're trying to keep the scaps nice and wide.
Good, let's do two more because it's such a nice exercise. Whoa, sorry, Vic, good, and last one. Excellent, good, bring the bed in underneath you. And we're going into down stretch, so hold the bed at the stopper so the carriage is staying at the stopper. You're going to press forward with the pelvis, up with the back, now I want a lot or most of you work to be about the heels back into the shoulder rests.
We'll do four than we're gonna take a little high release. So inhale back with your down stretch, and exhale, send the sternum up to the ceiling to bring you through and increase that thoracic extension. Down to the carriage with the thighs, and keep the heels back, back, back, back, back. Pull up here, and down with the thighs, good. Heels go back as you come through, one last one.
And hold it at the stopper. Now walk up onto your fingertips and find an upright body for me. So I don't want you in extension yet. You bring the pelvis back, arms are going to go up to the ceiling. Straight up, now, I want lift, I want shoulders over pelvis.
So Vic's got a lot of range that I'm trying to bring her back. Good, and from there, once we've established that very upright position, I want thoracic extension led with the fingertips, so thoracic extension back, back, back, good, bring it upright to your upright position. (inhaling) And one more, walk your fingers along the ceiling as you go back, now you can take a little more extension through the rest of the body, a little more thigh stretch. And then bring it back up. Good, alright, hands down onto the foot bar and sit back into a little rest position. Let your back have a little rest.
Then we're coming off around with the Balance Control Front. Okay, so now we're moving into Balance Control Front. So come off the bed, turn around, one and a half springs, or one spring is, again, a good setting for this exercise. So hands onto the shoulder rests to begin with. And then step onto the foot bar, I'll have V position today, please.
So, you can step up or you can kneel on the bed and put your feet back, whatever gets you up there safest. Now take this position out into a front support position. There you go, so it's a long plank. Now we want that one piece of steel, head to heel. So find first, before we move, that the head is extended out, with the neck involved, so give me that, that's it, sternum forward, engage the hip extensors.
Now I want you to press the bed away, as far as you can. So keep going, going, going, going, and then bring hands back, under the shoulders. So it's starting from underneath the shoulder girdle to as far away as you can, and you work the co-contraction. And back, under the shoulders. I'll have four more, or if you need to take a break, do at some point, build up to the six, and then you can go past the six.
Good, so you're aiming to go as far as you can with the body fully integrated. We'll have one more, I think will be our six. Good, now, little challenge, bring the hips up to the ceiling into your pike, and step the right foot down onto the bed, left foot down, and turn around, good. So if you haven't done that little transition, we'll turn it around and then we're going into Elephant. Slight variation on the elephant, I'd like heels down against the shoulder rest, or slightly forward if you're smaller.
I want you to bring head, shoulders back down in line with your arms, as much as you can. Think about your Caterpillar here. Think about sending that tailbone up. I want a long position of the spine, heels are down. Now, without going any more from the base of the spine, I want thoracic extension, so the head, shoulders, like we did on the mat, come foreword.
A little less, it doesn't have to be too much. Now, holding the bed still, we're going to bend the elbows into our tricep position again. So bend, and the body will lower with. Good, I want Vic to just bring, yes, support the lower back a little. And press up, you're going to do six.
Good, so we've got nice, upper body working in here. And up, good, keep that bed right against the stopper. And you should feel a lovely sense of thoracic interior, upper abdominals, triceps, shoulder girdles, scapula, whole-body, good, let's do two more. And, last one, keep that little bit of thoracic extension there, good. And now you can just lower the head, shoulders, a little between your arms for elephant.
So the bed's going to go back and under, and under. Find the abdominals, and get the hips pressing back from the hip extensors, to do the movement back. So I want more on that back focus than the hinge under. You can lift the toes if that helps you get the heels down. And exhale, four more, exhale, three, two, and one.
Very nice, good, alright, bend the knees down to the carriage. We're just going to kneel down and change our foot bar. So we're staying on the same spring. Foot bar will go down to it's low setting. We're going to have a nice little lunge but a little bit active, so right down for me.
That's it, good, alright, make sure that, make sure this gear's out of your way, up here. So, again, I want your heels right up against the shoulder rests, so where you are now. Excellent, let's start with your right foot up onto the bar. Or if you have a preferred side that you, or a side that you feel is tighter, finish with that side. So, find the side that's a little more used to stretching, or it doesn't feel as tight, and start with that one in the back leg, hopefully that makes sense.
Good, so I want this back leg pressing back. You will stay holding the foot bar for the moment, torso upright, now press the bed halfway out, good. And on the way in, I want you to stay down with the pelvis. Back with that back heel, and feel the front knee come over the foot bar, so we're just going to get you a little deeper into this, for six. Press back through that heel, keep the heel back as the knee comes forward, over the foot bar.
Good, four more, good, so go gently, it's a strong lunge but we're going to try and increase the depth of that lunge at your pace, so feel like you're in control of it is the most important thing. And is this five? Good. Alright, last one, and you don't have to get to full hamstring extension, just go to your range. Now from here, I want you to bring fingertips forward, and then, ever so slightly, just wider. Just give yourself a little width, that's it.
Now we're going to extend back for four. So just a way you can control the carriage and bring it home. So now this stabilization in this range of movement. Press it back, and forward, good. Last two, good, try not to drop into that any further as you go back, you stay with the pelvis on the same plane.
Hold that there, alright, for a last little moment, take the arms up, open the chest back, have a little stretch, bring it all the way 'round. Hands back to the foot bar, you can change sides. So if you have, this time or next time, set up with your easier leg back first, you'll now be on the tighter side. Again, go gently, alright, so make sure that heel is connected, connected, that's your point that I really want focus on. And then, fingertips still on the bar, body upright, press back through that heel.
Good, keep the pelvis low, come forward with this front knee going over the bar, good, we have our six. Just stay deep in that position, and don't feel like you have to get fully stretched with the hamstring, we can do that later. Although the work through the pelvis here is more about getting two points of stretch through hamstring, hip flexors, anyway. So, feel like it's all happening here. Is that five? Good, one more.
Good, now stay there, take the work into the torso as you bring your arms up, slightly forward. Good, and we have force, stay pelvis on the same plane as you go back, I don't necessarily want you dropping through, so Vic has a lot of range and strength there to hold that, but if you see her lowering, lifting it, you don't need to, you stay where your muscles are controlling the range of movement. Good, last one. (inhaling and exhaling) Good, alright, stay there, we'll take our little reach up. Give me that extension, stay lifted through the torso as the arms come around, brings you back to the foot bar, and takes that foot back, good. Alright, now we are going to go and get our long boxes.
So I wanna do a little sequence on the long box. And then some standing work, you're getting towards the final phase, let's grab our long boxes. Okay, so you have your long box. Set the long box on the carriage and put on one red spring please, so down to one red spring. We're going to start with a preparation for the pulling straps, and then go into pull straps I, II, and swimming, nice extensor work.
So, ladies, so lying on the box, I'll have chest just at that back edge of the box, facing the back of the reformer. Good, arms reaching forward to the side of the reformer. Head and shoulders flexed over. So, we're going to do unloaded preparation first. Headrests down if, yup, good, alright.
So start as you would in a mat work situation, bringing the head forward, so we do have breathing into the upper back that we did on the mat. Head comes forward, send it out of the body as you bring the arms back, emulating that pull strap's one movement. When you get to the top, I want you right at the lip of the box, so tie that in nice and tightly through the upper body, little more head, neck extension. And bring that all the way forward, as you come forward, breathe up into the upper back. (inhaling) As you breathe out, send a head out of the torso, pick up the shoulders, pick up the hands, bring them to the lip of the box.
That's where I want you to come when you have those straps. And forward with this one, we'll do two more. Just setting up this pattern again, breathe into the upper back, breathe out, slide the head forward, slide the shoulders back, find these heads of the humerus back towards the scapula. So you're in the back of the joint. And come forward, we've got one more.
(inhaling and exhaling) Use the breath, lengthen out through the torso, it doesn't need to be high, good. And as you come down this time, finish the exercise then take hold of the straps, up past the buckle. Good, unhook them, you're ready to go. Now we're adding the resistance to it. It's the same thing, breathe into the upper back, breathe out, send the head out, pull the straps back as you come through, and try not to give it too much thrust for me, I want you to really just squeeze it through to ya.
All the way down so that we've got a nice sense of kind of pulling the straps back. Good, we can get faster along the way. Remember, I want that lip of the box. And forward, good, so as we progress, we can get faster, for sure pace and dynamic is going to come into this. But I want to feel like we're really getting these muscles that are important to address gravity or tech posture, or a Pilates slump posture.
Good, and we'll have one more, and hold it at the lip of the box for me, stay there. Now, as the arms come out for pull straps II, keep the chest lifted, sternum forward, eye line up the wall in front of you. Now palms facing down as they come in, come right to the top of your butt with palms facing down, inhale, control it out. And, now I want you to maintain the same height of the chest and hands, arms come in, soften elbows. Beautiful, inhale, out, keep that chest up.
So we're now just staying in that thoracic extension, there's plenty of work in the back. Good, two more, I know, and we've got swimming to come. You're welcome, good, alright, now you can undo this last one down, back to your starting position, hook the straps. And we'll take a moment to set up swimming. So arms, you can just leave your head, shoulders down as we started for pull straps.
I want you to bring your heels up in line with the pelvis like we did in our hip extension from the mat work. So start by flexing those toes, heels, under like you would if they were on the mat. That's where we were, so open the front of the hip, femur's going into the pelvis, that's your hip extension position, sacrum in, now point the toes out in line with the heels, there we go, that's your legs for swimming. Now, bring the head, shoulders up as we have been doing with our thoracic position, nice, bring your arms in line with your head, or as close as they go, with good shoulder positioning. And swim for 40, with me, 1, 2, 3, 4, 5, 6, 7, 8, 9, 10.
1, 2, 3, slow it down, 5, 6, 7, 8, 9, 10. 3, 2, 3, 4, 5, 6, 7, 8, 9, 10, 4, 2, 3, 4, 5, 6, 7, 8, 9, 10, and hold it there, we did 40. And you can soften down, and bring yourself into a little rest position, okay, so your back muscles are working now, good, nice, so take a moment. Breathing into the back, just allowing all that tissue to stretch, and exhale, letting the breath go, two more breaths. (inhaling and exhaling) Good, and last one. (inhaling and exhaling) Good, let that go, alright.
Now, coming off the box, we're going to turn the box to a short box position for a side-over that's a little decompressing, long, and challenging. So put at least two springs onto the carriage for me, just to hold the carriage there. And then we'll bring up the foot strap. Now, if you ladies face in, but again, what I would prefer for you to do is to work with your stronger side first. And weaker side last, now I do that because my right side is stronger, I wanna start with that one, I know I'm going to finish with the left, or finish with the side that is a little weaker or less dominant.
So, we'll just do it for our choreography, facing front, the underneath knee will be bent up onto the box a little more, and foot forward, so that's going to give you a stable position there. Hook that foot into the strap and bring it slightly forward. So I want you not over working that leg but just able to hang off that strap and use your hands to walk all the way down to the floor. So you can help yourself down with the hands there. I want this stretched, decompression.
I want to take that moment where you allow the body to go over. Now if your sacroiliac joints don't like lateral flexion, they're not going to like this. I would adapt this to starting at the top and just working that top range. But if your solid enough to, and certainly, they should be set up and strong, take that range, hook the underneath, or hook thumbs, in that underneath position, so the underneath hand to the top hand, keep the ribs slightly open, armpit open to the ceiling, I know. Now, exhale, lengthen out and come to where you can come.
That's fine, neutral is fine, good, then lengthen it down so it's about the range, into lateral flexion that I want, decompress all those ribs. Hold it in neutral, no higher, so if you just get off the floor, than I'm actually okay with that. But if you come to neutral, that's as high as I want it. Last two, good, and we should see, you can still keep that concept of co-contracting front and back. The breath, exhale allows the body to move together.
Go all the way down, and then place your hands on the sides of the reformer to turn yourself a little rotation stretch, good. And feel free to breathe, good, then we'll come to the other side, so not a lot of repetitions but make them very precise, and you'll start to find that real length and activation of the lateral muscles, and you'll get stronger, good. So, again, I'd like you to use hands to walk all the way down first, so rather than just dive into it, find your position, open the armpit to the ceiling, good, make sure the pelvis is lined up and stacked. Top onto the bottom, then hook your thumbs, then extend with the exhale, we'll do four. And bring the ribcage to the pelvis.
Good, and down, so yes, make sure you're working for that length, ribcage away, stretch QL's, and then the ribs to the pelvis, with that exhale, with the co-contraction. When you've done four, lower down, and turn to have a little stretch into rotation for me. Very nice, good, alright, using your hands, come back up, we're taking the boxes off. And going into our standing work. The standing work, we will have the hand weights in our hands, all the joy.
Okay, so once you have your hand weights, I want one red spring hold the carriage, and we're starting with abduction and then we will go into adduction. But we will come down and change on the way through. So standing on to the stable part of the reformer first, and then place your other leg onto the edge of the carriage. Now, everything is about the torso so we want this co-contraction here, we wanna press from abductors but we are going to take the arms out into a lateral raise as we go so don't rush it, find the connection of deltoids to take that weight out. So this is really going to give us some nice shoulder stabilization if we can get deltoids to hold that shoulder joint properly.
So, nice straight legs, unlocked knees, but you wanna work from up higher in the hip. As you press the bed out, take the arms to shoulder height. Good, good, alright, and then bring that home. Good, a little, a little Australian trio here. And press out, good, and bring that home.
So your aiming to get, to stay very square in the pelvis with the ASIS forward like headlights. We'll do four more. Good, with no banging. Good, last two, and, last one, you are going to hold the carriage out now, from here we're going to spiral the elbows in, palms turn up, and then they go out. You've got 10, and a little pace, in, and out.
And wrap, good, bed stays pressed apart, and wrap the upper arms, so they aim the elbow into the front of the ribcage. Good, it's like wrapping the thighs, you get to wrap the upper arms. Is that six? (laughter) We'll call it eight, (laughter) last two. And, good, arms back out, bring the bed back in.
Good, and step off the back, and come around to the other side for me, please. So on the other side, we're going to just bend the elbows in and do our lateral raise with the elbows. But lucky for the girls, they get to open out and do their spirals again, lucky for you. Alright, it's such a nice exercise. So this spiral exercise is everything about externally rotating, and engaging in the shoulder joint with that position of the upper arm.
You'll learn to love it, I'm sure. So set elbows in beside you, shoulders nice and wide, broad across the chest, we'll do eight. And press out, lifting the elbows, taking the hands with her and close, good, find the abduction from the hips. And raise the hand at the same time as the elbow. And three, good, we are gonna want scapula nice and wide.
So they just stay stable across the upper back. We've got here, all our co-contraction, breathing, stability, you should be in a lovely place to get nice sensation of work into the deltoids. And the deltoids are very important to shoulder stability and the strength of the deltoids will certainly help keep the shoulders healthy, last one? Good, stay out there, extend your arms. And we're into our spirals for 10.
And wrap it in, and reach, so we're going palms up, palms down, palms up as the arms come in, palms down as they go out. If that last little palms down is a little too much internal rotation, if you feel it's not happy, just go to palms forward, and it's the pulling, and pulling, let's do four more. I know you want to. Two, good, last one, good, reach the arms out, bring the bed all the way back in as you grow taller, and lovely, step back to come off the bed. Good, you're doing beautifully choreographed, good.
(laughter) Now, you're going to keep those weights and we'll come around from behind the reformer, we're going on for adduction. So I want three adduction, I will leave you on one red spring, that's a little more supportive. But if you've been practicing adduction into your full range, feel free to go down to a half spring. Always onto the stable part of the platform first. So stepping up, and then taking your other leg wide, into the middle of the bed.
If you have the range, and Victoria might like to do this, come out to the shoulder rest, but turn the legs out. So in that range, you want a little bit of turn out from the hip joint, I want femurs externally rotating in the joint, keep the bed at the stopper for the moment. Alright, arms are going to come forward. So as you go out I want you to circle the arms around to take the bed out, so you're going out as far as you can. Take your time so that you can monitor the circle and the range.
Now draw the in-steps up, inner thighs up, hold, and beautiful, number two. Take your time to work the circle and work the range in your hip joints. And hold, good, one more. And, arms stay, alright, lower the hands, roll down, keeping the bed at the stopper. So hold that bed on the stopper, you're working those inner thighs as you curl through.
Go to where your roll down is happy. Stay there, breathe in, breathe out, keep drawing that bed in as you stack the pelvis, stack the spine on top of it. And then step back off the reformer, we'll come to the other side for our last set. You'll reverse the circle on this set. Good, around you go, oh. (laughter) Very polite ladies, good, so remember, onto the stable platform first, and then out to where your range works for you.
You don't overdue it, but then once you're out, I really do want the external rotation from the hip. So working in parallel is going to change how you do that movement, allow the femurs to move in the hip joints as you go, alright. So start with the arms forward, and we're going to reverse the circle. So bring the arms down and around, as you go, at your own pace, that allows you to monitor both the circle, and the range, good. Allow the femurs to move in the hip joints, and bring it home, in-steps pull up the inner thighs, to the pelvic floor, around, (inhaling and exhaling) good, and hold that there, we're rolling down.
And keep that bed right at the stopper, keep the inner thighs, in-steps pulled up, inner thighs drawing up and into the torso. Breathe into the back when you're down there. Exhale, draw that bed in as you wrap and stack the pelvis, stack the spine, good, wriggle that outside leg in. And step off the reformer, good, and turn around, give yourselves a clap because you are finished. Good, thank you very much, thank you ladies.
Hopefully you feel very upright. And that the muscles of your back, extensors, hip extensors, and holding the pelvis, holding across those joints at the spine, are all engaged in doing their work for you. Thank you.
Back Care: Tech Posture


Comments


You need to be a subscriber to post a comment.
Please Log In or Create an Account to start your free trial.
