Description
About This Video
Transcript
Read Full Transcript
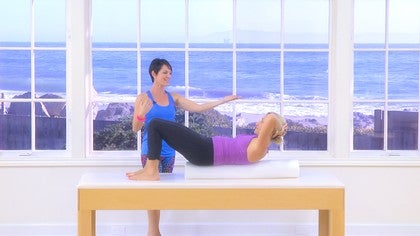
Okay. So Debbie, what we're going to do with some work to get the stomach and pelvis really stable and set and it works a little bit differently from being on the floor. So let's have you coming down onto the bolster. First of all, just sitting down, you have your two sit bones on either side, which can get you kind of having a sense of being very even and then roll back onto your back. Your hands are there to keep you stable and make sure you're tall girl. Do you want to be sure that the head and the sacrum is on to begin with? And the feet are parallel.
So the Nice thing is that you've done a little work into the shoulders. Now shoulders are nice and wide. See if you can pull the floating ribs down. Yes. And keep the sacrum down at the same time. Now just bring your knees and feet slightly closer together, just slightly and pull the stomach up. But keep the pelvis down and without anything changing, lift your right knee in toward your chest and then put the foot down.
So this is tricky. You can't move too fast. So you rock all over the place. Just keep alternating. See if you could find the deepest stomach and pelvic muscles so you don't wobble. [inaudible] very good. I wouldn't rush it any faster than this. So you kind of don't take chances.
That's very good. And then other side and down. Now keeping the shoulders wide. Check that the ribs are still touching the bolster and bring your knees and your feet together and see if you can deepen into the stomach and lift both knees at the same time. So this takes some work. Oh yes. And then lower back down, keeping the stomach up at the same time. Very good. And lift and down. Very, very nice. And lift.
Now narrow. The hips is yes and down. So you're holding the hips, holding the pelvis. So there's a lot of planes. And one more time this way. Lifting and coming back down. Very nice. Now lift again and now let's have you come right to tabletop. So the knees are right over the hips.
And just take the right foot to the mat and tip. Touch the toe on the map. And bring it back up and then take the left foot down without the pelvis rocking. Now what you'll do is you're going to do one leg and then one leg, so you they alternating moon. That's it. So instead of lowering and lifting one leg at a time, see if they can kind of like bicycling easy and see if you can keep that tabletop shape. 90 degree shape the whole time. This is not 90 degrees. This is 90 degrees. So it's like you have a cast, it's all gonna come from the hips. Now
Now keep going cause you're doing really well and do the same thing. But with flexed feet instead of tapping the toll, the heel taps. Yes, keep the stomach lifted, keep the ribs down so the back of the lower ribs stay down. But the shoulders stay wide. Very challenging to do. That's good.
And now bring both knees up again and lower both feet back down to the floor. This is so good. So just stay line where you are. The fingertips are still on. And now bring your left knee up the table top and your right hand up to the ceiling so you keep nice and stable and extend your right arm and your left leg away from you and then bring them back up and they go out and back, up and out and back up. That's it. And this is your fourth one. So you keeping everything, even the trunk shouldn't be moving at all.
The limbs are moving in isolation of the trunk and six you've got two more to go check that the ribs are not starting to swivel into an adaptive mode. They stay very steady. One more time like this and up. And then put the foot on the mat, bring the hand down, check that the shoulders are wide, the ribs are down, the sacred is on, the stomach is up. And then lift the other knee up, lift the other hand up. Easy, right hand above your shoulder.
And now nothing changes in the trunk as the arm and the leg extend away
Lift your head and chest up. So you're curling up. The hands are down. That's it. And then lower back so you can feel what happens in your upper spine as you lift your articulate up.
And down and this
Keeping the shoulders wide. Start to lift the hips up in the air. So you come into bridge pose and then roll down right through the center. So the spine comes to the alarm position. And again, lift your hips up, roll up, roll up, roll up, roll up. [inaudible] and roll down now all the way down. Now bring your feet right up and do your knees a little too wide, a little bit closer. And so their shinbones are vertical.
And I'll see if you can tail the tail and start rolling up. And as you roll up, send your knees away from you. So from your armpits you needs, you stay long and then roll down through the spot. Good. And again, send the size away from you. So you open up in the groin, stomach pulls in and roll back down. So you want to be especially aware. I would bring your feet a little closer Deb. A little closer. There's your vertical plane. And again, think of the knees moving away from you as you lift up.
So hamstrings and buttocks are working and then roll down through the center of the spine. And one more time. Rolling up, rolling up. So use, you can see you want w you can body wants to rock all over the place and roll down. Roll down, roll down two flat. So from here, lift your head and your chest. Stop. See if you can roll up to a sitting position. So again, really hard to do and then see if you can roll down to the hands. If you want can be on the mat. You're growling.
Just like roll up on the mat on the floor, but much harder because you're on this roller. And again, rolling up. Close the chest. Use a pat out that. Yeah, yeah, yeah. And you can see how your body wants to rock to one side. So as much as possible, see if you can be centered. Make sure you're, you're really rolling through the lower back, lower spine roll. Roll. Roll to flat.
Let the chest open when you're at the bottom. Again, lift and roller and lift right up. Nice and tall. And one more time. Rolling down. Rolling down. Rolling down to flat. And last one to exit. Rolling up one last time. Sitting up nice and tall.
So you just press out and sit down. And we're done with the pelvis stabilization.
Stretch & Release: Roll to Release
Mention
 |
Niedra Gabriel (Teacher) |
 |
Bethany K |
 |
Rajashree Srirangarajan |
|
|
Jean A |
 |
Joanna K |
|
|
Kristine L |
 |
Pilates Tot |
|
|
Jude M |
|
|
Patricia M |
|
|
Vlasta K |
|
|
Elaine F |
Comments


Narrowing the hips is tricky and not - have a look at an anatomy picture of hte pelvice and hip sockets and imagine taking the leg bones where they connect into the socket and presss them further into the joint. So yes, you are using both the adductors and the out hips to do this ( in contrast to tightening the buttocks) narrowing the obliques is good but really slightly different location. what this shoudl do is connect the legs and pelvice, allowing he tail and sacrum to get longer and provide a lock to lift the spine out of.
Hope this helps?


You need to be a subscriber to post a comment.
Please Log In or Create an Account to start your free trial.
