Description
These movements can be done together in a series or you can break them up individually to fit them into your day when you have time.
About This Video
Transcript
Read Full Transcript
Hi, I'm Carrie Macy Samper and this is the second class in the postnatal series. This is called pickups, some of the pieces. And it's meant for a woman from weeks six to 12, um, posts childbirth. So it's after you've been cleared by your doctor to exercise. So if that was week six for you, usually a vaginal birth is six weeks, um, post giving birth. So Zarian is usually eight weeks, so six to eight weeks.
Whenever your doctor says you can go back to your normal exercise, that's when this class would be appropriate and titled Pickups, some of the pieces because you're going to it, it's coming back towards assemblance of polarities. But there's definitely some modifications and some things we need to keep in mind as you go through it. It's also totally fine to do these exercises piecemeal. Again, you may not have 30 minutes to turn on the video and go right ahead and do a workout. And as frustrating as that I know was for me, um, it's okay to turn on the video and do one exercise and stop because you have to go tend to your child. Um, it's always better to do a little bit than nothing at all. And I definitely learned that from my first to my second pregnancy and child. So, uh, the other thing I wanted to mention is that very common, um, issues obviously for women after giving birth is either great weakness in their core or and, or diastisis rectify, which means that the abdominal wall actually gets a tear or it gets really pulled apart. So if you do have diastisis wreck die, you should follow the modification that I will show you for that specifically.
And if you don't have it, just do the other version that I show. And uh, here we go. It's kind of some fun exercises starting with the kneeling hundred. The reason we do this kneeling, um, is to eliminate a need to curl up into foreword flection, which is very challenging initially. And Contra indicated if you do have diastisis wreck tie, so you put the ball, you're going to need a soft squishy ball and you'll need a theraband for this workout. So, um, and we're using both in this exercise.
You put the soft squishy ball between your knees and press into it, and this will engage your inner thighs automatically whenever you're pressing into the ball. To use the inner thighs. Also lift in the pelvic floor and engage your transverse abdominis around the corset of your waist. Then pick up the therapy end and we'll start with three chest expansions just to open the chest so your arms reach out from your shoulders, a little wider than shoulder width and I would grab the whole band with your full fist. Roll your shoulders up, back and down. And on your inhale, pull the theraband slightly apart in towards your hips. Hold your breath for a moment as you squeeze the ball and tense your core and exhale as you release. Do it again. Inhale, pull the theraband down.
Arm Press Back
You can press it into your thighs and even pull your arms a little bit behind you to really get the chest to open. And then exhale as you release. One more time. Big Inhale, big exhale. All right, and move the theraband down. Reach your arms long by your side, but find that expanded chest position. Press the ball, tense your waist and begin your hundred pumps as you inhale. Two, three, four, five. Exhale, two, three, four, five. Keep breathing in and breathing out. You have 10 sets, so eight more spreads. Inhale and exhale and you're trying not to wobble around. Inhale, tense through the core. Exhale, hug into that little ball.
Hundred Variation
Breathe in again and breathe out for more. Inhale and exhale and inhale and exhale. Very strong arms. Tense your triceps. Inhale and exhale. Reach your head to the ceiling. One more breath in. Big exhale out unrest.You should be a little bit warm, even up on your knees. Okay, remove the ball and we'll set the ball down to the side. The next exercise in the mat series is the role app. So I will do the modification for diastisis rec tie first and then I'll show you another variation to do if you don't have that issue. So come on over to the wall. I'm going to use this nice post here for this purpose.
Stand all the way back against the wall, pressing your heels into the wall and measure one foot length distance away from the wall. You can stand with your feet parallel and hip with the part or heels together, toes apart, whatever feels the most stable for you at this time. So I'm going to go to parallel. Then feel your back of your head against the wall, your upper back, shoulder, ribs, and your pelvis, and then 10 surround your course set. Again. Take an inhale, lift your arms shoulder height. Imagine you're lying on the floor. As you exhale, Tuck Your Chin and as you round forward, your abdominals are trying not to let your back come away from the wall so they're really pulling in, but you're not rolling up against gravity and go down as far as your hamstrings.
Roll Down
Allow you to. If you touch the floor, use that as feedback to lift up your waist and your ribs away from the floor and then roll back up. Use Your abdominals to pull in and press each vertebra into the wall. As you come all the way back up to that start position, lifting the arms. Inhale, exhale, round forward. So this would be very easy to just flop forward to train your abdominals safely with diastisis.Keep pulling them up and in even as you're going forward. And then inhale the bottom and exhale as you roll back up and bring your arms to shoulder height. So keep doing that. If you're working with the diastisis and then if you're not, this is what you can do. So use the theraband to help you in your roll up because probably your abdominal muscles are still weak, even if you don't have that split. So place the theraband around the balls of your feet.
Roll Up Variation
Hold up on it a lot or more. For more help, less for less help. Head is down. Elbows press into the mat and shoulders open. Inhale on your exhale, lift your head and shoulders and pull on the theraband. Push down with your elbows to help you roll up as you come forward. Keep your elbows by your waist.Bring your head to your knees and then roll it back down. Your elbows are going to touch the mat. That will give you a little bit of help and lower yourself down. Inhale, exhale. As you roll up. Inhale as you round forward. Exhale as you roll back down.
Inhale at the bottom, do two more XL Rolette rounded over. Inhale, and then exhale as you roll down last time. Inhale at the bottom. Exhale as you roll up. Inhale at the top and exhale as you lower back down using the elbows and the abdominals to guide you back down. All right, now I'm going to slide forward a bit so I don't end up off my mat, but from this position of just coming down after your roll up, slide one foot out of the theraband and take your leg to the ceiling. So this is single leg circles and everyone can do this exercise in this fashion. Choke up on theraband a little bit just to make it a little tighter and then plug your elbows down into the mat.
Single Leg Circles
Hard flex both feet and cross your leg over to the left side. So pause here and really ground that right hip down into the mat. Tense around your waist and your Corset, and then circle the leg as low as your abdominals can control the movement around to the side and back up and they get crossover. Circle around and up. Keep going. So the theraband is assisting the weight of your legs so it's assisting your abdominals so that the leg is not so heavy.And do one more circle across around enough. Then reverse the direction. So five circles each way. One circle down, across and up too. So I'm going to start to make mine a little bigger because I can maintain that range and it feels good to stretch and work in the hip. One more time. Okay. Then bring the other knee in. Stretch that leg up. Switch sides, lowering the right leg. Keep the left leg up, cross your body again, pause for a moment, really ground in the left hip and then begin your circles.
Single Leg Circles
Five in each direction. Inhale and exhale around and up. Inhale, exhale. And you have to work really hard to keep the backs of your ribs on the mat and to keep your whole pelvis secure on the mat. Reverse direction. To the left. Five in each direction. One circle around and lift to circle again.
Three, two more, four last time.
There's a version for if you have diastisis and then there's a version for if you don't. So we'll do that. Now you will need the squishy ball again and no theraband. So if you did have, if you do have diastisis, then you can just stay on your back, right? You finish the single leg circles, put down the theraband, grab your ball, bring your knees in towards your chest and place the ball between your knees and you're going to keep your knees in. So do not bring them to tabletop. That might stress your rectus a little too much. Your hands go by your side. We're basically working the obliques, so instead of the crisscross cross or something like that, we're doing this here. Squeeze the ball, pull your knees into your chest, reach your arms nice and long. Get a core set around your waist.
Supine Side Bend
Inhale on your exhale. Pull your right hip to your shoulder and reach your arm forward in the opposite direction. So you're using your righto bleak in how? Back to the center. Other side. Exhale, squeeze the ball, reach your left arm forward, pull the left hip towards your in held back center and Exhale, do the right side. Again, this is very challenging on your side body. Inhale, come up and exhale. Reach the left arm forward. Pull the left hip towards your shoulder.Come back to the center wall and let's do one more on each side. Inhale, exhale, reach the right arm, pull the hip up, inhale center, and exhale. Reach the left arm and pull the left hip up and inhale to the center and then you can release your legs down. Keep doing that a few more times. If you want the alternative exercise, then you would stay seated upright. Place the ball between your thighs. Again, I call this exercise. The elbow slip. You hold your hands behind your thighs, your knees are about 90 degrees, you roll back until your elbows are straight, so that's an important setup placement.
Half Roll Back Variation
Then bring one elbow at a time right underneath your shoulders and you should just be propped up the length of your upper arm. Press into the ball, push your abs down towards the Mat so you are in a very deep curl. Then one arm at a time. First, try not to move anything except the right arm. Slide it out and reach behind your knee and then pull that elbow back. Then the left side, squeeze the ball, slide the left arm out towards the back of your knee and pull that arm back and keep doing that. If you need one arm at a time, stay with this. If you feel like you might be able to do a little bit more, you can do both arms at the same time.Slide both arms out so I'm not moving my upper body at all. Pull it back. This stays still slide the arms forward. Pull the arms back. This is very intense work and your rectus in your course. Slide the arms forward, pull it back. Let's do three more of these slide forward, pull back.
Inhale, slide forward. Exhale, bring it back one more time, slide it forward and bring it back. To get out of this position, slide the arms forward again and roll yourself up to seated, sitting up nice and tall out of your back. Okay. And if you don't have diastisis that side, bending one is also great for you too. So you can do both of those exercises together. From here, we'll move on to our stomachs. Now to get a little backwards, starting with the Mini Swan, so you may be tender and you're the front of your body depending on if you had a c-section. If you're breastfeeding, you also might be tender on your upper part of your body. So be careful here as you lie down.
So I placed my hands right by my ribs and don't actually put my chest all the way on the ground and then separate your legs about hip width. That's just to release any tension on your lower back. Press your pubic bone in towards the Mat, engage your abdominals and then use your arms to give yourself a little boost. Gaze forward. Only come up where it feels okay and then lengthen your legs and lift your legs a little off the mat maybe. And then lower the legs and lower your upper body.
Prone Double Leg Lift
And again, press to lift the upper body. Lengthen and lift the legs a little, lower the legs and lower the upper body so you're always helping yourself with your arms. One more. Lift up, lift the legs lower and take it down. And on your final one, reach your arms back behind you. If you can interlace your hands together, it feels so nice to open the chest and just lift your chest and lift your legs. And it's really more about the equal lift on the front and the back.
It's not about a huge extension through the upper back. You just want to fire up the muscles in your back body. So you will hold here for 10 20 seconds and then you release the arms here, pushed with your arms and sit back into child's pose to release the back body.
Child's Pose
Make a fist with one hand cup the fist in the other and I find it more comfortable still right now to have my legs a little bit apart. So this is different than normal where they would be pressed together. Um, it's also kind of Nice if you want to use the squishy ball between your inner thighs just to give your inner thighs something to squeeze and start toning that area on the pelvic floor. Again, push the floor with the arms, open the chest, press the ball with your legs. And then Ben, one leg kick, kick and switch, kick, kick and kick, kick, kick, kick and keep the kicks going. Try not to move the pelvis pop. Try to tense around the core, push the mat with the upper body. Breathe in and out just as normally as you would. One more each side and then rest.
Single Leg Kick
Place your hands back on the mat and sit back into your child's pose. You can move the ball out as you take a little breather. Okay, now flipping back over onto your back.
Child's Pose
Anytime you're squeezing the ball, pull up and your pelvic floor as well. All of those muscles need to come back in line online. Now place your arms by your side. Your legs are hip width apart and parallel and your heels are almost where your fingertips are, but not quite there. Squeeze your glutes. Start to tip your tailbone and roll your hips up. Ideally, create a straight line from your shoulders to your hips, down to your knees. Hold this position and press the ball firmly.
Bridge
Take an inhale and exhale. Roll down from the sternum, the ribs, the waist, the hips on the release the ball a little bit. Inhale, exhale, squeeze the ball, squeeze your glutes, roll your hips right up, holding at the top. You want to really feel the glutes squeeze. The ball is squeezing, the chest is opening and lower down. Let's do one more of those. Inhale. Exhale, squeeze the ball, squeeze the glutes, rural yourself up, creating that straight line, shoulders to knees, and then exhale as you lower down. That's enough for you. Then that's good. If you want a little bit more challenge with the shoulder bridge, remove the ball and put it down there.
Bridge w/Single Leg Lift
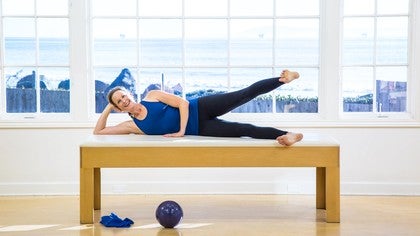
Then same idea. Roll yourself up. Create that straight line, shoulders, hips to knees. Try not to move anything in your body, so that means you have to squeeze in, engage, tense your waist, push the floor with the arms, pick up your right foot and inch, and then switch to the other side. And this is fantastic. Stability Training for your whole core and it's still hard for me now and it's great after you've had your baby and keep going.So let's do one more on each side and then we'll do fast little marches to the count of five, five, four. I'm trying not to move this three, two and one and then roll down and it's harder than it looks. All right. After your shoulder bridge, you can move on to sidekicks. So strengthening your outer hips is also important after having your baby. So line yourself up with the back edge of your mat and bring your legs forward to the front edge, stacked on top of each other.
Place your hand right against your abdominals. This is to remind you to course it. Use that course that even here. Flex your ankles, push out through that top leg, and then lift your top leg about two feet up and lower it down to hip level so you lift up and lower and it's just where your leg can lift without moving your pelvis at all and lifts. We're doing 10 of these. That was four and down five lift and lower six everything is stable. Seven you're growing tall through the head. Eight, two more times hard.
Side Leg Lifts
Flex those feet last time try to hold. It's going to be getting tired here and do your little circles. So about the size of a magic circle. You'll circle the leg five times one direction and then five times the other direction trying not to move the pelvis or the waist. And then you can rest your leg for just a moment. Okay, good.
Side Leg Circles
Now the front and back. So lift your leg up, point your top toes, kick front, front, and lengthen back. Front. Front. Lengthen back. And here you're tensing around the waist. Try not to move the upper body at all. You're pressing down with this opposite leg into the map and you have four more. So 10 sets of this kick. Good. Three more.
Side Kicks
Breathe in and out. And last one, kick, kick and kick, kick. And then return your leg home. All right, take a little break. Give a little pat to your hip. We have one more variation, which again is just for the outer hip. Lift your leg to the height of your hip, and then turn your leg in and turn your leg out. Turn your leg in and turn it out.
Side Leg Hip Rotation
So you're rotating your femur in your hip socket and you're just getting lots of little muscles around here, working them because they haven't been working very much lately. And do two more. So about eight to 10 of this rotation, and then rest your leg. Okay. And then you'll roll to the other side or sit up carefully and flip over to the other side. So again, line your back body up at the back of the Mat.Move your feet to the front, place this arm right in front of your waist. To maintain your core, lift your top leg and just lift and lower for ten nine, eight, seven you're always trying to reach out through that leg. Five four, grow taller, three, two and then hold the leg here. One little circle. Circle around for five, around four, around three, around two magic circle size one reverse. Go behind the bottom leg and in front of it. Good. Three, four and five. A little breather for a sec if you need.
Side Leg Lifts
And then you have front and back. Eight to 10 sets point the top leg lifted up hip level and kick one two to the front, one, two to the back. Kick, kick and kick, kick, kick, kick and links and long you're trying to bring back that links into your body and the connectivity of your core. Breathing in, breathing out three more and reach back front, front length and back one more. And then return your leg center and let it rest down. Give your outer hip the little pet, and you have your final rotations. So hard flex. Lift your leg up to the height of your hip, rotate in, rotate out, turn it in, turn it out.
Side Leg Circles
And you're really trying to get your full range of motion in your hip socket without moving your pelvis. So it's literally just your femur turning in and out. Three more, three and two, and one more and lower down. Good. Now the luckiest thing about this mat is that you don't have to do a teaser that will come, but maybe not in week six or eight just yet. So the next thing we're going to do is actually lie back onto the stomach again.
Side Kicks
Side Leg Hip Rotation
Put them down right and left. Return left arm, right leg. And you can keep going like this. Or if you feel like you have more in you, you can actually start swimming and go a little faster. As you inhale and exhale, you're thinking of length. Inhale. Exhale. Not a lot of heights yet.
Swimming
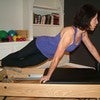
One more inhale and exhale and rest. And if the arms don't feel good, cause sometimes the upper body is still not in, you know, working like that. You can always rest your forehead on your hands, lift the legs and just do the legs just to get again, some more action and activity in the back body and then press back to a child's pose. All right. You're a lucky duck if you've gotten this far and your child hasn't needed something. So the final two exercises, push up is the first one, and I'll do a modified version first, especially if you're still dealing with diastisis and then a more challenging variation. So you reach the arms up to the ceiling, round yourself forward. You can bend the knees, place your hands on the mat or the ground, and walk yourself forward until you can put your knees down and then walk yourself out into this modified pushups. Do you want a straight line from shoulders to hips to knees tense around your core, bend your elbows and lower down wherever you can. Take that straight line and press yourself up down and press up.
Modified Push-Ups
Inhale, lower. Exhale. Let's do five here. One more then. Okay, come back. Just push your hips back. Walk your hands towards your knees, roll onto your feet and roll yourself up. Reach your arms to the ceiling. I will now go to the more challenging variation, but keep up with that first one. If you need to rollover, walk yourself out so you come into a full plank. You can hold full plank or take your five pushups, shift forward a bit, then the elbows and press up for five for 10 seen around your core three shoulders. Draw down to one more.
Push-Ups
Lift your hips. Walk your hands back towards your feet. Softly. Bend the knees and roll yourself up. One more time. Inhale, exhale, round forward. Put the hands on the ground. Walk it all the way out. Hold or five push up. Yes. Five, four, three, two and one. Lift your hips and walk your hands back softly. Bend the knees, rolling yourself all the way up. Lift the arms to the ceiling and exhale down to the side.All right, you're on the home stretch literally cause we have the x stretch for the final exercise. So oftentimes this is done on Relevate or on your toes. I suggest not doing that just for to keep your balance. Again, you might be a little dizzy still with the sleep deprivation and whatnot and the lack of stability. So stay flatfooted, spread your legs nice and wide. Reach your arms wide. You do have to lift your heels slightly just to rotate. So you want to rotate your body all the way around.
Standing Twist and Reach
So my toes are now facing the complete opposite direction. From here, you keep rotating your body, so your right hand is reaching towards the same foot. Your right foot, your left arm's up. Then you return bringing yourself back to where you started. Then you twist to the right this time, make it so all 10 toes are facing back. Keep rotating, reaching your left hand towards your left foot, right arm to the ceiling. Undo it and come all the way back around.Now I'm going to turn around so you can see it from the other direction. So I'll go to the left first. I rotate all the way forward. You can see this leg, the front leg is bent, and I just keep twisting, reaching right hand to right foot, left arm up, come out of the twist. Other side, twist to the right. Get all 10 toes facing back. Keep rotating all the way around, hand to left foot. Bring yourself back around and then bring your legs together and you are finished. Great job.
Postnatal Pilates: Postnatal Mat Pilates Series
Mention
 |
Carrie Macy Samper (Teacher) |
 |
Hannah L |
 |
Viola A |
|
|
Chelsea B |
 |
Margie N |
|
|
Emma W |
 |
Maryam |
 |
Lynnette G |
|
|
Aine B |
|
|
Kelly A |
|
|
Charlotte A |
|
|
Lori |
 |
Deborah Wasko |
Comments


You need to be a subscriber to post a comment.
Please Log In or Create an Account to start your free trial.
