Description
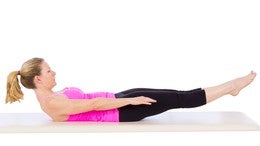
Muscle Focus: Abdominals.
Objective: Strengthen the abdominals, increase breath, and warm up the body.
Reformer Setup: Start with two to four springs. The footbar is down.
Start Position: Lie on your back, holding the handles in both hands, and bringing both knees into the chest. Reach both arms straight to the ceiling. Curl the head and shoulders up, while pressing both arms straight towards the carriage, and reaching both legs straight and together at a high diagonal.
Movement: Pump the arms as you inhale for five pumps and exhale for five pumps. Repeat nine more times. Ensure that the abdominals stay drawing down towards the carriages with the shoulders depressed as the arms pump. The neck stays in line with the spine as one unit.
About This Video
Transcript
Read Full Transcript
Hi there, we are here looking at the hundred again. Um, I say again because the a hundred is one of those quintessential PyLadies moves that is going to be in just about every class, whether you're on the Cadillac, whether you're on the reformer, and certainly if you're on the mat, um, we do have a few tutorials on our site that we'll go more into depth on the house or not the how, but the why and the how of the the hundreds. So be sure to check those out as well. But what I wanted to do today is to take the the hundred and put it on the reformer and give people some other alternatives if they're not quite ready to do the whole thing and to point out some really key things that'll make your hundred a little more successful. Um, if you could email me, would you just go into the a hundred however you want to. There's a few different ways, right? So that's why I'm not really going to be particular.
I just want to remind you what the a hundred basically is, right? It's an abdominal exercise primarily. Some would say it's more of a breathing exercise. That's what I tend to focus on cause that's what I need a little bit more of. The, the name of a hundred is five inhales to five exhales over 10 rounds, which adds up to a hundred and ideas that you're heating up the body.
You're getting the good air in letting the bad air out. So thank you. You can come on out of that. Now here's the thing, who knows, which we don't know what kind of reform you're on. We're on a balanced body right now. We also have a lot of growths reformers in our classes and it's a very different spring set up. So that could be confusing in general. Well always you want to be successful with your move.
So the two questions you might ask is, am, are, am I challenging this breath? Am I getting a full breath without sacrificing the position? That's one question you could ask to know whether or not you have the right spring tension. If it's too heavy, something needs to be adjusted most likely. Okay. Um, on the grads reformer, it is heavier springs for springs, but it's not that straight forward in terms of oh well then that one's obviously harder. Um, it has a little bit to do with the mechanics and that's a whole different tutorial. The point being is that when you curl up against that resistance, you need to be ready for it. You need to know it's going to challenge you differently than we'll be on the map and, and to adjust for it. And so it's just a new way or a different way of practicing that.
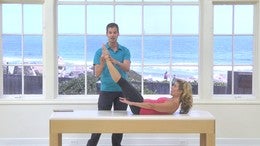
So sticking to the, the reform that we have in front of us, I have Amy on a red and a blue spring, which basically means for this exercise, for the body part that's going to be attached to those springs, which is really all of her [inaudible]. It's medium could be construed as heavy. I could take it lighter. Okay. Um, if I were on a garage, I would still, I would use all four springs frame you, she can do it. She just has to know what's coming. Okay. So I have her on that. Wait, I'm getting into this. If you've never done it here, whichever reformer you're on, just make it medium or heavy. Bring both knees up and I'm going to have her start with her arm straight.
So this is just a bit of a setup. Her hands are in the straps and you notice she's not gripping the handles. You could, um, if you have a wood bard, sometimes they encourage that. But I'm saying not so much at the moment because I want her to feel the weight of this strap from her hand transferring all the way down into her shoulder and ultimately her back cause she needs to work from the center, right? Isn't that what we're here for?
So if she were really focused only on our hand and didn't have that shoulder kind of connected, meaning somewhat down, just active, not excessive, it becomes a very different exercise. It goes almost instantly to your neck. So make sure you have that one test you can do is exhale, just the arms down, no head coming up and just feel or notice that the shoulders don't pop. Can you show what that would look like? Yeah. So then when your hands go down, your shoulders don't come forward. They stay down. Keep going, just maybe back and forth for a few and now doing a right thank you. And notice she's not going all the way to the mat. It's not totally unheard of for people to cue your hands all the way to the mat in class.
But generally the hands are even above the waist or at least in line with the shoulder. So you avoid that and you can really work against that resistance better. So the way I would get into this, if I wasn't sure about all that is I would do exactly that same arm position, but this time, curl your head, neck and shoulders up, and then let's just stay there at this point. Now you've got that weight on you. For some people that makes it easier to have something to push into, to reach into. That kind of gets your body going in the direction it shouldn't be. Right?
So that's good news. If you're letting it push on you, you've got to take charge, you've got to bring it back. Okay. So now she could start those pumps. You just inhaling for five and exhaling for five. Right? You can also challenge the breath differently, right? Or, or learn the breath by maybe not going all the way to five. You could do in for two out for two to build, build that duration.
But over time it's meant to be long, drawn out, breaths on each round. All 10 rounds. Okay, so that's one option. I mean she doesn't have to worry too much about her back. Come on out. So far so good. Okay. Now we'll do the version. That for me would be the next step up.
It was to go from the same start position, but as she curls up to extend her legs on a bit of a high diagonal keeping the center of the pelvis basically neutral. Right? So you're not going to arch your back when the legs go out. You've got to watch for that. So she shoots her legs out and then I'll stick it right back down. Just Yup. Just making sure it's all good and come again. Prove it to yourself.
This is good work right here. If that's all you did, we'll stay up on the next one. Of course, you know what that looks like. And then beginning the pumps with regard to the height of the leg. Right? Of course, the lower the legs go, the more challenging it is against your center. So you're going to watch for that. Mostly you can feel it right, but if all of a sudden your abdominals pop up, bring it back, bring it back. It's not worth that right? Let's work efficiently. Um, if you've done six rounds with the legs long and low, start bringing them up.
If you get tired. This is all about building our strength and feeling good about the work we did when we're done. Take a break. I think the only last one I want to show is the more commonly used traditional arm position and leg position. Um, the arm position before we stretch out all the way is just to have the elbows close. Um, this, this is assuming that you already know that, uh, connection. The short, you can feel that your shoulders are already down. You have some energy in your back, even though that's not technically what's working, you're ready to go. Um, you could start there and just do what the versions we did before, but even more traditionally would be to have the legs stretched out over the bar to start. Yep. So you'll see this often. Okay. Now in this position, you know, it's, it's not quite a straight dead lift of the legs, right? She's energized.
She's already thinking I'm going to pick up those legs before she does. So. So everything that needs to be stable is, and it's real good preparation for so many other exercises. So with that in mind, we'll start here, go ahead and Xcel, she's just gonna kind of pick herself up all in one shot. And there you go. I think you know the rest of it. Amy's probably tired of that, but good breathing. So keep practicing, let yourself very things, keep yourself successful by paying attention to the resistance against you, work with it. Um, it's there to help you and then get back to the mat and see how, how it translates. Cause that's where the real work happens is on that. Matt, thank you.
Comments

Thanks Pilates Anytime


You need to be a subscriber to post a comment.
Please Log In or Create an Account to start your free trial.
