Description
About This Video
Transcript
Read Full Transcript
Chapter 1
Reformer
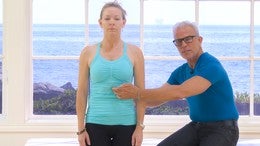
I'm Ken Gilbert here at [inaudible] any time. This is an extension tutorial from the one that I did call the five pointed star where we're working from this place of the center core. This routine that I will be doing here is not intended for a workout, but more intended for teaching and education about how the five pointed star relates to the work of the base, the feet, the legs, a little bit into the core and then into the upper extremities for the purpose of understanding where that center core is. So play with me on this and just pay attention to how I'm working from this zone of the spine. The bottom of the xiphoid process, the bottom of the rib cage where the arms and legs come together, transect with the neck. So as I go into the foot position of prehensile want to play with the midline, the midline is the dropping of the sacrum down onto the reformer, the dropping of the rib cage onto the reformer and the back of the head, keeping the front of the throat open, want to play with the midline.
So just I like to rest in this position here. Getting the sense of the toes, reaching over the bar, feeling the lower back, lengthen, not compressed down into the reformer but to lengthen. And now here I've connected my legs, right, they're connected to my legs into this center core. I can play with the arms here if I want to. Reaching out. This is a big breakthrough for me to understand how the chest can open with the width of the shoulder pads that I can stabilize. Shoulders and arms. And here's the five pointed star crown of the head, connecting the base of the neck, which is located here between my finger and the back of the reformer.
My arms are connected to the back of my spine, arms connected to the back of my spine and lace connected to the front of the spine. This idea of that this is the top of my legs, the back of my rib cage as the bottom of my arms, and then my neck is located between the two. So we'll be playing with this as we go. So heels down for the prehensile and a play with just to warm up a little bit of a, the joint action here to find that lengthening of the lower back and then zipping up as I love to say, zip the pubis to the naval naval to the sternum, and then sternum to the maneuver. Eum. Now my core is more active as I linked them. So then here at prehensile we can go into the basic legwork of, of reaching through the heels, keeping the prehensile of the toes, reaching over the bar. We go into the Relevate here. Same thing.
We're keeping the relevant heels high. Ken Gilbert has a philosophy about women needing to wear high heels once a week. Find a group of women where you can all go out and have fun wearing high heels when where your pelvis is in relationship to your feet and legs. Then we can play a coordination skill of reaching. All of us is coming from the center core, so I'm giving attention to the details of my foot placement, details of my toes, details on my ankle above the knee, high in a thigh, playing with this as I work the legs to the center core, so playing with that. Then I can go into the high heels and leave that alone.
Pulsing up to create a little bit of dynamic into the Myofascia. Again, going into the heels, lifting into the center core, so then playing with the idea that we have these five different foot positions, flexing the feet and then returning onto the heel centers here working. This is a challenge for me, particularly in the aging body. Now that I can admit that I'm a senior at 65 to reach the base of the big toe away, the little toe back, and then going into the leg extensions with the flex feet. Hard flex. I like to call that heart flex. My wife being a dancer has taught me that there are certain details to play with the feet. Hard flex is one that we want to activate.
One of the first things that starts happening in the aging processes. People forget to activate their ankles. Now my ankle is connected to my center core midline plum line, all of it in relationship to the center of the star. Then I like to play with this at the top. This drills out the Tibialis and so we can play with that a little bit there.
Even that sense of the feet extending from the ankle and then the ankle holding the legs. We can play with this awareness of the five pointed star and then returning. Then the narrow turnout. I don't use the term Platas v narrow turnout flex. We just did a narrow v when I was in my training program with Ron Fletcher, so the Narrow v, same thing, keeping the heels pressed together.
Now I'm at my center core pubis, the Navel Navel, the sternum and then Stern, the new moon maneuver, IOM and crown of the head. I did another tutorial about the Halos of the spine, the hips, the base of the rib cage, the shoulder girdle and the eyes getting older and my body. I realized that peripheral vision is really important to understand proprioception. So not only am I using my skin, but I'm using my joints and amusing my muscle to give me a sense of where I am in space and time so that I've learned through my body awareness that I can become precise about knowing where my legs joy my spine. Pivoting into parallel, reaching the arms up over the shoulders, heels go under. Now I want to be on the base of the of the The d, The sacred. I say sacred down, meaning that the tip of the tailbone is reaching towards the heels. The heels are under the bar, so the tip of the tailbone is reaching down there.
I am at the center of the core. If the inhale is this, the exhale is to reach and because their breath from Fletcher work
When I'm learning to do is to ask people to go to tiptoe and then to not wait the feet but give the feet weight, which is an oxymoron. However, what will happen here is moving from the base of the rib cage, I'll do it toward the weight from the camera first I roll to the side of the foot and I don't want to smash the foot. I don't want to shift the, I'm not shifting the knees, they're staying in parallel with each other. Now I'm on the side of the foot. I don't want to smash, but I do want to give it weight. Then reached the knee over to the wall is I'm going to touch the wall toward the ocean.
That's the initiation of the movement and I roll again to the center. Then going off to the other side so you see it from this angle to not squash the foot, but to give it weight without smashing or sliding the foot off and pulses. It's if the knee is going to face the camera
Reaching through the middle finger of this arm to give it even more challenge. Don't have to go this far with it to not fall off the bar as I just started to do and to reach the leg, the big toe to touch the wall, the middle finger to touch the corner. Couldn't do as many pulses as you want. Just to get more activation into the Myofascia. I like to bring the leg in first, bring the body to center and then to return the arm.
So to go the other direction, it's rotate first, let the arm reach that gives it balance. The leg reaches out big toe to the camera, middle finger to the corner. This is opposing forces in action.
And so finding that center, dropping the sacrum down, turning out and opening out to the side center. Core arms could be out here if you want to play with it. That's a good adventure or anchor here if you need to. I like this because it keeps you more aware of the spine and pulsing out to the side. Flexing and pointing. We can go through that drill or just get on with it here to place.
This is one of the favorite things that of about the uh, the work that I learned from Fletcher with. We got to play with a fully opened turnout in memory of him. I remember he would come over and hit the inner thighs and click good work and I always loved that endorsement. So I always give that endorsement to my students finding there's the five pointed star, so the needs are reaching out. This is a good challenge to give up mobility in the hips, they external rotation and internal rotation and opposition to keep the knees reaching out. We can always play with it this way.
So He'd give it to the dynamics through the arms and play with it. Many different ways to get that sense of where's the neck and show in relationship to the center core, the arms and the legs and we can play with it in many different ways. So there's the five primary lake positions we close parallel and then open again. Feeling the feet on the floor is really, again another part. This is a great dismount for anybody who wants to learn how to stabilize from the center core here to learn how to use the five point and start have orientation to new places in the in the room. We don't sit this way. I, I've been playing with this in many different ways with the leg straps, all sorts of things that are evolving as I learned to to acknowledge that this is where the power centers coming from as people work through the reformer into their spine.
Chapter 2
Ped-o-Pul
I'm Ken Gilbert and I'm here doing an extended tutorial on the pedicle. The pedicle that I'm more familiar with is one mounted on the wall, so I may have a little bit of centering that I have to do with this one. It's free standing. However, some of the same principles of the five pointed star that I give in a tutorial is, well example of exemplified here on the pole. So the idea of the five points being the feet, the hands and the head. So we're playing with that in the sense of upright.
I'm still recalling the very first time that I went under the pet. Napoleon and found that this is not a way that I'm going to stand. It's a an extended spine on the pole. The contact is coming onto the pole, so I would not walk around this way. However, this is a great exercise to teach the body how to pull up an end. Here's the example of the legs coming into the center of the five pointed star example of the arms coming from the back of the ribcage, the five pointed star, and they had been balanced on top of the spine. This is a great opportunity for me to review this idea of the five, the four Halos, five Halos in all. When we do an upright stand, however, with the core of the body, we can play with the specificity of the eyes hovering with the shoulder girdle hovering, so the clavicle itself, like a balanced beam as well as the rib cage. I love this.
The bottom rim of the rib cage is what I'm referring to more and more there, which brings us into the center of the core and then the hips, hip to hip. So as we play and come up, the turnout is best in this allows us to open up the sacred a little bit in the back. So we're going through the plea a and coming up. You can then activate more connection to the center core. That's what allows me to lengthen the pelvis down. So this sacred was actually scooping down and forward and working up into the rib cage, get involved in the Serratus, the four primary abdominals, the trans versus the Rectus Abdominis, the internal, external obliques, and then the [inaudible] here. So right, it's on the back and on the back we're also dealing with the QL.
And here's a good example of how we can lengthen the so as joining the front of inside of the, the femur coming from the lower back. That allowing me to find that sense of center core from the back and the front simultaneously. So I like to play with this in many different ways. So adding the springs, we get into a possibility of stabilization through the arms. Now this gives some feedback by Q that I enjoy giving to any client, whether they're advanced or or new to my work is that I like to get this idea, engage the arms, engage the arms. The terrorist major is a stabilizer. It's like a support of the arm as if it were shelf off the wall. So stabilizing, engaging the arms here, the rotator cuff is, is working.
I like to spin the elbows out. That allows me then to lengthen and widen through the shoulder girdle play and coming up. So this is now all connected to the center core, that place at the bottom of the sternum. The play with these five appendages working in unison and systemically. Then playing with the [inaudible], breaking the heels apart, being sure to do that. So staying on the ball of the foot, not rolling off the feet, staying on the ankles and then heels down. So we put it into a combination. It's the plea, AA, the relevant into the extend or I say extend a and then heels down.
So that's a routine that allows stabilization of the shoulder girdle. So working from the center of the five pointed star, the PA, the relevant, a being sure to be on the ball of the foot and then heels down. Then the reverse is always a challenge in another way. Going onto the Relevate first, finding the ball of the foot, not falling off the ball of the foot and the EA and then the heels down. This is a challenge that the as wants to pull the legs in to keep the legs reaching out and then extend up the spine so it's irrelevant. The Plea Pa, this is great for people who need more mobility and stability in their hips and pelvis.
Heels down to keep those knees spun out and then coming up the spine so it depending on the skill level of the the client, many people can get into more of a grom play with this where they get down even deeper and deeper. However, that's not necessary. It's about the spine and playing with that awareness through the feet so the feet are more stable. This is inviting that high heel work. Something that has just come through over the last few weeks is this idea that we can play with a awareness of the upright, so this is a an extension of the spine. We can play with side bending. I like this using this, keeping the head and relationship to the bar, keeping the sideband coming from the Serratus area into the side of the spine, the lateral flection keeping this centered here, so I'm working the five appendages simultaneously. Even the passive appendage of this arm is for balance.
I don't have to put it out here. I can, I can put it out here, but then I'm having to levitate through that. That line of the clavicle. So here just allowing to hang or to be on the connection to the body. Depends on what, what I'm feeling, how I want to connect with that midline and returning to center. So different than a side bending. That's free standing. You'll see that in some of the other standing classes that I do.
This has a different sense of of balance. Keeping the shoulder down the neck, outside of the shoulder here so it's not caught in the shoulder, it's outside the shoulder and returning to center, playing with the midline. The tendency to is to come away from the pole and to stay with that relationship as if this were a wall, not just a pole but a wall. And really finding this idea of opposition. We can play with all sorts of opposition forces playing with different things with the arms. So that's really an adventure that you can start to play with as you have confidence with that.
The five joints joint actions of the spine. So we've done extension and we've done side bending, we can get into a flection. So this is a classic, more of a classic way of rolling down. I'm engaging the arm so I stay aware of the the shoulder girdle in relationship to the diaphragm rim or the lowest rib coming down to the top of the sacrum and then rolling up, pulling the lower belly in and up, zipping up the front, the pubis to the navel, keeping the spine, one of the classic one vertebra at a time, except for the cervical spine. What's fun is in Australia I would say survival. I would not say cervical. I would say cervical as I was in Nia trainer for 11 years traveling down to Australia.
I was corrected one time when I said the cervical spine and they said, here, we don't say that, so it's the lumbar is lengthened, it's not flattened, it's lengthened. There is a slight tilt, the pubis to the navel and then coming up into the thoracic, the 12 vertebra of the rib cage, and then the cervical spine does not touch, but the back of the head does. So playing with a forward flection, people who get confident with this can start playing. Then with the hinge, so now I'm an extension. I can go into an upper back extension here, keeping the pelvis connected to the the pole, playing with this idea that the five pointed star is always in action. Here's this articulation. Then through reflection and coming up, lower belly, pulling in and up, zipping up the front. I like this engagement because they know where my arms are all the time. They're not just loose. They're always reaching out. This idea that life is a pullup is here and then the possibility of doing rotations. It's a little bit limiting if we're in relationship to the pole.
However we can play with it. As we are reaching out these five points, the appendages are now connected to the center. Core. Fletcher would get us to play with things like this where we would, yeah, hold idea is to stay established and connected here so the arms are moving out. This is a great opportunity for you to have that experience of what is it like to reach out the five pointed star. Of course we don't have as much overhead because of the springs, but that limitation can be overcome when we free up the arms. So this idea of playing with palm directions, this is also very helpful.
So standing with the awareness that the all of the imprinting, that's a little bit of Eve Gentry, the imprinting of the spine to the pole as we find ourselves upright. Linkedin in the front of the throat, this opening is this front of the throat. There's a little bit of the awareness of what Alexander was teaching to not compress the throat, not to compress the throat, but to allow the throat to stay open. That's part of the theater experience for me as being an actor and wanting to use the voice and fill the space with the voice without yelling and damaging. So the pepole five pointed star, the relationship with the spine and joint actions.
Chapter 3
Wunda Chair with Handles
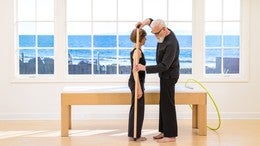
I'm Ken Gilbert here at [inaudible]. Anytime this is an extended tutorial on the five pointed star, I wanted to show the, uh, the ability to integrate the, the star notion of this center core at the, at the chair. Working from the legs or working from the base is always the start. I do have a personal philosophy that it begins from the base. It goes into the core and then ends with the upper extremities.
So that's a sequence that I'm always checking in when I'm doing my own personal work or if I'm teaching, I'm checking in with the base first and then the core, and then the upper extremities. In the theater work that we do that, we're always asking people to play with a long spine, a short spine or wide spine and narrow spine and advanced spine and a retreated spine. So those are actions that become character strategies or character behaviors. However, it's all coming from a center core. And then when they understand that we have them throw the center off and that allows somebody to then go into character. The reason I bring that up is because I started Pilati, so I'd be a better actor.
I wanted to be used my body to go off center to go into character strategy. However, I never wanted to lose who I was, so I keep coming back to who I am in the center of the work. It's a little adjunct thought on this. So playing with the awareness of the base, we're going into the relevant a, I will of stiffened this up and let's just play with that for a notion of getting this feeling of what it's like to be in the mid line. So I can feel, I don't have to look down. What I'm asking people to do is to trust the proprioception using peripheral vision, using the muscle, the skin, being aware of where my bones are in relationship to each other and trusting that I have to look at it. Cause if I look at it, it's going to be perverted anyway. So it's just something that I'm, I'm playing with more and more. So to activate here to lift, so I'm lifting through the pubis to the naval naval, to the sternum, sternum to the maneuver them and moving them to the crown of the head and being aware of the upright ankle bones touch above the knee and high inner thigh.
Then lowering the heels down. Here's the work of the five pointed star to stabilize the pelvis in here and also the shoulder girdle so that I can play with my balance. And centering, so I'm right now what I'm working here in this awareness is my midline and plumb line that I want to be sure that I'm stabilized in that sense of proprioception activating into an upright spine. Then to play with this differently, I'll go ahead and step off. Stepping off with one leg. This is a leg routine that I use a lot with people who want to find upright standing or seated this. They can use this for seated as well, but to learn how to press through the heel, staying high. I'm not doing the reps here. This is, as I said it an extended tutorial and then doing this so that I'm keeping the heel high to get that midline working, the ankle bone above the knee, high inner thigh, and then depress into the heel without going here. That's, that's an injustice to the five pointed star, so I want to come into that awareness that I'm wrapping, particularly at the base of the sternum. I'll do the other leg in a moment so you can see what's going on, so in fact, I'll do that now. So you get the sense of that what it's like returning. Again, I could always look down. However, looking down does not allow me to stimulate part of the agent in some legs are more flexible than others, so there was a little tweak there.
What I'm learning about the aging system is that this foot is not as centered today and then coming down and lifting the sternum. So life is a pull up. That is a philosophy of mine. I want to constantly pull up the sternum here at the base of the of the throat. Are those the maneuver him hitting the heel high and then the heel presses here without falling back into the so as to allow the so as to lengthen here and stabilize the pelvis. Wow. This leg is just a little more unstable today than I would like it to be, so this is good work for me.
I do have one side that's a little dumb or stupid as I refer to it. It's just that it has to be taught differently and then getting the leg to lift up. We can play with all sorts of things here. Going down and up and uh,
Then it's translated to upright posturing. Do you want to play with this now? Is that, I like to call this the uh, the swan. So there's a variation. You remember Fletcher teaching this to me getting this bar dip idea and notion of doing the elevation here and then playing with, finding the feet, flexing and pointing, flexing and pointing, finding the five pointed star here. The head is not thrown back, nor is it falling forward. It's an extension of the spine.
This is the challenge going up as the easy compared to the going down to not lift the shoulders up, to stay more centered. So playing with, and then there's always that possibility of staying here. Return to that idea of the five pointed star arms to stabilize the ice, stabilizing the head, and then coming off. I always like to step off and then continue to be in relationship with the equipment. So that's the leg work from the side.
Chapter 4
Wunda Chair
I'm Ken Gilbert here at Pius any time, and this is an extended tutorial continuing on into this five pointed star that I previously discussed, playing with how we sit. So I've done some other tutorials that are extended out of the five point of star.
This one is more about the practice of sitting upright and how do we do sitting up right when we drive or sitting up right when we eat. So other places and times, work stations. This is important to many people. And what I find happen, particularly somebody who's been traveling in their home from a distance where they've had to travel in through the flight a plane, they, they come in, they're a little stiff and sore or they're just feeling chugged. This will help them out really fast. It gets them back into the center and the awareness of their body, it at its best. So in playing with the midline, playing with the plum line, so being aware of sitting up on the sitz bones, I play with the sits bones as if I was sitting on the lip of a corrector.
This gives me that sense of a little precarious. If I sit back, I'll tend to fall back. This is the male thing to fall back into the lumbar. If I stay at my sits bones where I really play with that edge, it gives me an opportunity to feel less, um, heavy. I sit set up right, here's life as a pullup that this philosophy that I'm coming up with, I can zip up the pubis to the navel, navel to the sternum, sternum to the maneuver unit. And up. This also allows me to reach out on my leg. So the five point star becomes a much more relevant as we work. So we'll start with the heels.
So I did a little bit of a contraction back so that I want to reinvent my sits bones here, sitting upright. This is always a challenge for me. I have a little limitation in my knee flection today. I must've taken some Ibuprofen. So my knee flection here allows me to lift upright is a great way to get the lower back and lumbar on the SOS to behave. So as an interesting muscle, it does four things that will lengthen. It will shorten, it will stabilize, and then what it no other muscle in the body does. It folds on itself. So right now my, so as is folded onto myself on itself, it's not helping in any way, it's just resting. So playing with this like the hands on the side of the box, here's the five pointed star. I've got to recenter the heels.
There's always that role of the foot on the pedal.
Balls of the feet and then coming up into the upright sit. Get any of the heels high using the eyes, the appropriate section to find the middle of the bar pressing down and coming up. Once you find the center it's a little easier and I suggest that spending time with the first three, maybe five and then finishing out the set a little bit more connected to the center of the center core there. Same thing with that.
Moving the lights out, the bar he said and
A pattern here and there's the five pointed star. I prefer that we get the full range of motion going like standing up on the earth and then squatting down,
This is an opportunity for the ring,
Makes more sense to find that centering here. Good canvas is good work for me today, so being here upright, what happens is many times we get so busy teaching, we forget to do the work here and then finding the midline as well. Inner thighs are touching even though they're the ankle bones aren't touching that awareness. They don't have to be touching to touch. This idea that there's connected energetically is important. So we're playing with this
So letting the PSOAS stretch and lengthen this a cemetery of the work allows the brain to go across midline, which is very important from my point of view. It's really something we should do more often, particularly for the uh, brain past 35 and then finding that we keep that awareness with and relationship to the piece of equipment. So that is the one to chair and the five pointed star.
Chapter 5
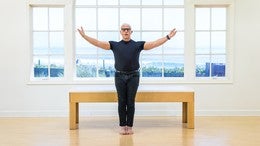
Cadillac
I'm Ken Gilbert here at bloodies anytime, and this is an extended tutorial about the five pointed star. So when I'm playing with here is the ability to stabilize the spine.
I did this on the reformer. It's as if I was sitting upright. It'd be the same awareness. I want to feel the same connection with the back of my sacrum pressing down into the table rather than tilting up. I want to reach that down into the table. So this is slight space of air between my lumbar and the table. Then I feel the back of my rib cage, not my shoulder blade is pulling back the back of my rib cage, my elbows reaching forward, which allows then the clavicle to level so that the, that halo of the shoulders shoulder is stabilized and I'm using my eyes to look up and not down. Being an extreme introvert. When I started working it was, I realized that I go in and I process my work with my head down and what I want to learn to do and what I have accomplished over the last five years particularly is that I'm looking out more so that this Halos in relationship to the shoulders, the bottom rib at the rib cage, and then the pelvis or the hips.
So that awareness is that I know where I'm upright, my posture is lifted, this is a pull up. I can actually pull up better here by doing that and then engage the five pointed star. So it's fun to play with this. Then it's the turnout of the legs and the turnout of the legs. Is that coming out of the pelvis? The leg is moving as a separate entity so the leg is not the pell, the legs are not the pelvis, the pelvis is not the legs.
And then to open a close, I can go through all of the drill of the flex and point. What I like to play with here is this is new over the last few months, is to get the leg to lower down so we can drill that we can play with it from diamond and go out and come down without the arch. Don't want to pop on to keep the spine integrated without collapsing into the table. So reaching out and coming up so the legs are separate from the pelvis and then be able to flex the feet and then we get into what I call the stirrup position here because if I was in the stirrups of a saddle, something like that, even though I'm not a writer or an equestrian question in any way, this idea of getting the heels to dig into the table, allowing that to happen. The idea is for me is that I'm working to get my legs as close to the table as possible rather than be up in here.
Here are the soul as this trigger to shorten here. The so as now his length and I can tell it's like the things my lower back wants to lift off the table but I don't let it happen. I keep reaching the sacrum down here so this is the five pointed star. I can add all sorts of work into the arms. I do have a young man that I'm working with that can actually roll up into a seated position from here. However, when others do it, it gets very terrifying because their whole body wants to do this as a recovery and that's not not healthy for the spine. So scary.
It's happened a couple of times when it's really terrified both of us, the client myself cause they didn't have the control yet or the awareness my legs reaching out this way. Five pointed star my heels going down into the floor, five pointed star. All of this connected to the center core. My arms here to stabilize the shoulder girdle. Playing with that awareness allows us then to go into a lot more versatility.
The playing with those single leg or playing with both legs, playing with this idea that we're always in awareness of this middle of the spine, getting those hips to rotate. Ron Fletcher would always talk about the rotation of the hips. He said, if we're not healthy on the hip joints, we're going to have problems in the spine, and I see that in people that don't move their sacred, so when they walk there, they're sacred, stays frozen, partly because this is not moving enough. Want to roll those balls inside the socket. That's healthier for any of us with aging people, particularly with this idea of balance and falling over our fears. They're major fears and of course then we talk about breaking hips, so the idea is to keep the stimulator, we get them muscle to tug on the bone.
We get the Maya Facia to move away from emotional, as I call them, emotional memory of holding on to allow that freedom of movement to occur. I do think that this is an important piece. I actually do this on the reformer. So imagine that your, your legs are in the straps. So the straps are lower here. They're coming from behind. So in the, in the, this is something that I can do for some reason it makes sense to me on the, the reformer. Then bringing the legs down. So we're now straddling the reformer, reaching the arms up and I can actually roll up into a seated position on the reformer. For some reason it doesn't happen on the Cadillac. I could probably work on it in the next few months, be able to do it. However, right now that's just enough.
It's a huge amount of awakening in the adductors which are used in upright standing there. We're playing with the five pointed star. It's activating the external and internal rotators. What I like about awareness here is that the internal external rotators now are stabilizers, cause I'm not activating this, I don't want to stand around that way cause that's too relaxed. It's a family tendency that my, my brothers have from my father is I do too. When I don't think about it, to stay at stand more in this awareness of kneecaps for a little safe for the knee joint, it allows us to stand, these are working, the internal external rotators are working now as stabilizers, not as movers difference. So playing with that awareness there.
Then we could always play with the diamond in many different forms. Always coming back to the five pointed star learning that the center of the spine is really the device that we want to operate from, whether we're standing, seated, laying down. So beginning with the my variation of hundreds, which has nothing to do with hundreds in a way, is about extending through the five pointed star. Here's a great example of your routine, the arms and reaching the legs. I like to to deliver this possibility with the legs.
There are five leg positions. This is lake position one, this is lake position too. I'm a little tight today being by the ocean, the lake positions three, four and then five is the most extreme closest to the table. So I like to play with that. However, when going into this pattern, when I'm teaching, I give those five legs positions of importance because it's an understanding of this, knowing that the legs are reaching out from this here, my lower back is not compromised in any way by so as really in for the action of this work here is a stabilizer to the spine rather than a mover of the legs. So playing with that notion. Then of course the arms just coming out of the shoulder girdle here so you're not pull back in the head come forward. But to reach the, the spine lifted up, the eyes are still focused out in the halo is established. So I drill it in a progression so I won't do as many repetitions as I might with somebody cause right now my outer legs are just fatiguing.
So reaching arms and reaching arms. So we usually four, eight that's enough because this does get strenuous and now adding the legs, so getting the sense of the five pointed star here, the arms and legs integrated, the head is stabilizing into the table that you might not be seeing that I am using it as a stabilizer for the legs. That's a real subtle awareness that it came to me most recently. So then adding the roll up. So we've added the roll up now into the progression. Then we'll add the arms as just a challenge and arms, arms and rolling down. This is one variation, arms, arms and rolling down adding the legs, arms, arms, arms and arms. So playing with that, it is fatiguing. So often people will just simply need to rest.
This is something that just evolved most recently and that's allowing the obstacle out to the side. So it's arms, arms, arms and return. I usually go down to the lowest common denominator when adding something new. So instead of pumping the legs, I'll add the acid, just ask the likes to be stabilizers or we will go ahead and pump the lays
So without the roll-up we can also add in the cross the cross the midline, so see if I can get there. And so it's
It's moving in the awareness of body, brain, brain to body. Then we can add the complication of
The Teacher's Corner: Teaching Tools


Comments


For the standing series in Chapter 3, it looks like Ken has one spring on the highest setting, and the second spring on the lowest setting. You usually want to have a heavy spring setting to help the body come up and down.
For the seated series in Chapter 4, Ken appears to have both springs hooked at the highest setting. Seated leg work can work well with a heavier spring setting, but feel free to lighten the load as needed here for your body.
You need to be a subscriber to post a comment.
Please Log In or Create an Account to start your free trial.
