Description
About This Video
Transcript
Read Full Transcript
Hi, I love my rib cage. I didn't always love my rib cage, but I love my rib cage. Now are all of the joints of our body. We know that there are several planes of motion. We bend forward backwards sideward and we rotate. But the rib cage, because of the design of the ribs and their articulation with the thoracic spine, there's a little bit of extra too. So you remember when you were a little girl and you wanted to look like an Egyptian princess and you know your rib, we go side to side. So that movement is really important in a lot of PyLadies exercises.
It's within the system, but sometimes I think it could be enriched more. So I came up with this little exercise sequence that we're going to do for the rib cage. And Are you ready to do it? I'm ready to do it. Let's lay down. Okay, so we're going to take a little shape like this, and I like to think of myself inside of a box. So now I will tell you the number one mistake that everybody will make, including me, you and your clients. Everybody will put their legs down here. And when you do that, you can, you really use the weight of your legs that at least that is what I think is the body's innate strategy. So you pull your legs up to here, knees opposite your hip joint, and you think of yourself in a box. And if you're in a box, then any motion that happens on the side plane, you can't go outside of your box.
So you're going to have to curve your ribcage up and down this way. That's the goal. Okay? So if we put our hands here, so if you're inviting your clients to try this one out, you may want to have them put their hands here and then as you lift your rib cage up as if you were doing the side Ben, and then you lower it back down again as you lift. Then the top of the rib cage is opening up and the hips are going to want to go down. And as soon as that happens, the arc that you had becomes a straight line. So sometimes it's just good to say, let's just do that. Let's do a couple of those where we lift and push and down and lift and push and down.
Sometimes doing what you'd like to restrict is the best way for people to notice what it is they're trying to avoid. And we avoid things for the opportunity of doing something else. So now let's keep that still with the rib cage up and let it go down and lift it up and let it go down and try to think of it as sequential one rib moving away and opening so it's not just a dip and dive and up, up, up, up, up and open. Now once you have that going, you're going to put the top of you. I like to put my fingers right at my occiput. I like to inform my body that everything goes all the way from the tailbone to the occiput.
And so I'm going to go down and you'll notice my elbow is now in a straight line this way. And as my rib cage goes up, my elbow goes up because my rib cage moved up. So sometimes people like the image of painting an arc, a rainbow arch on the ceiling with their elbow, as long as it's coming from ribcage, movement and down. And so we're going to lift now, let's stay up there and I want you to rotate, keeping your rib cage lifted and bring your elbow all the way down to your left hand and to be my right hand and then come all the way up and then lower down. So we have a lift and rotate and come back to center and lower down and the lift and a rotate and up and down. And one more.
Lift and rotate and up. Good and down. So let's do the other side. Okay. Okay,
Come back to center and lower and lift and rotate. And what I see in your body, any that's really good is you're not dropping. You're actually lowering and lift. That's good. Yes, it's very good. Thank you. And then down and one more and lift and rotate and up and come down.
Good. Now we go one, two, three, and four. Okay, here we are on the other side. We're going to add. So we had the lift and lower the lift. Rotate back and down. Now we have step three, step four, and you would always teach these sequentially. So you're to lift, rotate, press your rib cage down to the floor and rotate all the way around. So you're looking at the ceiling. So chest up, rotate all the way around, chest down and rotate all the way around. So I think of my whole rib cage as a steering wheel and I turn the steering wheel. Then I pushed the steering wheel toward the table.
Then I turned the seafaring wheel toward the ceiling and up. And I'm going to look at it and over and down and rotate. Good. And take a rest. How'd that feel? That's great. Tricky. Now see that's a quite enough, I thought that was the exercise until I saw a couple of my students come in and they volunteered to show me a new thing. That's how you get information by teaching.
And suddenly I started seeing people doing some strange things, so they were lifting up and they weren't staying in their box. Their elbows were coming out here, and I thought, yeah, my gosh, that's the snake. Lift down. Reach out to get an extension. Come up an extension, lift down. Now take that l bell deliberately outside of the box. Get an extension and lift up and rotate down and I need to watch and reach that elbow out. Out, out.
It will wonderful lift [inaudible] and up and down. And you can see why the leg positioning now is so important. Yeah, I do. Good. Oh, now for the sake of the camera, so they're, they could see both sides, but more importantly for the sake of ourselves. Yeah, we can do both sides. Yes, please. All right. Okay. So you check everything out and we lift and we rotate and down and rotate and lift and rotate. And you might like my steering wheel image of him in the rib cage and up and or you might like a flashlight on your sternum and up, down and up. Now let's see the snake, Amy down [inaudible] and up and
Lovely. Woo. That feels great. Good. So I would like you to lay down on mat right now for me. Okay. And you're in my math class. I've been in a few, yes, we've been in a few math classes. So I'm going to talk to you in the audience right now that I am a little, I'm confused about why Joe's book returned to life has the abdominals as single leg stretch and double leg stretch. Where did the scissors double leg lower lift and Chris Cross come from?
They're not in his book return to life. And I also thought that the, one of the things that really intrigued me about PyLadies in the very beginning was that Pele's didn't overuse one particular muscle group. Like Monday wasn't the but day and Tuesday, not the bicep day, that it was a total body workout and you never worked anything to fatigue. I liked that idea. So here we now have instead of the two and returned to life in the original 30 format list exercises, we now have those three additional ab series. I would like to suggest that many of us are brilliant at crisscross, but by the time we get to crisscross we are worn out with our abdominal series.
So what I've been doing lately, and some of you have been in my classes is I will do s uh, a single leg, double leg and then I will do scissors and double leg, lower lift. And then I will do the series that we just did because it's different and the body needs the rib cage warmed up. So we've just done that. Let's assume I won't make you do the whole mats here, the Ab series, but let's assume that you come to double leg, lower lift position and what the heck do one for us and I'm happy with that. Good. Now it's crisscross cross time. Let's see what happens and one and two, three and four, five and six, seven and finish and down. How does that feel? It felt better than normal. It really did. Explain how uh, yes, I, I might, I didn't, I wasn't feeling like I had to even think about neck, shoulders.
I was able to really feel the rotation in my rib cage truly just really through here. So this was one of my motivations for working on this piece of movement because I felt like the criss cross was really important and it deserved, it deserved being more than the stepchild at the end of the abdominal series. It's really important. And so if we give it that little bit of extra, not only are we inviting the ribcage into the participation of total body movement, but we're prep, we're preparing ourselves to be able to really enjoy that part of the plot. He's repertoire. So let's take some of this rib cage information to the reformer.
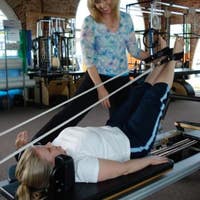
That sounds great. Okay. Can we do Cleopatra? We're going to do Cleopatra and I'm going to invite you into something special of the day that you can do. Okay. So here we are, we've brought our ribcage to the reformer. When I do this exercise I liked, um, again I'm a progression person. I like the body to be informed before it begins to, to start something. So with the, um, some of my clients are considerably older and it's really interesting doing it this way. They are actually doing incredible. I, I can't believe the kind of spinal mechanics they're doing.
So I'm going to start with this hand here and I'm going to just bring this hand over here for a minute and I'm going to repeat what I just did on the floor. So I'm going to think twist. I am thinking of bringing this corner, my right corner of my rib cage down through my left hip into, I've got a point to it, the bottom foot. So I'm really pushing into that machine. So when I'm here, the reason I have the clients do this is to feel the connection in here because this is the distraction. We immediately go, okay, I'm gonna push on this and make something happen.
Push has to be in my body. Once I have that established, then I'm going to take the position and I feel like my whole body is wound up tight. My arm is not in the middle of the bar. I prefer it in an angle of scaption for me. So from here I'm going to reach out, rotate the rib cage down, look under my back arm, keep the connection of my bottom right foot and the top right arm. And then I'm going to talk to my body. I'm going to invite my rib cage to start turning and for the turn to actually pull the equipment to the bottom.
When I go down, I'm going to start the turn in the rib cage. So here would be me pushing to make space that that certainly, uh, there's nothing wrong with that. It's just that I enjoy that. Well from my perspective up here, it's completely different. It's okay. More body, more body. How about from your perspective down there? We're going to bring her perspective, watching her do it, but yeah. Okay.
And then when we're off camera, I have to do the other side cause it's really, yeah, this is quite an amazing, powerful exercise. Okay. It is power bottom foot. Yes. Yes. So that bottom foot right through here. Okay. So let's just do the little progression. Now for some clients, if you're teaching a class and maybe you have somebody in there that really shouldn't be doing the full exercise, this is the exercise, they can participate in a group class and they can keep it right here. And I'm should be pushing with my bottom foot of it. So you're, you're feeling that there's the connection of a spiral all the way down. Okay?
So now let's take the position of the hand and the bar and you're here and you're spiraled. So for me, I will often take my hand lift up here and just use this part of my arm to kind of indicate when you feel what I'm doing here. Okay, now you need to untwist against me. Okay? Yup. And down. Good. There you go. Now start twist somewhere inside of your body. And here's where my hand comes around. And uh, yes, and down. And then as she does, I think, uh, four of these, if they're done well are certainly enough.
Don't you think? Yes. Good fee. And that's it. A little bit more good connected down here. And one more. Did you start to twist before the machine moved? I feel like I did. Did I do it again? Yeah. I think you're tired. I don't know. Let's see. I'm twisting. Okay. Yeah, there. Okay. Yeah, you were. Yeah. Thank you.
It's hard to tell sometimes. Now let's just do one on the other song. Let's do that. And I will say my input real quick while I'm transitioning. I know myself to have what feels like limited the rassic rotation and motion in general. Fluxion extension, everything. So this is really hitting home for me. Thank you. Hitting home in a good way. In a great way. Yes. You know, I'm feeling movement in my rib cage. Yeah. Well this whole body has been, I, it's been down the road a couple of times and what I'm finding about bodies is it's not that it's good for me, it's that it's mandatory. It keeps me going.
That's it. Good. And do that again now. Um, because I know Amy's body, well, one of the things I would be watching is, is when she starts to twist. So untwist a little bit on twist. Yeah. So there's a tendency, she works hard against this, but you will see clients that do that. Okay. So as much as they can keep that leg together and really bring the twist up to here. So you were doing, you were doing the right thing, but I know your body would like to do the other skewed back. Yes. Yeah, yeah, yeah, yeah, yeah. I just wanted you to show that to the audience thing. Okay. How generous of you teacher you were doing great.
And going down we learn by example teach by example. And I'm not joking and this is really, this is what's funny. I watch you do it and I think I can just see the word. I mean I can feel it in my body when somebody does this push, push, push. But that's it. Fantastic.
And you can see that that's the um,
Okay. Because this is the element of the twist. All right. So, um, the bars cause I go down, I want the bar down because, um, one of the things I want to point out, and I know a lot of people know it, but knowing it and doing it, uh, are two different things. One is that when you do this now, do you put your hand here or here up on the shoulder that's led? I've seen both. Yup. Is that when you start to do the twist? Let's say you're going to do the twist.
What you want to see is if my chest is over this reformer, it's not the arms going off in a diagonal like this. So you see, then I'm like this. What should happen is that my body stays over the reformer and comes in and out like this. See, so the only thing left then, and I just gave away my modification for the twist. Alrighty. So we're going to see how this feels to take the rib cage movement and we've been doing and bringing it into something that's super hard and letting our ribs do it for us. Good. And then start to twist.
And I have a very light touch on her, so I'm not holding her up, but I can inform her body. This is where the rib cage, like the steering wheel. And that's enough. I think you did great. Thank you. It feels great. Thank you so long.


Comments


You need to be a subscriber to post a comment.
Please Log In or Create an Account to start your free trial.
