Description
About This Video
Transcript
Read Full Transcript
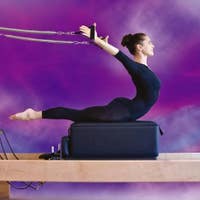
Welcome back to the discovery series. My name is Claire Dunphy Hamani and today we're going to be looking at the standing leg. I'm, we're going to be discovering all about the standing leg and where it shows up and how you can work with it. You know, because standing and posture is such a vital part of our everyday life and um, learning how to stand correctly and learning how to stand on one foot correctly has a lot to do with balance and aging well, which I'm sure all of us want to do. So we're going to look at the places where the standing leg shows up and how to help your clients or yourself tighten into it and fix it. Well, essentially there is a very reliable way to get your pelvis squared, we call it squaring the hips, but you're essentially squaring your pelvis. And then inside of that is your hip socket. So I'm going to just take off my detective hat while we get rolling here and we'll be looking at exercises on the mat, on the reformer, on the chair, on the ladder barrel.
And then we're going to have a little quick mini workout that you can do. It's only about nine or 10 minutes long to help you or your clients get more in touch with the connection of their feet to their seat. Because standing leg work and standing understanding is a connection from the foot. If you're standing on it all the way up through the knee, up into the hip on the mat work. The first exercise where it really shows up is in the one leg circle. So if you can please take your, let's see which leg should we use. We'll use this one.
Your left leg up to the ceiling. This is Alisa and who's joining me today. And this, this foot is flexed. This is the standing leg and the standing leg is going to show up a lot of time. Um, and we want to think of pulling up on the standing leg in order to help the pelvis be square. So in the one like circle two reliably squared off because this is going to show up again in the tree in the Ab series, which we're going to see.
And this is the first place that we really get to explore it. So this side is pulled up. That means the opposite side is lengthening down. So can you show me incorrectly? Yes. Where this leg is reaching but it pulled too far down and this side wound up pulling up.
Well this makes it a lot harder for the core muscles properly engage cause bones are out of alignment. So we're gonna pull up on that side. There it goes. So it's almost like you have a suspender pulling the hip up to the rib so that both sides are now equal in level. So she's got it and it's beautiful. Now what happens when we move with this? So circle the leg and come up and the idea is how do we hold this nice and still while the leg is circling around and reverse it.
So she's pulling up on the standing leg. Now in this particular exercise as we're going to see in the other exercises, hold on there, the other leg that's moving is also pulling up and out of the lower back. So go ahead and switch legs for me so I can show it from this side. So we're pulling up on the standing side, but this leg instead of pulling down this way is I'm going to put my hand here and push up into my hand. Yes. I don't know if the camera caught that, but she's now reaching up and out. So she's not like we were talking in the other tutorial of overcrowding.
She's not reaching her leg out of her back. Nice. And then relax down. So this is the first place that we see this is in the one leg circles and then it shows up again when we're in the Ab series doing the single leg stretch, the scissors and the crisscross. So let's go and take a look at this single leg stretch. So where you have, so now this extended leg is her standing leg and she's going to have to pull up on that side and length and out of this side.
And just to refresh your memory, it's the inner thighs working with the seat, working with the abdominals, lifting. They all work together in concert. And now we try to add movement to it. And let's go pull one and one direct line, two and two. And here's where you really want to hold onto it. Now let's show it where your hips don't hold on. So this would go and this would go. And this, you know, so it moves around.
So the idea is to really sort out how to hold onto that standing leg. Let's go to the scissors, a single leg stretch. And here we have it again. Pull, pull, pull, pull, pull. And she does a beautiful job showing it and then hold it there. But once again, this extended leg is the standing leg. She's pulling up, she's using the inner thighs, she's using seat, and then pretty lacks down. Okay. And the same thing would occur in the Chris Cross. The way we're organizing the pelvis in that dynamic movement, it makes a huge difference. Now here's another unlikely place where you have the standing leg, um, thing occurring. So turn to your side for sidekick series and just bring your back along the back edge of the map and your legs to the front of the map. That's it.
And back you up here. And you know she's going to keep herself pulled together here but not lifted too high and the neck is nice and long. So she's like got like her back around and imaginary wall. So what do you think is going to be the standing leg flex? The bottom foot. The top leg is going to lift in preparation. Of course we're going to reach out to the top leg, stretch it out towards me.
But what about this bottom leg? We also have to pull up on this bottom leg and often we don't really think of this bottom leg as being an active participant. So if I to have you bring your hand behind your head on this side, behind your neck, both hands behind your neck, a little lower like you're doing neck pole and lengthen, pull out. So this leg is reaching, this side's pulling up and automatically gets you into your powerhouse. And then from there, kick to the front kick, kick back, back, kick, kick.
I want you to go way back and I want you to go away, front, back, back. But stand on this leg and pull up on the standing leg. And now the movement really has a thing going on and then close, right? So that side's pulling up. Can you bring this down? Yeah. Pull up from your hip but not from your armpit. That's hard to do when you're not used to doing it that way. Okay.
So just something to think about when you're doing this exercise so that that standing leg is working for you. Come onto your back. And um, the other mat exercise we're gonna look at is the balance controls, right? So if you scoot forward, cause you're going to have your arms overhead, there you go. And bring both legs up and bring your arms back. Okay. And then bring your feet over to your, to the mat all the way down, and then grab your left ankle with your two hands and you're going to pull the heel back. Okay. Now lift this like up to the ceiling. So this gets a little tricky. It's like how do you square the pelvis in this? This leg is now your standing leg.
So you've got a pull up on it and this leg, you're reaching the heel hole. Pull the heel back and pull this back. There you go. So the standing leg is pulling back into the body while the opposite side is squaring, you feel that and now change. So there's your balance and here is your control. So this leg now is your standing leg and there's your square and change. You feel that good job. This is hard.
The trick is to let the energy go out. Pull that up. There you go. And take both legs to the ceiling and roll yourself down. So this is a couple of the places in the mat work where you start the idea of that standing leg. And especially when the legs are not together when they're apart.
So now we're going to take a look at some other exercises and we'll look at the reformer. You know, when I was starting my [inaudible], uh, teacher training with Ramana and I was surrounded by people that talk dancer talk and I really didn't know what they were talking about half the time. But one of the things that really puzzled me with this idea of stand up out of your hips, I thought, Geez, what the heck are they talking about? And so part of the conversation that we're having in this tutorial is how I've learned to wrap my head around this animal, this big animal of standing up out of my hips. And so in the reformer with the footwork, here's a place where we get to right from the foot work, really stand up out of our hips. And I use the image of like pretending that I have to like, I don't know, suspenders attach from the front of my hips pulling up to my rib cage.
That's what's happening in the front. Everything's pulling up, but it doesn't stop there. It pulls up and up and actually keeps going all the way out through the crown on my head and then down my back, my shoulder blades are going down, my is reaching to my heels. But there's this other missing piece that for me was like the magical ingredient. And that is I had to be able to hold my back up in order to make room to make this subtle adjustment down. That allowed me to pull up out of my hips. And that's gonna that starts in your footwork.
But it'll carry over to when we do the chair exercises, when we're actually balancing on one leg, or if you're working with dancers or skaters or divers or anybody who's in a, in a dynamic, they can reliably rise up and balance by just bringing these principles into play. So here's why. That's what we're going to do with the footwork. So go ahead and start reaching out and come in. So we have the rhythm and the dynamic that we all know and love without stopping. So it's one moves into the next and in, let me move you a little bit and in don't just go out and stop, reach to reach. There we go. Reach. So the driver is here, that's the driver, the drivers, not the fee that driver's not the legs and then come all the way in and we would go through all the footwork positions, but watching for that quality, cause it's easy to like push and then rush in or something like that. There's like, you know, a lot of iterations, but if you can just put your hands on people right around here and feel where the impetuses feel, where they, where the energy might let go a little bit and help them get into a jump.
But just by guiding. So if, if I have somebody who has a dippy hip, um, and I want to give them a little extra something. So during footwork at the end, after I go through all the footwork positions, I'll drop the spring load down. Okay. So you're on two springs and go out, reach out longer, reach out longer. That's it. So I'm watching the spring to see how much spring the spring can open. Can you go out even more? All right. Now keep the spring that wide open and raise this leg up all the way up.
Good. And now come in and out three times and reach. Open the spring. Open the spring, open the spring. Keep reaching out and lower this leg back down. Now keep pushing out and I'm watching that. That carriage does not move at all. And take the other leg up. Yeah, push out more. Push it out. There you go.
Pull up on the standing leg and I'll come in and out three times. So you get to explore the legs independently. Just three, reach out, push it out, push it out, pull up on that side, and then lower this leg slowly down and come back in as it's another just a simple, wonderful way that you can just add in a one leg foot work position that gives you that nice feeling and help people balance their pelvis and Lincoln, their thigh out from it. Pull out of their hips. So the next exercise that we have on here, um, that I wanna point out, step off to the side. We're going to look at the, um, tree.
All right. And Go ahead and stretch three times up, down, up, down, and walk up your leg. And then just relax your head towards your knee for a minute and stretch your spine curl. Just curl. Okay. So here she is, stretching and breathing. And here is where the beginning of squaring happens. It actually happens during that little prep time. So she's pulling up, she's into the center line, wrapped around in the seat, and then she's gonna lean back in that shape until her lower back touches stop there.
But I'm telling you, she's working really, really hard right now. And you know, just basically, um, you know, back in the other tutorial about the hundred. Guess what? What do you see here? That's the position again, but we're talking about the standing leg, but they all get related. Now Start to walk down your leg. And as she leans away, she's got a lot of work to do in order to state, pulled up on the standing leg and lengthened in the other side. And now she's perfectly straight and she can see the tag on the back. But now she's upside down.
Really still working that dynamic and bring your head in and curl up and up and up and up. Head to knee rounded spine curl. How's that feel? She's smiling and then finish. Okay, so they're in the tree. We're not going to do the whole thing. So in the tree there, you've, you've got that reaching leg, lets reaching like crazy. Um, but you're not pushing it out. You're holding the hip up. So I'm going to ask you to do it incorrectly if that's okay. So good.
So now she's going to go up and just stretch your leg up and then walk up your leg and she's going to just like reach so much out of this leg that it pulls her out off. Stay there for a sec. And I don't know if the camera can catch that, but this is such a, such a not healthy position for the body. So let's pull that together. Do you see the position of the hundred again? Right. Okay. And now she's squared off. And how do you reliably square off the inner thighs are hugging the midline.
You're wrapped around in the seat, the bellies pulling in. Okay. You're pulled up and you're lengthened out. Okay. Come all the way yet.
So she's pulled up, she's linkdin down. But what we're looking at, if you had a bird's eye view was that there would be no mambo and there'd be no, this action. Is that a Mambo? I don't know if that's a mambo or not or no. Up and down action. So there's a lot of work from underneath. So let's have running go and up and up and up.
So she's nice and level. And if I just slip my fingers underneath her low back, I would see that she was not pressing into my fingers at all. And now, quick and up and up and up. Because once you're in, once you're under control, take it into flow and try to marry those two together and up and up and up. Now let it go. Let your hips swing out a little bit. Yeah, you see how you can see her shirt move and everything and then come all the way in. And so we want this to be quiet, nice and quiet and still, and it's funny, I always remember you reminded me of this. Ramana would tell us, darlings, she would GLI down fifth avenue, don't waddle. And that always think of that when I think of of running because one of the promises of the PyLadies method was greater carriage and grace and posture. And um, you know, I think Joe in his book used were regal, you know, real and how you walk in, move and everyday life. And this one is one of the ones that really reminds me of that. Okay.
So now we're going to look at the standing leg as it relates to, um, the front splits. Okay, so in the front splits, so if you can set up, let's go to two springs. So in the front splits, you're basically in a lunge position, right? So in that lunge position, your standing leg is the leg that's pressing back into the shoulder block. And we're going to be pulling that side up and around. We're not going to let it just open up and we're not going to sag into it either. So that back leg, that standing leg is so vitally important.
Can you bring your foot off centered a little bit just so it's out from your hip and go forward into the position. Bend your front knee. Forward more. Are you okay? Go more. Go more. Go more. Go more. So this is her standing leg and standing means we anchor into the foot. The arch of the foot does not collapse. We're reaching the back. There we go.
So this is pulling up. This is lengthening and there's your standing leg. And one of my favorite spots that Ramana would do on a lot of people when she'd come around this way. And she reached around to support the knee and then with the shoulder, like kind of nudge the pelvis forward and down a little bit. Go and might go with me. Go with me, go with me.
So I'm supporting this standing leg, but she's, you see what I mean? So she's really got that feeling. And then from there the exercise occurs, but don't lift the hips up and come in. Stay low and low and low. You see it and now you do it. But keep pulling this around. There you go. And come in.
But let this come under you. There you go. Let it come on under you. You see? So it's the same feeling that we had on the, um, all the other exercises. You with me on that and then come in. There you go. And as soon as she does that, here's what magically happens.
This is turned on, this is turned on. This is turned on, right? And then finish. Come on down. So here's the standing leg. The essence of the standing leg all over again. And you can see it essentially pull that around because now as we get into, as we get into, um, like our, our, you know, our side splits and when we get into the standing chair exercises, we have it all over again. So I think at this point we're going to, to move into the chair exercises. Okay, we're at the chair now and we get to now put ourselves in the gravity field and take everything that we had without gravity on the reformer the mat and say, wow. Now what happens when we get into the gravity field? So here's where it's really important to pay attention to our feet and how our feet relate to the floor and work their way up through the kinetic chain up into our standing leg. And so, um, the pumping exercises on the chair are exercises that I frequently use because it involves, you know, being strong enough to stand up on the leg balance, work on balance, and then, um, kind of take a peak at where the weak link is and all of that. So one of the things that I try to impart to my people is that the exercise it begins, right? It begins on two feet.
But I need to find where my body is before I even lift a leg. Cause if I can't stand on two feet properly, how am I ever going to stand on one foot properly? And it might be too big of an ask to ask somebody to stand on one foot if they can't even stand properly on two feet. So I would have noticed through the foot work on the reformer, um, for example, or the stomach massage series like cow is how do the arches lift. So can you do me a favor releasing, just come up front here.
So just stand with your heels together and your toes support just a little bit. All right. So what's really important is for the inside of the arch to have a subtle lift. And can you go ahead and just let these collapse inwards a little? Yeah, it can be very subtle and nuanced how the collapse occurs. And for some people it's very much more pronounced than other people.
So go ahead and lift that up gently. Yeah, so the weight of the foot, the weight of the body is out of the heels. We want the shoulders to be over the ball of the foot, never over the heels cause that's gonna set us up for where we want to be. We're pulling up on the suspenders and lifting all the way up through the crown and then lengthening down through the back. And the critical thing that I mentioned before, it turns sideways a little if you will just walk around, is to lift up, lift up the back. So you have room to pull this under even a little bit more.
So you need the left to make space to pull this up on under a little bit more. That's going to be a huge difference when we get over on that one leg. So go ahead back in front and you can stand fairly close and good. We're all set up. Okay. You can put your hands on your hips, you can put them out to the side, you can put them more ever wherever you want. So we start already in that position.
So the second we go to lift up that foot, pull up on your standing leg, whichever leg that is, and put it back down on the floor. Lift your gaze. Really pull up on that side and don't move off that side because see, we want the shoulders, the ribs, and the hips to stay on top of each other. And when we go to put a foot up, we don't want the whole body to lean towards a standing leg. Okay, so go ahead. Now pump pump one and two and three.
Stay with me and up. Control it up and up and up and up. Slow it down so that it doesn't pop up. And then hold the pedal down. Great. Just hold it down back off this heel a little bit. And you know what, actually, can you move your foot to the side a little bit more in the center and just bringing out justice. There you go. And then hold the pedal down. Here's the test. So she's got the pedal down, she's pulled up, and now the test is to rise up and balance on your standing leg.
Lower your heel and take your foot away. Yeah. So here's the progression. Often we go to get on one leg and we lean over the leg. Okay. So we little by little pull up so much, so much that as you lift your foot off the floor, there is no change. Okay? So let's try the other leg. So go ahead and pull up so much, so much. And it's a practice.
You know, it's a refinement. These are nuances, but they make a huge difference. Okay. Back off this heel a little bit and go push, lift and lift. So thinking about that standing leg, now hold the pedal down. We're not doing full reps and go ahead and rise up, keep forward. And we go and lift. Control it. Lift. This is the medicine. This is your medicine, your new medicine per us and press.
So let's take this idea and bring it to the side. Shall We? Okay. How about we go like this?
She's gonna lift her ribs high up off her hips. So she has room to get her tail under. Did you feel what you just did? There's your opposition holding the back up. So you have room to get that underneath. You pull up your suspenders and we pump and one and two of these are tricks springs. See I just made them heavier.
Reach into the side and up and up and up and finish. Now rise up.
There you go. Lower your heel, take your foot away and finish. So there's a whole lot in that is so much fun because it, and when I'm doing it with people, I have them in front of the mirror so they can watch. Oh, what happens when I go to lift my leg? Do I fall into my hip? Do I fall over my life? So do I stick my butt out? So these are all the things that we're trying to do to get right up on that leg so we can reliably find our balance. And that's like one of the gifts of holidays is again, finding the back body, getting into the standing leg and all the standing exercises are going to be the same, same process whether you're going up front, whether you're doing the crossover pump, there's just, just go back to those simple ideas and you should always be able to be light out of your heels.
Like there is your foot bar down here and I'm never back back out of my heels. And so, um, I always say it's always the season for jeans. And you always want your butt to look good in your jeans though, you know? So the standing leg work is, is really wonderful. And, um, if you're working with dancers or even if your skaters or anybody teaching how to be on top of that leg will help them spin better, will help them be able to like easily rise up in balance because you're right on your leg and that's what it means to be out of your hips and on your leg. So, um, the other place I just want to just mention that this comes up is when we're in the, on the ladder barrel doing the ballet stretches and instead of bringing the ladder barrel out, we'll just do it free standing for a second.
So come over here and go ahead and take one leg and just put it up on top. There we go. So here we are. Let's say we were doing the ballet stretch series and here's our standing leg, um, situation again. So can you use your other leg for me? Yeah, cause then they can see the standing leg. Good. All right, so starting from the floor, she's pulling up, she's pulling all the way up into the hip. She's lifting up on that side. She's lifting her back. So she has room to pull the tail under and pull up in the front.
That's right. And you can always check your weight to make sure relaxes foot to make sure your light out of your heels. So that's on your standing side. On your other side, pull back as though you're pulling your hip into the ladder. Barrel. That's it. So, so it's from this place that we would be working the whole whole series and then take your leg away. So if people still have a challenge finding that or if I know that they're working on this particular thing, I have a quick little a series of um, sitting exercises that I do and we're going to do them right now. So it takes about maybe six minutes or so and it involves working with the magic circle, the toe Gizmo. And if you don't have a togas moe, you can just use rubber bands, you know, like Broccoli, rubber bands. Um, and that's all it involves. So let's do it. Okay, well, welcome to our little um, foot, but mini workout. Okay.
So we're going to just start seated, sitting up tall. And this is literally a series that I do very regularly and it's helped so much in understanding my standing leg and it's helped me a lot in my dance classes to balance. And so I hope you enjoy you ready? So we start flex point, flex point, we do eight of these, keeping the heels down, the legs are pulled together, you're lifted up out of this. See, you're lifted up out of the belly. We'll call this seven and eight and then flex your feet and keep them flexed. Okay, so you're really reaching your heel forward and not just your toes.
Make a fist with your toes. Then open, make a fist and open and keep going. And you really want to really get in, make a real fist so that like you have the knuckles that are on your hand are the same as the knuckles that you can see on the ridge of your feet, hopefully, and seven and eight. Now we combine it and we go point and flex. Make a fist and open. We do four slow and then for quick and you want to stay coordinated the whole time. That's the fun part.
Call this for now we have quicker getting faster. One and two and in n out and two and in and and three you're pretty good. And for now we go through the ball to the point. Flex threw the ball to the point. Flex three point flex and you can feel the lower leg really working and you almost feel you can feel the cab, the feet, the ankles, ball and point and flex lasts time.
Now flat, we're flexed. Turn out, pull your legs together, wrapping around in your seat, pull your legs together more. Now, point, turn parallel flex, turn out. Point parallel. Flex turnout. So you're rapping from underneath your seat. You feel that they feel good. Point, parallel flex turnout. So you're really getting the seat and the inner thighs and the feet all working together last time. Great.
Okay, so now take your toe Gizmo and you're going to slide it over your big toes. So with the toe Gizmo, when you put it on, um, if you start lower on the foot on the toe, it's a little less work. And as you get closer up to the tip of your toe, it has a little bit more pressure. The other thing is that you want to position your feet apart like that. So you're not pulling on the spring yet. So where the spring is closed, you want your heels open just a little bit wider so that as you pull them out, you really getting the work in the hip. Okay, I'm just going to slide it to mid knuckle to mid knuckle. Okay.
And you pull it apart and hold one. Hold to hold three and release. This is a later spring. I can tell. Wait a minute. So we're going to make your heels out a little further and go ahead. Pull it open hold. And to get taller.
Three and release and pull it apart and hold and two and three and release. Can you feel your hips starting to work? Pull it apart and hold. And this is a really good, just for the outer leg, the standing leg muscles and release. Pull it out and hold. Keep this leg still pull these, this toe to these four toes in and out. In and out, in and out and release. And again, pull it apart. Hold this side still.
Now this big toe goes to these four in and out, not the foot, just the toes. Talk to them and out and release and precedent apart. Let's go back to the side. You don't have to kill it on the spring. Just pull it out enough that you get your resistance and then the big toe goes in and out, in and out, in and out and release. It takes practice, pull it apart and keep them flexed. And this Togo's oopsies in and out, in and out. I'll help you in and out. Yeah, and release.
Okay, now pull it apart and both of them go at the same time. Pull them both in and out, both in and out, both in and out and release. Pull it apart. Point and flex, release, pull it apart and point and flex and release. Pull it apart and point and flex and release. Great. Let's stand up.
So you can do a lot of different movement patterns with the toes there. But that's just to give you a little starter. And now the piece de resistance. Take the magic circle. It's going to go between your ankles. All right? Okay. Okay. And let's, I'm going to stand back up and watch out for the toe Gizmo back up a little bit more. Back up a little bit more. There you go. Okay, so you've got the magic circle between your ankles.
Your heels are in and your toes are out. So you can see what I'm doing, right? I can see where my heels are. Okay. If dominoes are lifted, your back is lifted. So you have room to pull the hips under you. Can you feel the pressure of the circle? Keep squeezing your heels to the front of room and then hands on your hips. That's it. Pull up on your pull up on your hips and heels.
Lift heels lower and two and down. Keep squeezing the circle. Three and down. Four and down. Pull up on the hips. Five make room to get your tail under you more. And seven. Good. And eight. Great. You've got tension on the circle. That's it.
So now lift your heels, transfer your weight over to your right side. Put your heel down, stay lifted on your standing leg, and now we press one, two, three, four, five, six, seven, keeps squeezing it. Rise up to two feet, squeeze it tail under you, shift to your left foot, stay pulled up on your standing leg. And we have one, two, three, four. How you're doing? Five, six, seven, eight. You rise up and lower the heels down. Okay, now we're going to change it so you have one foot in front, one foot in back. Okay. Now I imagine that I'm standing on a tee and my studio, I have the tape on my floor that looks like a cross so that when we're working to the side, people can check to make sure that they put their foot down directly to the side and it's not landing behind. You see what I mean? So that you're always in that position. So now we have one to the front.
One to the back of the trick is to make sure just that you're, you're, you're magic circle stays level. So you can line your heel up to your heel or for an bigger challenge. You're going to line your front heel over your big toe. So you're really going to work on pulling this square round. So that's like balancing dancers. They always kind of crossed over, right?
So instead of heel to heel, it's you can do heel to toe, but the feet are turned out to the same amount. Hands on your hips if you like, or out to the side, whichever your preference. Make sure that your hips are pulling up and then rise up in balance. So use your inner thighs. You're going to be pulling the back hip forward the front hip back. Transfer your weight to your back leg.
And now we go one and two and three n four. Keep pulling up on that leg. Six, seven, squeeze it. Rise up and get your balance. Come down to your front foot, keep your arms out, press down. There you go. And now your back leg goes one and two and n four, five and six and seven and eight.
Then you rise up, find your balance, square everything off and then relax and we'll go to the other side. Crazy, Huh? Simple. Isn't that fun? But only do it once a day and never do more than the prescribed amount cause your, your butt will just be so sore. Honestly it's, it's intense. So when I'm teaching, if I, if I'm doing it with my clients, I only actually use the magic circle once a day. And so you're squared off once again, heel of the front foot, toe to the back foot, pull yourself around, lift high on the back heel.
Oh is that sliding? You know what you can do is pull up your pant leg so that you're on your skin. It prevents it from sliding. And also sometimes body lotion has that same effect. Are we there? Okay, so right hip, forward, left hips, pulling back.
Let's go ahead and rise up and balance squeezing the circle with both legs. Notice if one leg doesn't want to push back, that's it. And then transfer your weight to your back leg and we have it one and two and three and four, five and six and seven and hold. Go ahead and rise up. There's always one better side. Transfer your weight to your front leg and we go one and two and three and four.
Stay pulled up on the standing leg and eight rise up for your final balance. You got it. And then lower your heels down. Pretty good. How did that feel? Good. So all fun things about the standing leg, have fun with it and I look forward to seeing you again soon.
The Teacher's Corner: The Discovery Series


Comments


You need to be a subscriber to post a comment.
Please Log In or Create an Account to start your free trial.
