Description
About This Video
Transcript
Read Full Transcript
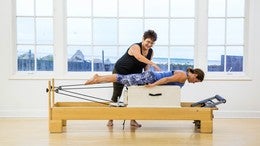
In this tutorial, we're going to differentiate the position of your posture, your ribs, and the position of your pelvis during a posture, your tilt. Oftentimes they're confused and some of the mat work. And this is a good, um, exercise or a good experience to help feel the difference. So I'm going to place this, this, uh, disc down here. It's about four inches away from the edge. I have one red spring on, so come and climb over the reformer, but don't sit down yet. Okay, so you're gonna hold that right there. I'm going to push the carriage back so that I can stretch the spring out and then I'm going to position you sitting right down on that. Good.
Now kind of lift your chest up a little bit. Great. Hold that carriage there. You got it without moving your knees forward, pull your belly in and let your pelvis come underneath you. Good. Hold that right there. I'm going to check you from the side. This right here is a posterior tilt. Now you're going to anterior tilt your pelvis to push the carriage out. Lovely.
And then pull your ribs back and your belly in as you let the pelvis tilt underneath you. Good. One more time. Push yourself back. Hold right there and then curl your pelvis underneath you. That's lovely. Now hold that. That's a load in your legs, isn't it? Okay, so hold that right there. And now we're going to take the band and I'm going to put the band underneath. So grab that and put it on the carrot. Give yourself a little bit more band.
Good. And I'm going to take this one. Give it a little load. Now her spring isn't all the way shortened yet. So now as you lift the chest a little bit, pull your shoulders back a smidge. Good. Get long. Now push your back ribs gently backwards as you tilt your pelvis J yeah, you go. So feel held that now less rounding of the shoulders. Good.
So the posture, your ribs are being met by the anterior ribs. Curling that tailbone. Very good. Now see if you can close that spring. See if you can close it. Good. Now pause right there. Take a big inhale. Exhale, pull your front ribs, your back ribs any bit more.
And now flip your tail and push the carriage out by arching your back. Good. Lift the chest. Inhale. Exhale. Front ribs to back ribs, tailbone curls all the way underneath. One more time. Press the feet down. Notice the knees really aren't moving. She's governing the movement of the carriage with the position of the ribs being back, tailbone, curling under. One more time. Curl it under. Bring the carriage all the way home.
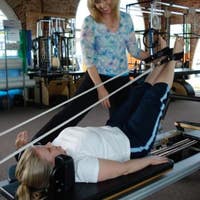
Very good. Now let's take this into a kneeling position. Alright, so climb on off the carriage. I'll take the band and then bring yourself onto the carriage. And this will get us ready for the exercise we call knee stretch round. So come on down here on your knees and put your hands forward on this bar. So it's a very typical Quadramed position. Does it go ahead and put your feet back against the shoulder rest.
I'm going to take the band again and put it in the posture. Your rib position. Remember, remember your posture, your ribs, your floating ribs are the one, the ones that are the furthest back. And they're called floating because they don't attach to the rib above them, nor do they attach to the sternum in front. So what happens sometimes I'm just going to get her set up here. What happens sometimes is people will queue, pull your belly in or activate your core and do all this when sometimes he grabbed this one please.
It's just a positional change that we need to make the connection. Remember, we're trying to build a relationship within the body to the different parts. This is a tutorial so it is a little bit picky. So in this position here, I want her to go ahead and stick your bottom out a little bit. Good. So we want to flatten sacrum here. Now what happens to some people as they get really a dividend this low back, and what they want to do is they always want to tuck their bottom to get rid of the divot. By divid I mean maybe an increased in lumbar curve. So instead what I want her to do is to pull her ribs back into this band almost with an inhale, because the inhalation will fill this posture, your lateral side of the lungs, and then exhale.
So once the body understands this, I can come back and tidy up the shoulders. The crown of the head can reach long, the arms can get strong right here. And she's doing a great job. Ooh, don't let this curl underneath yet. Stick your bottom out a smidge good. Leave the pelvis alone. Add an inhale into these posture area, ribs, and then exhale, pull your belly in. Don't move your spine. Very good breath. Inhale, fill these posture your ribs into the band. Exhale, scoop the belly. Don't move the spine. The next part of the exercise is round your spine by curling the pelvis member when you were sitting on that disc a little bit ago. And I said, yes, you good memory, no shoulders, please. There you go.
So we got the curling of this that we learned from sitting on the desk and we have the filling up of the posture, your lateral with the inhale. So one more time. Big inhale, fill this back. Ribs. Good. Exhale. Can you curl that tailbone and keep these ribs back at the same time? Very good. Making this entire flection connection right here from the posture, ribs back posture. You tilt of the pelvis, very good. And then come off of there.
You can play with this connection in many other exercises like rowing front, like stomach massage and anything where you want to make a relationship between the posture, your ribs, and the posture, your pelvis.

Comments


You need to be a subscriber to post a comment.
Please Log In or Create an Account to start your free trial.
