Description
About This Video
Transcript
Read Full Transcript
Hi everybody. I'm Tom a cook. I'm back here at [inaudible] anytime. Very excited to be back. I'm here with Andy and John and we're going to do a lesson on connecting your scapula and arms and shoulder girdle to your core. And the lesson is really just to understand how the bones move and how the muscles relate so you can have a better connection and put less stress on your shoulder joints and actually just get a little more out of your politeness and maybe build a little less neck tension that you'll find from this awareness. So the first thing we're gonna do is just show you the bones and I have a few options for that.
So the first option is you have your shoulder girdle show. The girl just consists of your scapula, humerus and your clavicle. The clavicle just goes right at what's called the AC joint, which is, it's really not much of a joint, it's more of a lip. And then you'll have your arm that hangs, always want to have that little groove in the front, cause that's your bicipital groove. And if you look at it on the skeleton, you can see how it kinda hangs here. And it's angled like this with the shape of the rib cage. Um, so they're designed this way for a particular reason because your shoulder girdle is designed to give your arm more range of motion without any one joint or muscle having to LinkedIn to the extreme.
Can you imagine if your arm was glued to your rib cage? It wouldn't be so good. So we're going to just go through some simple movements and then we'll build on it. So like you guys to take your left hand and put it on your right clavicle. And imagine as you trace the shape of your clavicle, feel how it's kind of S shaped that when you get to the sternal notch, which is right there, that's the only place that your shoulder girdle actually connects to your skeletons. Your basically your arm starts there. So think of that. That's what we want to consider. That's kind of an interesting deal. So now just notice that some movements we can do and leave your arm muscles relaxed cause the muscles that move your shoulder blades are not our muscles.
So lift your collarbones up. That's elevation and feel that movement right there and then let it slide down and just do that a few times ago. Oh my show. The girl is designed to be draped on my rib cage, not glued to it. It's designed to have a lot of range of motion. Now take the arm forward.
Now take the clavicle forward and the shoulder blade for it. That's called protraction. Now take the shoulder blade and the clavicle back and let the arm go back. That's retraction and do that a few times. We'll go arm, clavicle, shoulder blade, show the blade clavicle arm. And what you're thinking here is, Oh there's inside of all this movement, there's timing. My arm, clavicle, shoulder blade move in a sequence and that lasts my body to be very efficient, which is pretty cool. Otherwise we get, Mike gets strong, but we might get tired and a little worn out beyond our time. That's it.
Just to one more forward
You might notice it has more range. So you freed up. So one of the ways you want to improve function is first relieve tension and improve your biomechanics. And that's simple. Useful to do anytime of day. So the other shelters when we came in with, so should we do the other one? Let's do the other one. So let's trace along the clavicle and feel right at that sternal notch where that's where the arm begins.
I just lift the shoulder up and let it glide down and just feel that a few times a C. Oh, okay. I'm feeling how that that sternal notch slides down on the breastbone. As my shoulder goes up. Now take the arm and clavicle shoulder lay forward. That's pro traction. Take the shoulder blade and clavicle back.
Then the arm back that's retraction and just take it nice and slow where you can feel, Oh, I'm looking for a smooth fluid motion opposed to an aggressive Bracey movement.
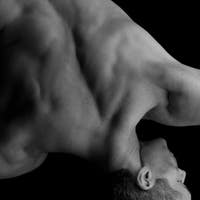
Now there's some muscles we want to go into that relate to how the shoulder griddle moves when you're putting weight on your arms, which we're going to go towards. So this is the back view of the left shoulder and underneath the back of the shoulder blade at this edge is this muscle that comes this way, which is called your serratus anterior and it connects to the first nine ribs on your torso and it pulls your shoulder blade forward. Then you have this one down here. This is only a portion of it, of your trap. You trap goes all the way up to the back of your head, but the lower part works with this guy to protract your shoulder forward. If I go forward and I go up, I'm actually, my mechanics are off and then my arm doesn't connect with my abdominal wall.
So that's part of what's called the anterial bleak lines. Let's just touch that on our own body. So take your left hand and put it under your right ribs and take your arm forward. And as you pull your shoulder blade down and forward, feel the muscles under your fingers. Become a little more engaged. The little finger muscles on the ribs, that's called the anterior Seritos. Now take your hand and go a little lower, and the next muscle in the chain is called in the external obliques.
Then go across to your other side of your waist, internal oblique. Then do your inner thigh on the same side had doctors. Let's do that one more time. So we'll go anterior, serratus, external oblique, internal oblique, adductors, and those are relevant to all the flection exercise and Pele's hundreds roll-ups, planking all related to that. Let's just feel that on the other side. So just take your arm. Now remember when you're pulling it forward, you're also pulling it down slightly so you feel like it's hugging your rib cage.
Feel those finger muscles and then we'll say anterior serratus. External oblique, internal oblique. Add doctor. One more time. Anterior. Serratus. External oblique, internal oblique. Add doctor. Now just practice like imagine you're doing, you're doing a hundred standing. So as you pull the shoulder blades down, feel it, feel it's an X across your torso to your inner thighs, and then come back up. I do that a couple times. So you start to see that usually the part that we leave out, inflection exercises is the lower part, the inner thighs. There we go. Now I'm going to show you a little strength move you can do.
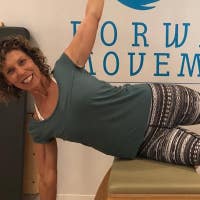
Take up your right elbow and puts your hand on your elbow. Now draw your shoulder blade slightly down as you reach your elbow into your hand. So that's your anterior serratus. Now keep that and puts your hand inside your elbow and press your arm into your elbows and your chest muscles. Keep them both turned on. Now keep all that and straighten and bend your arm. So now you have serratus lower trap and pecs all turned on at the same time.
So you've got shoulder stability and you're connecting your arms to your core. Let's try that on side to pull the elbow into your hand by pulling your shoulder blade down and forward. Put your hand inside. Now press them into one another and now keep all that active as you straighten and bend. And when we do this on all fours, we're going to practice doing this where we're not going to let the blades come to gather in the back. So you've got to use your side muscles a little bit more. Help free up your neck and let that go, huh? How we're talking now come on to all fours.
We're going to take that into a simple cat stretch and I want you to feel in your cat stretch that that action you just did is the action. But first, let's just do a couple shoulder blade glides. Just feel a straight line head detail. Now as you inhale, let the show the blades slide towards the spine in the back with the body slowly dropped between the arms. Now as you exhale, pull the shoulder blades down and wide like they're wrapping around the front of your torso and do that a few times and think of doing it without rounding your back at all. Just feel that connection. There you go. And a couple more. And now as you go this way, feel. There you go. Beautiful. Feel that connection. There you go. Nice.
And just do one more. Awesome. Now let that movement take you into a cat stretch. So on the next deck says you widen the low, your show, the blades. Curl the tail forward and feel the shoulder blades keep lowering and widening. So you start to feel it ties into your abdominal wall. Then inhale to extend.
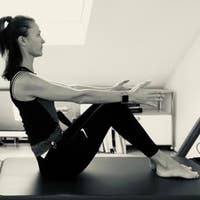
And again, exhale the curl. Feel that connection. Feel it all the way down to your inner thighs. Now as you inhale to extend, let the show the waves come slightly together in the back and then exhale, reverse it. Beautiful. That's it. One more you guys. Now you're connecting to your arms, to your core, all the way through the spine change. Really good. Nice you guys. Now from there, let's step it into a plank. So before you go into your plank, I want you to just first do the scapulas slides. So first, push the floor away, widen and lower your shoulders.
Keep that and activate your upper arms towards one another. Actually, I'm going to back it up a little bit. So now as you feel that feeling you had when I had your standing, feel like you're reaching through your elbows and you're squeezing your arms towards one another and bend your elbows straight back and straighten and see if you can do that without letting your shoulder blades come together. Keep them open. So push that up into my hand a little bit. Now feel that and keep reached. There you go. Beautiful. That's it. Really good. Now you're connected all the way through.
Now the next one is you straight and hold it and step into a plank and take three fluid breaths and feel the connection of your shoulder blades, your chest, and let your breathing be low and wide. One more big breath like that and then slowly rest. Beautiful. You guys. That's a little different, huh? I feel good. You look really good, you guys. Now from there, have a seat and we'll take it into spine stretch. So, and it's fine to bend your knees as much as you need to to fail. You can get up on your sit bones. But imagine when your arms are up, you're already feeling that feeling of the shoulders pulling a little bit down and wide grow tall on the inhale. Now the Xs you nod your chin for.
Let's show the blaze wide more as you go forward. Pull the waistline back and up. Then as you inhale, push down with your legs to grow tall, like you're right up against a wall and leave your arms right up. It's shoulder height as you go forward. That's it. Exhale to the front. Now feel that, and Hilda grow tall like you're right up against a wall. And again, exhale forward. That's it. And help to lengthen up. Nice work. One more.
There you go. And then lengthen all the way up. Now we're going to take it into a reverse plank to take your shoulders the other way, cause you did a lot of forward. So take your palms back now, just practice drawing your shoulder, drawing your clavicles back, and then let them go. Do that a few times. Just draw them back. Now bend your knees, draw them back, and on the excess. Send your tail towards your knees. Inhale to lower. Do that one more time. Shoulders back. Send your tail to your knees.
Slowly lower. Have you feel like you can take it further? We'll do it with the legs straight. So shoulders back as you stand into your arms. Take your hips forward and up slowly. Lower. Just one more time. Shoulders back, pelvis to feet.
Hold and lengthen down. Nice work you guys. And then from there we're going to call it right there in our, in our, in our tutorial. I hope you enjoy. We'll tie this into the class to follow and hope to see you again. Apply these anytime. Thanks guys.
Tips for Teachers: Keep It Fresh! Exercise Tutorials


Comments


You need to be a subscriber to post a comment.
Please Log In or Create an Account to start your free trial.
