Description
About This Video
Transcript
Read Full Transcript
Hello, I'm Sally Anderson, and we're going to look at some Reach Movement Health PosturePlus work. Now, this is very dear to my heart, the PosturePlus work. I've always been a posture nerd. And as every one of us knows, in our current day and age, posture is becoming more and more of an issue. And it is a health issue.
So with Reach Movement Health, we're constantly striving to find solutions to modern health issues. So, our lives are very, very different to what we lived a hundred years ago, 50 years ago, even three years ago. Pandemic has changed our lives forever, along with many other things, and just the rise of amazing technology that we need and that we want to continue using, but we have to work hard, or constantly, at rebalancing the issues that are going to come up from our constant device usage, our busy schedules, the stress that we're under, which serves to decompress us, so it's not outside posture, and we need to find a way to work on these rebalancing sequences and strategies that we employ every day, because every day, we're on our phones, we're on our devices, and we're sitting. And of course we know, sitting's the new smoking. That's an old phrase now.
Being sedentary and constantly sitting on our, you know, it's compressive on our nervous system from the base up, and then from the top down, we're getting this hanging of our head. We've all seen the images of the weight of the head hanging off the spine, and that hangs off all the junctions and all the structures and tissues that continue on down our back. It's not just a head on the shoulders, but that's dragging us forward constantly. So it is an everyday response that I believe we need to have. We need to be reversing this work and finding strength to hold us upright against these constant stresses, finding strength in our back line and legs to rebalance the amount of sitting open, the hips.
You know, there's so much that we can do and that we need to do daily that we developed a lovely little arc to help us. So this is a portable arc. It's very light, very easy to have at home or to use every day, or to have in the studio, and as a Pilates teacher, not to have to lift heavier things when you need it for your clients as well. But it also for me is kind of a Goldilocks of size right now for how I feel I need to work with my clients and how I hope you will enjoy working with yours and for yourself. So this is an everyday tool for me.
I'm a work in progress, so don't look to me for the perfect posture. I'm working on it every day. We've created the arc with a higher apex or peak and even slopes down both sides. So it's reversible; you can use it both ways, but I'm looking to address and encourage that reversal of the upper ribs, upper torso, shoulders, neck, head, that we are finding as one of the pivot points for our modern-day postural problems. So this tutorial's going to look at that more specifically, that upper body address, and how we're using this posture arc to help alleviate the compression, the stresses, and the positioning that we're getting into, and let's not forget that all that slumped forward seated position.
So the seated position sees us slumping under; the upper torso position sees us slumping forward. That's a constant compression through our organs and the inner workings, the viscera. It's all going to get tethered and stuck, and it's not gonna slide smoothly like what we want. We want our tissues to be able to move and allow space for the organs, and they have to do that tens of thousands, hundreds of thousands of times a day. So they're doing a lot of work in the position they're in, so let's get them into the better position that we can have them in.
I'd like to start with looking at the positioning on the posture arc for the head, neck, shoulders, upper body, and Andrew has kindly agreed to demonstrate for me again. If I can have Andrew lying supine over the arc, and we'll talk a little about how to position somebody in their first kind of starting point of using the arc. So hands behind your head, just to go back. So it's a little bit safer, kinder, easier to go back with the hands supporting the head, and elbows can be in. So if somebody's shoulders feel a little strained being out, just bring those elbows in.
What I want is to find somebody's position on the arc where their head is comfortably back, where kind of around the sternum on the peak or the arc or the apex of the arc ideally, or, and I'll ask Andrew to bring his hands out now and just bring them alongside your body so we can see the positioning. So if I've got you in position where you're nice and open in the chest but your head feels stressed, then I'd have you move that way. So see how his neck adjusted there? I think that's a better position for Andrew. So my starting point is sternum on the peak of the arc, and then if that doesn't feel or look, so feel if the client's saying, or look as an instructor like it's in the best position, then we come down the down slope of the arc a little more, and then progressively, I'm going to work towards getting back into that extension point.
So over time, we get the ability to slowly open, release, find that better extended position of the upper body, but right there and then at the beginning of using the arc, we find the most appropriate, comfortable, safe position. And when we're there, I'm gonna make a note of that for that client, and I'm probably going to get them to understand where they are on the the arc and what it feels like, spend a little time making sure they know how to place themselves on the arc, because yes, I will want them to work at home on it, if they feel like doing that. There's plenty we can do at home without the arc, or you could use towels under this, or versions of other arcs. Like I say, this sizing and fit is my Goldilocks for what we're working on, particularly 'cause people can't be over big arcs all the time anymore. We're a little bit too tight.
Commonly, that might be a little extreme for some people. So once we're there, exercises that we'll use will be things like chest lifts. Let's have a little look at that hands back behind the head again, or they can be beside the body. It's just stronger on the neck. It's not less.
It doesn't become chest lift one, then two. It's a variation depending on somebody's capacity. So from here, wherever we're set over, my focus is getting the extension over the arc. Then on the upward chest lift, I want to slide, so come back a little. That was a great example of where I don't wanna start from.
I don't wanna start from the head. Thank you so much. (Sally laughs) I wanna start from the ribs sliding towards the pelvis, and the head rests in the hands. So the upper abdominals are doing the work. That's all I want.
There, I want long, slightly flexed chest lift. I don't need all the flexion at the moment. I do need the sinking back of the upper ribs. Think ribs one and two dropping back over the arc. Then from the abdominals, head stays in the hand.
Look at that, beautiful. Now, even there, I could have a little bit more pressure into the heads, there. So that opens the throat, opens the ribs here, and then control that movement back, good. Again, I quite like elbows in for this, which allows us to focus on the ribs. It doesn't matter.
If they're fine, they're comfortable out, that's fine, but this allows a little bit more weight into the hands, elbows in, armpits are wrapped around, and I get more access to the ribs. Coming down, I wanna feel like the ribs go first, and then the head gets down. We'll do one more. Ribs slide and glide, pause. Again, it can be a long line.
The abs are working hard, and then allow the ribs to go back, back, back, back, back, good. So that's chest lift over the arc. So coming up out of the chest lift, I want the hands to help the head so that we don't strain the neck. As somebody gets used to using the arc, that will happen more naturally. So as Andrew places himself sideways over the arc so that we can look at a little bit of the side work, I wanna show you just a little self kind of awareness or self-palpation that can help for people at home, or for me, I do this.
Fingertips on C7, elbows in, wrapping the armpits forward, and let's try and get it from the best angle. I want you to press that C7 forward and the head back. So you're gonna give yourself a little push forward with that joint. The head goes back over it. Then you can just settle the ribs down.
So that gives you a sense of bringing the spine into alignment by the head sitting back over that junction, that joint, C7-T1. So, that gives you a little pressure that you can do at home yourself to find that, and if you do it in the mirror, you start to see how much to bring the head back, which isn't an extension of the neck or a retraction where it's really forced through the neck, but it's sitting the head over that joint. Then we just get to soften and find that elbows forward allows that positioning to be a little bit more wrapped and articulated through the upper ribs. So that's a little self-help tool. Like I say, in the mirror, you'll start to see and get a sense of where to bring the head, and that can often help with how you feel you work supine as well.
So then the other ways we use this posture arc are side-lying, and we will use this in a variety of side lift exercises. But starting with this long arm in either direction, we're gonna go both directions with each arm to come up into a long side position. So Andrew will lift, and he's initiating from the bottom arm, and the head stays in line with the spine. Everything comes back down to rest. So this arm is also working quite strongly.
The bottom arm initiates, and bring it up, and long, long side lift, and there's plenty of work again, and comes down. And when you come down, we're going over the arc. We're opening up the topside. Lengthen and reach, and bring it back down. So that's the starting point of our side work.
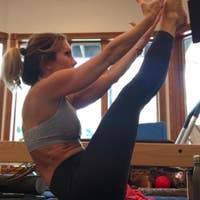
We might have a little look at the waving while we're here, which means bending this top leg, keeping the knee where it is. So this foot bends back, the thigh stays in line with the torso, and the top arm will be your operating arm. The arm lifts up to the ceiling, rotates in the socket. Now it reaches overhead, and I want the focus on the knee down as the arm reaches overhead. Arm comes back to the ceiling.
De-rotate in that upward position. Now as the arm reaches away, I want the focus on the head softening into the underneath arm, so waving one. I'd like to show you the second version of waving, which is to bring the underneath arm forward, and the head hangs off that shoulder, so we've got a much deeper stretch and it's much stronger. So this is a progression, same thing. Actually, one more thing: the other thing you can do is take the underneath knee out, and you get a stronger ITB abductor stretch.
So let's try that here with Andrew. Arm comes up to the ceiling, rotates, knee presses into the mat. Arm comes up, de-rotates, head is lengthened. As this arm reaches away, it takes the upper trapezius with it. Once you've done some of these, be really sure to bring that top arm forward anywhere on the mat that it services you.
Roll into it and use the arm to help bring you up again so you're not going to go from a full-ease, stretched side of the neck to bounding up. Good, I'd like to show prone on the arc. This is good for 80, 85% of the people. Five to 15, I'd say, may find it's uncomfortable to the point of not wanting to do it. Perfect.
Take the arc out; there's other options for the prone work. But I'll ask Andrew to pop himself over here. I like it kind of under the ribs. So the upper torso goes onto the downward slope, maybe back a fraction, that's it. Legs are passive at the back, but what we get is kind of this opening of the upper back.
Over time, we can move you further over, but again, it's going to take a little preparation, a little bit of adaptation and working towards it. First position is hands under the forehead. And the hands stay glued to the forehead as we send the head out and up, and bringing it back in line with the spine, bringing the arms with it to there. Breathe, and then return that. So you can breathe either way.
I tend to use an inhale-up, exhale-down, but for this, I'll let you breathe any way that helps. Yes, and armpits to the floor. So we're really focusing on this upper torso, upper ribs roll back. Stay there. Even at the top then, press with the hands to get that head back into C7 there.
Perfect, and back down. We'll just do, stay for a moment. We'll do it with hands behind the head too, which tends to be my favorite. I'm not sure it's Andrew's favorite. He'll play along anyway, I'm sure.
But what happens here is we get the feedback of the hands as the head presses into it. That's what I want: head, head, head, head, head, head. Look at that, beautiful. How could that not be your favorite? And come back down over the arc.
I'll have two more, just 'cause while I've got him here. Head leads the way, okay? So the heads sits back into the spine. Elbows can come in, which gives you that beautiful control of the shoulder girdle. Head starts.
You can think about eye line rolling forward, rolling a marble out, anything that gets you into that glorious position, delicious. All right, and then I'll ask Andrew to use hands to sit back into rest position, very nicely done. All right, I'm just going to take the arc out for a moment while he turns onto his back, into a supine position, knees bent, and then we're going to slide the arc up under the bridge. So if he bridges up, arc goes under the pelvis, and then yeah, a little shuffle, a little find where it feels good, and then bring the knees into a little frog position. We won't do the whole series here, but this is the setup for doing legs supine.
Hands can either hold the arc or be flat on the mat. It'll be absolutely fine. If your mat is slippery, pop a little nonslip mat. You'll know what to do. And the only thing that sometimes I will cue is, if somebody's a little prone to being dominant in the back, I'll pop hands under the pelvis.
So just slide them under the back, if you'd show that, Andrew, and it just gives a touch more height, a touch more flexion into the lower abdominals, and just gives them more access to lower abdominals. So that would be the two positions for setup on the arc with the supine work. Pop the feet back down, and I'll slide the arc out, which everyone can do themselves. So if you're in a class situation, everyone can lift into a bridge, pop the arc under. They don't need me or anybody to do that for them.
Andrew, if you'll come to sitting, we'll just show the seated position. So then sitting on the the arc, legs extended, and we have an ideal elevation that we can use after these arcs that I'll use in group classes quite often. So being able to just use it as an elevation and get through all our work like spine stretches. We do rowing seated on the arc and a whole range of things, but it very quickly just gives somebody elevation out of their hamstrings, able to lift up through the back. For anyone that is a little tighter in back or hamstrings, it is perfect.
But again, if you don't have it, we've got yoga blocks or all these things that we can use, towels, books, the Bible. Anything to sit on to give that elevation works. We just have this moving through the class with us where we'll have supine, side-lying, prone, seated, pelvis on it, another supine. So you get to work through all these positions in a fairly efficient way, and what could be an autonomous way to take home or have people use in a daily dose in their own environment. But we can facilitate this rebalancing of our modern-day posture.
Thank you for joining me. I hope you will want to do our PosturePlus class on the mat.
Reach Movement Health: Posture Plus


Comments


You need to be a subscriber to post a comment.
Please Log In or Create an Account to start your free trial.
