Description
About This Video
Transcript
Read Full Transcript
My name is Pat Guyton and today I'm going to be working with my friend Amy havens. We're going to be addressing how we cue in the body and I'm going to focus a little bit more on the thoracic spine, which is the rib cage. Animals are going to focus on the Scapula, which are your shoulder blades and it's okay to use con conversational words. You don't have to use everything that's specific anatomical and we're going to see how different killing might affect the results or how we feel in our body because really the whole purpose of exercise is to make us feel better about who we are and we move better. So Amy, if you'll take the quad repaired position, what I'm going to ask her to do is not an exercise but a movement experience. So I'm going to have her bend her elbows slightly. So when you do this at home, one of the things I did learn from first-generation teacher, Bruce King is one one joint is hyper extended.
The joint above and below is hyper extended, which means if we keep going, we are hyper extended. So I'm going to have her bender elbows and we're going to focus on your shoulder blades. All right, so you have an image of your shoulder blades. I know you've seen them. What if you were to separate your shoulder blades and just really focus on that feeling and then bring your shoulder blades together. Good and shoulder blades apart and shoulder blades together.
And shoulder blades apart and shoulder blades together. Now keep doing that. Underneath the Scapula are two important muscles, the subscapularis and the serratus anterior. And they covered the rib cage so you can even have the image that the Scapula are opening and closing and sliding over some muscles that are between the bones of the scapula and the bones of the rib cage. And that's great. Now let's switch and go inside and we're going to think about our ribcage.
So we know that the ribs attach to the vertebrae and we do have a vertebrae way up here. Okay? See One or the atlas and then it goes all the way down. We're not gonna look down here for right now. We're going to look just at the rib cage. So what I'd like you to do, Amy, is can you imagine lifting the rib cage? Yeah, allow the Scapula to do whatever they do, but lift the rib cage. Now when I do teach children, and sometimes I say, you know the backs of your spinus processes could be likened to dinosaurs.
Spines can, so can you show us if you were Barney and you were purple may, so you probably felt purple some days. Now if you push your ribcage toward the floor, then the sternum is the other side where the ribs attach. So we could say dinosaur spines up. That would be a metaphor. And then sternum down. So you're really thinking about your rib cage and rib cage up and ribcage down and the rib cage goes up and the rib cage goes down.
As you do that. I noticed that when you did Scapula, there wasn't as much neck motion, but as you do the rib cage, because your neck is also part of your spine, I see that your neck is responding a little bit more to that queue and then you can come down and then sit back for a minute. How that feel and can you tell me and the audience the difference, like what was the difference between doing your Scapula? How did that feel when you opened and closed them and if there was a difference, how did it feel when the rib cage went forward and back?
My Rib cage felt big. I more movement. So not as actually not as hard for me to get to.
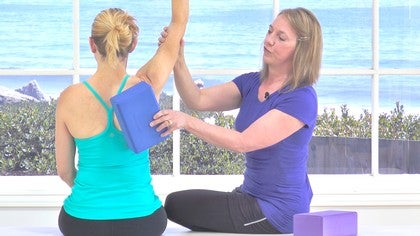
So one of the things I'd like to just demonstrate here, I guess this is bigger. So this is a rib cage and there would be two of these, but I don't have three pairs of hands right now. So when you're looking at these blocks, Amy, this is the rib cage. This is a scapula. It's not really important. We're just going to look at two blocks and they have a relationship there together and there's something nice and slidy between them. So if they have a coupled motion, that means that as one block goes up, the other goes down. So both blocks are moving in space. Okay?
So sometimes what will happen is the rib cage will move in space and the scapula will move in space with the rib cage. Okay. Sometimes perhaps the rib cage stays still and the Scapula by itself slides up and down. Right? Right. But if the scapula goes up relatively, what has the rib cage done?
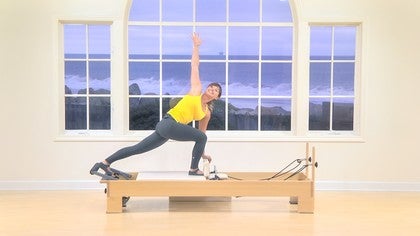
Alright. So sometimes movement happens like that in the body where both of them are moving. Actually, probably nothing is ever stationary, but there's sometimes situations where one is definitely moving more than the other. Does that make sense? Okay. The nice thing about these cues and this little kind of a demonstration is this, you're doing it anyhow so you don't have to wrap your, your mind around this and make it an amazing puzzle and you don't have to go read an anatomy book. Just that concept might allow you to have more freedom in your body. So let's demonstrate how that might work on the trapeze table.
So those of you watching at home, we're not going to do a full range of motion, a piece of movement. So we're just going to do little pieces and give you an idea of how the demonstration that we just did works inside of [inaudible] or any movement for that matter. So I'm going to have Amy round forward and as she rounds forward, I might say to her, Amy, I'd like you to open up your scapula and then come back and let's just have you sit up for a moment and Scapula go apart and Scapula go together so you can feel your scapula going apart. Yeah. Now some students already have their scapula elevated, and so you really have to stay on them about the positioning of the Scapula. Let's try the other cue. Let's try pushing the spinus process these backward through the scapula.
Okay, so the rib cage goes back and the rib cage comes back to neutral [inaudible] and their rib cage goes back and the rib cage goes back to neutral and the rib cage goes back and it comes back to neutral. Now which queue did you like best? Scapula or rib cage you'd like to Scapula? Good on this one. On this one. Okay. Let's bring the bar up over our head. Lean forward.
All right, so can you show us maybe what you used to do when you first started? Yes. Your scapula were up and it looks like your sternum has gone forward and your neck doesn't look really comfortable. So let's just round back for a minute from this position. So rib cages back, Scapula have gone apart. Yeah, and you're going to press up and I'm going to suggest that what you might think about here is lifting your sternum upward upward.
Now your Scapula can rest down your back, but really pull your scapula up and then pull them down. Now pull your sternum up. Good. Which position do you feel more confident about right here. And what's nice about feeling the difference between the sternum and the rib cage is you can self-correct without having to look in the mirror all the time because that's, we don't get a mirror. I haven't been able to find anybody that will follow me around with the mirror so I can check myself all the time.
So let's have the spine moving back. Scapula open, which, which way do you like to focus here? Ribcage, back. Scapula open. Okay, you like rib cage back? Let's go straight up over top. And what do you like there? Sternum up. Okay, so let's do that. Rib Cage back and sternum up or ribcage, hip ribcage back.
Now once you start getting a little more confident and when you really are able to make corrections in your body, you'll notice that suddenly you have to go all over the place cause other things changed in response to that. All right now round forward and do what you prefer, which is scapula open. And then as you come back, you like rib cage back. That's okay. So here you like sternum up. All right, that's okay. And round forward. So you like Scapula Open. Okay, coming back, you like rib cage back and then as you go up, sternum goes up and then the teacher can always say it's, it's great to slide your scapula down and she pull your sternum up. Now let's bring the bar down and what I'd like you to do is just a little swan up here.
So swan up and what cue do you like here? Rib Cage forward. Yeah, and sternum on the ceiling. Shoulder blades, back and shoulder really? Well you like that? Okay. You could either one works, that's the important thing, but it's what works for you. Right? Okay, so now you're going to just round forward a little bit. Scapula goal apart. Ribcage goes backward and then you're going to come back up. Do Your Swan. I do this for a lot of my people where we're trying to just organize. It's a very small movement, but it's quite profound to feel the scapula sliding around the rib cage.
So why don't you do this two times where you think rib cage and rib cage back and sternum up. Good spinus processes reaching backwards. That's your focus. And then your sternum comes up and open. Now think scapula pushing the bar forward then thanks scapula back pulling the bar. Sternum goes up and there you are in a swan. One more time, pushing forward as it feel good from the Scapula here. Spine back. Good. And then coming back, sternum goes up and yes, the Scapula will protract or retract.
Yes they will. They will retract. Okay, so there's some information. Um, can you share with our audience how that felt?
And once you go back to the blocks and you think about the coupled motion of how the Scapula, the Scapula have to slide around the rib cage. If the rib cage has changed its shape, it's no longer around barrel. It's actually now become somewhat of a c curve. The scapula have to adapt. Yeah, I'm a student in class. [inaudible]
So you have to take some responsibility. And that's why we're doing this tutorial. So you can choose, let's do the nailing arms facing in and we'll do the hug. We could do this also standing off the end if you like to do the standing arms. So bring your arms out to the side. Okay. And then a hug is a hug, right? The arms come forward.
And let's just have our fingers stay here for a minute. What did your scapula half to do? They, they separated the bit. Yeah, they had to because they need your arms need to come front. All right. Now if you close your Scapula, your arms and fingers will widen. So actually queuing hands together is not as accurate as killing scapula apart.
And then scapula together. You could think of your Scapula as saloon doors. So they're opening the doors open and they close and the scapula open. Good. And you really focus on that feeling. Now I'm going to ask you a question. It's your puzzle.
What is the cue that you want to use for your rib cage? Do you want to push it through your scapula or do you want to push it behind your scapula? Either. You don't want to do either. I didn't do either. And that's an example of when we use the blocks. The relative motion here was our ribcage, relatively our scapula. Our moving probably would be this way, but you can just imagine so more as you come forward, scapula separate. There is more of your spine and your ribs to the back exposed because want, but we don't want to collapse.
And keeping the sternum lifted is sometimes a good cue because so many people come in with their sternum. And for those of you who are working with clients who are older, who have kyphosis, it's really good to get them to understand the difference between that sternum and that Scapula. So I think that looks good. Unless you'd like to stay here and do 40,000 more of those. Yeah. All right. So that's one of my favorite things to teach. I teach it to all of my clients, at least in the very beginning.
And then we refer back to it as the days progress. Do you have anything that you'd like to add that you've learned from this?
I wasn't planning to do this as a bonus. All right. So if my scapula were a square, it's, it's more like a triangle. It has to rotate. So this little corner has to go up so it gets out of the way of this bone and then it comes down. So yes, cause otherwise relatively, this is going up, but it has an elevated [inaudible] constantly versus constantly doing that. Anything else you'd like to share with our audience?
The Teacher's Corner: Teaching Tools
Mention
 |
Pat Guyton (Teacher) |
 |
Melody B |
|
|
Mary Jeanine G |
 |
Karin H |
 |
Fiona |
 |
Rachael S |
 |
Laura G |
 |
Sue T |
|
|
Molly R |
|
|
Julie A |
|
|
Angel D |
Comments


You need to be a subscriber to post a comment.
Please Log In or Create an Account to start your free trial.
