Description
About This Video
Transcript
Read Full Transcript
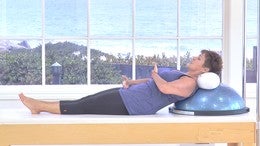
A, this tutorial on deep neck flexors and we'll start with your lying on your back here. So then I have another tutorial, it's called where's your head or where is the position of your head during certain exercises. So go ahead and bend your knees and put your feet flat. Just to acquaint you briefly, I don't have a skeleton here. Your deep neck flexors are in the front of your neck and they're actually what start to flex your head forward on the skull, on the cervical spine. And then what bring your cervical spine to lift your head up. And a lot of people in Plata is used to say, hey, when I do a hundred beats, when I curl my trunk, Eric actually used to say it kills the neck.
But we've been working on the position of the neck, not just employees, but he's worked, been working on it other places as well. And um, one of the things that gets misunderstood is actually the position of the neck right here. So you're good with your head down. So I have my fingers are right underneath the base of his skull and my hand is in his cervical spine. The first awareness that we have to come aware of in terms of the deep neck flexors is the position of the shoulder bone. So as this shoulder bone kind of reaches down to the math. Yeah. And then release it. So this is kind of an exercise right here.
So he's pulling his arm back and then release it. Keep doing that place as he keeps doing that. Notice the position of his chest is not changing. The position of his abdomen is not changing. The pitch position of his neck is not changing.
So as an instructor we have to make sure the client understands what it is that we're asking for. So it's not that there's something special to say, but we have to figure out what to say and then decide if the client indeed is hearing what it is that we say. Communication. Okay. So after doing that a couple times, you can see that his arm kind of rest down a little bit over there. We'll do the same with the other side a couple times.
I'm going to move my fingertips to the base of his skull and I'm going to say this, Eric, look your eyes down towards your thighs. [inaudible] okay, so lift up your face for me. Good. And then put your whole head back down. Cause that's not what I wanted you to do. But that's okay because he heard one thing and he did what I thought.
So now what I want him to do is really not changed the position of your neck, but I just want your eyes like they're going to look into your cheeks. Yes. Don't curl the corners of your mouth down. It's so interesting when you watch people, when they move their eyes, sometimes they pull their mouth down. That's a different set of muscles. Plus it doesn't look very attractive. We all look much better when we smile anyway.
So the eyes look into the cheeks and now you feel my fingers back here. Imagine that that part of your spine ever so lightly is pressing into my fingertips. Perfect. That's it. That's all you got. That's what you hold. Five, four, three, two, one, and then release. Good. And then again, you don't see much on the camera, but as his eyes look into his cheeks, that feeds a small flection force to the spy. Then as his throat, sometimes I say, soften your throat down. Feel the back of these bones. Go into my hand. Good job. Now we're going to take it a step further.
Keep your eyes looking towards your cheeks. Keep these vertebrae gently into my hand and start to grow your occiput away. Good. Stop. Hold. So don't lift your head yet, but feel how the front of your neck is starting to come into play and then release everything. And then again, eyes to cheeks, a vertebrae. Beautiful. Now remember the occiput. That's that part of your skull when you get your hair washed, okay, in the at the hairdresser, and you're going to just continue without dropping your chin so much. Lengthen the occiput away from your c one. Very good.
Hold it right there and then release. So we haven't even done anything to lift the neck. Now, some people have this whole action when they lift up into their a hundred beats without a problem at all. And other people need to be educated into their deep neck flexors. So we're going to do this one more time and you're going to look into your cheeks. Lengthen your your vertebrae down as you lengthen your occiput. Now I want you to think about lifting your head before you don't even lift your head. Just pretend like your head weighs a million pounds.
Try to lift your head, but you can't. Can you feel the anticipatory action here in your truck? He's shaking his head yes. Hold that right there. Still think of lifting your head. Look into your cheeks and then release. Now just imagine that your entire face is lifting to the ceiling and see how that feels so differently. Really. Both they just lit. Yeah. Try to see.
Then the belly bulges and he lifts his head too. And then release right there. Can you feel how that's much more stressed to the front of the neck, the front of the body and the bulging there. So if we're going to curl up, we have to flex. So again, eyes, two cheeks, skull away, hold shoulder bones, heavy abdominal wall pulled in, and if somebody had a little bit of trouble with their abdominal wall, we may engage the pelvic floor and do that exercise in that lesson there. He understands that. So we're just going to leave that here. And then Eric continued to look into your cheeks without moving your shoulders. Just pick your head up to look right between your thighs. Hold, smile, different set of muscles. Seriously. Hold right there.
Keep holding when you lie your head back down. He starting to quiver now quivering in the trunk, but when you start to lie your head back down, lie this C7 vertebrae down first. Very, oh, very good. Very good. Then your occiput and then rest, and then look to the ceiling. Okay, no easy task, right? Okay, so the head's 15 to 20 pounds. So let's do it again. Eyes to cheeks, [inaudible] vertebrae kind of lengthening down. I think of it as a pelvic curl for your neck. You know how we do the pelvic curl up to kind of mobilize the low spine.
Think of it as the same thing in your neck because the cervical spine and the lumbar spine do behave similarly, although the shape of their facet joints are different and then lengthen your occiput away. Start to look towards your thighs. There's the occiput staying long. Good. Hold right there. Inhale, big exhale, hollow smile, whole big inhale again. Exhale, C7 comes down. [inaudible] back of the neck comes down, skull comes down. Very good. So we work the holding time up to almost 45 55 seconds. I'm not going to do that here for the sake of time, but you can certainly try that again. Here's the next phase, how we can do it.
I'm going to have him take his left hand behind his head. [inaudible] he's going to go ahead and do the same thing. Eyes to cheeks, back of the skull on occiput. Y'All must use this hand to pull your occiput away. Lift your head yourself like you just did. Just leave your hand down. Lift your head yourself like you did. Good. Now say he starts to get tired, he can hold his head. Re lengthen the occiput.
Re Look your eyes to your cheeks, look right between your thighs. Now let your head go for a second. Just let it go.
Cause here's what happens in a gripper or whatever is the head headstart. The Chin starts to let go and he looks up. Oh my gosh. And then all the weight is on the face. All the weight is on the neck. So you have to re lank, then regroup the scoop, re hold the neck and then lower your c seven down. Yes. And then your occiput
And we know that some people in this position tend to do this, which is a short neck or they tend to just hang their head and sag in their shoulders and do this. So we, yeah. And then they do that. So we don't want that. So we know he knows length and occupied. Here's his occiput here. Head of the line, I mean the head in line with the spine. That's really what that means. So stay there for just a second. One of the cues. That's my favorite cue when somebody is a head dropper.
And if you say lift your head, they tend to just lifted and look in front. And really what you want to do is maintain this and open your eyes. Look at my hand, just pull back from my hand. Pull your skull. That's it. So it's like you're pulling your face into your skull without moving your neck up and down. Then I like to give a little force here and I say reach the crown of your head.
Yes. So it didn't change the shape of the cervical spine, but it changed its length. And then the abdominal wall pulls in. All that happens right there. Okay. And then you can do opposite arm and leg reach and all that business. But we keep the shape here. Sometimes I have a little ball and I can say, can you just hold that there?
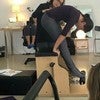
And then if he tends to lose it and lift your head a little bit and then the ball drops out and then you know, then that's what that ball is there for. But you have to, you know, pay attention to what size of the ball, depending on the people's necks and stuff like that. So now as people get a little more advanced in their exercises, I'm going to have Eric lie his legs out. Long. Move this box forward. Put the hip creases at the edge of the box. [inaudible] there you go. Now reach your legs out. Long behind you. Curl your toes up underneath you. Good job. And that pressure legs out. So in this position, now I'm gonna have Eric start to press up into a swan.
So he's going to lift the chest. Now look at, I want you to hold this ball. So now I want the lengthening not to come from lifting his head first. He's holding the ball, but can you lift your chest more? We asked without dropping the ball. There you go. And then I'm going to take the ball away and because your chest goes further forward, then the head lifts good.
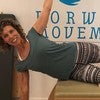
And then lift your pelvis up off of the box and hold yourself right there. Now pull the chest forward more. Yeah, very good. Big Inhale. And then exhale, everything comes down. Head comes down and restaurant there. Okay, so now we watch that the head doesn't lead the motion, right? But the chest leads the motion. Okay, so now bring yourself up to the plank again. So now without spinal extension, hold that plank. Okay, now pull your face backwards. There you go.
I'm just getting that ball and to take the ball away now because that gives us a space hold. He's holding this plank. Now he's going to come to one hand on the box. Other hand on the box. Good. Hold the space. Hold one hand down on the floor. Other hand down on the floor. Do one push up and then push up. Good. Climb on the box up on the box. Another push up.
So you go down and then you push up and then you come back down on the box, come up and then crawl down to the floor or the table. Lower down space holds base. Whole Chin. Next go. Good job. Lower yourself all the way down. Rest right there. So the deep neck flexors play a role in the plank position as well to maintain the whole level of the plank. So now after we have fun with the plank, come to the front of the table here.
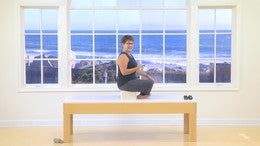
So have a seat on this wall. A long time ago people used to say, Hey, I'm going to sit on the ball to build a better core. But the whole thing about building a better core is to learn about your core. Okay? So you know what, go ahead and turn your feet that way and turn your whole body that way. So I would probably have a bigger sized ball for Eric to be on. Uh, let's turn you a little bit more so that your body is sideways. There you go.
And then have a seat there. So take this ball and put it underneath your Chin and just, this is what we kinda did. And then lift your sternum in to the ball. Yes. Do you see the difference between, I'm gonna take it away now between lifting the sternum up into the ball or dropping the chin down into the ball. So you saw this tutorial as well in the common gripper tutorial where we talked about the spinal extension. So they're in this position now. Just kinda jump your body a little bit up and down on the ball.
Because to me this is really good for the neck awareness. Okay? So the ball is not just a work for your core and your core is not just your abs, we know that, but it's really a relationship between the position of your head on your neck, your neck, over your belly. Good. Can you continue to do this with one leg out? You can lean back, that's fine, but just keep the core relationship. Bring your head back till it touches my hand. Oh yeah. Is that not a core exercise? Good switch. Do the other leg. Good.
So we start to take, go ahead and arrest. We start to take a simple exercise like being on the ball or simple exercise like core and now hold these weighted balls. Okay? So once we maintain the space holder, the cervical spine and the lumbar spine, gently press your feet down, pressing through your heels. That makes a good connection behind your thighs. Take your arms out in front of you.
You have some weights or something a little bit heavy in front of you. Hold that right there. Turn your palms up and then turn your palms down. For some people that are weakened, their arms, their neck changes shape, so it's real important to watch position of the net. Now turn your palms up and you're going to start to do just a simple roll back. Much like you do in a mat class, you start to roll your lumbar back. Good.
Pause right there. Keep the shape of this beautiful job and then as you curl up, you curl up from your ribs. Bring yourself up and then grow up your spine. Lengthen again. Inhale, big exhale. Press the feet gently. Roll back gently. Yay. Just like that space holding the neck. Very good. Just right there and then bring yourself back up.
Take your arms a little bit higher. Feel how the weight in front of you challenges. This now hinge your body back. Space Holding, meaning this stays, this stays good, and then sit yourself up from the hip. Hinge. Very good. Just one more time like that. Inhale, neck stays in the same shape. Rib, stay in the shame shape. Hold yourself right there and then bring yourself all the way up and then the arms come down and rest right there. Very good.
Some other ideas to do. A space holding the neck shape for the cervical spine.
Mention
 |
Karen Sanzo (Teacher) |
 |
Dita H |
 |
Margery C |
 |
Liya O |
 |
Crissy L |
 |
Kathleen M |
 |
Ewa |
|
|
Laura L. |
 |
Vanessa C |
 |
Giglia M |
 |
Theresa F |
|
|
Anne H |
 |
Filippo F |
 |
Jacqueline D |
|
|
Lori |
Comments


Thank you, Lori, for first response.


Brand New


You need to be a subscriber to post a comment.
Please Log In or Create an Account to start your free trial.
