Description
About This Video
Transcript
Read Full Transcript
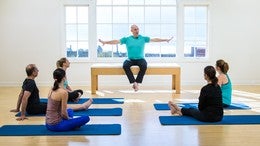
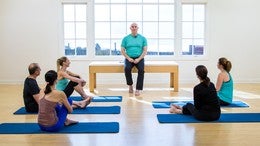
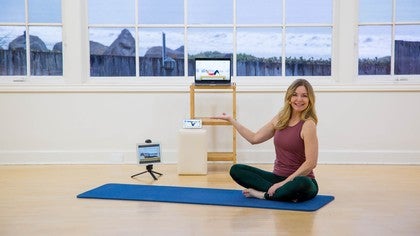
This is a brand new Anderson, uh, excited to be here. Please any anytime with our third tip of how to optimize your online experience at home with piles anytime. And we're going to be talking on this next tip, the third one of how to organize ourselves and increase our awareness. We talked about in tip one, tip two of space. How do we, how do we orientate our bodies to gravity? How do we feel or increased that internal awareness? And we're going to do that by playing with some external props.
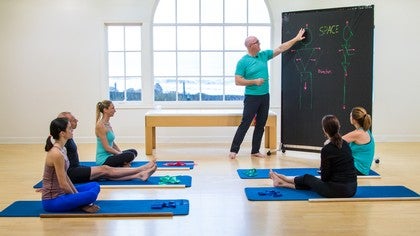
So I want to show you a little bit about what we're talking about. And the idea here is that of course all appreciate my incredible artistic qualities here. But I think the point is well made is that there are directions of movements and this ties into swarm theory that I'm going to talk to a little bit about, um, of how we are able to move through individual rules. And so the idea is I want you to imagine that you are one of a thousand people watching that class at the same time, taking that class, all different parts of the world, right? And you're taking that class and you have a couple basic rules that you need to follow. The first rule is direction.
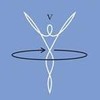
So direction is really important of are we following or do we have a direction to go to? And that's really important. We talk about the direction being directly linked into our axial skeleton. So when we're moving well, however we decide to move, our axial skeleton and space is our direction. So I want you to imagine a flock of birds flying. And the one thing they all have in common is that their heads are all pointed in the same direction and they're going in that direction wherever it's going to be. And they can change things. So if they come across a bunch of trees, they can go up and over the trees. If they come into cloud Orain, they can deviate their pattern. If it's windy, they can go a different direction, but their heads will always be going in the same direction.
So we call this axial elongation at Pollstar and that's the idea of in this axial skeleton, which if you think about it's the head, it's the cervical vertebra, is the Thoracic Vertebra, the Lumbar Vertebra, right, and down into the pelvis. And so all of this being drawn in the two directions, right in space. So I want you just for a second to put your finger on your crown of your head and just sort of think of where you're sitting on your bottom so you can adjust your legs to be there. And thinking of, can I send them in opposite directions? Can I create that axial length in my body? The opposite of axial length would be collapsing.
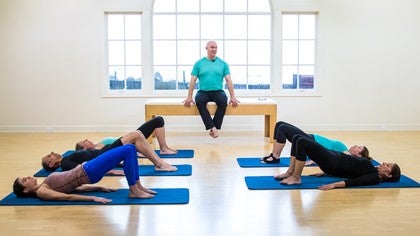
So go ahead and collapse for a second. And then actually long gate, right in all of our movement, I can't think of any plot is movement where I don't want to actually long gate. So the first little drill here is we're going to do a partial modified roll down. You're going to do this at home as well. And I'm just going to have you sitting up. Your knees are bent. Yep. You're in this position here and you're sitting nice and tall, keeping that leg. So I'm still thinking of direction. My head is sending in that direction.
And I'm going to start moving my pelvis back towards the floor, keeping that nice long length. And I'm just want you to go about halfway down. And then I want you to bring it back up again, driving the spine and keeping that axial length, your interpretation of where is that axial skeleton going? Right? And then we're gonna do the opposite. So we're just going to compress ourselves down and try to roll back, right? And this is a set feeling that I, you're not gonna do any harm doing this, but I just want you to feel the difference and go, what does this feel like?
Versus having some axial length involved in that problem solving. So this is what you can try at home. Just filling the difference between that length, that axial length and the direction. Now, this is true with all of our movement. It doesn't matter if we're doing a mermaid, if we're in quadra paired, if we're kneeling, if we're running, if we're doing a roll up or roll down. There always is a direction of movement.
When you understand that direction and where that movement is going to come from is a self awareness, you're going to be pleasantly surprised at how good it feels to move with axial length. So that's number one. Okay. Number two is going to be awareness of space around our bodies, right? So if you think of that flock of birds flying, they somehow know how much space to have between them or the school of fish. They know the space. Well how do they know that space? So a very simple basic rule is they know that there's going to be this much space between them and the object next to them. And so they create what's called a push pull kind of concept.
So they feel that there's an energy coming in towards them from the other bird as well as their energy going out towards the other bird or the other fish. And we're going to create that same energy in the movement we do. So let's go and try this in a quadro pet position. And I want you to also, you're headed towards the center of the room and you're going to try this at home as well in your quadriped position. And what we're going to look for now is thinking of space.
So right now everybody is next to somebody, correct. And you can pretend to be next to somebody on your own. Okay? But the idea is where is the wall in relationship to you? Where is another object in relationship to you? And right now with you, you have each other as your barriers of what you're looking at in that space. So when we create that space, now what you're going to feel is what is going on, how much distance is between you and the next person or the wall or the object.
And now what you're going to do is just sit back towards your hills, hanging in your hips, maintaining that space and that awareness of what's going on to your side and then come back up into the quadro pit. Just nice and easy repeated a couple times. Now because we're in a group class setting here, you can even make it so that your movement is synchronized with each other on the hedging back and forth, not just the space right now. Come back up into your high quadra pad. Yeah, there you go. And now we're going to do this.
We're going to shift our weight to the right limbs. As you shift the way to the right limb, see if you can keep the space equal between the object or whatever you're moving away from or feel the space increasing and then come back to center. Shift again to the right. Come back to center. Shift again to the right. Come back to center. Now this time shift to the left.
Feel the pull and the push of space as if you were in water. Whereas if you were in a room filled with balloons and feel how you are moving space, can you maintain that relationship is space as you move through it and relax. The next one is looking at what goes on inside of our body. That was an external spatial orientation. We want to talk about an internal spatial orientation.
So inside my body I want to draw the external parts of my body as close to that central access as possible. So that's where we get the concept of axle elongation. We draw the body parts close to the central axis and they help us with that. We're gonna play a little bit with your therabands. So at home, if you have a theraband or elastic band, you could stop the video right now and go get it and bring it back. Or You can imagine that you have elastic band and you're going to put it around your chest.
So let's start with that with all of you taking it and just tie it pretty tight so you can actually feel the pressure around your chest. Yup. This is a great one to do because there's a good expansion movement here,
This is looking at us from this side. We're looking at the same thing of bringing things close to central axis or our abdomen close to central axis, right? So let's go back into that cloud or pet position that we were doing and we're gonna experiment with the same thing, right? So here just in your quadrat pet position, you're aware of the external space. So it might be an object or a wall or a couch or something like that.
And now let's go internal. As you breathe in and breathe out, the inhalation should be expanding the rib cage away from center axis all the way around 360 degrees into that thera-band. So you want to feel like you're really pushing into it. And then as you exhale, you surrender to the theraband and allow it to come closer to central access. Let's do that two or three more times. Appreciating the expansion in all directions.
This is why breath is such a key tool for us in plots is because if we can appreciate expansion laterally anteriorly, posterially inferiorly, we can appreciate it to be a tool for us in all of those movements. All right. And then relax, come back up. This time we're going to take our arms, right, take that same loop and we had tied around our shoulders. Alright, so nice and tight. And now we're going to add our shoulder girdle into that awareness, right? So without going into quadrupedal this time, let's just stay kneeling and let's think of this space that we absorbed.
So we're going to push into the theraband, like we're pushing straight out to the side and then we're going to let it come back in.
And now from this space, we could theoretically move our arms into small circles, right? Or if you wanted to, you could try laying on your back and doing an arm mark or something like that. But the idea is that the circles now you can feel yourself pushing out into the theraband, filling space and becoming aware of this space. Now here's the cool part. Take a theraband off, right? Lay on your backs. Let's bring the feet towards the center of the room.
And as you move the arms pretending still that you're sort of pushing into that thera-band in space, which would be this direction here, pushing the shoulders out, right, or allowing the rib cage to expand and to narrow towards the central axis. We able to fill the difference of that image right that we have with that. Fantastic. So let's have you sit up again and the next thing is going to be looking at axial length again and we're going to use the dowels to help us with that image. You can use a broomstick, you can use a yardstick.
Any of those things are great tools to use and I'm going to have you go back into [inaudible] head in the middle. Now what we might want to do is partner up with this one a little bit. So let's have to have you working on him from both sides and you with, with her and just in a quad or pet position, you get in the best position you can get in. And then the others are going to lay the dowel across the shoulders in the back. And just without making any corrections to them, go ahead and rest it on the head and on the sacrum and just look at the space around that. Right. So the space that we have around the spine, and this is a beautiful little tool here for us and we'll share with each other, is how do we fill up that space.
So what I want to see is I want the head to come up a little bit here and this one, and I want your spine to fill up this space. Yes, stop. He just created actually elongation in his body and quadro pit. Same thing coming over here is looking and saying, if I could get her to go a little bit more anterior here, enough, fill this space up between, by breathing into, not from the low back but from the upper. But yes. Good. Okay. So the idea is that we're looking to see if we can create the right space. Now, what space should be visual here should be the cervical curve and the lumbar curve, but the Sacrum, the head and the t seven should be in contact with the doubt. Let's switch partners and see what that looks like. Okay?
And this is something you can do at home just by taking a dial on your back and noticing or coming up against a wall. We do this all the time at home on the wall is can you get your head, your thorax, and your sacrum against the wall? And that's how you come around the back or on this side. Okay? So again, you see where we naturally think we're in this optimal position and we're all Pilatos, right? So we all think we know what we're doing, but we put a little external feedback into us and something changes. Right? Beautiful. Okay, we're figuring that out. Now this is what I like to do, this sort of mean, but I take this off and I push her down right now.
Come back up and find that position again and then lay this on it and see if she had any memory. Find the correction, take the stick away. You know what's happening, right for all the way down. Let it go down. Don't five minutes and go back. Y'all fight because it gets worse right now. Find that ideal position again. There you go. Looking better each time. Space. Good. So we again, remember I said when you repeat it, repeat it, repeat it.
You start to get the idea of where that spatial awareness is going to come from because we don't know otherwise we miss it and we can continue to identify it. And this is why it's really important for everybody and please anytime land, you do need to find a teacher every once in a while to come in and be assessed and to be looked at and to be queued. Because again, our internal references are not always accurate, even amongst ourselves. Those of us that teach all the time, we need to have somebody, and this is true for a lot of you that are [inaudible] teachers who are learning how to teach. And get other moves from, uh, our fellow teachers in anytime is we need to have feedback coming into our bodies. We can't make the assumption because we've taught for 20, 30 years that we know what this is. All right, cool. All right. The next one we're going to do is looking at neutral on the pelvis and the spine. So I'm going to have you lay on your backs. And this is fun because we take these glasses of water and we're going to put them on your pelvis. Knees are bent. Yeah.
And you really don't want to spill it cause it really does have water inside of it.
Oh my goodness. Keep it going. Get it. So it's neutral. Yes. Okay. Now he doesn't have to stay in that position. The point is, is neutral, is figurative. It's a, it's an ideal, right? But from there, the idea is that we start learning where the imbalances are. So for him, he has a little bit more biased towards a posterior tilt. If I pull him to complete neutral, I'm going to put his spine into a hyper extension for him. But that's better.
Now rest the head. Could you disengage your right foot from the floor and maintain that cup of water? Nice and quiet there and back down. And then the left foot. And don't think you guys are getting out of it cause you're getting a cup of water in a second. But this is something you could do at harm because these are real things that measure for you to know. And just to take that cup of water, put it on your belly and go. Am I really in a position this not too posteriorly tilted or too anteriorly.
Tilt it. Right. Good. So let's move this cup around a little bit here. We're going to have you do it with it on your head. I'm just kidding. Alright. So again, tilted a little bit back that way. And remember there's different countries and different body types have a little bit different orientation. So for example, when I go down to Brazil or other parts of the country, uh, that tend to have a little more redundant tissue in the back, the tilt, when they're laying on their back, they can be in a very neutral position at pelvis, but it'd be like if they had a smart pillow underneath their pelvis. So the neutral pelvis is going to be a little bit of angle. So this would not work as well, right?
When I go to other countries that tend to be flat or spine, right? They're going to be really flat, but they might not have the mobility that they need in their spine either. So everybody's unique, everybody's individual. These are just little tools that we use to try to help people figure it out. Now how much room do you have to move before the water spills?
So the two of you, I want tilting it forward and back without spilling it. And there is real water inside that cup. So the worst thing that could happen, she's like, you wet your pants. That's right. So what you'll notice is if you just put a little bit of water and it allows you to figure out, and your goal is just to bring it a little closer towards the neutral, like a level on your pelvis who were using the cup is a level, by the way, these are plastic cups so that we're safe. We know we're not gonna break any glass. All right? And be thirsty. All right, so let's have you sit up the, let's just recap what we've talked about real quickly on this last tip.
Tip number three, we're looking at space. How do we create awareness of space? Number one, we have direction. So we talked about axial length. We're always moving our body into a direction or creating an internal direction, right in that axial skeleton. Where's the skeleton? Gonna move. The second one is looking at space around us. So it can either be the rule of the space between us and the next object, or it can be the drawing. It's we cause a push pull.
We play with this experience on the workshop that we did recently applies any time looking at, you know, how do we, how do we use this swarm theory concept to be able to align and how do we deal with the load and how do we do a tempo? We use this as a little bit of a lab experience. And so the idea is that you have this push pull me relationship. So what I want to do is I'm going to do this with one of you just to demonstrate it and then you can try this at home if you want with a friend or a partner or in your classes if you're teaching. But it's a great little tool, right? So Juliet, Julianna, stand up for a second.
We did this yesterday. You know what to do already. So once we're tied up here, what we have is we have a space between us, but the energy is pulling us together. Okay? So if we wanted to maintain and be sensitive to that space, pulling us together, whatever direction I move in, Juliana's going to be moving opposite to me able to keep that space. If I move this way, she's going to have to come towards me. If she moves back, I have to move towards her. If I move right, you see how that opposition plays. So it always maintains the space. You want to hand me the doubt.
Now the dowel access, something that pushes us apart. So if we were to put this into our belly here, now we have the opposition of space. This is the rule. Okay? So the rule of swarm theory is there's something pushing us apart. There's something pulling us together. So wherever Julian and I go, we sort of have this rule of telling us space is we practice this, we can become more familiar and it becomes easier and easier for us based on where we're going to move, right? So we start filling that space and that property of movement.
So it's almost like if we were dancing, right, we can create that movement through our bodies. And that's the kind of space that we want to create even inside of our body. So she was another part of my body. We want to create that push, pull me relationship inside of our body tissues. That's why we put the theraband around our shoulders. That's why we put the theraband on our ribs.
Being able to push and pull ourselves into,
Pilates at Home: Optimize Your Online Experience
Mention
 |
Brent Anderson (Teacher) |
 |
Nguyen H |
 |
Ivan Z |
|
|
Cynthia G |
 |
Ioanna I |
 |
Jill C |
|
|
Patty Hafen |
|
|
Linda T |
 |
Kimberly P |
 |
Valya Karcher |
 |
Heidi G |
|
|
Julia T |
 |
Ira R |
|
|
Debra H |
 |
Laura G |
 |
Ewa |
Comments


You need to be a subscriber to post a comment.
Please Log In or Create an Account to start your free trial.
