Tutorial #3174
Snake and Twist Progression
Description
About This Video
Transcript
Read Full Transcript
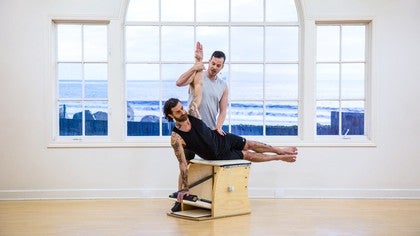
Hi, everybody, my name is Benjamin. I'm here with Gregory. And this video is part of a series where I wanna take a look at some of the reformer exercise that are considered advanced, or even super-advanced, and just break them down to showcase that there are bits and pieces of them that are actually quite accessible to pretty much anyone, and I think super-worth teaching and practicing. This video is about the snake and twist exercise, which a lot of people shy away from, because it's a very precarious one to setup. We're on a slant, on a twist, with very little base of support against our feet.
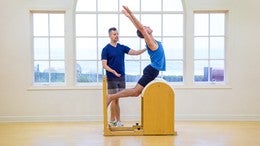
So I just wanna show a few ways to build trust into performing this exercise well, as well as give a few pointers as to what to look for, and how to progress the exercise. Are you ready? I think the first piece is to really own and understand the start position that we then begin to move from. So the way that I often introduce this exercise is to actually load the springs up fully. So I'm going to use four springs on this Gratz reformer, to actually prevent the carriage from moving, so that Gregory and I can work on just finding the right start position for him.
So you can step towards the reformer, The way that this position gets set up is with the hand that is far from the foot bar set up on the far shoulder block, the opposite foot goes into the front of the foot bar here, And the way that I would like this exercise to be set up is with the foot parallel, that has the ability to move in and out on top and around the foot bar, because your positioning in relationship to the foot bar will change throughout the exercise. Once you have your hand and your foot set up, you take your right hand down either underneath your shoulder, You can make a fist, or you grab your palm around the front of the carriage, wherever you feel the more secure, secure enough to then lift your hips up, and bring your left foot in front of the right, letting it casually just rest here for a second. Right, so we're just gonna stay here I'll even pull the carriage in with my own foot, so that I make sure that it doesn't move at all. One of the things that you wanna get done first is to create distance between your left hand on this side and your left hip, to really lengthen out, having your shoulders square with the side of the carriage, and that right leg securely anchored into the foot bar. We're gonna take a few breaths here.
So those of you that also practice yoga, almost think of a down dog position, on a twist. All right, so we're just gonna stay and breathe here for a second, to build trust into this position. Keep in mind the four springs hold him in place. And then once you own this position, just unravel the left leg to step it down. We'll do the same thing on the other side.
So again, I talked about different hand positions being available. The one that Gregory chooses is the most commonly used one. And for his frame and his shoulder width, this is probably the most appropriate for him to work from. So set yourself up on this other side. But just know that, especially as you go through the beginning stages of familiarizing yourself with this, you have the option to even place your far hand on the near shoulder block, to create a little bit more openness.
The headrest is another place you can put your hand, but this is commonly where we prepare for the exercise to be done. So with no threat of losing control over the springs, because they hold 'em in place, really work on that length again, through the side of the hand that's on the shoulder block all the way into the same side hip, finding length in there, finding breath. (inhales) Once you feel like you have that, you unravel the right foot, you step on down. This is a great exercise, in and of itself. So even just getting into that position, understanding how to position your body before being asked to move from there is a really good way to familiarize and acquaint yourself with snake.
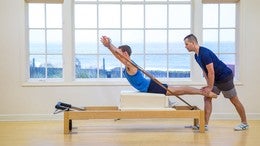
Now that we have it, we're gonna drop down to two springs, which is the original spring setting for this exercise. There's a lot of support that comes through the springs, which means that maybe you're not going to be able to go out super far right away, but it does mean that you will be supported no matter how far you go. So knowing that the carriage might move as we set ourselves up now, I'll still give him some support by having my foot against the back of the carriage here. Lift the left hip up and away from your left hand and find that length here. The next thing you wanna add here is really just thinking about your up stretch on the reformer, where you press your arms and your leg away from one another, to give the spine some space to unfold itself into one long plank line, and perhaps from there into a hint of a back bend.
But again, any amount will do as you get familiar with the exercise. It's the left hip that pulls itself back up to initiate the return all the way back home. We'll just do that one more time on this side. Try to have even weight on both hands, using your arms and your leg to push the springs out so that again, the spine doesn't have to pick up the spring tension, and then let the left hip lift up. The springs follow you, lifting your hips towards the ceiling.
Nice. Take your left leg out, and we'll walk over to the other side. All right, so feel free to set yourself up. The moment that I'm really mostly interested here as I introduce the exercise and the movement here is to make sure that, in the moment the carriage is at its maximum length and pushed out, then the second he changes for that configuration of his spine, that the springs don't start to close underneath him. So right in this moment, keep pushing through the arms to find your back bend, and as you initiate the return, make sure the carriage doesn't move in right away.
He lifts his hip up, and then the spring starts to close on him, so that the spine is not compressed by the springs in this precarious bend that it's in. Let's do that one more time. Push through both arms and the back leg that is on the foot bar. Notice how his foot kind of swivels through the inside of the foot bar, which is why we position it that way, rather than another commonly taught version which has the foot turned out. And then lift the right hip up, come all the way back in.
He does an awesome job holding this position while I talk, which is awesome (laughs). I'd be afraid to move. Take your right foot down to the ground. And that is sort of your second variation, which already looks so much more like the snake. We're gonna add a next step, which is our twist.
Starts the same exact way. Again, keep in mind that another variation here would be to just drive the right hand on this side down underneath your shoulder, press out from here the same way you did before. Now again, once he's out, the carriage no longer moves, as he finds his twist, letting the left hip drop towards the carriage, opening the chest so that he can peek over his right shoulder, and then the carriage stays out as he untwists, and lifts the hip back up. So there's four distinct steps here. He pushes out is step one.
He twists the body, exhales the air, step two. He untwists, step three, and then he comes back home on step four. He unravels the left leg. We walk around to the other side. We'll do the whole thing again.
So that is how the twist comes in, right? It's...think almost of a figure four stretch that we all know to love, but it's a very extreme version of that, right? Using the support of the upper abs. Let's do the other side. Left foot, right hand.
The leg that is crossing in front of the standing foot, try to leave it out of the exercise as much as possible. It's just kind of limp there. It's really the standing leg that's on the foot bar that takes the load. Press on out. Step one is to press out, find the length.
Step two, keeping the carriage where it is, you twist. Step three, carriage stays, you untwist. The right hip on this side lifts him up, pulls the carriage all the way back in. We'll do one more here. And believe it or not, there is a next step, and then there's a whole other way to do this exercise too.
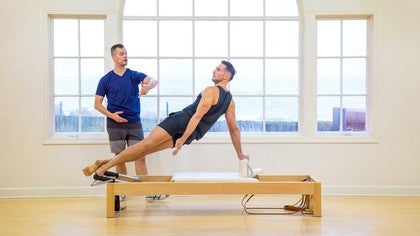
Beautiful, untwist, lift the right hip back up, come all the way back in. Now keep in mind, you can step off, that you might not be able to go nearly as far out against two heavy springs. Which then might mean, oh, you wanna drop down to one spring. I suggest really working with the support of the springs until you feel like your body works as a unit, and is able to actually get those springs to move fully. Next step is to come to one arm.
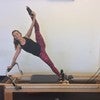
All right, so if you are somebody who works with the hand underneath the shoulder, and using the support of this arm here, you will probably have a hard time transitioning from two hands to one. Whereas where Gregory just worked, you already use this hand a lot more, which we're gonna need for the next exercise. So we'll set it up the same exact way to start. Both hands, one leg. We'll visit a side plank, a nice little chest opening all while testing the skill of his left shoulder on this side holding him up.
Press yourself out, and while you transition out, allow your shoulder to almost move over your wrist a little bit, unlike the snake. Exactly. Let your right arm swing forward, up towards the ceiling, and perhaps back behind you, making sure the carriage does not close underneath you. It's the right arm lifting back up and the left hip twisting itself back that initiates the return. Step on down, we'll do one on the other side as well.
That was awesome. Nice work. It does actually feel good, if you get through it (laughs). Other side, still we're on two springs. Just because we're on one hand, we didn't necessarily change the spring tension just yet.
The right hip swivels up. Again, as you go out, allow the shoulders to travel a little bit towards the shoulder block, so that you have a better plum line through your shoulder to support yourself. Make a big swoop, biggest radius possible with that arm. As the arm lifts up, let the right hip cut up and back to pull yourself all the way back in. And once the carriage is securely closed, step the right foot down.
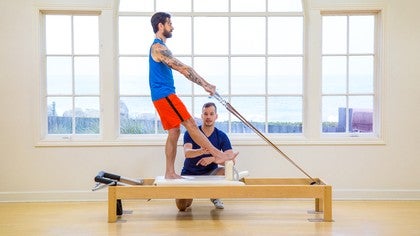
Nice work. And that is what we would consider sort of the full expression of snake and twist. But it can also be done with the foot bar up, which adds a whole other element of taking the hips deeper down, while the legs are being hold up, obviously. It closes the distance a little bit between the two pieces of the reformer that support you. So, it's a little harder to get into position, let alone to move.
So for this one, we do drop down to one spring, because everything else would just be crazy. Not for the faint of heart, but I have a feeling you can do it (laughs). Let's see, so left hand, right foot, on the highest point. I'll keep the carriage closed here. Jump yourself up, Cross your right foot, and then before doing anything else, make sure your right foot, the one on the foot bar, is secure along its entire length.
Holding the position is an exercise enough itself. And then any amount. You can snake. You can twist. Work with the spring.
Make sure it stays open as you find your twist. Gorgeous. Untwist, lift your left hip up, cut it back. I'll keep the carriage here as you unravel that foot and step on down. Right, so it adds much more space for you to actually find your twist.
It actually forces you to find more rotation, because the reformer itself shortens the distance. Let's do the other side, so you don't end up walking around in circles the rest of today. Take the right hand on, left foot. Push the carriage out just enough to set yourself up. I'll keep you secure here.
Good, find that right hip, swiveling up. Nice. Any amount. Side to side might be different. Twist over the left shoulder here.
You see we get a much deeper fold at the hip that is supported by the foot bar. Unswivel, keep pushing the carriage out until it's time to drive it all the way back. Unravel your right leg, step it down, come all the way in. And that is your progressions on the snake and twist, starting from just holding and honoring the start position into this full advanced variation.
Exercise Breakdowns & Tips: Exercise Breakdown Tutorials
Mention
 |
Benjamin Degenhardt (Teacher) |
 |
Danielle H |
 |
Joan Breibart |
 |
Alex R |
 |
Beverly L |
 |
Jennifer S |
|
|
Emilie A |
 |
Jo D |
|
|
Efigenio A |
 |
Brenda A |
|
|
Patty Hafen |
|
|
Mat Work |
 |
Everlea B |
 |
Jenny L |
 |
Rachel |
 |
Bonnie G |
|
|
Tama S |
 |
Lois S |
 |
Jean A |
 |
Deborah (Roberts)Soules |
|
|
Kathleen M |
 |
Chrystelle C |
|
|
Kathleen S |
Comments


You need to be a subscriber to post a comment.
Please Log In or Create an Account to start your free trial.
