Description
About This Video
Transcript
Read Full Transcript
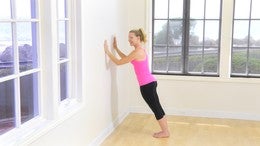
Hi Everyone, I'm back to do another wall workout. Um, it's another short 10, 15 minutes or so, a little more focused for the lower body. And I'm going to just mention that the wall is a great place for if you find yourself having some instability or balance, um, balance challenges come over to the wall whenever you have an opportunity to because it's a great place to train. Uh, this is an osteoporosis safe class. Uh, definitely safe for older clients. If you're out there watching and um, you are going to feel, we're going to do a little bit of abdominal work to start. We'll work on our hips, standing balance with that. Talk about a little bit of Femur gliding and movement I'll say.
And then some hip extension to stretch out the front of the hip. So a lot of good stuff. I think things you'll need, uh, but not necessarily mandatory. I have a theraband, this'll be some, some breathing into the back. I have a sticky, which I think is really essential if you have dry feet or uh, balance issues. Sometimes having yourself a little more stuck against the surface gives you more of a grounded sense. And I have one of the Gondola Poles, you could use a broomstick, you could use the back of a chair if you're at home doing this. If you don't have a big stick, a styrofoam roller can certainly work as well. Okay.
So I'm going to put the stick down and the sticky down. We'll get to that. But let's open up our thera-band and any, any strength of theraband really would work. Put it right behind you. I'll show you if I turn around for a second, I want it to be pretty wide. And right at the back of my, the lowest ribs, not in the low back, but not up around the shoulder blade.
So we're gonna really try to focus on breathing into that back space and fill it up. Okay. So again, like last time, the distance away from the wall. I've got about a foot, maybe a little bit more to be more specific today in this workout class. Uh, notice where my, if you can tell where my heels are on the floor in front of my knees versus back there, that that further, that's not going to feel great. So you know, further as better heels in front of knees, I've got a little Palati stance and as you organize yourself like you learned last time, we want to go lengthened up from the tailbone out the top of the head. The sacrum is out the wall, the back of the ribs, shoulder blades like you learned last time and your head. Now if you're at home and don't have your head at the wall due to maybe a spinal shape, like a kyphosis or um, or your shoulders are tight or your chest is tight and your, you feel like you're standing here and you just can't get them back practice.
But I don't want you to force the shoulders back to compromise the rib position. That's what I spoke a lot about last time. Okay, so to carry on with that, it's this concept of the trunk, like a cylinder. You can think of it like that. Or in essence, your rib cage and pelvis or in alone. Um, connection align here. We don't want the pelvis behind the ribs, ribs in front of pelvis that, that concept. Okay. And if some of you are new to your PyLadies practice, um, that's really good to learn early and really get it. Get an inner system cause it's, it's the alignment we're looking for.
And I've said with that, I'm going to look straight ahead for a moment and I'm going to just kind of wrinkle up the edges of the band into the pomos palms of my hand and thumbs up, putting the shoulders in their proper position. And just for a moment, check and see if your back is still the back of your ribs is still against the wall. And if not, here's what we want to study. And when you hear us say, breathe into your back, what the heck does that mean? So having a wall behind you, you can actually expand or inflate the back of your lowest ribs backward or to the back. So the band is on my back. I can feel the resistance of it just by pulling on the theraband a little bit and I'm just having my arms a bit wide. I want to take a big inhalation through my nose and try to inflate my ribs back and side. And as I exhale, I want to try to keep the expansion that I just created. That's the muscle work. There's muscle work on the breath in as well.
So if we inhale, think of height, and as you exhale, hold the height. And again, you can really start to use the wall as a partner if you will, a workout partner. And as you inhale, feel yourself widen against it and go up it with your spine. Okay, so postural muscles, uh, in the, in the back are really going to work for me. I can feel that very easily. I want to just settle the shoulders down a moment and then one more breath just to prepare. But this is a lot of abdominal work. If you're doing it correctly. Hell, this is nice and level. Okay. Now to get more out of the abdominal work and add some mobilization of the spine. Let's roll off the wall a little bit. My feet are sliding, guys.
I'm going to just gonna adjust myself. Okay. I don't have dry feet. They're a little on the sweaty side. Okay, so I'm going again, as I exhale, I want to no peel off the wall, my head, my, my upper back, and I'm going to just come to where my back of low ribs are. They're still against a wall. I want to hold my front body, my stomach in very deep against my spine and spine against the wall. This is a great place to again, read into the back and as I exhale, I want to place one vertebra at a time or at least work to that theme as I return to the wall. Let's do that four more times and XL head, shoulders, upper back, middle back. My arms are still at this, this kind of wide angle. I can see them out of the eyes. Inhale back into the back ribs and exhale like you're pressing your back against the band, securing the band on your body to the wall. Inhale and exhale and round forward.
Use those abdominal muscles to move the spine in this forward flection. Inhale and exhale. And the last two that we're going to do, I want you to kind of notice your feet this time when you go down and exhale that you notice how nice and well you're standing, that you're not rolling out on the ankle, you're not knocking. The knees in heels are pressed together. Take a breath and exhale and rule up and some of you may be feeling some work in your arms and your shoulders. That's a good thing. And exhale, and here we go off the wall. Okay, so that's a forward flection bending the spine in a forward direction.
Let's come back. Now I'm going to do a very small rotation of my spine toward you and I'm taking my body. I'm not taking my pelvis, but I'm taking my trunk towards you a little bit back to center and toward the window here on my left and center. Now I want you to keep the band, uh, pulled taut evenly on both sides. As you turn your torso, the opposite hip should stay or both pelvis sides should stay on the wall. So what you're inviting now is mobilization in turning. You might be feeling your back muscles again, I call that out.
That's a good thing. That's a really good thing. You can always work on more tummy muscles if you want. By zipping up. Imagine doing this in a tight pencil skirt or something or a tight pair of jeans. If you're at work mainly k and turn one more. Each side. Pelvis stays the level anchored on the wall.
I said it in the last class, but get your office mates to do these. Yeah, grab some theraband and bring it to work. Okay, now let's bend to the side. So I'm going to take my whole body and Ben to the side, my torso and level and then to the left. If your arms are getting tired, just put them down for a moment and keep going. So this is a side flection and we're trying to work my waistline with these exercises. Well, I have stable shoulders, a long spine, and in a moment we're going to put those three spinal movements together. Flection, rotation and side bend after this one. All right, so let's go back to the side bend. I'm coming your way.
We're going sideways now I'm going to rotate toward you. So that back shoulder leaves the wall and I've turned my torso. I'm going to come around the front end of that forward deflection, rotating toward the right, placing my opposite shoulder on the wall for the side bend and return. It looks a little mechanical right now as I break it down. But in a moment we're going to want to just kind of do a circular movement that feels more fluid. All right, I'll do one more slow one broken down each side. So we do side Ben.
You can think of drawing your ribs to your [inaudible]. Yep. Now rotate. One shoulder does come off the wall. The opposite back comes off the wall. Both sides of the back come off the wall. That's the flection. Go to rotation. One side of the back is on the wall, the other one is not side Ben both sides of the back. Okay, one more slow. One side bend. Rotate forward flection.
Keep thinking of expanding your ribs back into the band. Okay? Lower your arms for just a little rest. We'll do four with more fluidity. And here we go. Breathe in to prepare one, exhale all the way around.
Here's our last one. And practice that because it does get easier over time. You sometimes will see us do that on the spine corrector sitting and doing the torso movement while sitting. It's great for your tummy muscles. Okay? That's all with the therabands. You can put that down. Alright, now let's grab the sticky mat and your stick. And here's what I want to do. I want to put this a sticky mat on the wall.
Okay? And if you have someone helping you, that's great. Maybe they can do this part for you and you're in a step your foot on it and the other foot is out front and basically the same distance, but now in parallel. Okay, so both legs are parallel and what I want is to feel first and foremost is the pelvis. Again, that's our home base so that you have both halves of your pelvis on the wall evenly, not one side forward, not one side up, but both very planted and horizontal line. This heel, it depends on how your knee feels. You could have your heel lower, meaning your foot lower. You could certainly have your foot a little higher up this way. I'm going to go there and see what happens. Stick is right out front in my mid line, my center line. Okay, so here we go guys. We're loading our standing leg.
The opposite hip is very active for me. Ankle calf. This hip is also active. I want you to push this heel into the wall, push the other heel onto the floor and hinge off the wall and just p there. It's Kinda like a running start, right? If you don't have a stick, you can certainly put your hands on your leg or on the wall. Now I'm going to push off the wall with this foot, the other foot into the ground and I'm going to use this stick and hold on and move away keeping my back in extension. So I've got my glutes and backbone together.
Go back to the wall and vertical torso. Let's do that four more times. We can come forward. That's our hip hinge. Real good for us. Your process and balance work and push off the wall. Now be sensitive to how your own knees feel.
I happened at this particular exercise does not bother my knees. In fact, I feel like it's strengthening them. However, like I said, if this is bothering the knee, you just put the foot down. You don't have to come that far off the wall either. Okay? Off The wall. You're going to notice you're standing bum getting very, uh, worked. It feels good. Alright, toning the Tish. Now let's add to it. Instead of being pitched forward, let's climb up that stick and come to tall. Okay. Push this stick down into the ground. Now we're gonna do something here. If you want to, you don't have to is hold on.
Firm shoulders are aligned and rise up onto the ball of the standing foot a little and lower it down. I'm still pushing this heel back against the wall so I'm rising up as a pushback. What that's for is to keep this activated up into my back body. A lot going on here. Three more. Press up, lower down. Push the heel against the wall. Rise up, lower down that front standing.
You don't have to be so high on the heel. Okay, that's plenty. And then just step down. Shake out the leg that you were standing on because very most likely that bum is probably tired. That's the good thing. We're stabilizing the hip joint, working all the hip muscles there. And of course we have our second leg, so on the wall foot, hopefully you can get your foot in relatively the same place as it was on the other side. Standing leg, parallel pelvis level. Organize your shoulders first and foremost. Get those hips square. Here we go. Everyone push your heel against the wall, hip Hinze, your torso away from the wall.
Now you've got to push the heel into the ground, the other heel against the wall and you're coming forward. This hip getting a lot of attention going back. Hopefully the pelvis lands at the same time, both sides of your pelvis land at the same time and you returned to vertical again. So pushing off or hindering first, use me push and as you go back, keep that foot solid on the ground. If you're sliding, get another sticky. We could also do this probably with a partner. That'd be fun. Kind of fun. They could help regulate you and actually check in and see if your pelvis is level or hiking.
If they know what to watch for two more times, hinge forward, push off. Woo, go back. Hope you all are feeling. What I am feeling is very, very specific place on that hip. Okay, now that was our fifth one. That's ry sustained. Making sure we don't lock out this standing me and here we go. The back heel pushes against the wall and you rise up a little.
On the ball of the front foot and lower push and rise. So if you know yourself to be challenged with balance work, this is great. If you feel pretty good about it. Other ways you can add variety would be to do this with your eyes closed. Hold on to that stick though, clay, don't do it yet. If you're not ready like that, you could do one arm up.
You don't need the stick at all, but for right now, that's my five and I want to step off, okay? And shake out that leg. Now we have one more exercise today in this little workout. See, right now I feel it's perfect, right on both sides of my hips. Okay, here we go. Guys up. You may or may not want your stick. I'm not going to use it. I'm going to see if I don't need it today. All right. I want you to have your heel. The back heel half.
Hm? It's up the wall. So if I run the reformer, it's halfway up the shoulder rest. If you have no idea what I'm talking about, but your heel on the wall. Okay? Now the other leg needs to be forward enough so that when I bend that knee that the knee is above the shinbone. Initially back leg starts out a little bit bent as well. Back knee and pelvis. Once again, level. Okay, but we're going to change it. I want you to initiate and work your stomach. Pull the abdominals up and rotate your pelvis back. So I'm thinking what does that mean back pubic bone angles forward.
Hipbones pulled back. You should feel a very strong stretch here. Okay, I'll release two more. Contracting your gluteal muscles, pushing the heel against the wall. All in an effort to feel and become aware of the opening up the front of your hip. If you've been sitting all day, you could just do this section later and get some ease in your hips. One more time. Curl holding that by contracting and zipping up. Contracting. Circle your arms three times.
Get a big movement and to keep pushing your back heel back. Three initiative your hands on your head. Now we're going to do last part on this particular exercise is stretching this line from hip to heel and I'm thinking of pushing the wall backward, squeezing this glue. It's almost like a moving my side back in a way and then bend in five of these heel pushes. Try to stay on the same horizontal line if you can, three more.
If you wanted to grab your theraband again you can absolutely put that against your back and do this with that theraband there. Okay, one last time. Push and lets old lift up. That's plenty. And relax. We've got one last leg. Feel the difference between the two. I hope you want to have that same sensation on your other side. All right.
He left the wall, you're on the ball of that foot. All five metatarsal or toe bones are on the floor. Your foot is not twisted or rotated. Okay, take a minute. Okay, here we go. So pelvis starts level but then we intentionally tilt it. So I'm taking my hipbones back, pubic bone forward, feeling that deep stretch in the quadriceps and hips and then release and again tilt
Not Everybody feels this stretch as deeply as everyone else or some others, but I certainly do hold your tilt. Circle the arms three times. I want you to keep pushing the wall back with your heel, your back heel and three and hold hands on head. Okay, here we go. I'm trying to stay on this horizontal line and I'm going to push the wall backward. I travel away from it, but yes.
And then met a little bit of the tilted pelvis on this harass
If you have some balance challenges that you want to overcome, do this. I think it'll help and let me know how it goes. Okay, guys, I'll see you next time.
Bone Health: Standing and Chair Workouts


Comments


Thank you for such an excellent balance & stabilization class! I have an 89 yr old client who wants to work on balance and I believe there are a lot of things you did that could be worked into her program. Question regarding using the stick and "pushing' the foot against the wall. Would like to see if she wants to try this exercise but know she would need something more stable than the stick. Do you think if she placed her hands on a table - that would be just as effective ( as using a stick)?
Just a comment - the latest research contraindicates forward flexion with lateral flexion and rotation for those clients with osteoporosis as it can cause stress fractures in the vertebrae. Hinge-ing at the hip is good to teach to these clients though, so the wall hinge is great.

You need to be a subscriber to post a comment.
Please Log In or Create an Account to start your free trial.
