Description
Many of the exercises in this class are only done of the affected side of the body to promote symmetry during recovery. You can always repeat the movements on the other side if you want to work both sides of the body.
About This Video
Transcript
Read Full Transcript
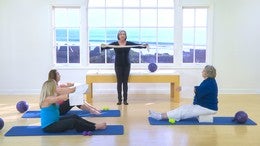
The emphasis and focus of this phase two program is body alignment and symmetry and movement. We will be using helpful tools to increase body awareness and correct imbalances. This phase two we also add body resistance exercise movements and we will using a core band which allows us to see if we are lifting our arms evenly and helps to engage the underlying support muscles through the shoulder, upper back and arms. We're going to begin the phase two part of this program. Once again joined by Amy and Janet and we will work now with resistance exercises and we're also going to use some color tapes to really begin to see our own body awareness.
The idea of most Polonius program is that what we want to do is give you the tools so that you have an awareness of how the body is working. We want to work the body to symmetry. We want to work the body with flexibility and also with strength training so that we really have a nice balance between our strength, our flexibility, our grace and freedom of movement. So we'll begin with a core band. The core band is something that I feel is very, very helpful for this program because it helps to improve the circulation. It has several pockets or sleeves that you'll slide your arm in.
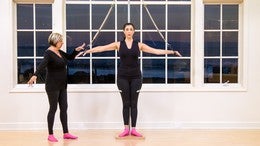
So where we're going to start is one n on the end and all the way on the opposite. And I think Janet, you're in a good place for you for your shoulder girdle seeding. Again, sit comfortably. These exercises can also be done in a chair if it's difficult for you to get up and down off of the floor or you find the seating uncomfortable for you. And also, um, these exercises can be done with a pole or a towel if you don't have the core band. So just making it again working for you in this program. Let's bring the arms just up to shoulder level.
Now the idea here is using that resistance by pressing outwards. So you're activating all the muscles up into the shoulder girdle and then rotate it down and just lift in pool and then center and down, lift in pool and center and down. Let's remember, breathing is important, so we're going to take an inhale, exhale and inhale and exhale and use that breath all the way through the movement. Very nice as we do it. And just one more time. Take it up and come down. Let's bring the band jest to chest level. Now we're going to work on the effected arm as we spoke before.
The effected arm is the arm or that we've had that disease on. So we're going to work on Janet. You're on your left arm and Amy, you'll just work on the right arm today. So just to show the opposite way of working. So the opposite arm is your stabilizer effected arm is going to do the work. Pull it out, just pull it out, Emmy, just pull it out and release.
Put out very nice and release. Pull out and release. Pop out. One more time. Pull out now. Pull on both sides together. [inaudible] and release and reach and release. One more time reaching release and take a nice breath. Come down and round the back over and come back up.
Sit Nice and tall. Now let's get that rotation in the shoulder girdle center and overhead center and lifted up and rotate within the shoulder girdle and down and center. Overhead and center and down and center. Lift overhead center. One more time. Center overhead and center new.
Let's try and work for a little bit of rotation. The band is going to come up overhead and now turn the body and twist to the side. There you go. Keep that taught. So you're getting it full range in the shoulder girdle. Beautiful. Come back to the center, bring the band down, lifting, twist the other way. Come from under the rib cage. Very nice and back to the center and come down one more to each side.
Lifting, twist. Very nice. Come back to the center. Rigid down. One more time. Lifting, twist and come back to the center and lower to come down. Now let's bring the arms up at the center one more time and we're going to work starting with the effected arm. And that is you just pull that arm back behind you, pulling it back and front and pull it back. Try to keep the elbow nice and level with the shoulder so you're really not dropping the elbow down or up, but creating that more flexibility, range of motion. And one more time.
Good. And try to keep the other arm is your stabilizer good and front. So we're getting more work in the shoulder girdle and front. One more time. Alternate and now come back. Very good. And Front and the other arm and front.
Just two more of those really working through the upper bath. That looks great. And now let's go ahead and put both arms back. Squeeze the shoulder blades, push it front two more. We can do it. Breathe and front one more and lower down and chest relaxed the back over.
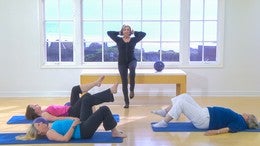
How are we doing? Okay. It's a lot of great work for the upper back in this phase too, so that we're moving from the phase one exercises and increasing our resistance by using the band and increasing the strength of the body. Let's go ahead and straighten the legs out and take the band hot. This exercise is called the saw. And so we're going to turn the body and you're going to reach down and reach past your toe. So you really want to go out in over very nice and come up and we're reaching Ellyn opposition and turn to the other side.
Reach past the toe, which the other arm behind you. So you're reaching an opposition. Really working through both range of motion of both shoulders. And one more time. Each side chair reached toward your toe stretch.
Use that van for the resistance that can give to the upper body. One more time. Use your breath. Exhale and a long, long stretch. Come back up, turn into the center and lower the Bandana. Just one more, I promise. With the band. Place the hands right next to the center pocket. So you're gonna slide in right here on both sides. Perfect. And bring the band once again in the center.
Let's go ahead and take the effected arm. It's going to go on top. Other arm on the bottom, and then we're going to rotate and go around to the other side. Very nice and come center. Rotate ticket around. Very good and center. Nice rotation with breath and center and around and center last time and center around the back and reach the band lightly forward and pull the band taught so you get that resistance in the upper back roll is fine.
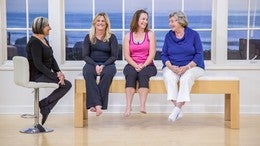
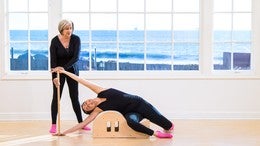
Back up and come up to fitting. Great. Now I'm sure you'll be happy that we're getting rid of the bands for the time being, but we're going to do a technique to help you create your own awareness in your body. So a Christie's is going to come and help me with this and we're going to have you sit in a comfortable position and Amy, you can sit with your legs. I know you're very comfortable there and Janet, however, it's a comfortable position for you.
We're going to take two small balls on each side of the body and we will need two pieces of one color tape and two pieces of another color tape.
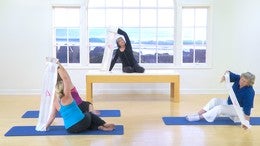
So we want to have a little bit more movement to the outside of the body. And Amy we see for you that we need to have more stretch and opening through the upper back. So let's roll out one more time. Same position. Amy is going to take an inhale and as you exhale you're going to roll more forward. Janet is going to roll a little bit more out to the side. Good and release and roll back Amy. And let's do that again. Roll the ball.
Amy's going to go pass the tape in the front position and Janet is going to go out past her tape in the side position just on the effected arm breathing. Good. And we're going to tape one more time. Let's use the other color
We see that we would like to have a little more stretch on the left side of the body. So Amy, chance to be a little stingy on her left side. Um, so now we're going to use the breath of a basket. Both go out, Janet, the balls both go out and what did we see there, Christie? Pretty good. It is pretty good. You're very even, however, what we are seeing is that again, the left side is slightly in front. So what we're going to have you do is roll the balls out and you're going to inhale and as you exhale, I want you to stretch back just a little bit and release just the effected arm and Amy, you're going to roll out away from you. Just the affected arm or just this side of the body that needs more stretching. These exercises are good alignment exercises for everybody.
We're working with Amy A. Little bit with her scoliosis as well. And come back and roll out in Christie. Let's get some more tape they asked for you and see if we have made that internal adjustment so that Amy needs to be out just a little bit more.
And then you're gonna take a breath and you're going to roll and round thrower, bringing the ball onto the tape, onto the chain. Good. Roll it back, touch the chape on the sides of the body and roll it in. Rule it out one more time cause it looks great. Do you feel how much you're increasing that stretch and roll it front. Reach for symmetry and an extra stretch through the body and come back and come up. And now there's just one more here. And this is on rotation too.
It's a diagonal stretch. So from here and uh, Christy, you're gonna come one more time. We will just again, you'd need two and two, which we just had the right amount. And Amy, Janet, you're gonna lift the ball and round the back over and bring the ball over the calf and just place it there and come up other side.
Once again, we use the breathwork and inhale and exhale and inhale. And exhale. Go back to your first side, Amy. Inhale and exhale.
And again, the taping is just a great way for our own bodies to know where we move, how we move in our daily activities. And now let's go back to the, uh, a supine exercises. So we're going to rule the body back down. We use the balls on the side
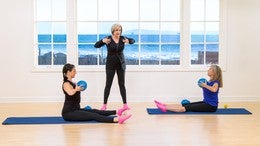
Take the leg up and circle and go the opposite way and calm down. And now we have one more exercise that I would like to do with the balls. Placing the balls in the hands. And this time we're going to do a roll forward. We won't be doing the, but what we want to do is now it's the upper body that we want to see working in symmetry. Lift the head, neck and shoulders, roll the ball a long row and try and keep that length in the torso. Watch the neck position through, went to work, those neck muscles as well.
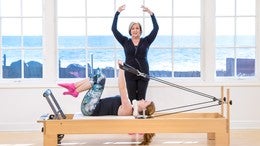
Take a breath and roll the body back and try to feel that symmetry in the body as we are working. Once again, come on up. And very nice. We're activating as abdominal stretching all the way through and roll down and the last time roll up linkedin upward and roll to come down. And now we're going to work on the core band with the core band. One more time holding the core advantage. And for this time I think we're going to want to be in all the way at one end and in the closer to the center on the second one. And for Janna, I think we're going to put you in here and then the closer in, the more you have to work with your own range of motion.
The wider out. It's a little bit easier for the shoulder girdle, but that looks like a very good place. I'm going to do an exercise called the bridge. So we're going to roll the body up, then lift the arms up so your enroll up from your tailbone. Good. And lift the arms up. Very nice. And now keep the arms high, roll the body down, pulling away, keep the band taught very nice and then lower the band to the thighs. Lift the band up, roll the body up.
Good. Open across that shoulder girdle and rural back down and bring the band in and we're keeping the band taught all the way through the movement. Once again, last time up, roll the body up, roll the body down and then bring the band down last time. Very, very nice. And now let's go ahead and do an exercise that we know is the hundred. So this time what we're going to do is you're going to slide the upper body the same way we did with the balls, but bring the band closer over this eyes, reach it long and it bring the band a little bit higher.
And now we're going to do a small pump. Inhale, two, three, four, five. Exhale two, three and head up or head down. Either one is fine. Inhale four, five, exhale to one more set. Inhale two, three, four, five. Exhale, two, three, four or five and lower the body down. This is going to help increase our lung capacity as well as work all the way through the abdominals. And the last one we're going to do is a with the core band is to do single leg stretch. When they say it's down, when they comes up and the band comes up as well.
We're going to bring the upper body to the band and then we're going to stretch and come back out. Good. If you can, you can straighten the leg. Otherwise the leg stays bent. And in good three, two more and four beautiful. Rotate through that shoulder girdle and last one and bend the knee. Change sides. And again, when they say it's flat and come up, pull it in. Beautiful Gannett and extended long. And to use your breath and three and out.
Good. And four and out. One more and five. Great job. And then mini flip flop. Let's now take the band off. We're going to finish the program with our sideline exercises. And so in doing so, you're going to want to lie on the unaffected side of the body.
And again, we must remember, we will always check with our doctors for these exercises, um, as well as knowing our own body. So we want to make sure that we are not, um, fatiguing the body at any time. My knees are bent foot is flat. Arresting the head on the arm if you need to, you can place a pillow or something soft under the arm as well. But now we're just working the affected arm. The effected arm is going to slide down leg.
Now we reach the arm up to the ceiling. We rotate in the shoulder girdle and we take palm over Pong. Getting a long, long stretch. We come back up, we rotate and reach the hand down toward the toes, getting a full range of motion. Inhale, turn the arm, act Shaylin reach long and stretch all the way over and use the breath. Turn within the shoulder girdle and come down. Let's just do it one more time. Take it up and turn and stretch it over and left.
Turn and reach toward your two shoes. Now let's take that arm and just place it on the floor in front. Just relaxing all the way through. The next exercise we're going to take an inhalation and as you inhale, I want you to round your back and bring your tailbone down towards your toes, up. Beautiful. And then as you exhale, I want you to think about reaching the shoulders away from the hips and really stretching the ear toward your hand. Very nice. And once again, take an inhale and round the back, tailbone towards the heels. Exhale and stretch. Nice and long.
Stretch out and once again around the back.
Reach and stretch at that long, long stretch. Work through the neck, work through that with the breath and come back. And now I've just come up to sitting, sit comfortably, ring the arms out to the sides and reach the arms high.

Comments


And adhesive tapes....What a great idea!
Good morning from Argentina!
You need to be a subscriber to post a comment.
Please Log In or Create an Account to start your free trial.
