Description
If you would like to see the first series that Kathy taught for breast cancer recovery, go to our Playlist to see all of the videos.
About This Video
Transcript
Read Full Transcript
Hi, my name is Kathy Corey. This is the second three-phase program in our series for [inaudible] for breast cancer recovery. The phase one exercises concentrate on increasing lung capacity, mobility of the shoulder girdle and ribcage, and on creating body awareness. We will be focusing on the quality of movement rather than on the quantity of repetitions. This program is an opportunity to get to know your body in a way that is more in depth than ever before.
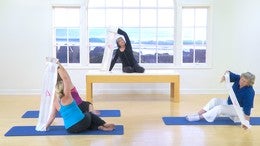
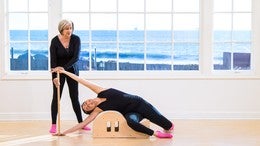
We want to create a new body awareness that becomes a foundation for all movements and improves your activities in daily life. We begin with breathing. We're going to begin the phase one program for breast cancer recovery today. We're starting with breathing exercises. I am joined today by my daughter, Amy and by Janet who has undergone a single mastectomy about a year ago. Thank you for coming, Janet.
It's really wonderful to have you as a part of this program. So breathing as we know, it increases lung capacity and the deep breathing that we do in prolong [inaudible] is really so beneficial. Uh, in order to get those lungs working, oxygenate the system, improve circulation, and increased lung capacity. So let's begin by just placing the hands on our rib cage. I'm going to take an inhale and as we inhale, I want you to really feel the movement on both sides of the ribs and exhale. Now in order to decrease increase the lung capacity, what we're going to do is divide that breath into two sections.
So what we'll have happen here is we're going to breathe and go. Inhale on one, inhale again on two exhale on Warren and on two we want to have great movement through the Reps. Let's try it again. Inhale one and inhale two beautiful. And actually a really moving that rib cage to oxygenate the system that looked great. Let's try it on five. Shall we increase that lung capacity on one inhale, two, three, four and five. Exhale, one, two, three. Keep going, Amy.
Four and five. Inhale, one, two, three, four and five. Exhale one, two. That's great movement through the lungs and through the rib cages. Well now the change of the breath I'll show really helps to increase lung capacity. So what we're going to do here is take an inhale on a three count. Okay, exhale on a seven count. So it really gets movement through the rib cage and really increases the amount of oxygen that then can come into the body. Let's begin. One, two, three. Exhale. One, two, three, four, five, six, seven. One, two, three.
Exhale. One, two, three, four, five, six. One more time. One, two, three. Exhale. One, two, three, four, five, six, seven. Very, very nice. One full breath. In and out. Nice. Janet. And again, one breath in and out. Now let's work with the rotation movement. And so Jana, I would like you to place your hands back on your ribs and rotate into your affected side. So we're going to have you rotate into that side. So your affected side is your left side. And so Amy, you're going to rotate into the right side. Now, if in fact there is, you have had a double mastectomy, you're going to do this exercise on both sides, but now you're Jesse affected side. Now we're going to breathe into that side, opening that ribcage. Inhale and exhale and inhale and exhale.
Turn to the other side, but I still want you to breathe and inhale into the effected side. Get moving in that rib and then exhale. Taking that movement down and inhale and exhale. Going back to the first side again, we're going to breathe into the effected side. This time we're going to take a long inhale churn. Inhale on the exhale, I want you to rotate even more. Taking that whole body around.
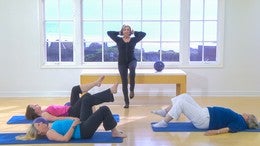
One more breath here. Inhale, exhale and rotate. Open across the shoulder girdle and then come back to the center and again, turn to the opposite side. We're still breathing into the affected side. Inhale more rotation, moving that body around. Very, very nice. One more time. Inhale and exhale and come in to the center and just relax the hands down at the sides. Now we're going to use the balls to help us. You want to take the, the larger evolves or blue ones and place them on the side of the body. You can sit with your feet flat and knees bent. In this position, I'd like you to take a nice inhalation and as you exhale you're going to roll the ball forward and round the back.
And what we're looking for now is the symmetry of rolling each ball evenly and equally and rollback and again rule the balls evenly and equally. Now for for both you you can get a little bit more stretch on that effected side by inhaling, exhaling, ruling, just that side just a little bit more. She just reaching nice and stretch and come back and roll and sit up nice and tall. One more time just for the symmetry of the body. We want to even that out and have it come lower in the back. Less from the shoulder rolling, rounding the back and stretching. Nice and long and reaching.
Very, very nice. Stretch just a little bit more with the breath and exhale. Beautiful and roll back and sit up nice and tall. Leaving one ball at the side. Take the other ball and straighten your legs and center so your legs are going to be just about as wide as the mat. I'm going to sit up very, very tall and the first thing we're going to do is place the ball right at the waistline. So we're at, it's at the lower abdomen. From here.
You're going to take an inhale and as you exhale, I want you to round your back and really feel the upper back on the exhalation in full. Your abdomen away from the ball. Now lanes in this mine and let it grow. Take a nice long inhale, exhale and round the back even more away from the ball. Pull away from the ball. Now let the spine grow. Sit Up tall that it grow nice and long. I shouldn't long one more time here. Pull away from the ball using those abdominals and really activating from those low abdominals length in the spine and come up nice and tall.
So we're drawing the breath even deeper into the movement. Now we're going to work on and moving. That's called spine stretch forward. So you place the ball on the mat in front of you and once again we'll take the inhale and then we're going to roll that ball out in front. As you exhale, but still thinking about pulling those abdominals in and back so you're working now in opposition and stretch just a little bit more and then roll the ball back and roll up to sitting in Hail. And once again we're going to stretch and reach nicely. Beautiful all the way out and come back one more of these linkedin and reach and stretch that ball reaching walking in as far forward as you can.
Very nice increasing our stretching flexibility each time and come back into the center. Let's take that a little bit more advanced now. Lift the ball up and now round the back and roll the ball again on the mat. Roll it out. Now this time as you roll it back, lifted up to chest level rollback, lifting the ball to chest level and now bring the elbows back in behind you. Squeeze those elbows back and really work as much as you can for symmetry. Arms come out and round and roll the ball out and over.
Stretch, stretching nice and long and roll it back. Roll back. Bring the ball up and squeeze. Bring those elbows back and reach out. One more time. Rolling the ball, reaching nice and long and forward. Roll back. Beautiful. And one more time. Let's take the ball now.
Place it on the chest and press those elbows behind you. Very nice. Release press again, release. And one more time. Very nice. And now [inaudible] let's go to lying on the mat with the knees bent and the feet flat. So yes, and you're going to come this way. Good.
Your arms are down at the size. Now let's rotate to that. We have our palms facing upward. We're going to bend those elbows so the hand goes toward the shoulder. Now bring the elbows up, very nice and then extend the arms, bend the elbows and come down. Now to increase the flexibility and range of motion on the effected arm.
Let's work on the effected arm. Only. Bring the arms back down. There we go. Now affected arm is going to banded in elbow. Raise it stretching. Feel that length of the scapula on the Mat. Bend. Bring the elbow down and the arm down. One more of these in.
Increase that range of motion. And flexibility and helped you really, uh, prevent scar, any scar tissue from forming and any depletion of our range of motion. So, so important in this movement. Now let's just do both together. Both come in, rotate and try and keep them even create symmetry. Take both arms all the way up, bend it back and come in and come down. One more time. Band and rotate.
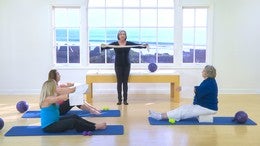
Reach and stretch as much as you can and come in and down. Let's work on our shoulders now bringing the arms to the ceiling. We want to lift evenly now. So sh just the shoulders coming straight up to the ceiling, coming into the center and pressing Jack around in to the mat. Shoulders come to the ceiling. Beautiful.
Press in to the [inaudible]. Matt and press down showed us the ceiling releasing down to the mat and an even further down. Beautiful and come back up. A little bit of resistance here and press down and unresisting one more time. Come on up and release and storage all the way down. Very nice into the mat. Let's place the hands behind the head.
We're going to work affected arm first so that elbow goes to the nose and opens and stretches all the way back and down. And again, exhale, use that breath with every movement and open and take it down. Very nice. One more time. That exhale as we come up and open to come down. Now let's take both together. Squeeze and I really try and bring them together. Let's get an even movement through the range of motion.
Good and open all the way down. And again, use your breath. Exhale, squeeze those elbows and try to make it an even movement open as we stretch all the way down. One more time, bring it in and open and stretch to come down. Very, very nice. Now we want to work on our pelvic alignment and on really working the whole body, which is the one of the principles in [inaudible] is that it's not just working and affected area or rehabilitation. We want to think about creating body awareness throughout our whole body. So what we're going to do is we're going to take this small ball and place it directly under your head.
So it's going to go back on the exhibit all in a comfortable place for you and then you're going to really press in to the ball. It's a very soft ball, so it's almost like a little pillow. You don't want to have anything too hard under your head. Is that comfortable? From here? We're going to be doing a pelvic curl, so I want you to think about lengthening they small of the back and curl the tailbone toward the ceiling. Very nice. Do you see how that affects the movement all the way up to your head and come down into the center with the pelvis and again, a small curl really coming up and then Langton and stretch the torso down so that from the waist to the tailbone, get stretched out and one more time curl.
Using the movement to just lightly round the back and come down and really feel how you have to stabilize the neck muscles and the upper back to do the movement. Now we'll add something to that. We'll go up into the curl. Very nice. Come into the center or your neutral spine neutral pelvic alignment. Now tip the body slightly forward so we have a slight arch of the back. Really opening that space from the ribcage down through the hip.
Come back into that center or relaxed position and curl the pelvis up. Very nice. Come back into the center. Feel how you have to stabilize all the way through and remember to keep breathing. Then tip the pelvis so we're actually getting a little space under the waistline all the way through and once again really working on our spinal alignment, working on the pelvis and the shoulder alignment and that relationship as well. And one more time as small arching position and come into the center position.
Take a breath. Just relax the spine and relaxed to the pelvis as well. Let's work on some circles. So we're going to keep that ball under our head to really show if we're going to maintain that alignment and stability through the shoulder girdle and take one leg up, knees bent, other foot stays flat. This is a small circle in the hip joint. It goes across the body around on one, around two very nice. Three and see if yet me moving your shoulders.
That ball is going to move under your head. And then the other way around and circle, try and keep the other leg stable and the hips stable as well. And waist the leg down. Let's work with the other leg, bring it up and the small circle. Good, Nice Janet. Try to keep that hip stable and feel how much work you have to do under your head as well to really keep that ball stable.
And let's go the other way and around. So we're really working inside the hip joint as well, working a whole body and come down first like up ankle circles. Now again, these exercises are to help improve our circulation so that if we are having any problems with blood clots, um, or lymphedema, we will be able to improve that circulation all the way through the body, which of course is a common occurrence through the body with and any treatment for breast cancer. So now we're doing that circle on the other leg, coming up and around, up and around, and then we reverse it. Very nice. Improve that circulation. All the way through your foot and place the foot down.
Let's take the ball out from under the hip and with these balls because they are so soft, you can really see if you've been pressing more into one side than the other. And again that's a good tool for us to know. If we are not using the neck muscles in alignment, it's a great tool for body awareness. Let's bring both legs up. One knee up and the other knee up. Bring your arms out at your sides of your body.
We're going to go chew the affected side of the body. So we take the the knee and we lower knee down to the floor, just the knee. One knee over. Beautiful. And now let the other knee come over as well. Lift the arm. Beautiful. And now we're going to turn rotate. So they've net goes over, the body goes over and stretch and lift up.
Now if this is too much on the effected side of the body, we'll just work on the unaffected side. If it's, if you feel any discomfort, um, or, or you can place a pillow under your arm. Leg comes up and other, that guy leg comes down other leg down. Very nice. This is the stretch that we want really. Oh, putting through the shoulder girdle. Bring the arm up and roll it over. There's a stretch that we want working the neck muscles as well. And now roll through the shoulder girdle. Place the arm down.
Head comes back to the center. Very nice. And now the top leg comes up, leg comes up and lower both legs down on to your match. Let's come up to seated position. Are we good? All right, very nice. The work looks fantastic. Now just with the hands up the sides of the body, let's began to lift the shoulders. So we're going to shrug both shoulders up and down and both shoulders come up and down and both shoulders up and down.
Let's go and do some shoulder rolls. So we'll bring the shoulders down and around, up to the front. And again, what we're looking for is a nice evenness in this movement as we come all the way around and through. And now let's reverse the movement. Come up and down to the back, draw from underneath his shoulder blades, working through the shoulder girdle, increasing the flexibility and range of motion. As we circle around and through the next exercise, we're going to place one arm on top of the other. So I'd like the effected arm to be the bottom arm and the unaffected on the top. In this movement, we're going to create our own body resistance, so the bottom arm is going to push up as the top arm just acts as a stabilizer and feel how that activates all the way through and release and again, reach upward and release and reach app.
And now change the arms so that the bottom arm now still the top arm is going to be your stabilizer pull up and down, up and Dan. One more time pulling up and down change. One more time. This time the bottom arm is a stabilizer push down in, push down. Nice in resistance and push down. Very nice, good activation, Janet and change. One more time. Pushing down and release. Very nice Amy.
Good muscle activation all the way. She threw that shoulder girdle and down and release. Now in this position, up and down at the same time. [inaudible] and breathe. Exhale as you press and release. Exhale, press and release. One more set. Turn the air, changed the arms and both arms are now your working arms pressing up and down at the same time. Present, release, press and release.
Good. Very nice work and bring your arms down the sides of your body. I know it's tough. It's a tough exercise. It's a lot harder than it looks. Again, I spring the chin to the chest for some nick activation exercises, bringing the chin over the affected shoulder and nose comes up, Chin over the shoulder, reach a little bit further to the back and nice deep breathing. As you come through the center and up to the other side, Ginny comes back and reach out and come down one more to each side and reach long. Come down through the center and reach up and down into the center and bring the head up and bend your knees that comfortably. And you can have your feet flat and now arms just at your sides. And we're going to once again have that feeling that you're pulling away from the ball without the ball actually being there and round the back and Elaine's in the back so that you're really letting the spine grow.
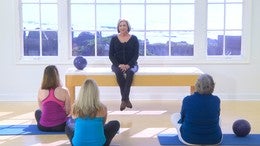
Long Stack Vertebra by Vertebra and come all the way up to the top of your head. And again, exhale and round the back, pulling the abdominal slightly in Nice, long rounding lanes in the spine and come up. Sit Up nice and tall. Let the arms float in the shoulder girdle so they're just out at the sides of that shoulder level. Bring them high to the ceiling, as high as you can comfortably get that stretch. Keep your ribs down, lengthen through the body through this spine. Inhale, exhale, and thank you very much for joining me in phase one of this program. Thanks. Good job.

Breast Cancer Recovery: Phase Two of Breast Cancer Recovery


Comments


You need to be a subscriber to post a comment.
Please Log In or Create an Account to start your free trial.
